How to track projects and tasks for your clients
Last updated on: February 21, 2024
Recent time tracking statistics show that the US economy loses as much as $7.4 billion per workday just on unrecorded work activities.
That’s a lot of money that could have been saved by properly tracking and managing your project from your client — especially if you perform freelance work, or work in an agency.
But, what exactly should you track for your projects and tasks? And how should you approach the process?
In this blog post, we’ll cover:
- How you can properly set up your projects and tasks, in order to make tracking them easier.
- How you can track time spent working on the projects and tasks.
- How you can track your progress and performance on the tasks and projects.
- How you can track and distinguish between billable and non-billable activities.
- How you can track estimates and deadlines.
Table of Contents
Why should you track projects and tasks?
According to the 3rd edition of the Project Management Body of Knowledge, a project is a “temporary endeavor with a beginning and an end and it must be used to create a unique product, service, or result”.
In project management, each project consists of a series of tasks that you need to accomplish with a given time period or before a deadline in order to complete the product, fully provide the service, or reach the desired result.
So, considering that a project is a “temporary endeavor” that consists of tasks that need to be accomplished in a “given time period”, both are easily trackable by definition.
And, tracking projects and tasks has several tangible benefits:
- It will help both you and the client understand whether the project will be completed on time.
- It will help both you and the client understand whether the project will be completed within budget.
- You’ll get a clear project overview you can later analyze to see whether similar projects would be profitable for you in the future.
- You’ll get the documentation that helps you understand whether and how you could perform better on similar projects in the future.
- You’ll get tangible proof of your work to send to the client — this will increase client satisfaction, in addition to your chances of getting paid on time.
How to set up and track projects and tasks
Before you can start tracking your projects and tasks, you’ll first need to embark on an even more important quest — making sure you properly set up the said projects and tasks.
To properly set up, you’ll need to go through the following steps:
- Creating a project outline
- Breaking the project into tasks
- Deciding what billing approach you’ll use
- Deciding how you’ll approach hourly or flat fee billing
- Deciding what tasks will be billable or non-billable
- Defining estimates for task and project completion
- Defining the final project and task deadlines
Each step will have its own elements you should track.
1. Setting up and tracking project outlines
How to create a project outline
A clear project outline can tell both you and the client what you can expect to accomplish with the project, as well as what you should pay attention to when working.
First, you’ll need to ensure everyone involved in the project understands what needs to be achieved at the end of it — i.e. what are the project goals.
Example: The goal of the project is to build and maintain a fitness app, within a specific time frame and a client-approved budget.
Next, you’ll need to establish several project milestones after each set of related tasks, in order to pinpoint and track important achievements in the project.
Example: One of the design-related project milestones you can follow for the fitness app can be the different phases of the app design:
- MS 1: different design concepts completed
- MS 2: the final design concept approved
- MS 3: approved design implemented
- MS 4: version launches
Afterward, you can establish the Key Performance Indicators (KPIs) you’ll use to measure how well you or your team are performing with the work.
Example: The KPIs for your fitness app can be:
- KPI 1: the user rating
- KPI 2: the conversion rate
- KPI 3: the revenue per user
In the end, you can also establish the Objectives and Key Results (OKRs) you’ll use to define and track project objectives and their outcomes.
Example: The Objective for your fitness app can be to “Improve the quality of product releases” and it’s related Key Results can be to:
- KR1: reduce the number of bugs found during the development process by 30%
- KR2: improve unit testing coverage from 60% to 75%
- KR3: increase sprint capacity from 80 to 100 SP
How to track a project outline
Tracking project goals and milestones
To keep track of project goals, first, plan and organize the time you’ll spend on the project in a scheduler.
Account for all the resources you’ll need, whether it’s additional team members or equipment, or simply extra time, so that you don’t go over the budget. If you come close to exceeding the budget, notify the client about possible changes.
You can associate project milestones with specific dates or sets of tasks. Once you reach a project milestone, review the upcoming workload. This will help you better understand whether you need to change your workflow to accommodate your current pace or direction of work.
💡 To learn more about how best to set and track project goals and milestones, check out our blog post on the subject of project timelines:
Tracking Key Performance Indicators
When it comes to your chosen Key Performance Indicators, their type will determine how you can track them.
Example: You can track the user rating for your app on Capterra, or a similar website.
You should also differentiate between your weak points (i.e. lagging KPIs) and strong points (i.e. leading KPIs) in project work.
You can then try to learn from your leading indicators (e.g. how you can best build apps that attract great user reviews). But also, you can work on improving your lagging indicators (e.g. how you can improve the conversion rate of the apps you build).
In the end, save summaries of your project KPIs, for further analysis, comparisons, and conclusions.
💡 To learn more about how best to set and track Key Performance Indicators (KPIs), check out our blog post on the subject:
→ Key Performance Indicators (KPI): Why and how to set them, plus KPIs in Excel tutorial
Tracking Objectives and Key Results
When it comes to your chosen Objectives and Key Results, their type will also determine how you can track them.
Example: You can track the reduction of the number of bugs you find during the development process by 30% with a bug and issue tracking tool, such as Jira.
Then, you can connect the data, and compare your actual results with your expected Key Results to see how successful you are.
In the end, you can once again save and further manipulate summaries of your project OKRs.
💡 To learn more about how best to set and track Objectives and Key Results (OKRs), check out our blog post on the subject:
→ Objectives and Key Results (OKR): everything you need to know
2. Setting up and tracking time and progress on projects and tasks
How to break a project into tasks
Next, to make it easier to track the project, you’ll need to break it down into tasks. The type of project will help you decide how you can best do that:
- Tasks = different phases of the project
Example: A software developer can use the different phases of development (e.g. planning, analysis, design, development, etc.) as tasks.

- Tasks = different categories of the project
Example: A professional party planner can use different categories of party planning (e.g. catering, decoration, entertainment, etc.) as tasks.

- Tasks = different parts of the project
Example: A housekeeper can use different rooms in a house he or she cleans (e.g. kitchen, bedroom, bathroom, etc.) as tasks.

💡 For some projects, it will be relatively easy to decide whether you should use project phases, categories, or parts as tasks. Other projects won’t be as clear cut. For a quick and easy guide on how best to customize the process of breaking a project down into tasks, check out our blog post on the subject:
How to track time on projects and tasks
When approaching time tracking your projects and tasks, you’ll first need to choose the time tracking method to use. And, you’ll need to think about how best to implement the said method in your workflow.
Choosing the time tracking method
There are four distinct time tracking methods you can rely on to track the time you and/or your team spend working:
- The paper method — You measure the time you spend working on the project and tasks via a stopwatch and write the results down with a pen.
- The honor system — You don’t measure, but merely estimate the time you will spend working on the project and tasks.
- The spreadsheet method — You measure the time you spend working on the project and tasks by manually entering the hours and minutes you spend on them in a spreadsheet you’ve created or a simple spreadsheet template.
- Time tracking software methods — You measure the time you spend working on the project and tasks by using an app specialized for time tracking.
The first 3 listed methods have their cons, though.
Nowadays, the paper method may be viewed as somewhat unprofessional, inefficient, and lacking in accuracy. In the same line, the honor system relies too heavily on the client trusting that you’ve done the work you claim to have done, which may be too much to ask — especially when you’re looking to attract new clients.
The spreadsheet method, on the other hand, may prove problematic for you and/or your team. Namely, the fact that it requires you to manually enter time increases the chances that you’ll eventually make a costly mistake. Both the spreadsheet and the paper method can be time-consuming processes, especially if you’re working on multiple projects.
In the end, the time tracking software method emerges as the best option due to its currency, professional appeal, speed, and accuracy. So, let’s see how you can best use such software to track project and task time.
Implementing the time tracking method
To help understand and implement the concept, let’s take a look at our own time tracking software, Clockify.
First, within the app, you can define your projects, tasks, and their clients.
Then, you can choose the time tracking solution that suits you — you can:
- track time as you work, with a timer
- add time manually
- enter time in a timesheet
If you want to track time with a timer, you’ll just need to enter the “Timer mode”, write a description for the activity you’re working on, and select its project and task. Then, start the timer, and let it run until you’re done with the activity — once done, stop the timer, and the system will add the newly-created time entry to a list of time entries below.

If you want to add time manually, just switch to “Manual mode”, and follow the same write description-specify project-specify task pattern. Afterward, you can add the duration for the task, without having to bother with the start and end times.
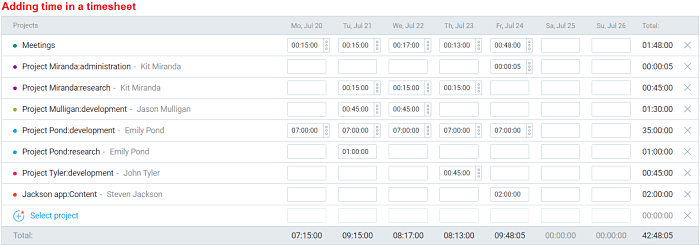
If you opt to enter time in a timesheet, you’ll just need to populate the timesheet rows with the projects and tasks you’re working on, and then add your time in corresponding cells.
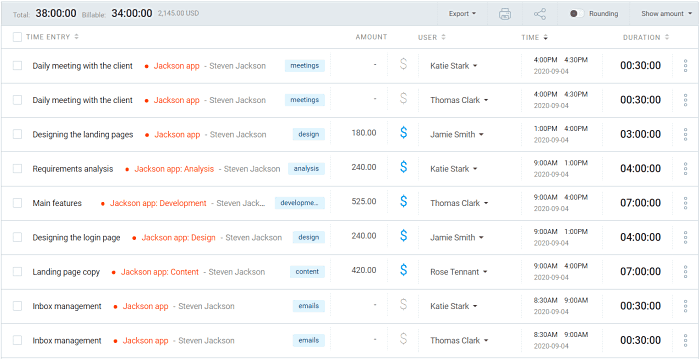
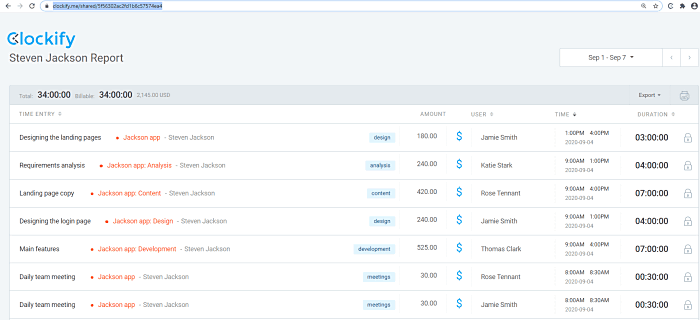
Once you’re done tracking time, you can make use of the Reports section of the app. Here, you’ll be able to view the amount you’ve earned for a particular project and/or task by filtering results.
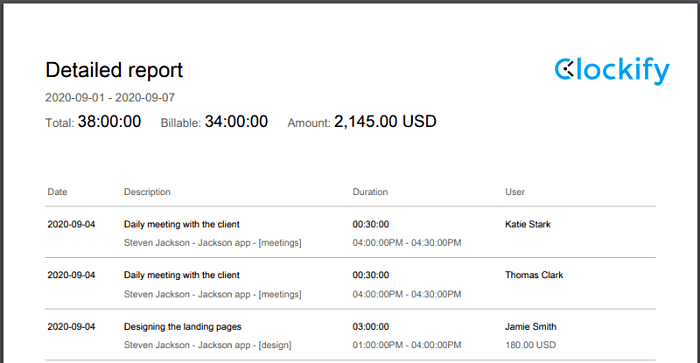
Afterward, you can export a PDF or Excel report of the hours and minutes you’ve tracked on the project and tasks, and send it to the client to serve as an invoice.
How to track progress on projects and tasks
In addition to tracking the time you spend working on the project and its tasks, you will also benefit from implementing a progress tracking system.
Tracking progress with apps
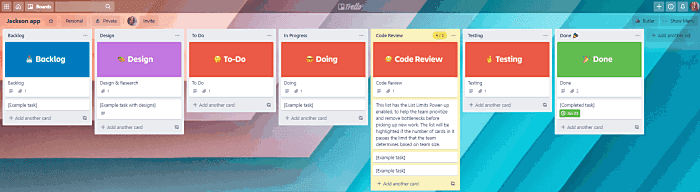
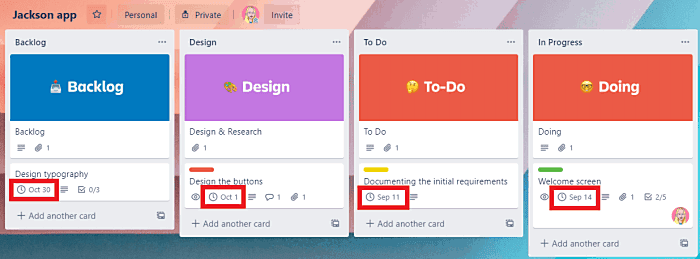
To start tracking progress, you can try a Kanban-based system, like Trello or Asana.
Both apps are based on a similar principle:
- Create a board that represents your project
- Create several cards that represent your tasks
- Name columns so that they represent the status of all the tasks placed under it (e.g. “Backlog”; “Design”; “To do”; ”Doing”; “Code Review”; “Testing”; “Done”)
- Move the cards/tasks across the columns, to symbolize their progress status (e.g. is the said task in the “Backlog”, related to “Design”, ready “To Do”, currently ”in Progress”, currently in “Code Review”, under “Testing”, or already “Done”?)
Trello also offers an option to add “Observers” to your boards/projects — so, you can add your clients to their respective boards, who, unlike the members of your team, will only be able to view your progress with individual tasks, download attachments, add comments, as well as export the board.
In Clockify, your client will be able to track project progress in terms of time, via a shared report. Just, share a report you’ve filtered by the correct parameters, copy its link, and send the link to the client who can then view changes in real-time.
Making progress tracking easier
Apart from using a Kanban-based app to track project and task progress, you can also use various templates to speed up the said progress:
- If most of your projects follow the same structure when it comes to tasks (e.g. all projects involve the tasks of analysis, design, development, content, and administration), you’d be wise to create a project template that helps you duplicate the same set of tasks for each new project you take on.
- To better organize your time (and speed up project work as a result), you can use a suitable to-do list template to serve as a reminder of what exactly you need to do.
- To help you save enough time for priority tasks (and minimize the time you waste), you can use a suitable time blocking planner template.
3. Choosing a billing approach and tracking its efficiency
How to decide what billing approach you’ll use
Now that you’ve created your project outline and defined your project-related tasks, you’ll need to decide how you will bill the said project and tasks:
Will you bill work by the hour?
Or, will you charge a flat fee?
If you bill by the hour, you’ll base your bill solely on the clean number of hours you put into your work.
If you charge a flat fee, you’ll base your bill on the scope of work you complete, regardless of the number of hours it takes you to finish the project.
No matter the billing approach you choose, you’ll need a comprehensive list showing:
- The tasks you performed for the project.
- The time you’ve spent on the individual tasks and the project in total.
- Some indication of whether the tasks are billable or not. This way, in case you bill by the hour, you’ll always get a clear amount your clients owe you for your work.
On the other hand, in case you charge a flat fee, you’ll still be providing your clients with proof of what exactly you worked on (and what exactly they are paying for).
💡 To help you decide how you can best bill your project work, check out our previous articles:
→ Salary vs hourly employment: pros and cons
How to track the efficiency of your billing approach
When it comes to tracking the efficiency of your chosen billing approach, if you’re having doubts, it’s best that you play around with the two main choices you have.
Try implementing an hourly approach or a flat fee approach first. Perhaps you’ll eventually find that the alternative approach to the one you initially choose suits your type of projects or workflow better.
Or, you may find that one type of your projects is better suited for an hourly approach while another type is better suited for a flat fee approach.
4. Setting up a billing approach and tracking its accuracy
How to approach billing by the hour or charging a flat fee
Once you’ve selected the ideal billing system for you, it’s time you decide how exactly you’ll approach the billing process.
If you bill a specific price by the hour, there are four efficient types of hourly rates you can implement:
One hourly rate on all projects. Great if:
- Your team usually works on one type of project
- Your team consists of one type of professionals
- You work alone
Example: A freelance team of two designers ($35) who specializes in logo design.
Specific hourly rates per team members. Great if:
- Your team usually works on one type of project
- Your team consist of professionals with different skills, experience, and expertise
Example: A freelance team of one designer ($40) and three developers ($65) who specializes in creating landing pages for fashion websites.
Specific hourly rates for specific projects. Great if:
- Your team works on different types of projects
- Your team consists of one type of professionals
Example: A freelance team of three developers ($65) who build custom apps.
Specific hourly rates for each team member working on specific projects. Great if:
- Your team works on different types of projects
- Your team consist of professionals who possess different skills, experience, expertise
Example: A freelance team of two artists ($50), four developers ($70), two designers ($55), one audio specialist ($45), and two video game producers ($35) who create strategy and puzzle games.
Alternatively, if you’re charging a flat fee, you’ll likely want to base your prices on the scope of individual projects — which can revolve around specific tasks or sets of tasks.
Example: A freelance team of one designer, two developers, and a copywriter who creates websites views each element of the project as a separate task with its own fee:
- Setup: $170
- Design and building $3,500
- Content creation: $550
- Client training: $700
- Website maintenance: $600
💡 For more insights into how you can bill your projects and tasks, check out our blog post on the subject:
How to track the accuracy of your billing approach
When it comes to tracking the accuracy of your billing process, a comprehensive invoice with a clean list of completed tasks is always key. It will help the client better understand the value (and, subsequently the accurate price) of your work.
Of course, you’ll also need to ensure your prices are accurate in itself:
- If you charge a flat fee, make sure the prices you quote to the client match the ones you’ve listed on your website or used for previous clients.
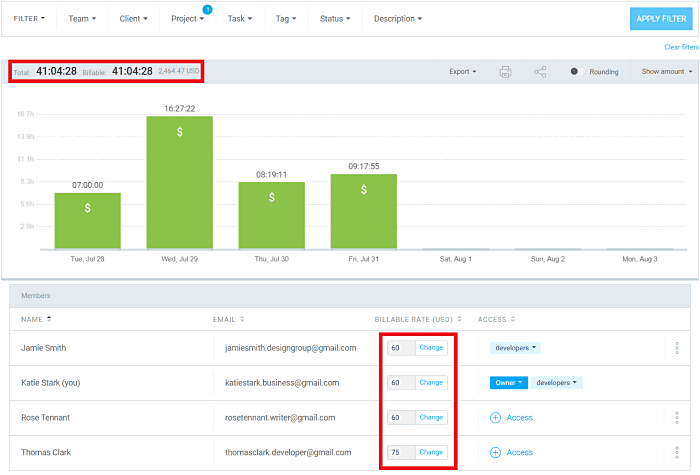
- If you work for an hourly rate, make sure your calculations are correct. If you track time in Clockify, you’ll have your earnings per project automatically calculated for each minute you track, based on the hourly rates you’ve previously entered.
5. Setting up and tracking billable and non-billable tasks
How to distinguish between billable and non-billable tasks
Now, it’s time to decide what tasks you will directly bill for? And, what tasks will you leave out of the invoice?
You’ll definitely want to mark primary, project-specific tasks as billable and add them to your invoice. For example, software developers will bill for all development-related tasks.
But, software development is a complex process that also requires certain secondary, recurring tasks. You’ll likely need to hold team and client meetings, communicate with the client and team members via email or chat, as well as manipulate project-related data on a regular basis.
Although these tasks are crucial for the development project, you should probably refrain from marking them as billable and adding 20 separate “Daily meeting” items in your official invoice.
Instead, you can have the time you spend in meetings, on emails, and manipulating data be reflected in the hourly rate you’ll use for the development tasks — i.e. make your hourly rates higher.
How to track billable and non-billable tasks
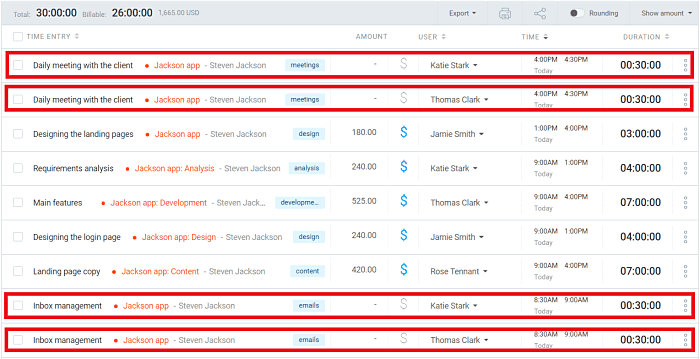
When tracking time in Clockify, you can specify whether activities (or even entire projects) are billable or non-billable.
If you’ve marked a task as billable, its amount will be added to the total amount for that project.
Alternatively, by marking a task as non-billable, you’re excluding it from your direct earnings.
The key here is to maximize the time you spend on billable tasks, in order to increase the value you’ll personally get out of the project. So, consider whether you are wasting time on some tasks and should instead allocate this time to more important (and more profitable) tasks in the future.
Example: You’re a freelance team of 5 people who find that they spend 1 hour on daily meetings, but could instead cut this time to half — this way, you could be saving 2.5 hours per day, or 12.5 per week, in total.
💡 To learn more about billable and non-billable tasks, as well as how to find the perfect balance between the two, check out our blog post on the subject.
→ Billable and non-billable hours: how to find the perfect balance
6. Setting up and tracking estimates for task and projects
How to define estimates for task and projects
Some of the most important questions you’ll need to answer for your client are the following:
- When will the project be done?
- How much will it cost?
If you charge a flat fee, you can base your price estimate on your ready-made price-list. You can then base your time estimates on experience with similar projects you’ve completed in the past.
However, if you price by the hour, clear time estimates will give you clear figures about how much your client can expect to pay.
Example 1: The freelance team of two designers ($35) who specializes in logo design can quote a $700 price estimate for a 20-hour time estimate.
Example 2: The freelance team of one designer ($40) and three developers ($65) who specializes in creating landing pages for fashion websites can quote a $4,450 price estimate for an 80-hour time estimate (e.g. $40 x 30 + $65 x 50)
Example 3: The freelance team of three developers ($65) who build custom apps can quote a $31,200 price estimate for a 480-hour time estimate.
Example 4: The freelance team of two artists ($50), four developers ($70), two designers ($55), one audio specialist ($45), and two video game producers ($35) who create strategy and puzzle games can quote a $54,100 price estimate for an 1,000-hour time estimate. (e.g $50 x 200 + $70 x 300 + $55 x 200 +$45 x 160 + $35 x 140)
How to track estimates for tasks and projects
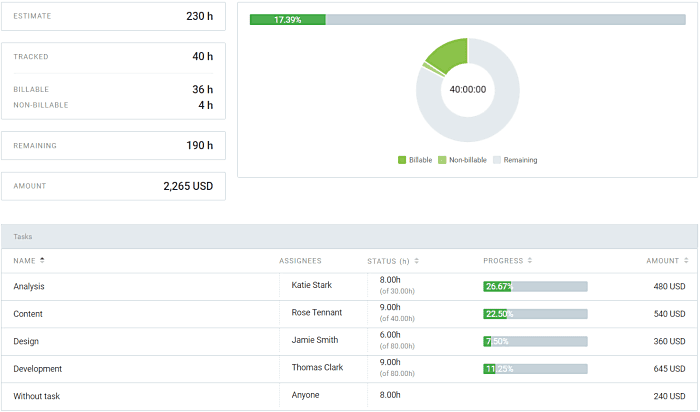
If you’re tracking time in Clockify, you will be able to set up time estimates for projects and tasks, and then track them against your real-time results.
As you progress with the project, you’ll see the estimate bars for the project and tasks fill up. So, you’ll be able to tell when you’re dangerously close to breaking your time estimates, and, indirectly, your budget.
7. Setting up and tracking project and task deadlines
How to define project and task deadlines
In relation to other projects you’re working on, the resources you’ll use for this project, as well as the number of tasks you’ll have, you need to set some clear project and task deadlines.
The task deadlines will directly relate to the project deadline, and, all of them will relate to the project estimates you’ve just set.
For example, if you’ve defined a 480-hour estimate for project completion per three developers, that means you’ll need about one month for completion (if all three of you will work on the project for 40 hours per week).
However, your team may work on two projects estimated to take 480 hours, at the same time, meaning one developer will likely only be able to work 20 hours per week on the first project. In such a case, a deadline of two months may be the first realistic date you can quote to the client.
In this example, we had all three members of the freelance developer team start working on the project at the same time.
But, in reality, it’s rarely that simple — because of something called task dependencies.
Task dependencies dictate in what order you can work on tasks. And, one task may depend on the other in such a way that you need to:
- Finish Task A before you can start Task B
- Start Task B at the same time as Task C
- Finish Task C before you can finish Task D
- Start Task D before you can finish Task B
Now, the listed tasks may amount to 480 hours of work together. But, their type of task dependency (as well as who is assigned with them) will also influence the realistic end completion date you can quote to your client.
How to track the final project and task deadlines
If you’re tracking your project and task progress in Trello, you can define separate deadlines for each card/task you have planned.
These individual task deadlines will help you determine whether the project deadline is realistic. Now, if you keep missing task deadlines, it’s a sure bet you should eventually negotiate a deadline extension for the project as well.
Wrapping up
Projects and tasks are seemingly complex notions with various important elements you need to consider and track.
With project outlines, it’s vital that you track the project goals, milestones, Key Performance Indicators, Objectives and Key Results.
With projects in general, it’s vital that you break them down into tasks whose time and progress you can easily track. Moreover, you should define price and time estimates, as well as clear deadlines.
When it comes to your billing approach, you should track its accuracy, efficiency, as well as distinguish between billable and non-billable tasks.
In the end, tracking the various aspects of projects and tasks may seem like a complex process, but, it’s rather simple, once you’ve defined and organized everything you need.

