Working with tasks
You can categorize time entries even further by using tasks (in addition to using tags, clients, and projects). Tasks provide you with an extra level of hierarchy and can function as sub-projects.
Tasks are mostly used for type of activity (e.g. design, coding) while description field for the actual thing you’ve worked on (e.g. “Working on bug #213”). For more advanced task management, it’s best to use a dedicated project management tool like Trello, JIRA, etc.
For example, you can name tasks by type of work (“Front-end programming”, “Writing”, “Designing”) and later sub-group time entries by task in the Summary report to see how much time each activity took.
To create tasks:
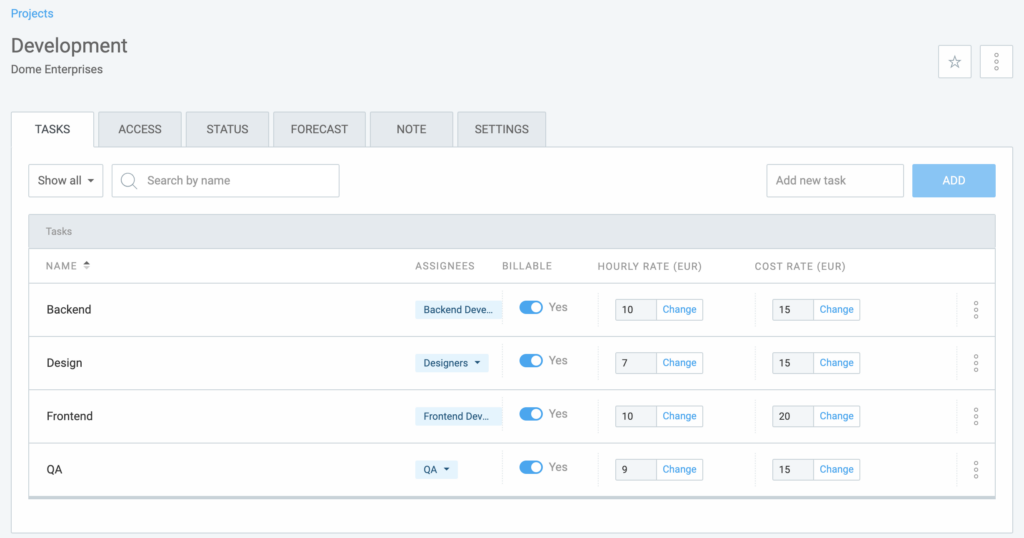
- Go to a project
- Open Tasks tab
- Type task name
- Click Add and people will then be able to choose it when tracking time.
You can:
- Indicate who works on which task by selecting an assignee
- Set an estimate for each task once you enabled it from the Project Settings tab (this can be useful if you’ve quoted your client a certain number of hours for each type of work so you can track how things go along)
To change task name, simply click on its name and type what you want.
By default, owners and admins can create tasks. However, this set of permissions can be modified if Who can create projects and clients is set to Admins and managers or Anyone in the Workspace settings.
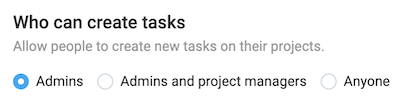
Who can create tasks if selected:
- Admins (default): admins
- Admins and project managers: admins and project manager
- Anyone: admins, projects managers, team managers, regular users
Marking tasks as done #
When you’re finished with some task, you can mark it as done so it doesn’t get in the way:
- Done tasks don’t appear on project page until you select Show done or Show all tasks
- Done tasks don’t appear in the project picker when tracking time
- Tracked time for done tasks is shown in reports
Marking tasks as done is really useful if you have a lot of tasks on projects, and you organize projects as to-dos (the other workflow is to put types of activities as tasks, like coding or design, in which case there’s no need to close tasks).
Deleting tasks #
To delete a task, you first need to mark it as complete. After that, click on task’s options again and you’ll see the Delete option.
Only admins and project managers can delete tasks.
Once a task is deleted, all time entries for that task will become without a task (but they’ll retain the project).
Assigning users to tasks #
When a task has Anyone as the assignee, everyone who has access to that project can select and track time on the task.
If a task has a particular user or group as the assignee, only that person can select and track time on the task.
If it’s a private project, you’ll have to add the person to that project first.
Adding tasks from a template #
If you often create projects with the same task structure, you can set up a template so you don’t have to add these tasks one by one every time you create a new project.
Projects you create with an existing template will have settings such as Tasks, Billable Rates, Estimates, and Team already applied.
Project templates is an extra feature, which you can enable once you upgrade your account.
Rates and billable status #
If you wish to set hourly rates and mark which tasks are billable, you need to enable task rates in workspace settings.