Time categorization & tags
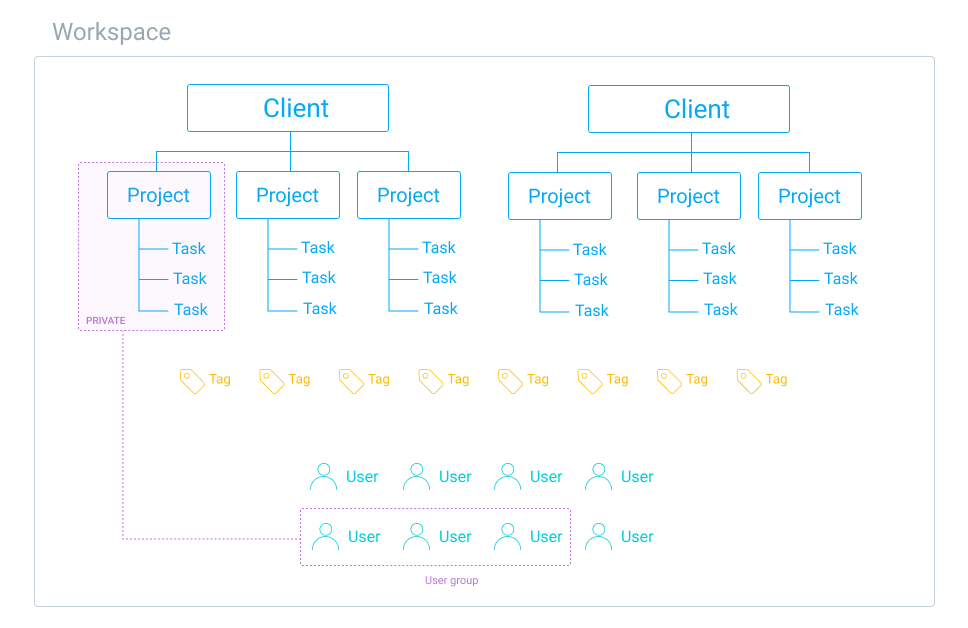
Clockify lets you categorize and analyze time using a 4-level hierarchy: description, tasks, projects, and clients.
For further categorization, you can also use tags, which work regardless of the hierarchy.
If you wish to categorize time differently, you can rename Project, Client, and Task labels into something else.
How you can organize time entries #
- If you do client work, name projects with the title of the assignment given by your client (e.g. “E-commerce Analytics”, “Website Redesign”, “SuperApp”). You can also have a special project where you’ll put all non-billable time entries (e.g. emails, time-off, meetings).
- If you do client work but want to keep it simple, you can just use client’s name as the project name and then use tasks to indicate what type of service you’ve provided (you can also change the project label to say client instead).
- If you have common projects for different clients, you can use projects for the type of service (e.g. marketing, development) and use tags to indicate for which client a particular time entry was.
- If you don’t work with clients, you can use projects as general areas of work (e.g. sales, operations, support).
- If you use Clockify for tracking personal productivity, you can name projects by activity (e.g. emails, working, learning, cooking).
Clients, projects, and tasks #
Projects are the main way in which you can organize your time in Clockify. At a higher level, you can group projects around clients (or departments or whatever else). Learn more about managing projects.
Clients are used to organize projects. A client can have many projects, but a project can belong to only one client.
It’s not possible to add just a client to a time entry as clients are used as a grouping mechanism for projects. However, you can create a project named after a client. Alternatively, you can create a tag for each client and add it to a time entry, so you can later group entries by tag.
If you need more control, you can further classify time entries using tasks (i.e. sub-projects or jobs) and use them to designate the type of work (e.g. design, writing, programming), or whatever else you want (e.g. bugs, sprint A, phase X).
While tasks are commonly used to designate the type of activity (e.g. Design, Coding), the description field is most commonly used for the actual thing you’ve worked on (e.g. “Fix bug #638”).
Changing labels #
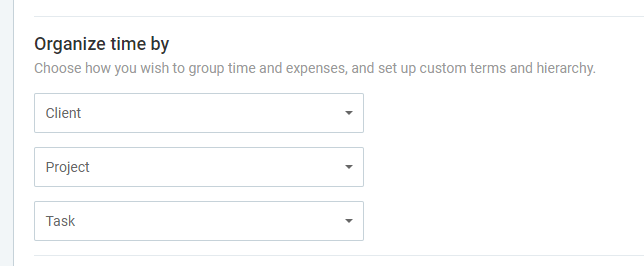
By default, time in Clockify can be categorized by Client/Project/Task.
To change these labels into something else:
- Go to Settings
- Find Organize time by
- Choose what you wish to rename
Managing clients #
By default, owners and admins can create clients. However, this set of permissions can be modified if Who can create projects and clients is set to Admins and managers or Anyone in the Workspace settings.
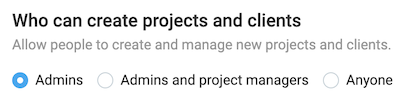
Who can create clients if selected:
- Admins (default): admins
- Admins and project managers: admins and project manager
- Anyone: admins, projects managers, team managers, regular users
Regular users will be able to create clients when they create a new project. However, they still won’t be able to see the Clients page.
How owners, admins and project managers can create clients #
If you’re the owner or an admin of the workspace, to create a client simply:
- Go to Clients page from the sidebar
- Enter the client’s name in the Add new client field
- Click Add
How regular users can create clients #
If you want regular users to be able to add clients:
- Admin or owner needs to set Who can create projects and clients to Anyone
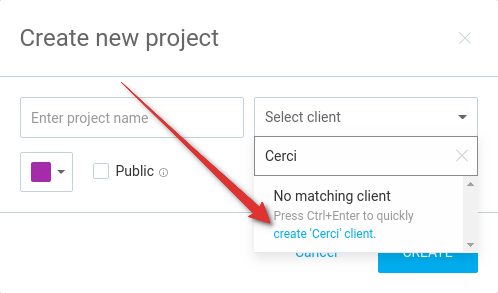
- A regular user can then go to the Projects page to create a project
- Click Select client
- Enter client name
- Click Create client or press Ctrl+Enter
If you want to create a client only, simply create the client with the mentioned steps above and cancel the project creation.
Archiving clients #
Only owners and admins of the workspace can archive clients. Only after the client is archived you will be able to delete it.
- Go to Clients page from sidebar
- Click on three dots next to the client’s name
- Choose Archive
- Confirm the action in the pop-up window. There you will also have the option to archive all projects assigned to that client
Restoring clients #
Only owners and admins of the workspace can restore archived clients. Clients can only be restored after being archived.
- Go to Clients page from sidebar
- Select Show archived or Show all from the drop-down menu
- Click on three dots next to the archived client’s name
- Choose Restore
- Confirm the action
Deleting clients #
Only owners and admins of the workspace can delete clients. Clients can only be deleted after being archived.
- Go to Clients page from sidebar
- Select Show archived or Show all from the drop-down menu
- Click on three dots next to the archived client’s name
- Choose Delete
- Confirm the action
Deleting clients in bulk #
If you have a lot of archived clients and you’d like to clean up your Clients page, you can bulk delete them in the following way:
- Check the Name box on the Clients page
- Click Delete
- Type DELETE in the popup windows
- Click Delete to confirm the action
All deleted clients will be removed from time entries they are assigned to.
Managing tags #
When projects and tasks aren’t enough to keep things organized, use tags.
The best thing about tags is that they are available across the workspace. Tags work regardless of the project, so you can create one tag, use it on multiple projects and filter reports based on them. You can even use multiple tags to filter reports with more precision.
Tags can also be used to add additional information to time entries. For example, you can:
- Mark time entries with non-standard billing rates or currencies so you know how to invoice them
- Mark time entries you’ve invoiced with invoiced tag so you don’t bill a client twice (you can use bulk edit to update multiple entries at once)
- Mark what type of work or service you provide (e.g. project management, feedback, debugging, coding), so you can see how much time takes to perform a specific type of work across all projects
- Mark what part of business you’re working on (e.g. internal, support, client work, mobile)
- Mark the amount of time you worked overtime
Tags are useful because you can use them as keywords by which you can filter reports to find exactly what you need.
Before you can use tags, you have to create them by typing a new tag name in the tag picker and pressing Ctrl+Enter. Once you’ve created a tag, all users in your workspace can select it when tracking time.
Everyone can create tags (though you can limit creation to Admins only in workspace settings). Only admins can edit, and delete tags. You can create as many tags as you want.
Creating tags #
- Go to Tags page from sidebar
- Type tag name and click ADD
Or:
- Click tag icon on a time entry
- Start typing tag name
- Click Create tag or press Ctrl+Enter
Archiving tags #
- Go to Tags page from sidebar
- Click on three dots next to the tag’s name
- Choose Archive
- Confirm the action in the pop-up window.
Once the tag is archived you will be able to delete it.
Restoring tags #
- Go to Tags page from sidebar
- Select Show archived or Show all from the drop-down menu
- Click on three dots next to the archived tag’s name
- Choose Restore
- Confirm the action
Deleting tags #
- Go to Tags page from sidebar
- Select Show archived or Show all from the drop-down menu
- Click on three dots next to the archived tag’s name
- Choose Delete
- Confirm the action
Note: Tags first need to be archived in order to be deleted.
Deleting tags in bulk #
- Check the Name box on the Tags page
- Click Delete
- Type DELETE in the popup windows
- Click Delete to confirm the action
All deleted tags will be removed from time entries they are assigned to.
Filtering reports by tags #
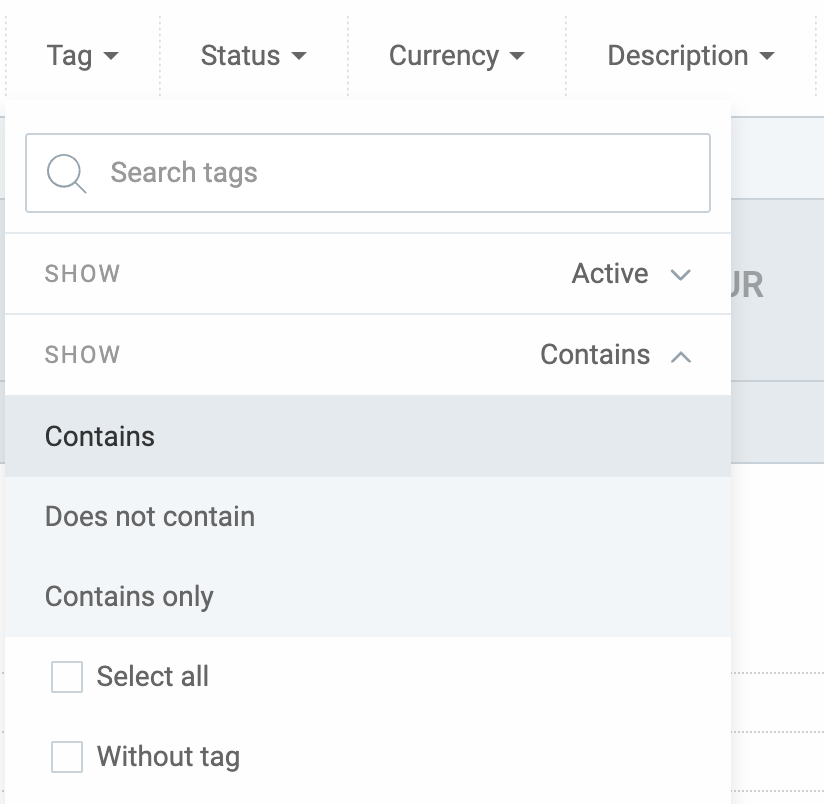
You can filter time entries in reports in three ways:
- Contains – all entries that contain that tag will be shown (e.g. if an entry has tag A and B, and you filter Contains: A, that entry will show up)
- Doesn’t contain – only entries that don’t have that tag will be shown (e.g. if an entry has tag A and B, and you filter Doesn’t contain: A, that entry won’t show up)
- Contains only – only entries that have that and only that tag will be shown (e.g. if an entry has tag A and B, and you filter Contains: only A, only that entry will show up)
How editing tags works #
- If you change the name of the tag in Tags section, time entries that have this tag applied will remain tagged with the renamed tag
- If you use bulk edit to change tags on time entries, you will have the option to add a new tag to existing or overwrite existing
- If you delete a tag all time entries that had this tag applied will end up untagged.
Advanced organization #
Clockify lets you categorize time even further with custom fields. Custom field is an extra feature which you can enable by upgrading to PRO plan.
Custom fields let your users add additional information to time entries (e.g. expenses, mileage, etc.), plus you can auto-categorize time entries based on a project.
For example, if some projects are done in one location and the others in another, you can create a custom field called location and tell which project belongs to which location. Then, when you download a report, you’ll be able to create a custom report, and group and sort time by location.