Jira is an Atlassian-developed issue tracking software that allows you to plan, manage, and track projects, priorities, bugs, issues, and tasks.
Jira has a native real-time time tracking functionality, but it’s fairly simple. For the most accurate timesheets and logs, you still need an external time tracking software, like Clockify. With Clockify, you can track the time you spend on issues, tasks, and bugs — right inside from Jira.
Best of all, time tracking in Jira with Clockify is free and works without any setup or configuration.
Let’s see how best to track time in Jira with Clockify.
What is Clockify and how you can track time with it
Clockify is the only truly free time tracker for teams. It’s integrated with 80+ web apps, including Jira.
With a robust set of features, Clockify seamlessly adapts to your workflow.
You can track time spent on any platform, webpage, or task.
After downloading the app or the browser version, all you have to do is write down what you’re working on and click the “start” button.
Your entries will be automatically added to your Clockify timesheet, so you can look at the overall time spent on each task at the end of the day.
You can track time with a timer or choose to enter times manually. It all comes down to your personal work preference.
But, if you’re interested only in Jira time tracking, Clockify can integrate itself into your workspace, and give you all the luxury of a paid time tracker with a simple free plugin. You’ll be able to track time from Jira’s issues, and later analyze this time in Clockify’s Mobile and Desktop apps, or via your preferred browser.
Let’s take a look at how you can connect Clockify and Jira, the ease of using our timer, and the benefits you get.
How to track time in Jira with Clockify?
To track time in Jira, all you need is a Clockify account, and the Jira integration installed.
Clockify Jira integration lets you:
- Start and end tracking time on your activities with just one click,
- Continue tracking time on an activity whenever you want to,
- Associate activities you’re tracking time on, with the right projects, tasks, and tags; and
- Define the billability status of your time entries.
The plugin for Clockify is linked with other Clockify apps, which means that all data tracked across the apps syncs in together — once you enter data in the plugin, it automatically appears across other Clockify apps.
How to get and setup the Clockify plugin for Jira
To start tracking time in Jira, you’ll need to install the Clockify plugin on your device. It’s a simple process, finished in a few clicks.
Step 1: Download the Clockify timer plugin from the Attlassian marketplace. When you click the “Get it now” option, you’ll see a pop-up window like in the image below:
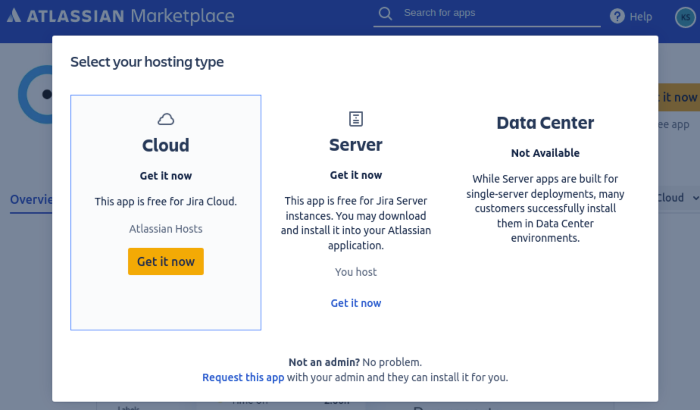
You can choose between three versions, depending on whether you have a Jira Cloud account or not. Most likely, you will go with the second option.
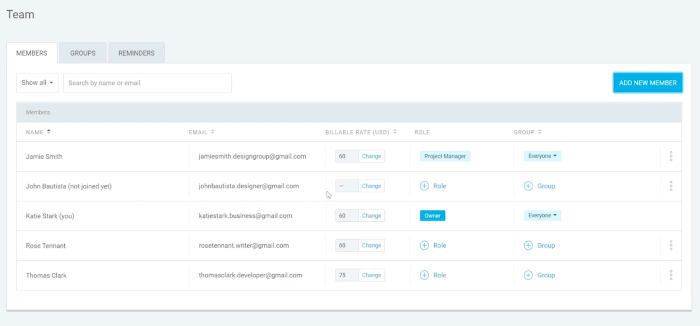
Step 2: If you are a manager, invite the rest of your team, like shown in the picture below.
Like we mentioned, simple and easy — the setup is complete in just two steps.
After the installation, you will choose whether to track time on each task with a timer, or by manually putting in the hours.
How to track time in Jira with the Clockify timer
By using Clockify and Jira together, you’ll get a powerful agile system with straightforward time tracking features. Let’s take a look at how you can use the timer in Jira.
Just like the setup process, the time tracking itself is fairly straightforward.
First, you will need to get your API key. These keys are actually serial numbers that work like your digital identification number. It’s how Jira recognizes that the person using the timer is also working on a particular task. As a result, the time tracked on a task will be automatically put in your timesheet in Clockify. No need to go back and enter anything manually!
Step 1: Generate your API key
When you go to your profile settings in Clockify, scroll all the way to the bottom until you see the API key generator like in the picture below.
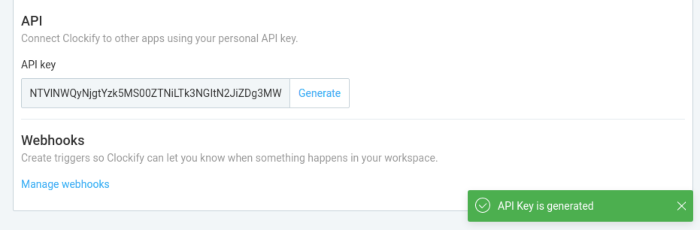
All you have to do then is click the “Generate” button, and then copy the serial number.
Note: Generating an API key should be done only the first time you start the timer. If you generate a new key, the old one will stop working and potentially render your integration useless!
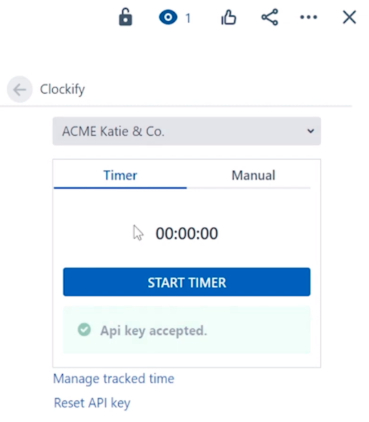
Step 2: Paste the API key and start the timer
Right after copying the key from your profile, you can go to your Jira workspace, to the task you need to work on.
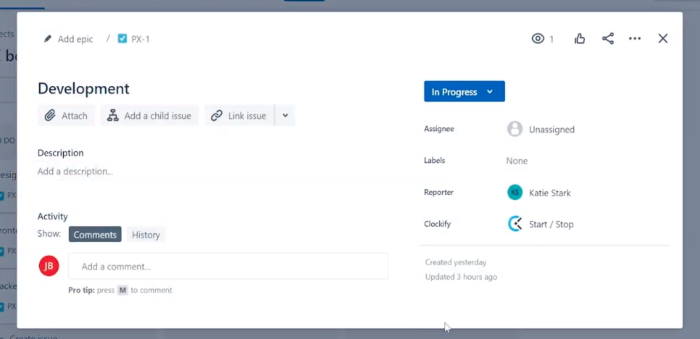
Go to the Start/Stop option and click it, after which an empty field will pop up for you to insert the API key.
Simply paste the serial number in the required field, the timer will pop right up. And once you’re done with the task, you can stop the timer from the Jira card again.
As a neat little bonus, whenever you start the timer, the time entry will display all the necessary information concerning the task: the project name, billable/nonbillable status, any relevant tags, and descriptions. So long as that information is within the Jira card, the required fields will be filled in as well:
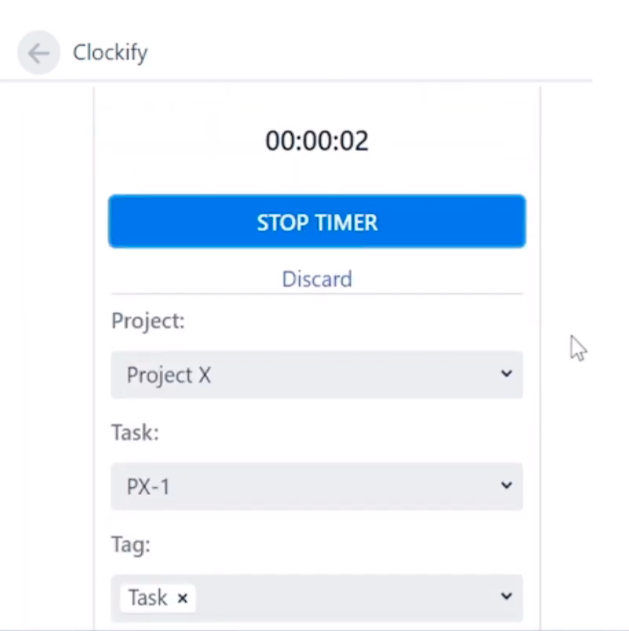
Once the timer is stopped, a time entry is created inside your timesheet, with the data on the task and project.
Note: While new time entries are synced between Clockify and Jira, deleting entries doesn’t sync. Editing or deleting entries whether in Jira or in your timesheet won’t reflect the changes in the other platform.
How to manually track time in Jira with Clockify?
If you’ve forgotten to track your time, or find the setup too much of a hassle, Clockify in Jira lets you input time manually. The button is conveniently located to the right of the timer option, so it’s again — one click away.
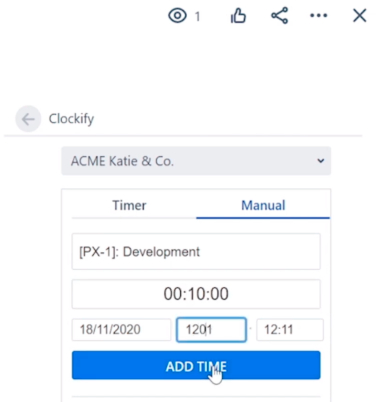
You select the project, client, and all the relevant information, choose the date, and enter the time spent on that particular task. Once the entry is filled in, it’s automatically transferred to your Clockify timesheet and visible to you, your team, and the managers.
Generating and reading Jira time reports in Clockify
As the project moves along, it’s fair to expect that the team will track its progress. And when you fill in your timesheet with entries directly made in Jira, you’re saving a lot of time. Most notably:
- You avoid filling in belated timesheets with inaccurate time entries;
- There’s less miscalculation in time estimates because the entries are more precise;
- With API keys it’s easy to see who worked on what;
- There’s no rush to meet deadlines for filling out timesheets;
- There are fewer chances of putting in the wrong project name, or tag, when the timer does it for you, straight from the Jira card.
The above benefits are just a bonus to the two main ones: expedience and efficiency.
When it’s time to generate reports, they might look something like this:
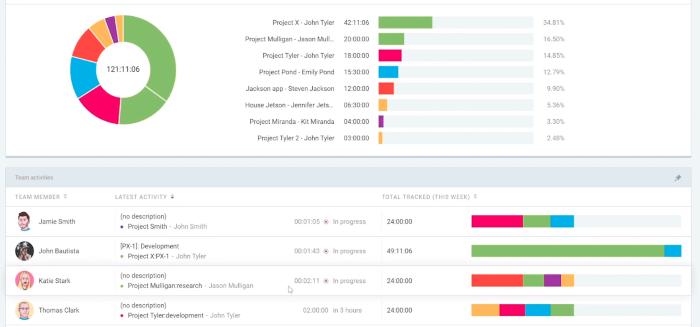
You get a visual representation of how much time was tracked on the project overall, which project was worked on the most vs the least, and even see who is currently working on specific tasks.
Conclusion
By using Jira and Clockify together, you’ll have a better handle on your projects. You’ll know which project took how long, what your team is working on, and more. This was an overview on how the Jira integration works. If you’re interested in a more detailed, technical step-by-step, you can take a look at our comprehensive Jira time tracking guide here.
To start using Clockify, you can sign up for a free account here.
✉️ Did this guide help you? Any suggestions or comments? Let us know at blogfeedback@clockify.me and we might feature it in one of our next updates!