How to calculate billable hours
When you bill clients by the hour, you need to keep a log of where the time goes so you can bill accurately and make sure your hourly rate isn't too low. Here's how you can automate the calculation process and find out the exact amount you need to bill in less than a minute.

Calculating billable hours
Calculating billable hours is straightforward: you take how much you've worked and multiply it by your hourly rate. But, the complications arise when you charge different fees to different clients, or when you have a diverse team doing differently paid work, and you need to factor in all those different rates.
Clockify calculates billable hours you've worked automatically. All you have to do is track time and separate billable from non-billable hours, and Clockify will do all the rest (from calculating how much money you've earned to showing where each minute went).
Step 1.
Track time you spend on activities
When you work on something, use the work hours timer to measure how long you've worked. When you switch activities, stop the timer for the previous activity and start a new one. If you forgot to start the timer, you can always add time manually later.
If you charge different rates based on what you're doing, be sure to categorize entries and group them around projects.
Step 2.
Separate billable hours from unpaid work
Some of the work you do will be billable and some won't. For example, you can't bill for the time you spend on invoicing, marketing, and finding new clients.
If you want, you can track only your billable hours; but, then you won't know how much time you spend on unpaid work and won't be able to calculate your real hourly wage.
In Clockify, you can select whether a particular time entry is billable or not. If you mark a project as billable, all its time entries will be billable by default (which you can override on case by case basis).

Step 3.
Set rates for billable hours
Once you have separated billable from non-billable time, you can set hourly rates so Clockify can calculate how much money you've earned.
If you're charging different rates for different projects, or if some of your contractors work for higher fees (eg. a senior developer might have a higher hourly rate than a junior designer), you will need to set multiple billable rates.
Clockify uses a four-level hierarchy to let you separate different rates so the right one is applied:
- Default rate, used when no other rate is applied.
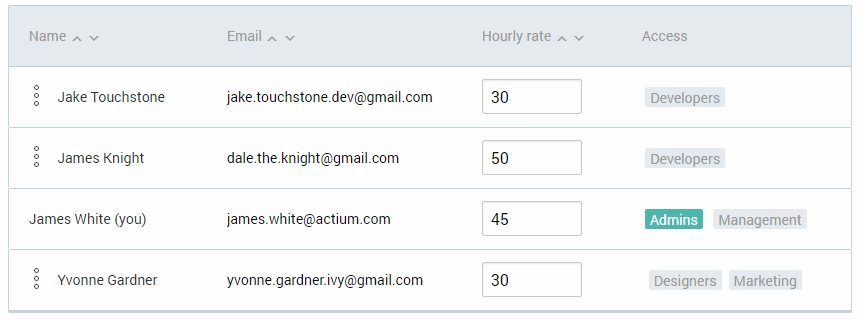
- Employee rate, used when the time is tracked by a specific user (eg. writer, designer).
- Project rate, used when the time is tracked for a particular project (and which needs to be billed differently from your normal fee).
- Project member rate, used when time is tracked for a particular project by a particular user (useful for separating the more expensive work from simpler tasks).
Step 4.
Track billable hours in real time
Clockify has a powerful integrated reporting system so you don't have to count billable hours and add them up manually. All your time is automatically updated and sorted, and can be instantly viewed.


Clockify's reports let you:
- See how much money you've earned on each project
- See how much time you spend on billable vs non billable activities
- See how much money each contractor and employee costs you
- See which members has the most billable hours
- Compare estimated vs actual tracked time
- Compare your weekly, monthly, and yearly earnings
Step 5.
Export billable hours for invoicing
Report are useful to track fees and costs in real time in just a few clicks.
When the time comes to bill your clients, you can filter your time by client and billability, and send the report to your client.
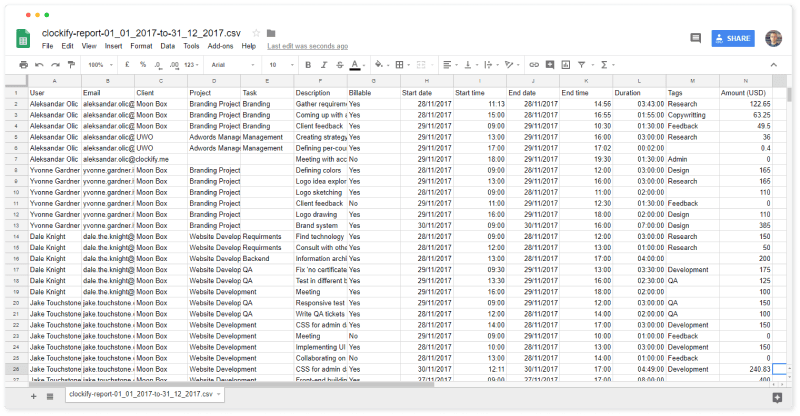
Clockify lets you save your calculated billable hours like you see in the report in PDF, or export all your time entries to Excel so you can pick and choose what you want to bill for.
You can also save a report and share it with your client so they can track costs in real time.