Complemento de faturamento eletrônico Peppol
O complemento de faturamento eletrônico Peppol permite que você envie faturas digitais através da rede Peppol, para que o seu faturamento esteja em conformidade com a legislação local e com normas internacionais (Peppol BIS 3.0).
Para usar este complemento, você e seu cliente precisam se cadastrar no Peppol e ter identidades válidas no Peppol.
Both versions of the Peppol e-invoicing add-on are paid. The Peppol e-invoicing Starter lets you send up to 20 invoices per month, and Peppol e-invoicing Growth lets you send up to 100 invoices per month.
Instalar o complemento Peppol #
- Acesse: https://marketplace.cake.com/
- Faça login com suas credenciais do Clockify
- Procure por Peppol e-invoicing na barra de busca
- Select your preferred add-on plan:
- Peppol e-invoicing Starter (send up to 20 invoices per month)
- Peppol e-invoicing Growth (send up to 100 invoices per month)
5. Click Install on the add-on page
6. Select the workspace where you want to install the add-on
Configurações gerais #
Depois de instalar o complemento, você precisa ativá-lo nas configurações de Add-on.
- Clique nos três pontos ao lado do nome do seu espaço de trabalho
- Selecione Configurações do espaço de trabalho
- Clique na aba Complementos
- Clique nos três pontos ao lado do complemento de faturamento eletrônico Peppol
- Selecione Configurações
- Acesse a aba Geral nas configurações do complemento
- Preencha as informações do remetente (Cobrar de):
– Nome da empresa
– Endereço
– Identidade fiscal
– Identidade Peppol - Clique em Connect e-invoice
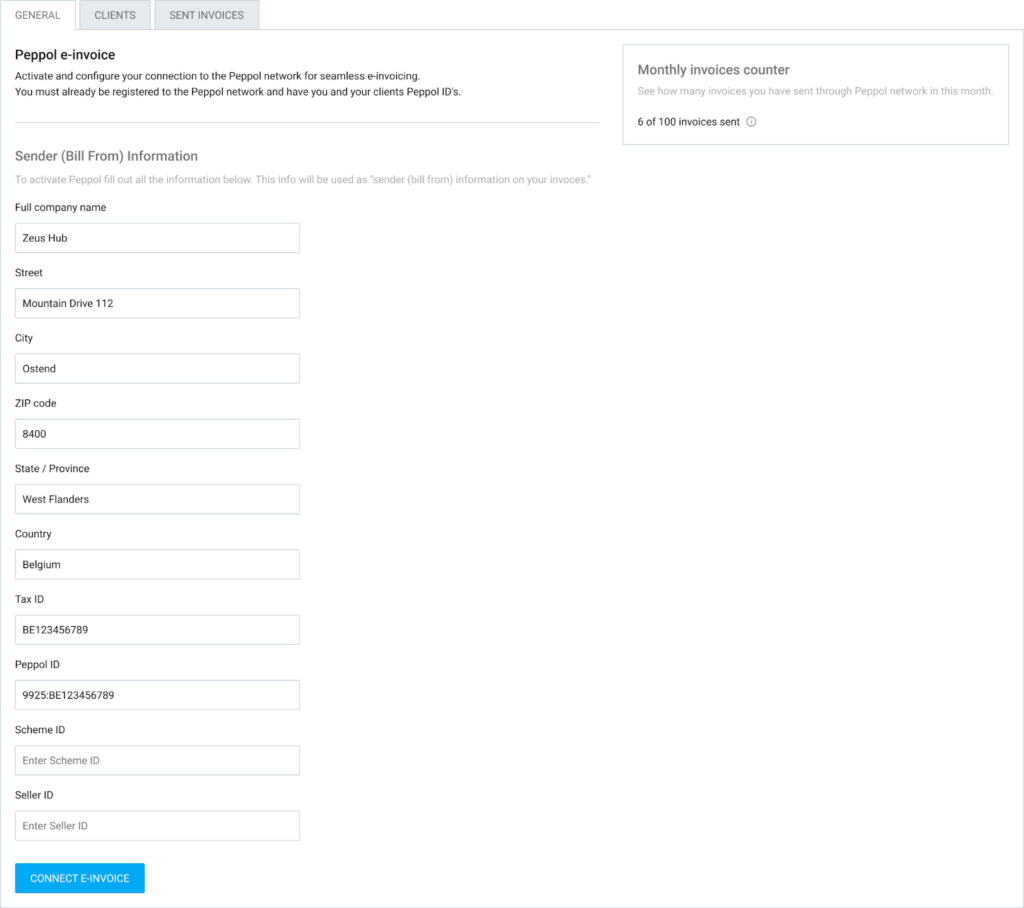
Você pode acompanhar seu consumo pelo contador de faturas mensais. Ele mostra quantas faturas você enviou em comparação com seu limite mensal.
Gerenciando clientes #
Antes de poder enviar uma fatura eletrónica, os seus clientes devem ser cadastrados e verificados no complemento.
Para gerenciar seus clientes:
- Acesse a aba Clientes
- Você verá uma lista de clientes importados do seu espaço de trabalho Clockify
- Clique no botão Configurar ao lado do cliente
- Insira os dados da empresa do cliente e a identidade Peppol dele
- Clique em Configurar cliente
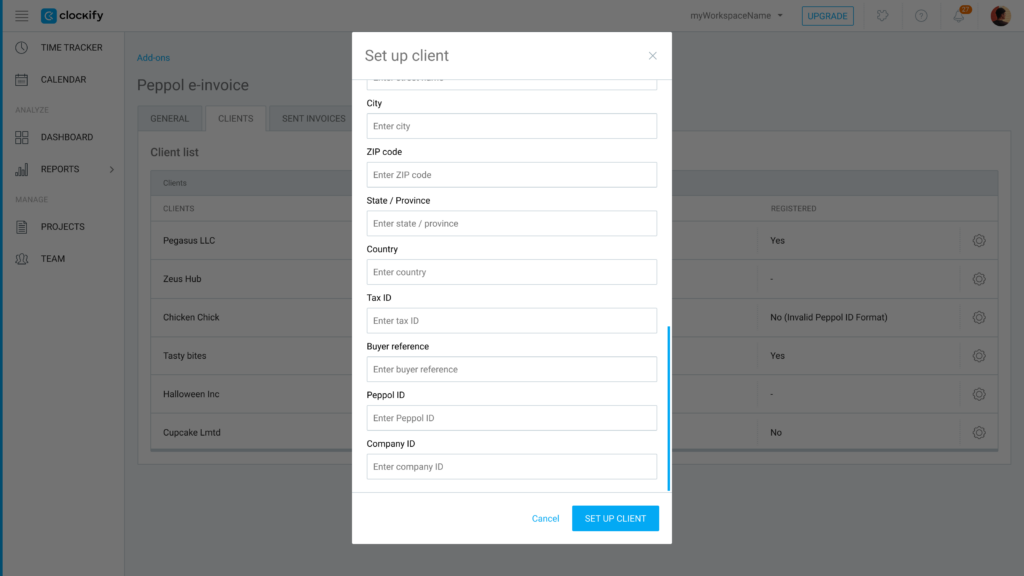
O sistema verificará automaticamente se o cliente está registrado na rede Peppol.
Se não estiver registrado, exibirá uma mensagem de erro explicando o motivo da falha na verificação.
Enviar faturas #
Após configurar sua empresa e seus clientes, enviar uma fatura eletrônica é simples:
- Acesse a página de Faturas
- Abra a fatura que deseja enviar
- Clique no menu suspenso Ações de Add-on
- Escolha Enviar via Peppol

A fatura será enviada no formato Peppol BIS 3.0, em conformidade com a legislação.
Se você clicar em Enviar para Peppol na página principal de faturas, todas as faturas exibidas na página serão enviadas.
Rastrear suas faturas eletrônicas #
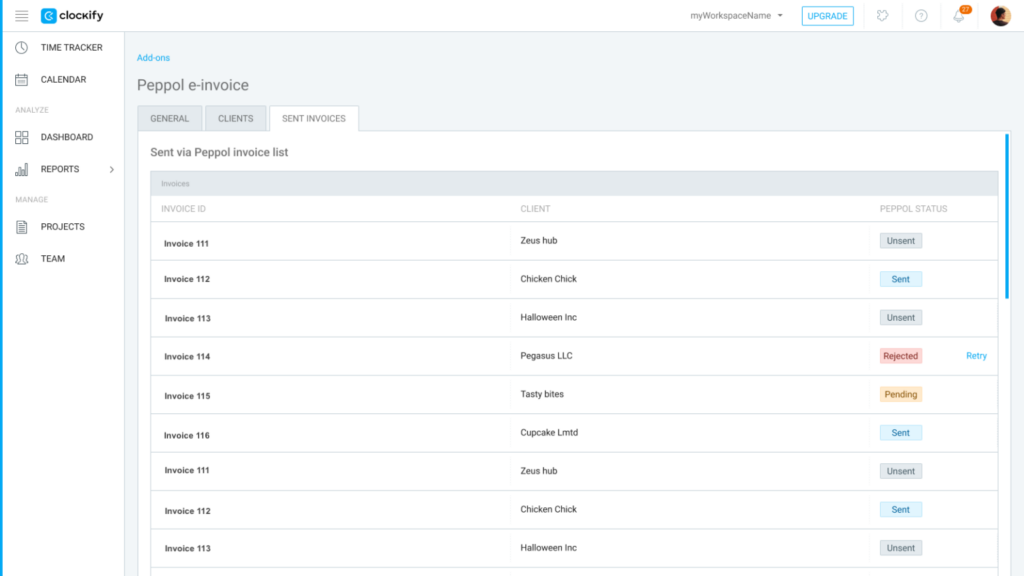
Use a guia Faturas enviadas nas configurações do complemento para monitorar o status de suas faturas eletrônicas enviadas.
Consulte as seguintes informações:
- Histórico de envios: Veja uma lista de todas as faturas enviadas, incluindo o ID da fatura, o cliente e o status específico da Peppol.
- Faturas com falha: Se uma fatura falhar, o sistema fornecerá um motivo (p. ex.: informações do cliente ausentes).
- Tentar novamente: Você pode clicar em Tentar novamente para qualquer fatura enviada sem sucesso, depois de corrigir as informações ausentes.
Perguntas frequentes #
Quem pode usar o complemento de faturamento eletrônico Peppol?
O complemento está disponível para espaços de trabalho com um plano de assinatura Standard ou superior. Além disso, você e seus clientes devem estar registrados na rede Peppol e ter seus respectivos IDs Peppol prontos para usar o serviço.
Como sei se meu cliente pode receber faturas eletrônicas?
Ao inserir os dados e a identidade Peppol de um cliente na guia Clientes, o sistema verifica automaticamente o registro dele na rede Peppol. Se ele não estiver registrado, o Clockify exibirá uma mensagem de erro explicando o motivo da falha na verificação.
O que acontece se uma fatura não for enviada?
Você pode monitorar o status de todos os documentos enviados na guia Faturas enviadas. Se uma fatura falhar, o sistema fornecerá um motivo específico para a falha (como informações do cliente ausentes). Depois de corrigir os erros, basta clicar em Tentar novamente para enviá-la.
Há um limite para o número de faturas eletrônicas que posso enviar?
Sim, seu uso está sujeito a um limite mensal com base no seu plano adicional específico. Você pode monitorar seu uso atual através do contador de faturas mensais localizado nas configurações gerais do plano adicional.