Module complémentaire de facturation électronique Peppol
Le module complémentaire de facturation électronique Peppol vous permet d’envoyer des factures numériques via le réseau Peppol, afin que votre facturation soit conforme aux législations locales et aux normes internationales (Peppol BIS 3.0).
Pour utiliser ce module complémentaire, vous et votre client devez tous deux vous inscrire sur Peppol et disposer d’identifiants Peppol valides.
Les deux versions du module complémentaire de facturation électronique Peppol sont payantes. La version Basic vous permet d’envoyer jusqu’à 20 factures par mois, tandis que la version Light vous permet d’en envoyer jusqu’à 100 par mois.
Installer le module complémentaire Peppol #
- Rendez-vous sur https://marketplace.cake.com/
- Connectez-vous avec vos identifiants Clockify
- Recherchez Facturation électronique Peppol dans la barre de recherche
- Choisissez la formule complémentaire qui vous convient :
- Peppol e-invoicing Starter (envoi de 20 factures maximum par mois)
- Peppol e-invoicing Growth (envoi de 100 factures maximum par mois)
5. Cliquez sur Installer sur la page de l’extension
6. Sélectionnez l’espace de travail dans lequel vous souhaitez installer l’extension
Paramètres généraux #
Une fois l’extension installée, vous devrez l’activer dans les paramètres de l’extension.
- Cliquez sur les trois points situés à côté du nom de votre espace de travail
- Sélectionnez Paramètres de l’espace de travail
- Cliquez sur l’onglet Modules complémentaires
- Cliquez sur les trois points situés à côté du module complémentaire Facturation électronique Peppol
- Sélectionnez Paramètres
- Accédez à l’onglet Général dans les paramètres du module complémentaire
- Remplissez les informations relatives à l’expéditeur (Facturé par) :
– Nom de l’entreprise
– Adresse
– Numéro d’identification fiscale
– Identifiant Peppol - Cliquez sur Connecter la facture électronique
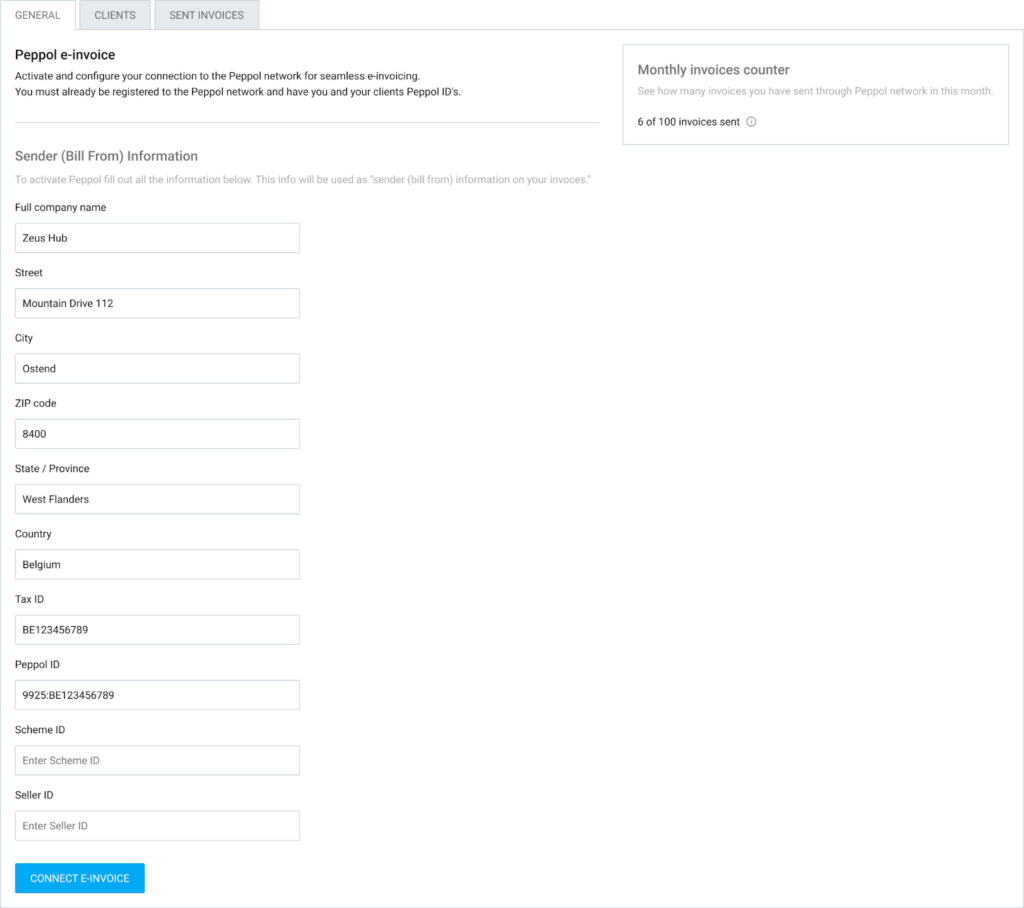
Vous pouvez suivre votre utilisation grâce au compteur de factures mensuelles. Il vous indique le nombre de factures que vous avez envoyées par rapport à votre limite mensuelle.
Gérer des clients #
Avant de pouvoir envoyer une facture électronique, vos clients doivent être enregistrés et validés dans le module complémentaire.
Pour gérer vos clients :
- Accédez à l’onglet Clients
- Vous verrez apparaître une liste de clients importés depuis votre espace de travail Clockify
- Cliquez sur le bouton Configurer à côté du nom du client
- Saisissez les coordonnées de l’entreprise du client ainsi que son identifiant Peppol
- Cliquez sur Configurer le client
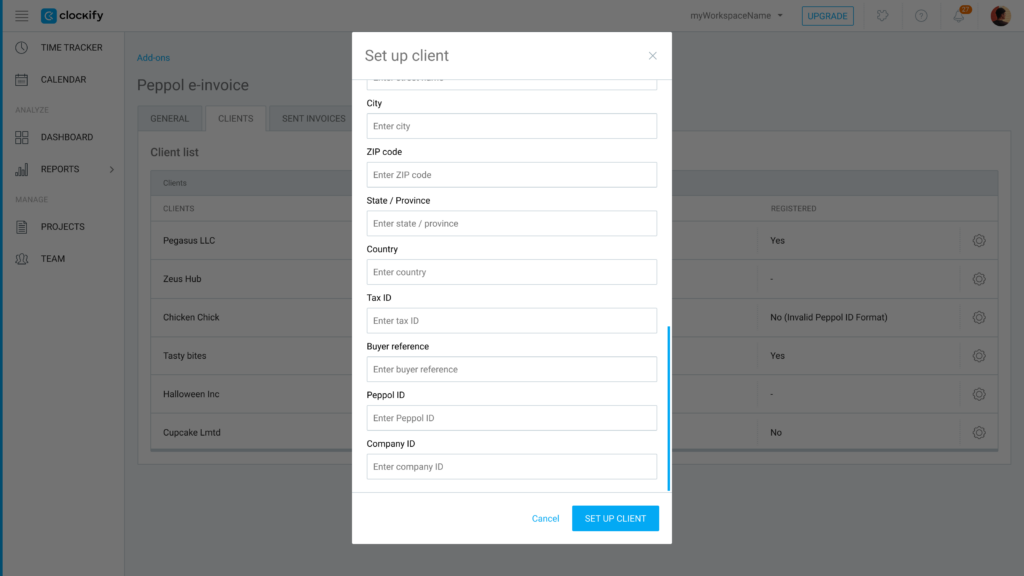
Le système vérifie automatiquement si le client est enregistré sur le réseau Peppol.
S’il n’est pas enregistré, il affiche un message d’erreur expliquant pourquoi la vérification a échoué.
Envoyer des factures #
Une fois votre entreprise et vos clients configurés, envoyer une facture électronique est très simple :
- Accédez à la page Factures
- Ouvrez la facture que vous souhaitez envoyer
- Cliquez sur le menu déroulant Actions supplémentaires
- Sélectionnez Envoyer via Peppol

La facture sera envoyée au format Peppol BIS 3.0, conforme à la réglementation.
Si vous cliquez sur Envoyer à Peppol dans l’écran principal des factures, toutes les factures affichées sur la page seront envoyées.
Suivre ses factures électroniques #
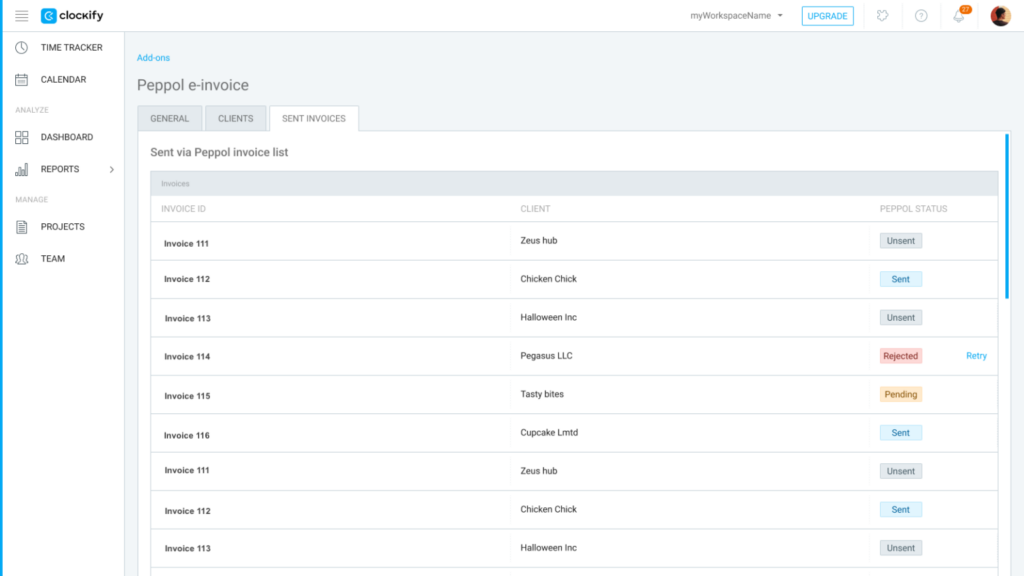
Utilisez l’onglet Factures envoyées dans les paramètres du module complémentaire pour suivre le statut de vos factures électroniques envoyées.
Consultez les informations suivantes :
- Historique : Consultez la liste de toutes les factures envoyées, avec le numéro de facture, le client et le statut Peppol correspondant.
- Factures rejetées : Si une facture est rejetée, le système indique la raison (p. ex. informations manquantes chez le client).
- Réessayer : Vous pouvez cliquer sur Réessayer pour toute facture dont l’envoi a échoué, une fois que vous avez corrigé les informations manquantes.
FAQ #
Qui peut utiliser le module complémentaire de facturation électronique Peppol ?
Ce module est disponible pour les espaces de travail disposant d’un abonnement Standard ou supérieur. De plus, pour pouvoir utiliser ce service, vous et vos clients devez être inscrits sur le réseau Peppol et disposer de vos identifiants Peppol respectifs.
Comment savoir si mon client peut recevoir des factures électroniques ?
Lorsque vous saisissez les coordonnées d’un client et son identifiant Peppol dans l’onglet Clients, le système vérifie automatiquement s’il est bien enregistré sur le réseau Peppol. S’il n’est pas enregistré, Clockify affichera un message d’erreur expliquant pourquoi la vérification a échoué.
Que se passe-t-il si l’envoi d’une facture échoue ?
Vous pouvez suivre le statut de tous les documents sortants dans l’onglet Factures envoyées. Si l’envoi d’une facture échoue, le système vous indiquera la raison précise de cet échec (p. ex. des informations client manquantes). Une fois les erreurs corrigées, il vous suffit de cliquer sur Réessayer pour la renvoyer.
Existe-t-il une limite au nombre de factures électroniques qui peuvent être envoyées ?
Oui, votre utilisation est soumise à une limite mensuelle qui dépend de votre niveau d’abonnement. Vous pouvez suivre votre consommation actuelle grâce au compteur de factures mensuelles situé dans les paramètres généraux de l’extension.