Criar e gerenciar projetos e clientes no nível do espaço de trabalho
No Clockify, você pode configurar e gerenciar projetos e clientes com facilidade para organizar o tempo da sua equipe, acompanhar o progresso dos projetos e gerar relatórios precisos.
Projetos versus clientes #
Vamos analisar a tabela abaixo para entender a relação entre projetos e clientes antes de começar a criá-los.
| Tipo de item | Descrição | Hierarquia |
| Projetos | Essenciais para categorizar e agrupar registros de tempo. Ajudam a analisar o tempo gasto em diferentes tarefas e a definir estimativas. | Um projeto só pode pertencer a um cliente. |
| Clientes | As entidades, indivíduos ou departamentos internos para os quais você está trabalhando. | Um cliente pode ter vários projetos vinculados a ele. |
Visibilidade do projeto:
- Público: Visível para todos no espaço de trabalho
- Privado: Visível apenas para usuários selecionados que foram atribuídos ao projeto
No plano gratuito, a visibilidade do projeto só pode ser definida como Público. Atualize para qualquer plano pago para definir os projetos como Privados.
Criar um novo projeto #
Por padrão, somente Administradores podem criar projetos. Você pode alterar essa configuração em Configurações do espaço de trabalho para permitir que gerentes de projeto ou qualquer pessoa no espaço de trabalho criem projetos.
A opção Quem pode criar clientes/projetos/tarefas/etiquetas está definida como Todos por padrão e não pode ser alterada no plano gratuito.
Para criar um novo projeto:
- Acesse a página Projetos
- Clique no botão Criar novo projeto
- Digite o nome do projeto
- Selecione um cliente. Se o cliente não existir, basta digitar o nome e clicar em Criar cliente no menu de seleção
- Escolha uma cor do projeto para distinção visual
- Defina Visibilidade (Pública ou Privada)
- Clique em Criar
Você também pode criar rapidamente um novo projeto diretamente da página do Controle de Tempo.
1. Clique no campo +Projeto ao adicionar um registro de tempo.
2. Comece a digitar o nome do projeto.
3. Expanda o menu e clique em Criar novo projeto se ele não existir.
4. Preencha os detalhes necessários (cliente, visibilidade, cor).
5. Clique em Criar
Atalho: Use o atalho de teclado Ctrl/^ + Enter para salvar o novo projeto.
Editar detalhes do projeto #
Você pode editar as configurações principais de um projeto a qualquer momento:
- Acesse a página Projetos
- Clique no projeto que deseja editar
- Alterne para a aba Configurações
- Modifique o Nome, o Cliente e a Cor do Projeto
- Atualize o Status do Projeto (ex.: Em Andamento, Concluído)
- Adicione Notas do projeto para fornecer contexto à sua equipe (opcional)
Definir taxas de faturamento por projeto #
- Acesse a página Projetos e clique no projeto que deseja atualizar
- Alterne para a aba Configurações
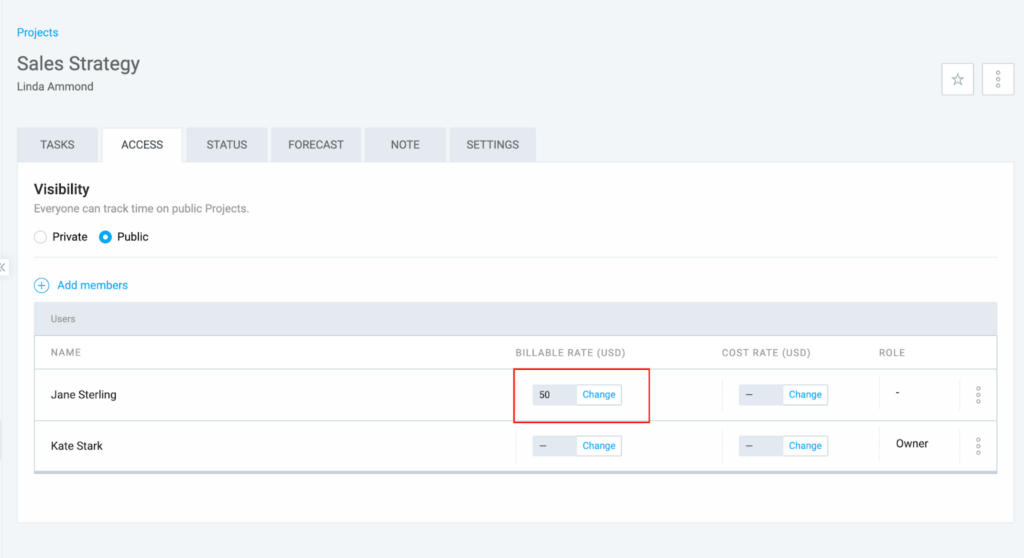
- Defina a Taxa faturável padrão para o projeto
Se diferentes membros da equipe precisarem de tarifas diferentes para o mesmo projeto, acesse a seção Acesso do projeto para definir tarifas específicas para cada usuário.
Gerenciar acesso e permissões do projeto #
Você controla quais usuários podem acessar um projeto privado, modificar tarefas e registrar o tempo gasto nele. Você também pode atribuir usuários como Gerentes de Projeto.
Para saber mais sobre como gerenciar usuários em um projeto, consulte o artigo de ajuda Gerenciar pessoas em projetos.
Projetos de arquivamento e restauração #
Para manter seu espaço de trabalho organizado, você pode arquivar os projetos concluídos.
Para arquivar um projeto:
- Acesse a página Projetos
- Clique em
 three dots next to the project name
 - Selecione Arquivar
- Selecione ou desmarque Marcar todas as tarefas como concluídas
- Clique em Arquivar
Para restaurar um projeto arquivado:
- Altere o filtro Ativos para Arquivados na parte superior da página Projetos
- Clique em Aplicar filtro
- Click the three dot icon next to the archived project name
- Selecione Restaurar
- Clique em Restaurar na janela de confirmação
Excluir projetos #
Os projetos devem ser Arquivados antes de serem excluídos.
Para excluir um projeto:
- Acesse a página Projetos
- Defina o filtro para Arquivados
- Clique em Aplicar filtro
- Click the three dots icon next to the archived project name
- Selecione Excluir
- Digite EXCLUIR e clique em Excluir para confirmar a ação
Excluir um projeto o remove dos registros de tempo, mas os dados históricos de tempo permanecem intactos.
Fusão de projetos #
Embora não seja possível mesclar dois projetos diretamente, você pode reatribuir registros de tempo:
- Navegue até a página Relatórios
- Selecione a visualização de relatório Detalhado
- Filtre pelo projeto desejado e clique em Aplicar filtro
- Marque a caixa superior para selecionar todas as entradas de tempo exibidas
- Clique em Edição em massa
- Selecione o novo projeto para a fusão
- Clique em Salvar
- Arquive e Exclua o projeto antigo
Gestão avançada de projetos #
Aqui estão alguns recursos avançados para gerenciar projetos dentro do espaço de trabalho, alguns dos quais estão disponíveis em planos pagos ou para funções de usuário específicas.
| Funcionalidade | Descrição |
| Adicionar e editar tarefas em massa | Administradores e proprietários podem adicionar ou editar tarefas em vários projetos simultaneamente usando a tela de edição em massa. Isso é útil para organizar um grande número de tarefas. |
| Criar projetos a partir de modelos | Disponível nos planos pagos, os modelos permitem que você crie novos projetos com configurações predefinidas (taxas faturáveis, tarefas, estimativas) para economizar tempo. |
| Filtrar e classificar projetos | Use os filtros na parte superior da página Projetos para encontrar facilmente o que você precisa. Filtrar por: • Status ativo • Cliente • Usuários do projeto • Faturamento • Nome Ordenar por: • Nome • Cliente • Status |
Criar um novo cliente #
Por padrão, Administradores e Proprietários podem criar clientes.
Se a configuração Quem pode criar projetos e clientes estiver definida como Qualquer pessoa nas configurações do seu Espaço de Trabalho, os usuários comuns também poderão criar clientes, mas não terão acesso à página Clientes.
Para criar um novo cliente:
- Vá para a página Clientes
- Digite o nome do cliente no campo Adicionar novo cliente
- Clique em Adicionar
Editar informações do cliente #
- Vá para a página Clientes
- Clique no ícone de caneta ao lado do cliente que deseja editar
- Modifique detalhes como:
- Nome do cliente
- Endereço de e-mail do cliente
- Destinatários Cc
- Endereço físico
- Anotações do cliente
- Moeda
Arquivar um cliente #
- Vá para a página Clientes
- Click the three dot icon next to the client’s name
- Selecione Arquivar e confirme a ação
- Marque a caixa Arquivar também todos os projetos atribuídos a este cliente (opcional)
- Clique em Arquivar
Excluir um cliente #
Os clientes devem ser Arquivados antes de poderem ser excluídos.
- Vá para a página Clientes
- Selecione Mostrar arquivados no menu de filtros
- Click the three-dot icon next to the archived client
- Escolha Excluir
- Digite EXCLUIR e clique em Excluir para confirmar a ação
Perguntas frequentes #
Como posso registrar o tempo de um novo projeto?
Depois que o projeto for criado, você poderá selecioná-lo ao registrar o tempo nas páginas de Controle de Tempo, Folha de Horas e Calendário. Se o projeto estiver definido como privado, somente os usuários atribuídos a ele poderão selecioná-lo.
Como posso registrar o tempo de um cliente?
Para registrar o tempo de um cliente, primeiro crie um na página Clientes. Atribua o cliente a um projeto. Certifique-se de selecionar o projeto ao registrar o tempo para atribuir corretamente as entradas de tempo ao cliente para fins de relatório e faturamento.
Posso definir uma tarifa para o cliente?
Embora não seja possível definir uma tarifa diretamente no perfil do cliente, você pode estabelecer preços específicos para cada cliente definindo uma tarifa faturável no nível do projeto. Para isso, atribua um projeto a um cliente e defina a tarifa desejada nas configurações desse projeto.
Posso alterar o cliente ao qual um projeto está atribuído depois de criado?
Sim, você pode reatribuir um projeto acessando a página Projetos, clicando no projeto específico e navegando até a guia Configurações. Lá, você pode selecionar um cliente diferente no menu suspenso ou criar um novo, e a alteração será atualizada imediatamente em todo o espaço de trabalho.