Campos personalizados
Os campos personalizados permitem adicionar dados extras às suas entradas de tempo, tais como:
- Quilometragem
- Status da fatura
- Localização
- IDs de projeto
Essa funcionalidade está disponível no aplicativo web, nos aplicativos móveis (iOS e Android), no aplicativo para Mac e no aplicativo para Windows.
Criar campos personalizados #
1. Clique no ícone de três pontos ao lado do nome do espaço de trabalho.
2. Selecione Configurações do espaço de trabalho
3. Clique em Campos personalizados
4. Clique em Criar
5. Insira um nome e uma descrição para o campo.
6. Selecione o tipo de campo:
- Texto – Digite qualquer texto
- Número – Aceita apenas valores numéricos
- Link – Aceita um URL para arquivos ou sites
- Interruptor – Oferece uma simples alternância Sim/Não
- Selecionar – Permite escolher apenas uma opção de uma lista predefinida
- Selecionar Vários – Permite escolher várias opções de uma lista predefinida
Você também pode definir Quem pode editar para Todos ou Administradores.
Se você definir um campo como editável apenas pelo administrador, os usuários comuns não poderão alterar seu valor, mas ainda poderão vê-lo em seus registros de tempo.
Você pode criar até 50 campos personalizados.
Ativar campos personalizados #
Os usuários não verão os campos personalizados até que você os ative. Para ativar os campos personalizados:
1. Acesse as Configurações do espaço de trabalho
2. Clique em Campos personalizados
3. Arraste o campo da coluna Disponível e solte-o no espaço Visível na coluna Ativo.
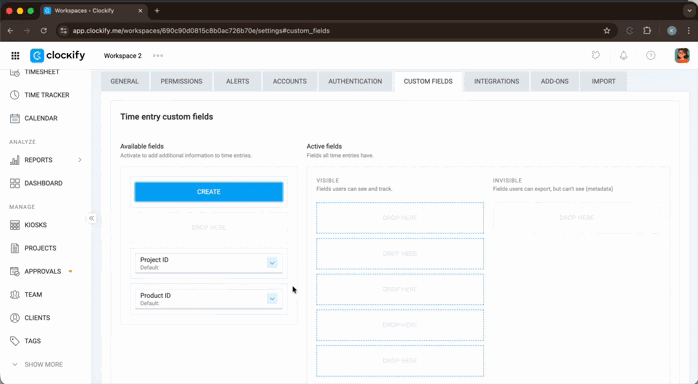
É permitido um máximo de cinco (5) campos visíveis ativos para todo o espaço de trabalho.
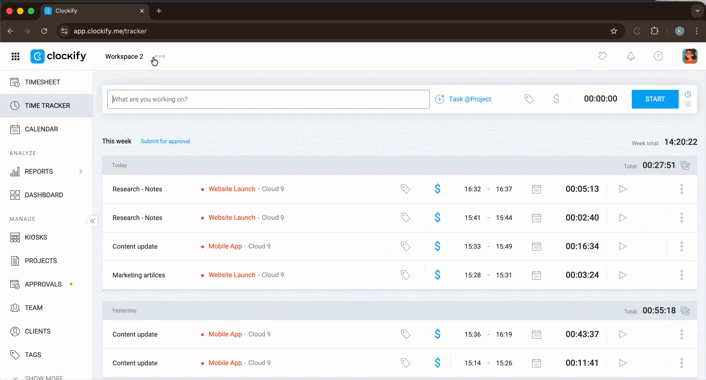
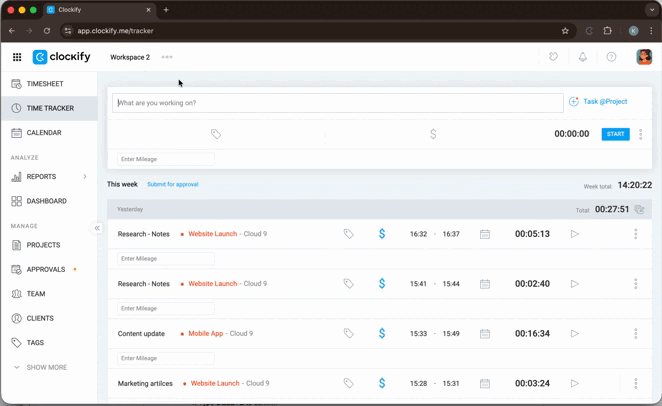
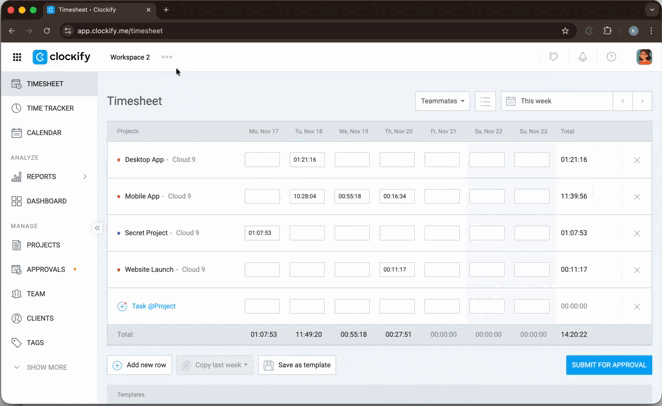
Os campos ativos e visíveis aparecerão na Planilha de horas e no Rastreador de Tempo para todos no espaço de trabalho.
Campos invisíveis #
Os campos invisíveis não são visíveis para os usuários. No entanto, eles existirão nos registros e aparecerão nas exportações em Excel/CSV do Relatório detalhado.
Os campos invisíveis são usados para:
- Herdar automaticamente metadados (como o ID do projeto) do projeto.
- Atualizar entradas via API ou integrações
Personalize os campos por projeto #
Você pode substituir as configurações do espaço de trabalho e aplicar campos personalizados a projetos individuais.
1. Acesse a página Projetos
2. Clique no projeto
3. Acesse as Configurações
4. Clique em Campos Personalizados
5. Encontre a seção Campos Adicionais
6. Gerencie a visibilidade e defina os valores padrão para os campos ativos
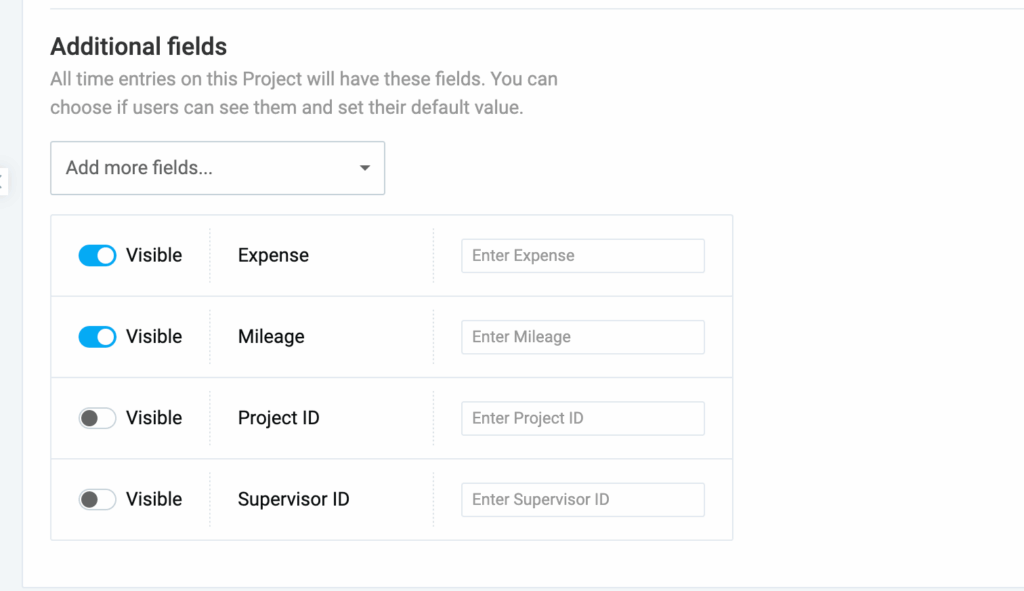
Você pode ter até 10 campos visíveis em um único projeto.
Tenha cuidado ao definir valores padrão em um projeto. Um valor padrão sempre substitui qualquer valor de campo personalizado existente em um registro de tempo quando um usuário altera o projeto associado ao registro.
Uso avançado #
Você pode usar os quatro mecanismos principais abaixo para personalizar seu fluxo de trabalho:
| Permissões | Visibilidade | Valor padrão | Caso de uso |
| Todos | Visível | Vazio | Capturar entrada do usuário (por exemplo, quilometragem, recibos) |
| Todos | Invisível | Herda | Adicionar metadados do projeto (por exemplo, ID do projeto) |
| Administradores | Visível | Herda | Exibir informações do projeto para o usuário referência |
| Administradores | Invisível | Vazio | Preparar entradas para atualizações de API exclusivas para administradores |
Tornar um campo personalizado obrigatório #
Você pode definir um campo personalizado como obrigatório para garantir que os usuários sempre insiram dados nesse campo.
1. Defina o campo personalizado como Visível
2. Defina Quem pode editar como Todos ou defina um valor padrão
3. Navegue até Configurações do Espaço de Trabalho > Geral
4. Selecione o campo na seção Não permitir salvar a hora sem
Editar campo personalizado #
Ao editar um campo, a alteração não afeta as entradas anteriores. Você precisa atualizar manualmente as entradas de tempo existentes para adicionar um campo recém-criado ou alterar seu valor.
Para editar um campo:
1. Navegue até Configurações do Espaço de Trabalho
2. Selecione Campos Personalizados
3. Encontre o campo que deseja editar na coluna Ativos ou Disponíveis
4. Clique no botão expandir ao lado do nome do campo
5. Faça as alterações:
- Modifique o nome do campo.
- Alterar a permissão Quem pode editar
- Atualize as opções (para os campos Selecionar/Selecionar Vários)
6. Clique em Salvar para aplicar as alterações.

Desativar campo personalizado #
Desativar um campo é útil se você deseja manter os dados de entradas anteriores, mas não quer usar o campo em novas entradas.
Para desativar um campo:
1. Acesse Configurações do espaço de trabalho > Campos personalizados
2. Mova o campo da coluna Campos ativos para a coluna Campos disponíveis.
Excluir campo personalizado #
Ao excluir um campo personalizado, o campo e todos os seus dados são removidos permanentemente de todos os registros de tempo no espaço de trabalho. Não há opção de desfazer.
Para excluir um campo personalizado:
1. Acesse Configurações do espaço de trabalho > Campos personalizados
2. Clique no botão de expansão ao lado do nome do campo que deseja excluir
3. Role para baixo e clique em Excluir
4. Digite EXCLUIR para confirmar

Campos personalizados em relatórios #
Você pode recuperar dados de campos personalizados para análise em tabelas dinâmicas usando o recurso exportar CSV/Excel no Relatório Detalhado.
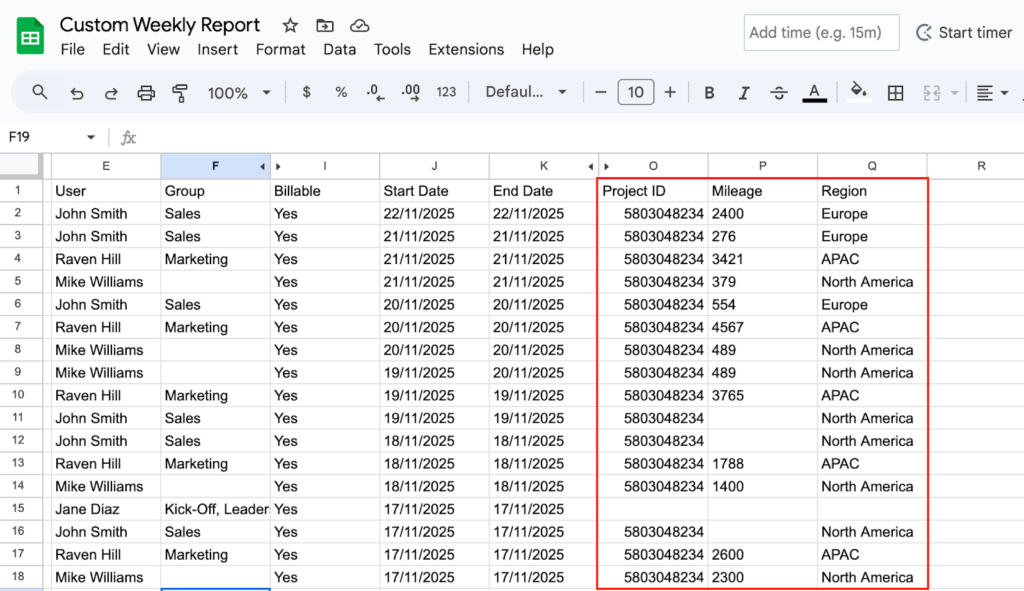
Os dados podem ser filtrados usando campos personalizados e isso não afetará outros usuários.
Baixar exemplo de relatório (Excel)
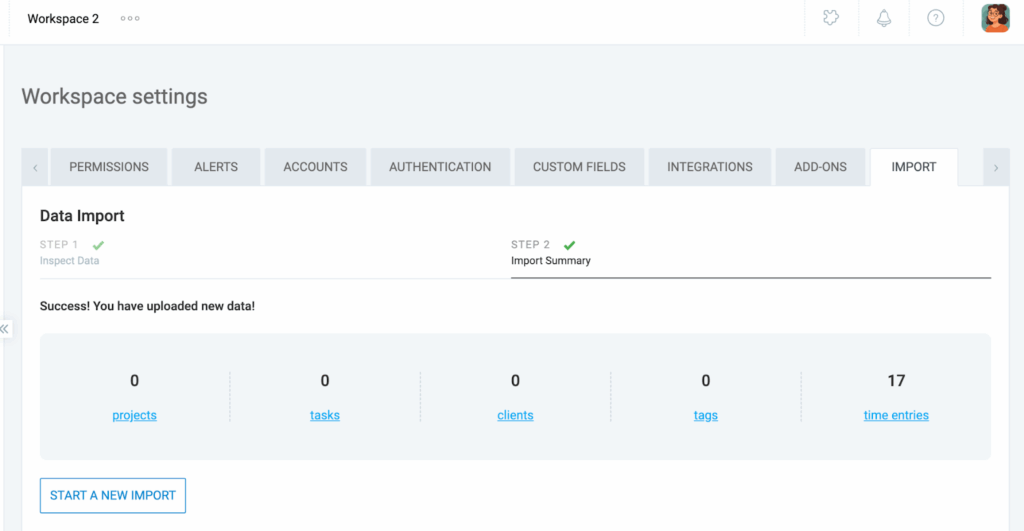
Importar campos personalizados #
Os dados de campos personalizados podem ser importados usando um arquivo CSV que contenha registros de tempo. Certifique-se de que os cabeçalhos das colunas estejam em inglês e que o formato de duração do tempo corresponda às configurações do seu espaço de trabalho.
- Acesse Configurações do Espaço de Trabalho > Importar.
- Faça o upload do seu arquivo CSV.
- Revise a análise de importação e clique em Iniciar importação.