Complemento de QuickBooks Payroll
El complemento QuickBooks Payroll te permite conectar tu espacio de trabajo de Clockify para sincronizar tu seguimiento del tiempo, informes financieros y procesamiento de nómina con Quickbooks Online.
Este es un complemento de pago que requiere una suscripción separada de tu plan de Clockify. La tarifa de suscripción adicional es de 6,99 $ por mes para todo el espacio de trabajo.
Antes de empezar #
Para que Clockify y QuickBooks se comuniquen correctamente, los nombres de tus usuarios y clientes deben coincidir exactamente en ambos sistemas.
- Coincidencia de empleados: El Nombre de usuario en Clockify (que se encuentra en la Configuración del perfil) debe ser idéntico al Nombre para mostrar del empleado en QuickBooks.
- Coincidencia de clientes: El Nombre del proyecto en Clockify debe ser idéntico al Nombre del cliente (o nombre del proyecto) en QuickBooks.
Instalar el complemento #
Para instalar el complemento:
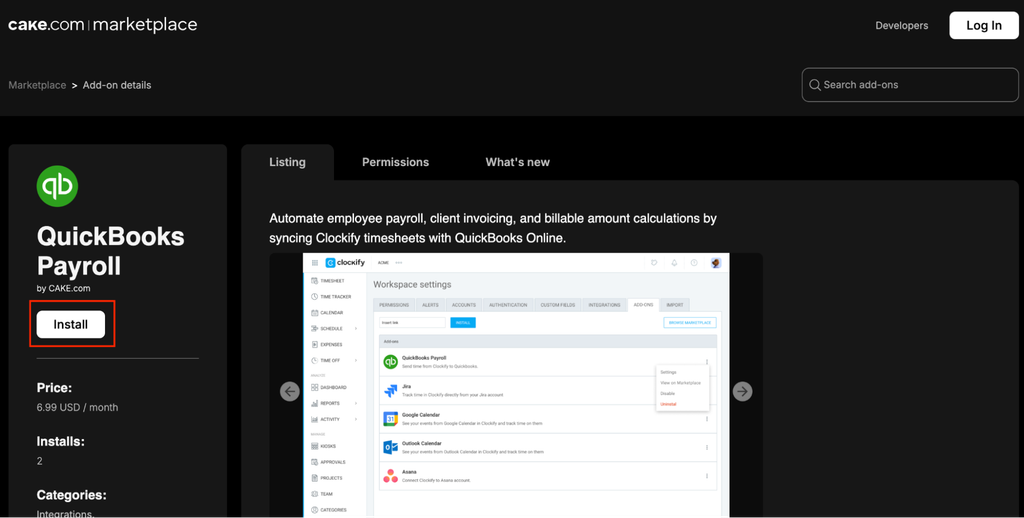
- Ve a Marketiplace de CAKE.com
- Selecciona Quickbooks Payroll de la lista de complementos
- Haz clic en Instalar
- Sigue las indicaciones para completar la instalación
Conectar tus cuentas #
Para empezar a conectar tu cuenta Clockify con Quickbooks:
- Inicia sesión en tu cuenta Clockify
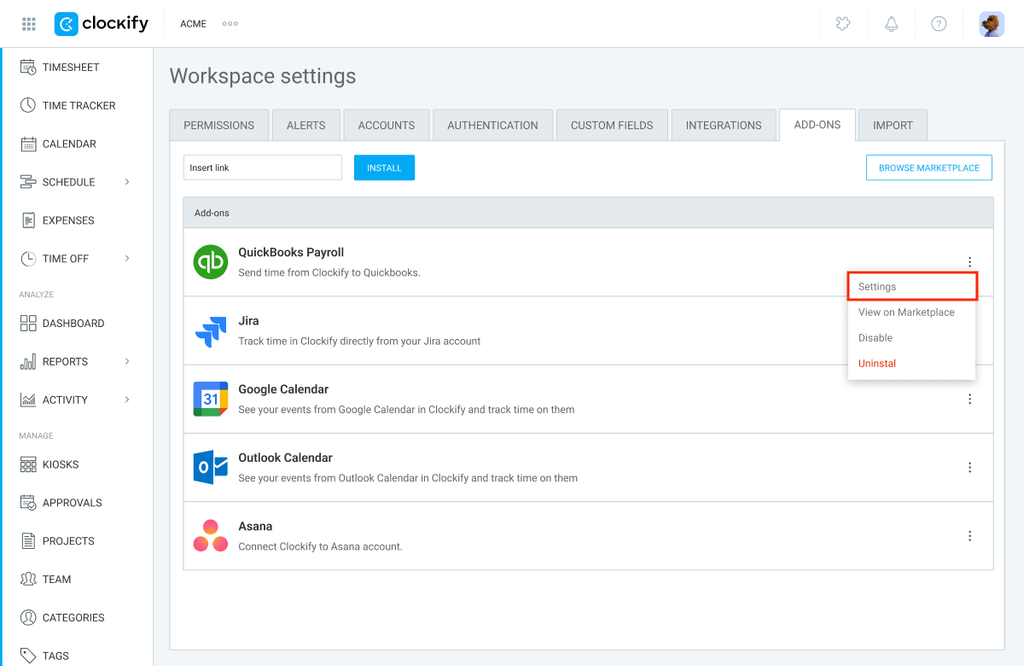
- Haz clic en el icono de los tres puntos junto al nombre de tu espacio de trabajo
- Ve a Configuración del espacio de trabajo
- Haz clic en la pestaña Complementos
- Haz clic en el icono de tres puntos al lado de QuickBooks Payroll
- Elige Configuración
7. Haz clic en Conectar con QuickBooks
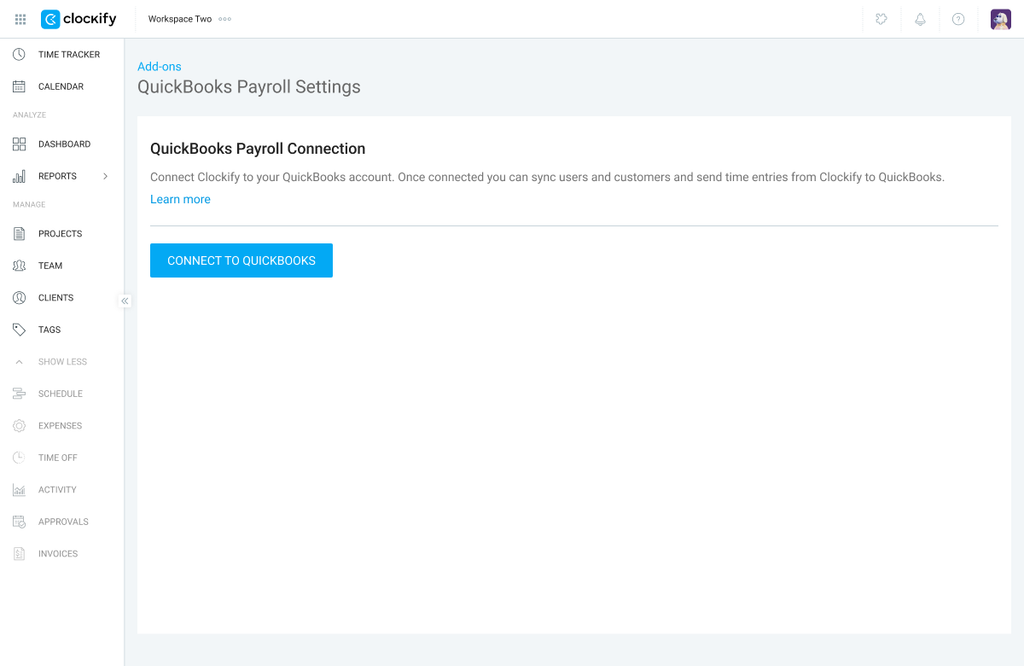
Asegúrate de tener a mano tus datos de inicio de sesión de QuickBooks para autorizar la conexión fácilmente.
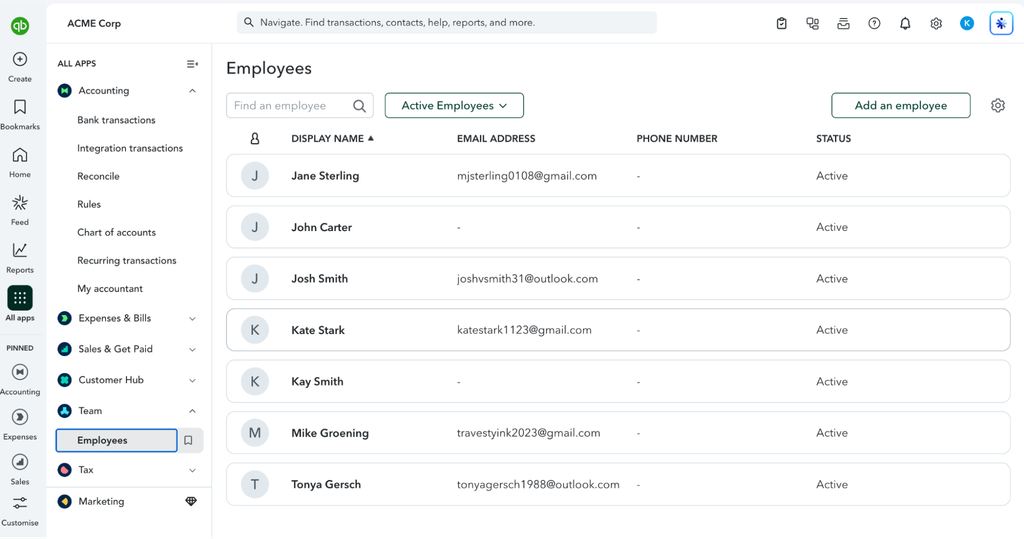
Una vez completada la integración con éxito, deberías poder ver a tu equipo en tu cuenta de QuickBooks accediendo a Team > Employees.
Enviar entradas de tiempo a QuickBooks #
Para enviar entradas de tiempo a QuickBooks desde Clockify:
- Ve a Informes > Detallado
- Filtra los informes según sea necesario (p. ej., por cliente, miembro del equipo, proyecto o rango de fechas)
- Haz clic en el menú desplegable Acciones situado sobre la tabla
- Selecciona Enviar a QuickBooks Payroll
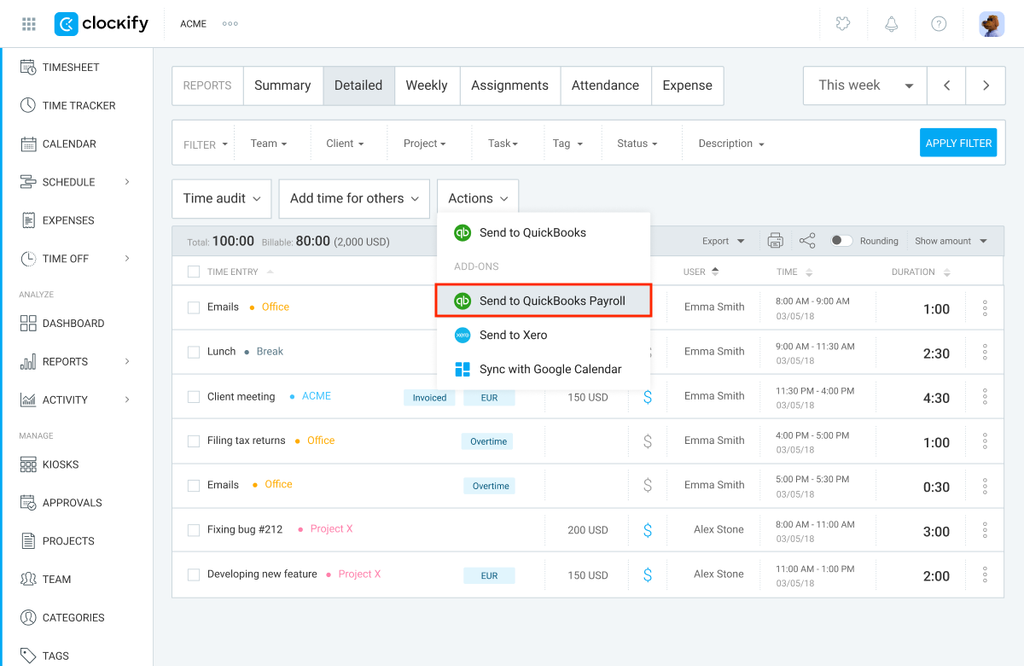
Debería aparecer una ventana emergente para confirmar que las entradas se enviaron a QuickBooks.
¿Qué se envía?
Clockify enviará lo siguiente:
- Nombre del usuario
- Fecha
- Proyecto (Cliente)
- Duración
- Descripción
- Estado de facturabilidad
- Tarifa facturable
Una vez enviadas, las entradas se marcan como "Enviadas" en Clockify y no se pueden volver a enviar.
Para buscar entradas enviadas en Quickbooks, ve a QuickBooks Reports y abre Time Activities by employee Detailed Report.
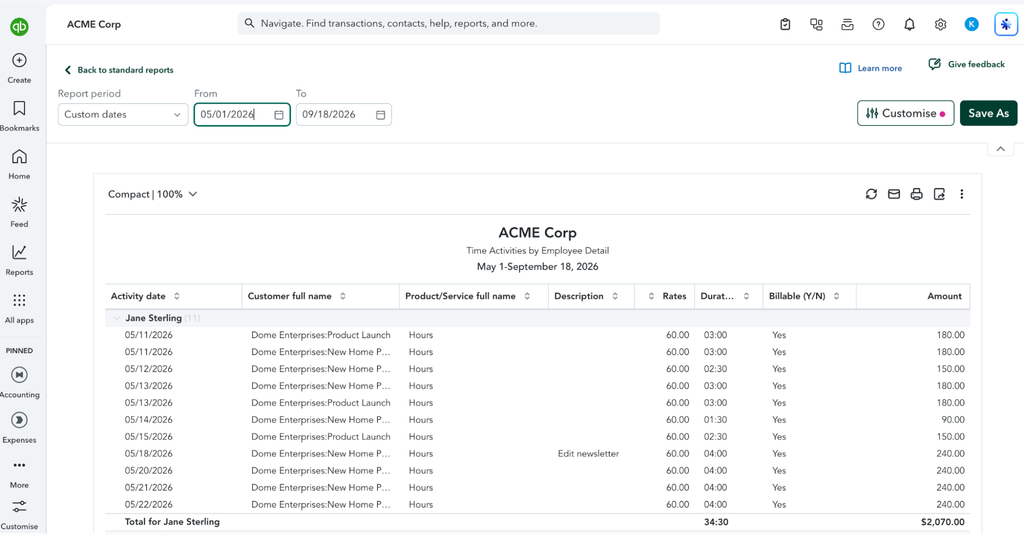
La duración máxima de una entrada de tiempo individual que se puede enviar desde Clockify a QuickBooks es de 23 horas y 55 minutos. Las entradas de tiempo que superen este límite no se sincronizarán correctamente. Divide el tiempo registrado en dos o más entradas separadas dentro de Clockify antes de exportar los datos a QuickBooks.
Filtrar entradas #
Puedes filtrar las entradas de tiempo en el Informe detallado para ver cuáles se han enviado a QuickBooks y cuáles no.
1. Ve a Informes > Detallado
2. Establece el intervalo de fechas mediante el calendario
3. Aplica filtros adicionales según los datos que necesites
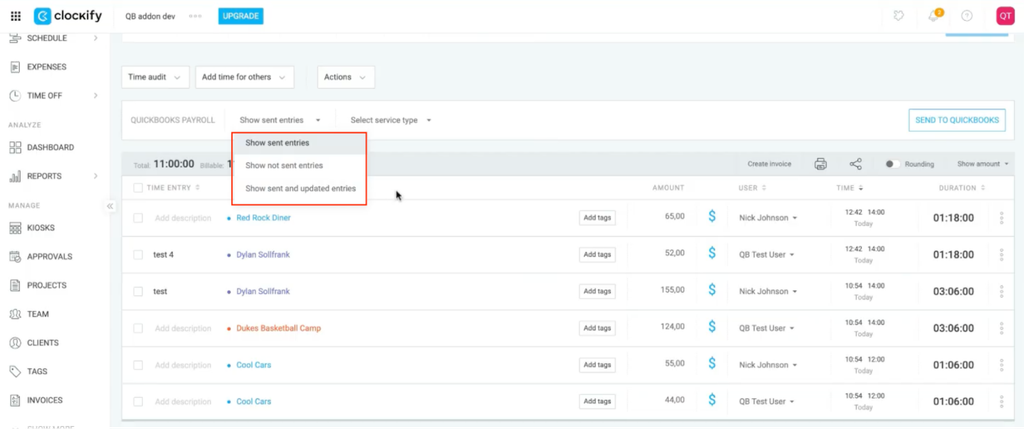
4. Haz clic en Mostrar entradas enviadas para desplegar el menú
5. Selecciona una de las siguientes opciones:
- Mostrar entradas enviadas: Muestra las entradas que se han exportado correctamente a QuickBooks.
- Mostrar entradas no enviadas: Muestra las entradas que aún no se han enviado o cuya exportación ha fallado.
- Mostrar entradas enviadas y actualizadas: Muestra las entradas que se exportaron anteriormente pero que se modificaron después. Si quieres actualizar estas entradas en QuickBooks, deberás enviarlas de nuevo.
Configurar tipos de servicio #
Los tipos de servicio creados en QuickBooks se sincronizan directamente con Clockify. Puedes elegir el tipo de servicio adecuado para tus entradas antes de enviarlas a QuickBooks.
1. Ve a Informes > Detallado
2. Filtra los datos que quieres enviar a QuickBooks
3. Haz clic en el menú desplegable Seleccionar tipo de servicio
4. Selecciona el tipo de servicio que quieres de la lista
5. Haz clic en Enviar a QuickBooks Payroll
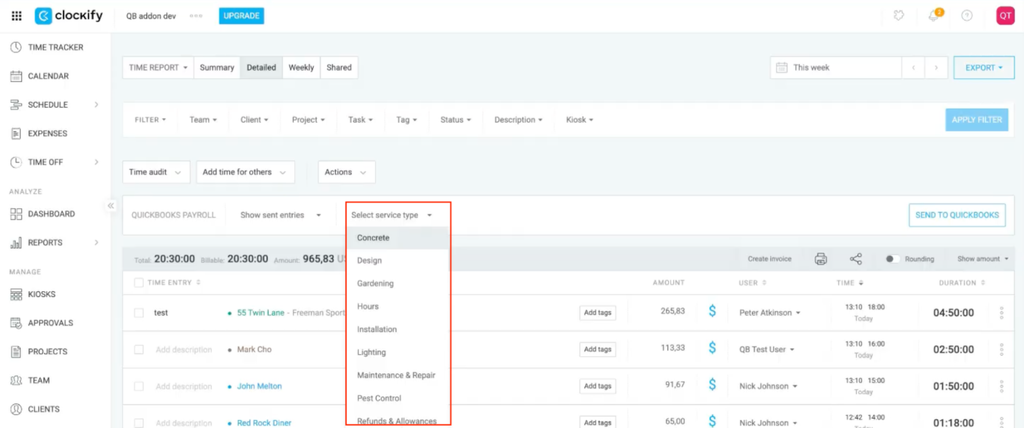
Si no seleccionas un tipo de servicio, QuickBooks lo asigna a la categoría de servicio predeterminada.
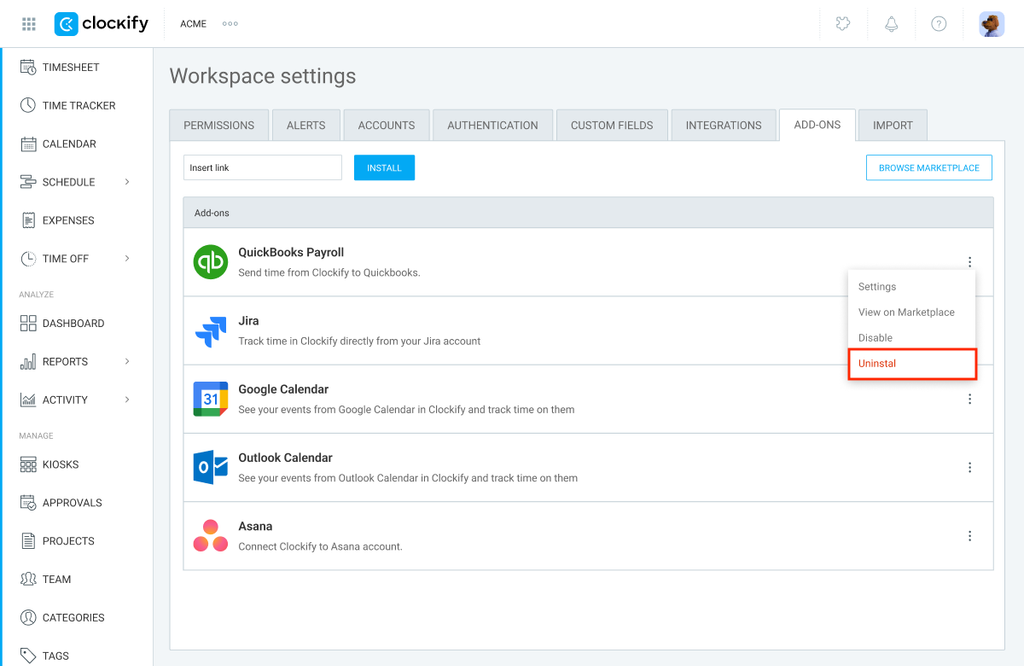
Desinstalar el complemento #
Para desinstalar el complemento de QuickBooks:
- Ve a Configuración del espacio de trabajo
- Haz clic en la pestaña Complementos
- Haz clic en el icono de los tres puntos junto a QuickBooks Payroll
- Haz clic en Desinstalar
- Confirma la acción
Preguntas frecuentes #
¿Qué debo hacer si la integración se bloquea o los datos fallan repetidamente al procesarse?
Si la asignación de datos es correcta pero la sincronización no se realiza correctamente, reiniciar el protocolo de enlace de la API suele solucionar el error:
- Ve a Configuración de espacio de trabajo de Clockify > pestaña Complementos
- Selecciona la flecha desplegable junto a QuickBooks y haz clic en Desconectar
- Confirma la acción
- Haz clic en Conectar con QuickBooks de nuevo y sigue las instrucciones para completar una nueva autorización