QuickBooks Payroll Add-on
Das QuickBooks Payroll Add-on ermöglicht es dir, deinen Clockify-Arbeitsbereich zu verbinden, um deine Zeiterfassung, Finanzberichte und Lohnabrechnungen mit QuickBooks Online zu synchronisieren.
Diese Funktion ist ein kostenpflichtiges Add-on, das ein separates Abonnement neben deinem Clockify-Tarif erfordert. Die Add-on-Abonnementgebühr beträgt 6,99 $ pro Monat für den gesamten Arbeitsbereich.
Bevor du beginnst #
Damit Clockify und QuickBooks korrekt miteinander kommunizieren können, müssen die Namen deiner Nutzer und Kunden in beiden Systemen perfekt übereinstimmen.
- Mitarbeiter abgleichen: Der Benutzername in Clockify (zu finden in den Profileinstellungen) muss absolut identisch mit dem Anzeigenamen des Mitarbeiters in QuickBooks sein.
- Kunden abgleichen: Der Projektname in Clockify muss absolut identisch mit dem Kundennamen (oder Projektnamen) in QuickBooks sein.
Add-on installieren #
Um das Add-on zu installieren:
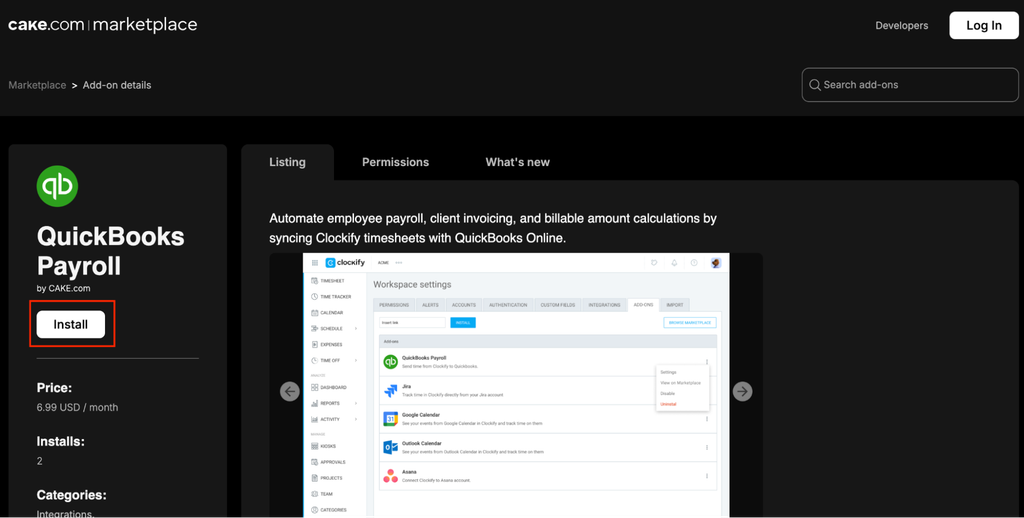
- Gehe zu CAKE.com-Marketplace
- Wähle QuickBooks Payroll aus der Liste der Add-ons aus
- Klicke auf Installieren
- Folge den Anweisungen, um die Installation abzuschließen
Konten verknüpfen #
Um dein Clockify-Konto mit QuickBooks zu verbinden:
- Melde dich bei deinem Clockify-Konto an
- Klicke auf das Drei-Punkte-Symbol neben deinem Arbeitsbereichsnamen
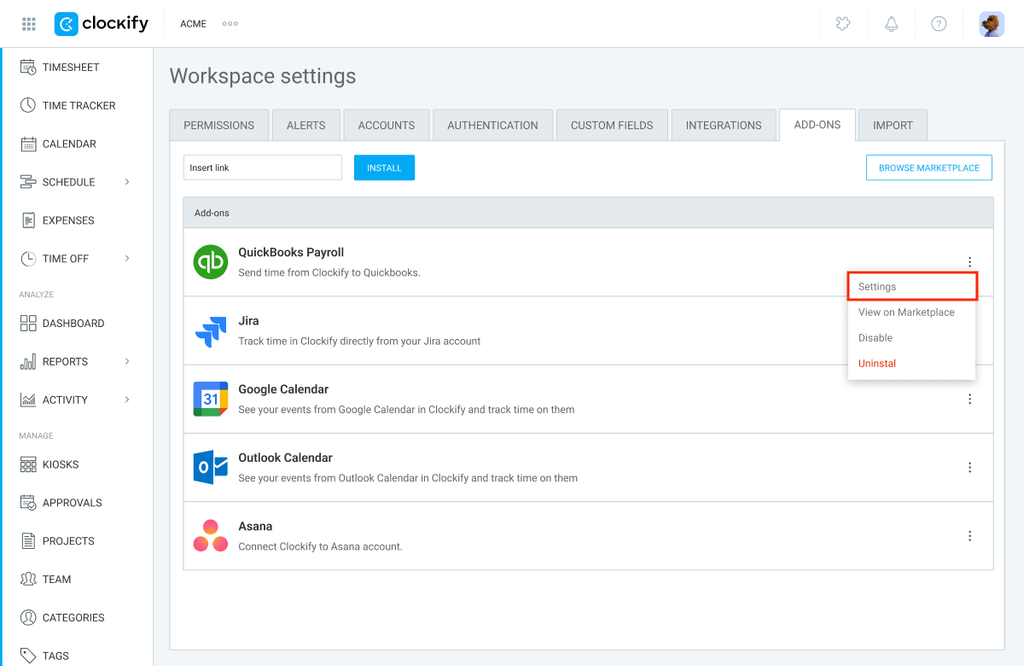
- Gehe zu Arbeitsbereichseinstellungen
- Klicke auf die Registerkarte Add-ons
- Klicke auf das Drei-Punkte-Symbol neben QuickBooks Payroll
- Wähle Einstellungen
7. Klicke auf Mit QuickBooks verbinden
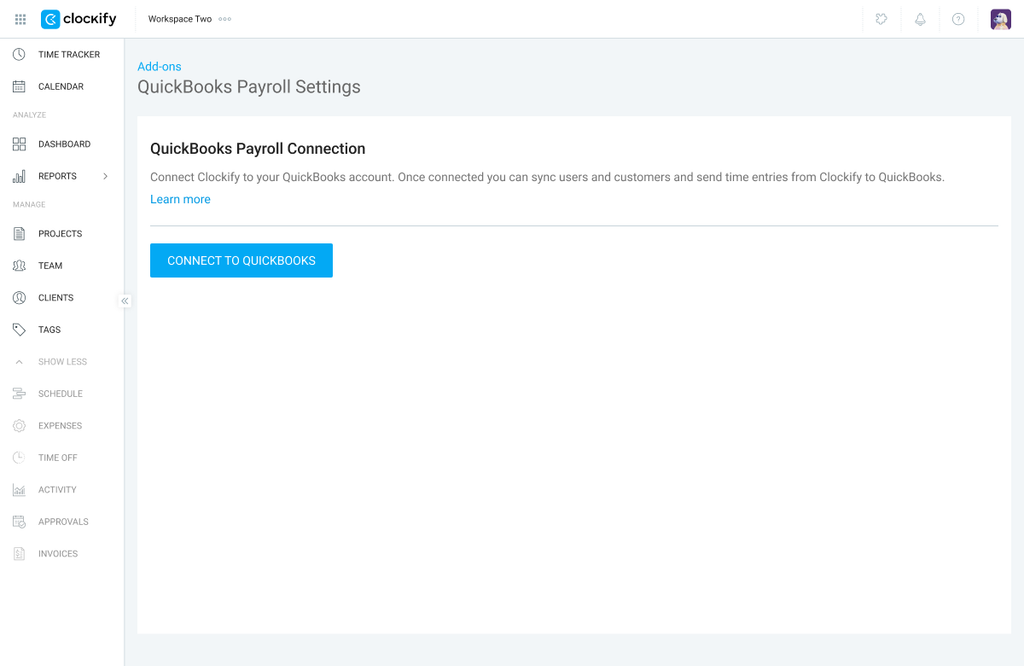
Halte deine QuickBooks-Anmeldedaten bereit, um die Verbindung mühelos zu autorisieren.
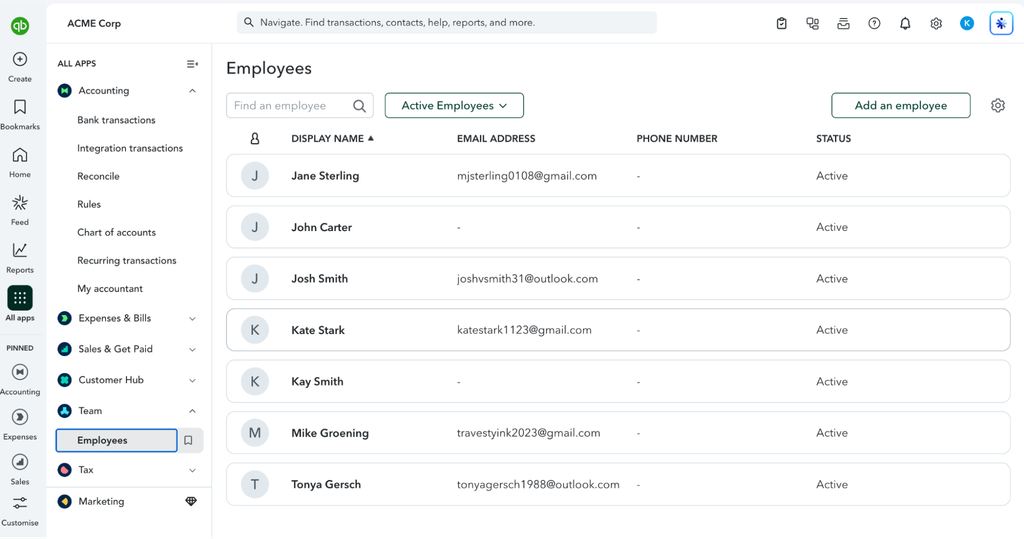
Nach erfolgreicher Integration solltest du dein Team in deinem QuickBooks-Konto unter Team > Employees sehen können.
Zeiteinträge an QuickBooks senden #
Um Zeiteinträge aus Clockify an QuickBooks zu senden:
- Gehe zu Berichte > Detailliert
- Filtere die Berichte nach Bedarf (z. B. nach Kunde, Teammitglied, Projekt oder Datumsbereich)
- Klicke oben über der Tabelle auf das Dropdown-Menü Aktionen
- Wähle An QuickBooks Payroll senden
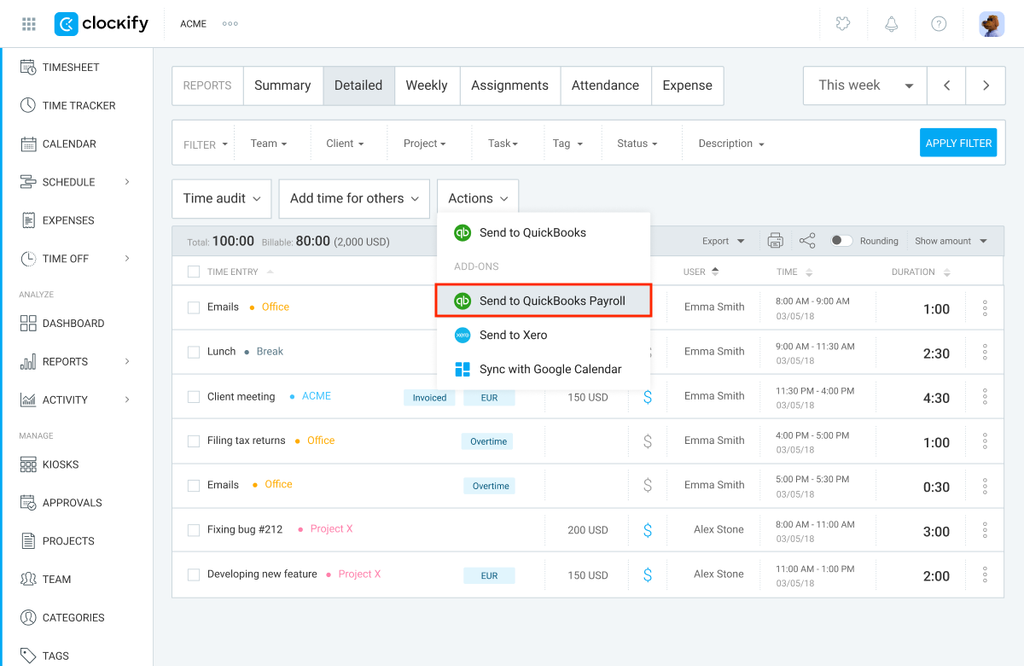
Es erscheint ein Pop-up-Fenster, das bestätigt, dass die Einträge an QuickBooks gesendet wurden.
Was wird übertragen?
Clockify übermittelt die folgenden Daten:
- Name des Nutzers
- Datum
- Projekt (Kunde)
- Dauer
- Beschreibung
- Abrechnungsstatus
- Abrechnungssatz
Sobald die Einträge übertragen wurden, werden sie in Clockify als „Gesendet“ markiert und können kein zweites Mal übertragen werden.
Um gesendete Einträge in QuickBooks zu finden, gehe zu den QuickBooks Reports und öffne Time Activities by employee Detailed Report
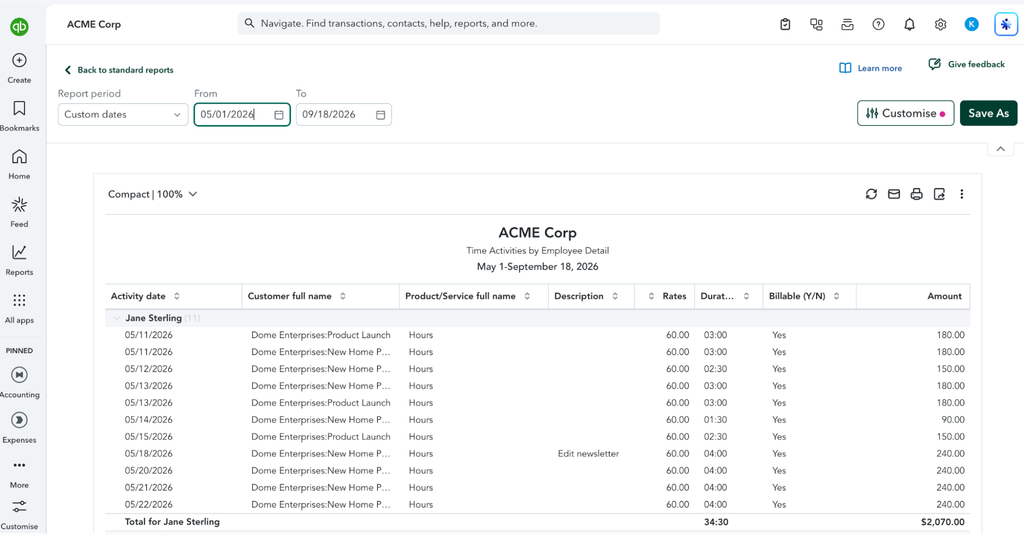
Die maximale Dauer für einen einzelnen Zeiteintrag, der von Clockify an QuickBooks gesendet werden kann, beträgt 23 Stunden und 55 Minuten. Einträge, die dieses Limit überschreiten, werden nicht erfolgreich synchronisiert. Teile die erfasste Zeit vor dem Export in zwei oder mehr separate Einträge in Clockify auf.
Einträge filtern #
Du kannst Zeiteinträge im Detaillierten Bericht filtern, um gesendete und nicht gesendete Einträge an QuickBooks anzuzeigen.
1. Gehe zu Berichte > Detailliert
2. Stelle den Datumsbereich mithilfe des Kalenders ein
3. Wende zusätzliche Filter entsprechend den von dir benötigten Daten an
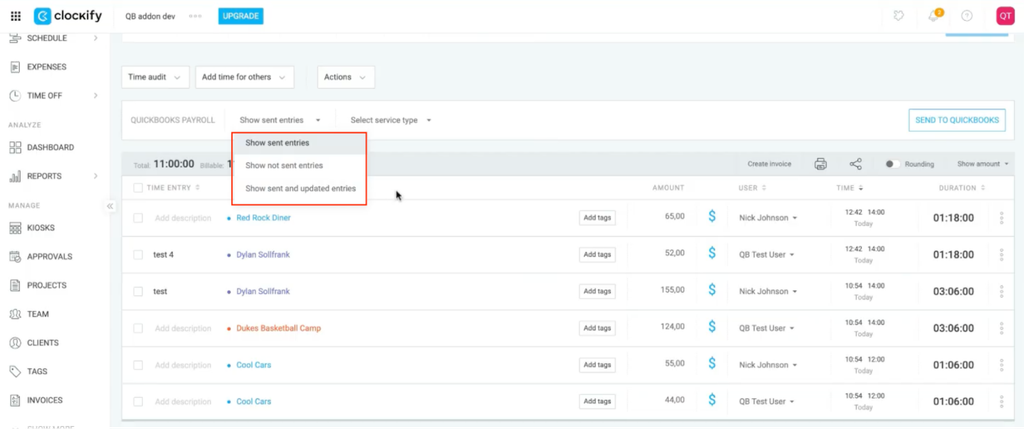
4. Klicke auf Gesendete Einträge anzeigen, um das Dropdown-Menü zu öffnen
5. Wähle eine der folgenden Optionen aus:
- Gesendete Einträge anzeigen: Zeigt Einträge an, die erfolgreich an QuickBooks exportiert wurden.
- Nicht gesendete Einträge anzeigen: Zeigt Einträge an, die noch nicht gesendet wurden oder beim Export fehlgeschlagen sind.
- Gesendete und aktualisierte Einträge anzeigen: Zeigt Einträge an, die zuvor exportiert, aber nachträglich geändert wurden. Wenn du diese Einträge in QuickBooks aktualisieren möchtest, musst du sie erneut senden.
Dienstleistungstypen festlegen #
In QuickBooks erstellte Dienstleistungstypen werden direkt mit Clockify synchronisiert. Du kannst den passenden Dienstleistungstyp für deine Einträge auswählen, bevor du sie an QuickBooks sendest.
1. Gehe zu Berichte > Detailliert
2. Filter die Daten, die du an QuickBooks senden möchtest
3. Klicke auf das Dropdown-Menü Dienstleistungstyp auswählen
4. Wähle den gewünschten Dienstleistungstyp aus der Liste aus
5. Klicke auf An QuickBooks Payroll senden
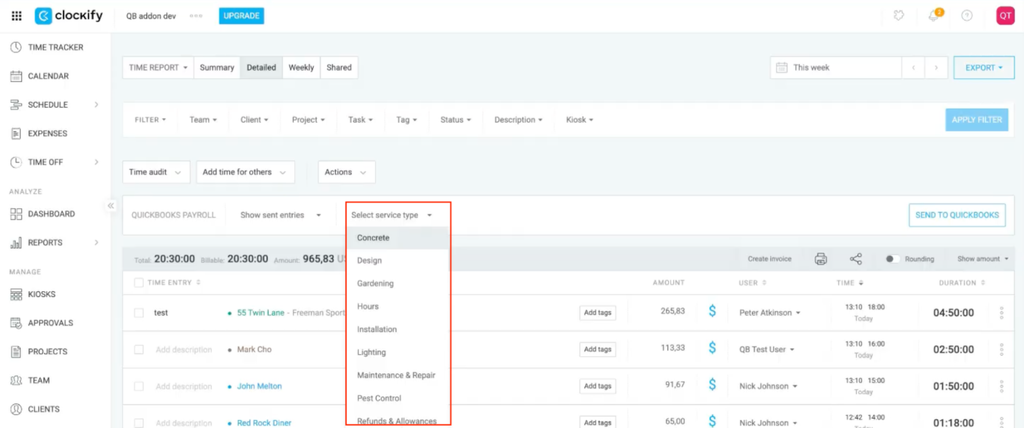
If you don’t select a service type, Quickbooks sets it to the default Service category.
Add-on deinstallieren #
Um das QuickBooks Add-on zu deinstallieren:
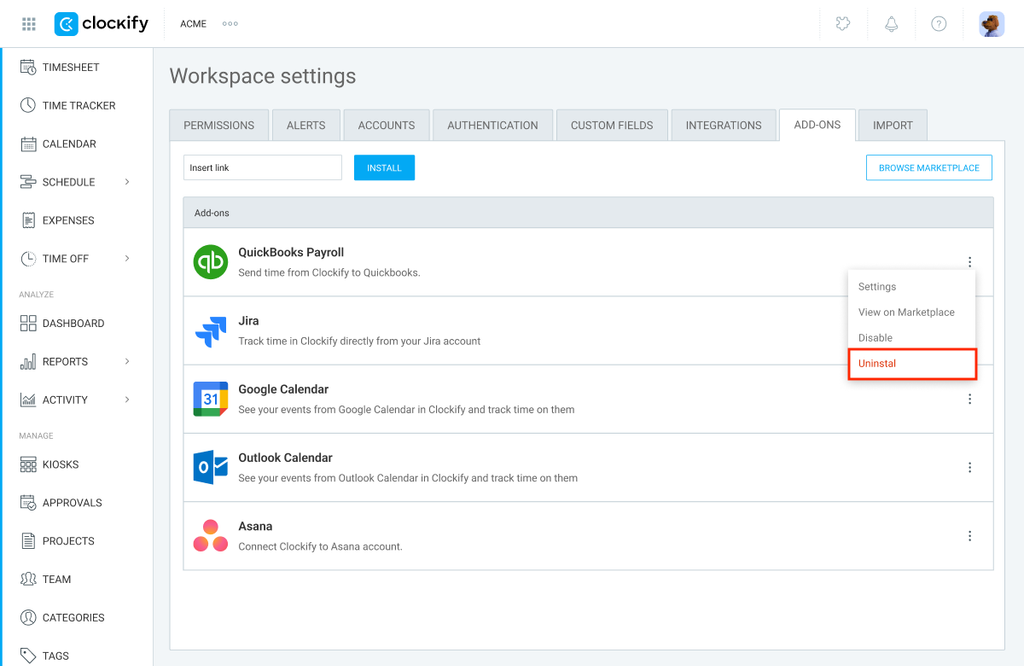
- Gehe zu Arbeitsbereichseinstellungen
- Klicke auf die Registerkarte Add-ons
- Klicke auf das Drei-Punkte-Symbol neben QuickBooks Payroll
- Klicke auf Deinstallieren
- Bestätige die Aktion
Häufig gestellte Fragen #
Was soll ich tun, wenn die Integration hängen bleibt oder die Datenverarbeitung wiederholt fehlschlägt?
Wenn deine Datenzuordnung absolut korrekt ist, die Synchronisierung aber dennoch fehlschlägt, lässt sich der Fehler meist durch das Zurücksetzen der API-Verbindung beheben:
- Gehe zu den Clockify-Arbeitsbereichseinstellungen > Registerkarte Add-ons
- Klicke auf den Dropdown-Pfeil neben QuickBooks und wähle Trennen
- Bestätige die Aktion
- Klicke erneut auf Mit QuickBooks verbinden und folge den Anweisungen, um eine frische Neuautorisierung durchzuführen