QuickBooks Payroll add-on
The QuickBooks Payroll add-on lets you connect your Clockify workspace to sync your time tracking, financial reporting, and payroll processing with Quickbooks Online.
This is a paid add-on that requires a separate subscription from your Clockify plan. The add-on subscription fee is $6.99 per month for the whole workspace.
Before you begin #
For Clockify and QuickBooks to communicate properly, the names of your users and clients must match perfectly in both systems.
- Match Employees: The User Name in Clockify (found in Profile settings) must be identical to the Employee Display Name in QuickBooks.
- Match Customers: The Project Name in Clockify must be identical to the Customer Name (or Project Name) in QuickBooks.
Install the add-on #
To install the add-on:
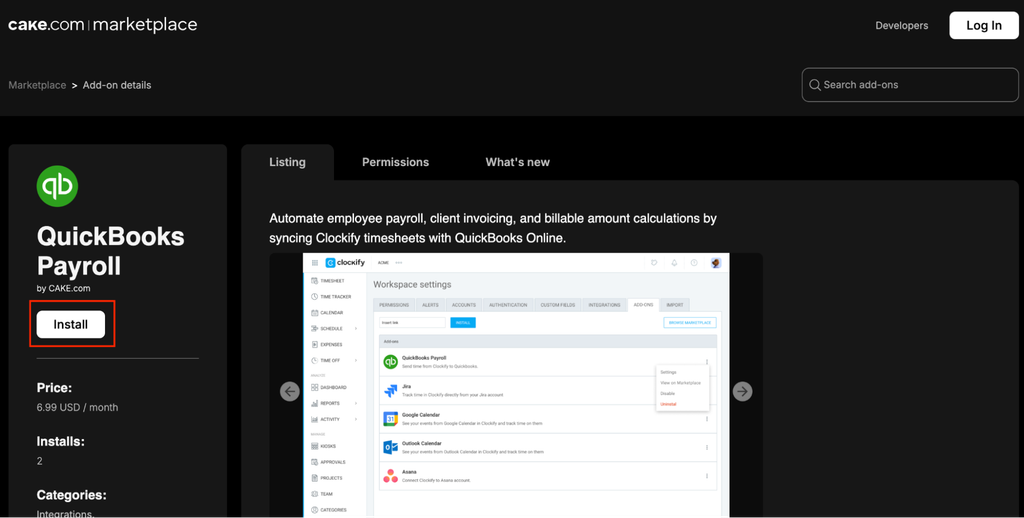
- Go to the CAKE.com Marketplace
- Select Quickbooks Payroll from the list of add-ons
- Click Install
- Follow the prompts to complete the installation
Connect your accounts #
To begin connecting your Clockify account with Quickbooks:
- Log in to your Clockify account
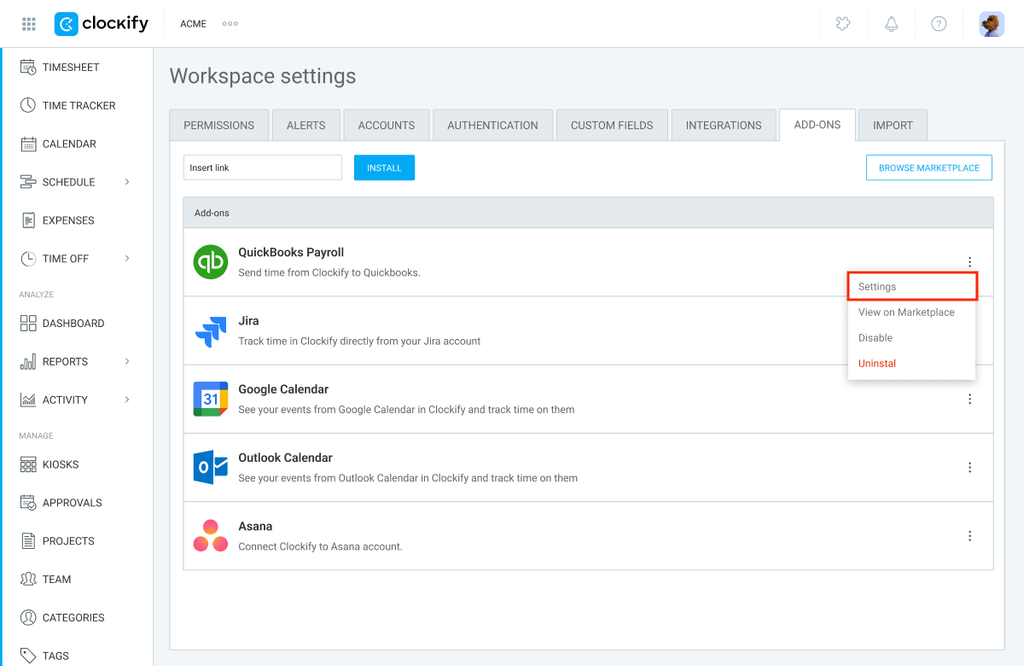
- Click on the three dots icon next to your workspace name
- Go to Workspace Settings
- Click the Add-ons tab
- Click the three dots icon next to QuickBooks Payroll
- Choose Settings
7. Click Connect to Quickbooks
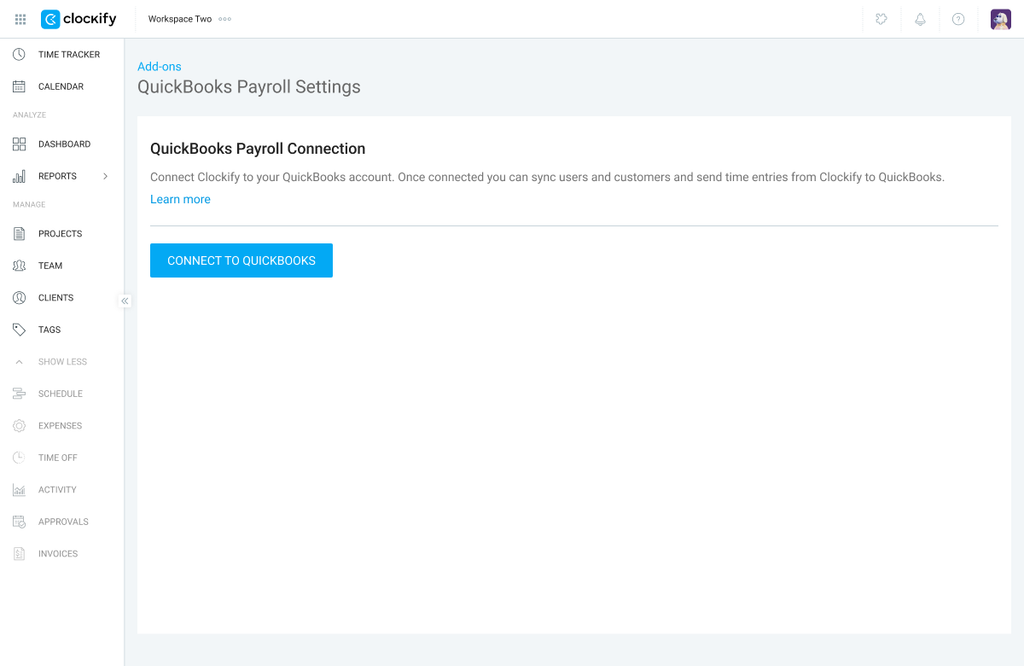
Make sure you have your QuickBooks login details handy to easily authorize the connection.
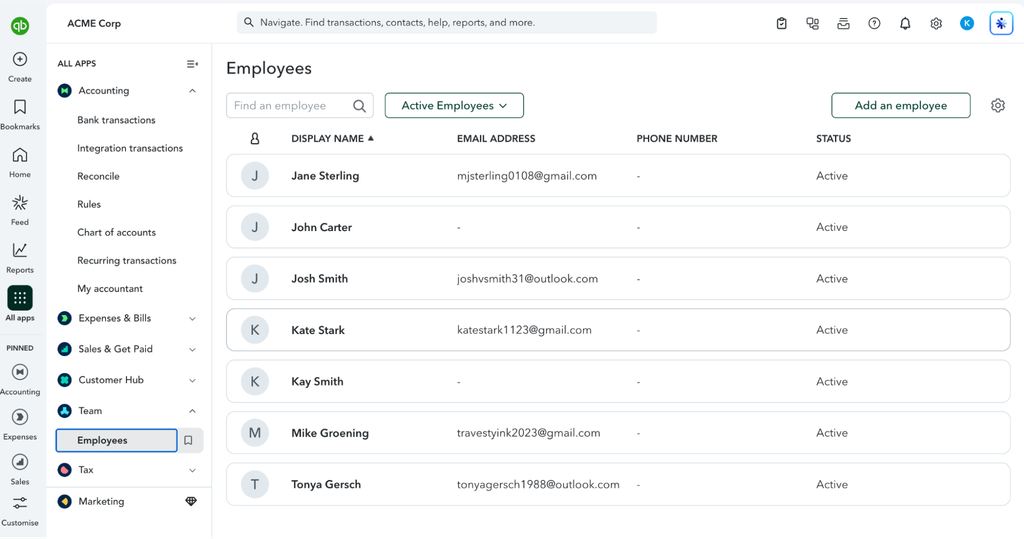
After successfully completing the integration, you should be able to see your team in your Quickbooks account by going to Team > Employees.
Send time entries to Quickbooks #
To send time entries to Quickbooks from Clockify:
- Go to Reports > Detailed
- Filter the reports as needed (e.g., by Client, Team member, Project, or date range)
- Click on the Actions drop down on top of the table
- Select Send to Quickbooks Payroll
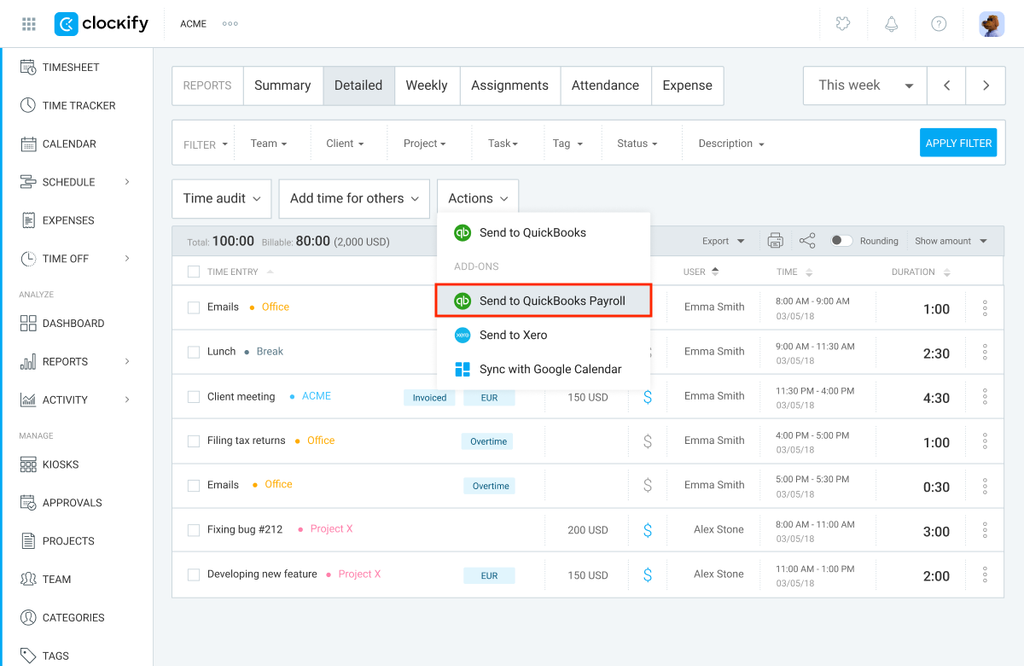
A pop-up window should appear to confirm that entries were sent to QuickBooks.
What gets sent?
Clockify will push the following:
- User’s name
- Date
- Project (Customer)
- Duration
- Description
- Billable status
- Billable rate
Once sent, the entries are marked as “Sent” in Clockify and cannot be sent again.
To find sent entries in Quickbooks, go to QuickBooks Reports and open the Time Activities by employee Detailed Report.
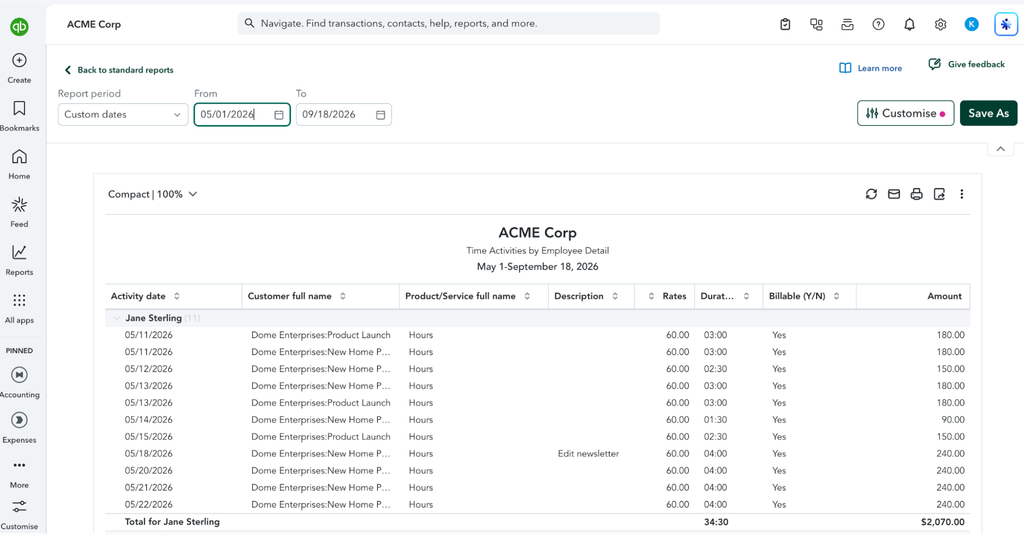
The maximum duration for an individual time entry that can be sent from Clockify to QuickBooks is 23 hours and 55 minutes. Time entries that exceed this limit will not sync successfully. Split the tracked time into two or more separate entries within Clockify before exporting the data to QuickBooks.
Filter entries #
You can filter time entries in the Detailed Report to view sent and unsent entries to Quickbooks.
1. Go to Reports > Detailed
2. Set the date range using the calendar
3. Apply additional filters according to the data you need
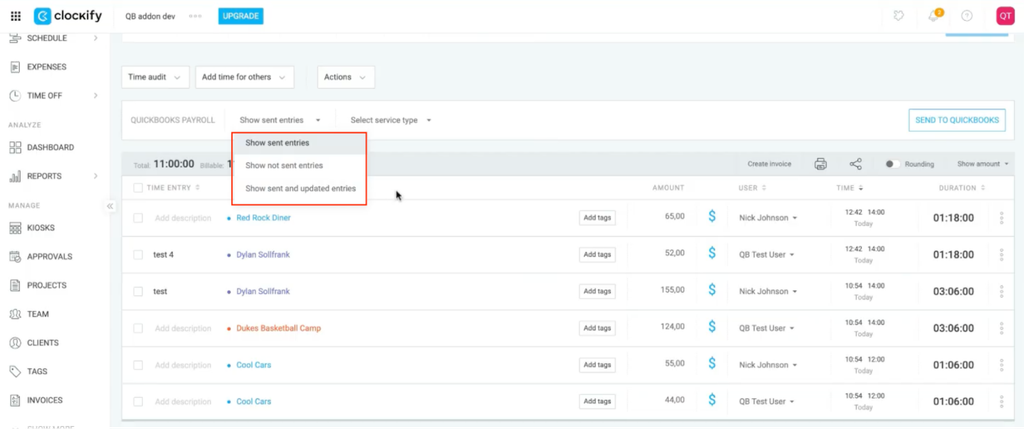
4. Click Show sent entries to expand the dropdown
5. Select any of the following:
- Show sent entries: Displays entries that have been successfully exported to QuickBooks.
- Show not sent entries: Displays entries that have not yet been sent or failed to export.
- Show sent and updated entries: Displays entries that were exported previously but modified afterward. If you wish to update these entries in QuickBooks, you’ll have to send them again.
Set service types #
Service types created in QuickBooks sync directly with Clockify. You can choose the appropriate service type for your entries before sending them over to QuickBooks.
1. Go to Reports > Detailed
2. Filter the data you want to send to Quickbooks
3. Click Select service type dropdown
4. Select the service type you want from the list
5. Click Send to Quickbooks Payroll
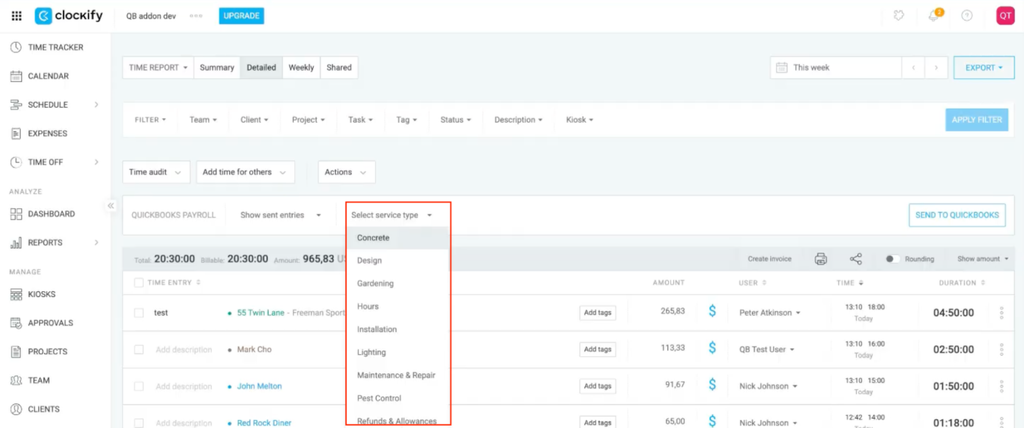
If you don’t select a service type, Quickbooks sets it to the default Service category.
Uninstall add-on #
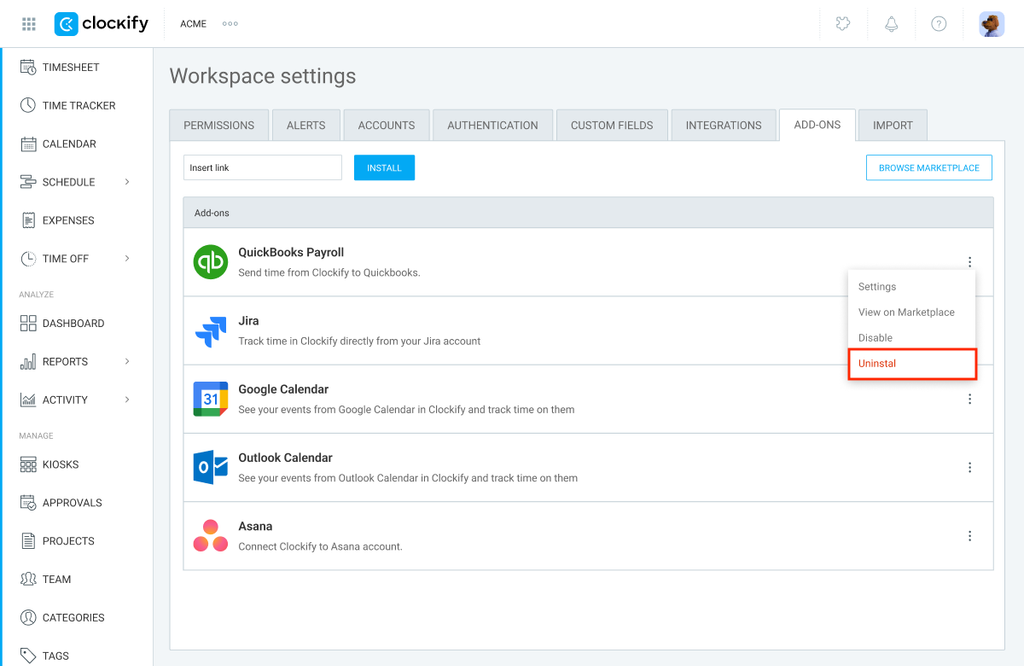
To uninstall the QuickBooks add-on:
- Go to Workspace settings
- Click on the Add-ons tab
- Click the three dots icon next to QuickBooks Payroll
- Click Uninstall
- Confirm the action
Frequently Asked Questions (FAQs) #
What should I do if the integration gets stuck or data fails to process repeatedly?
If your data mapping is completely accurate but the sync remains unsuccessful, resetting the API handshake usually clears the error:
- Go to Clockify Workspace settings > Add-ons tab
- Select the dropdown arrow next to QuickBooks and click Disconnect
- Confirm the action
- Click Connect to QuickBooks again and follow the prompts to complete a fresh reauthorization