Gérer les paramètres de son profil
Vous pouvez facilement personnaliser les paramètres de votre profil afin de personnaliser davantage votre expérience de suivi du temps. Ce guide vous aidera à mettre à jour les informations de votre profil, à définir vos préférences et à gérer les paramètres de votre compte.
Accéder aux paramètres de profil #
Si vous souhaitez mettre à jour vos informations personnelles, telles que votre adresse email ou votre photo de profil, vous pouvez le faire directement depuis votre compte CAKE.com.
- Se connecter à Clockify
- Accédez au sélecteur d’applis dans le coin supérieur gauche de l’écran
- Sélectionnez votre compte CAKE.com
- Cliquez sur votre profil en haut à droite et sélectionnez Mon compte
Mettre à jour les informations personnelles #
Pour mettre à jour vos informations personnelles :
- Accédez à Mon compte sur CAKE.com
- Cliquez sur l'icône en forme de crayon ou sur le bouton Modifier pour mettre à jour les informations suivantes dans votre profil :
- Photo de profil
- Prénom et nom
- Adresse email
Lorsque vous modifiez votre adresse email, vous devez vérifier votre nouvelle adresse avant que la modification ne soit prise en compte dans votre profil.
Définir les préférences de votre profil #
Personnalisez votre thème, votre fuseau horaire, vos notifications et d’autres paramètres de profil selon vos préférences.
Pour accéder aux paramètres de votre profil :
- Cliquez sur votre photo dans le coin supérieur droit (Paramètres du profil)
- Sélectionnez Préférences
Ces paramètres s’appliquent uniquement à l'application Clockify et non à votre compte CAKE.com.
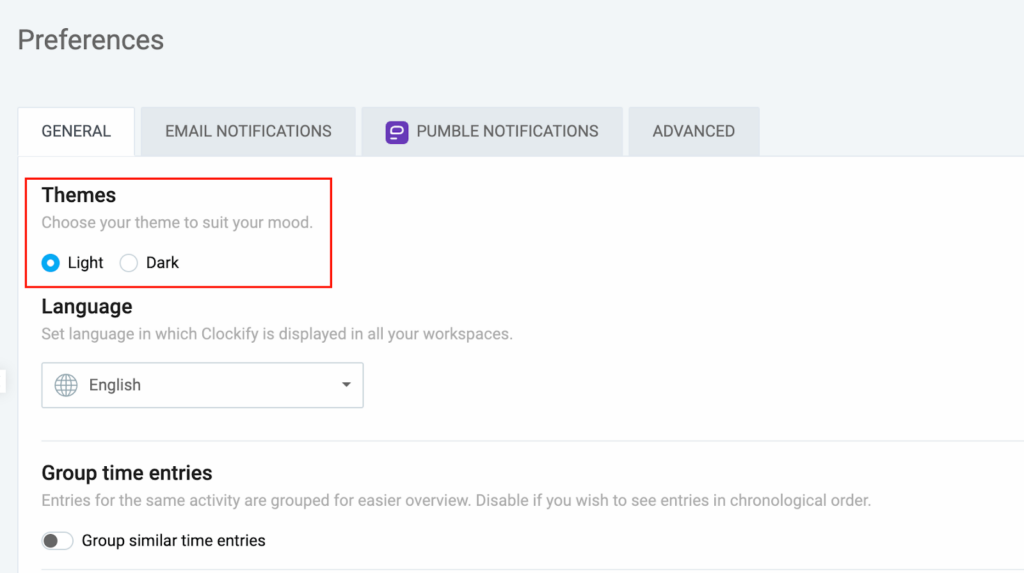
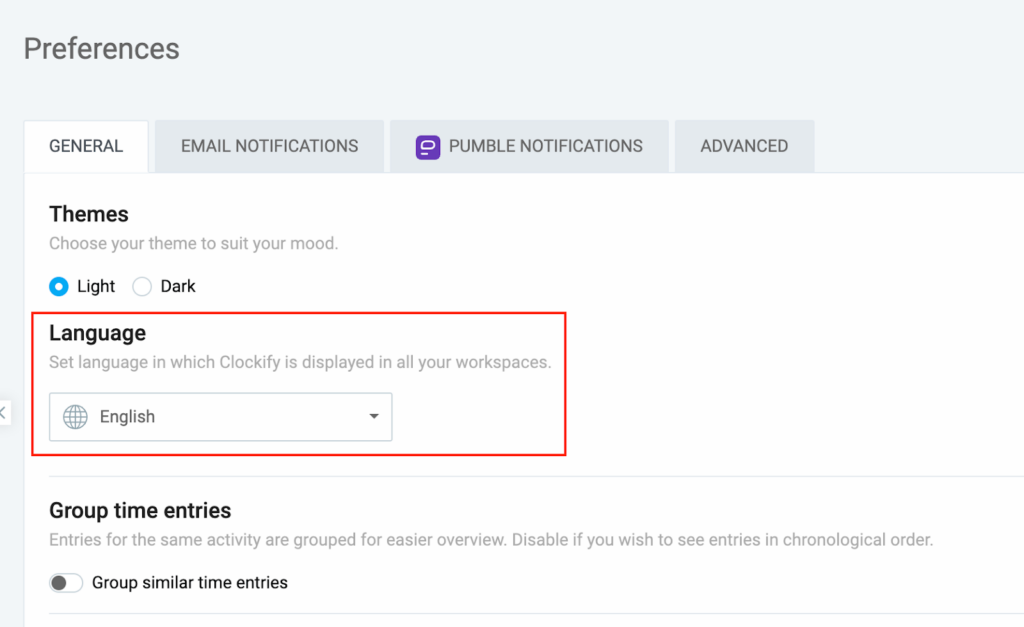
Configurer le thème de votre appli #
- Accédez à Paramètres du profil > Préférences
- Sélectionnez le thème clair ou foncé dans la section Thèmes de l’onglet Général
Choisir la langue #
- Accédez à Paramètres du profil > Préférences
- Choisissez votre langue dans la section Langue de l’onglet Général
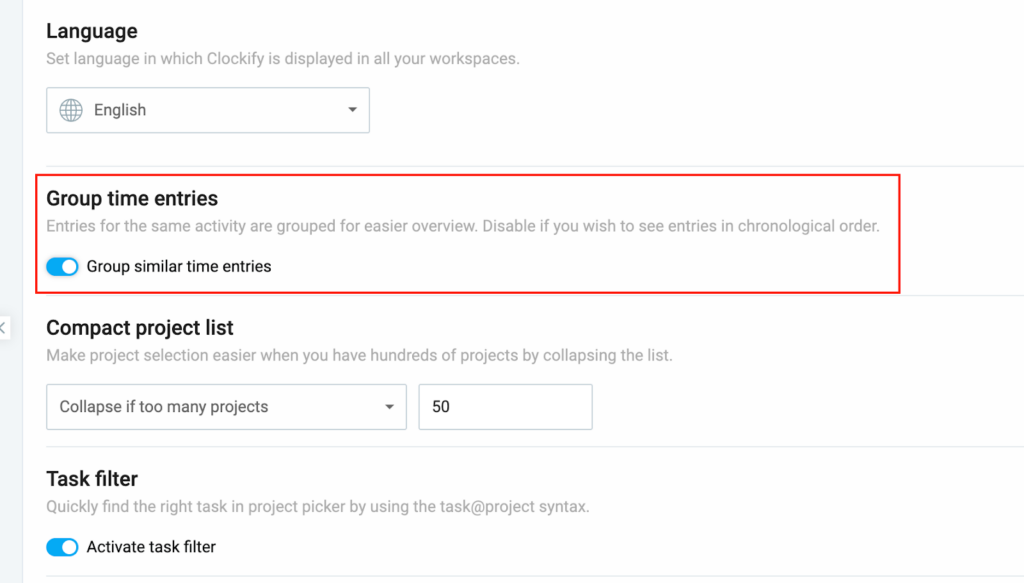
Changer votre façon de visualiser les données #
Vous pouvez effectuer l’une ou l’ensemble des opérations suivantes pour modifier l’apparence de vos saisies de temps, en fonction de vos besoins ou de vos préférences :
Regrouper les saisies de temps similaires – Les saisies relatives aux mêmes tâches/activités seront regroupées.
Pour activer le regroupement des saisies :
1. Accédez à Paramètres du profil > Préférences
2. Activez Regrouper les saisies de temps similaires
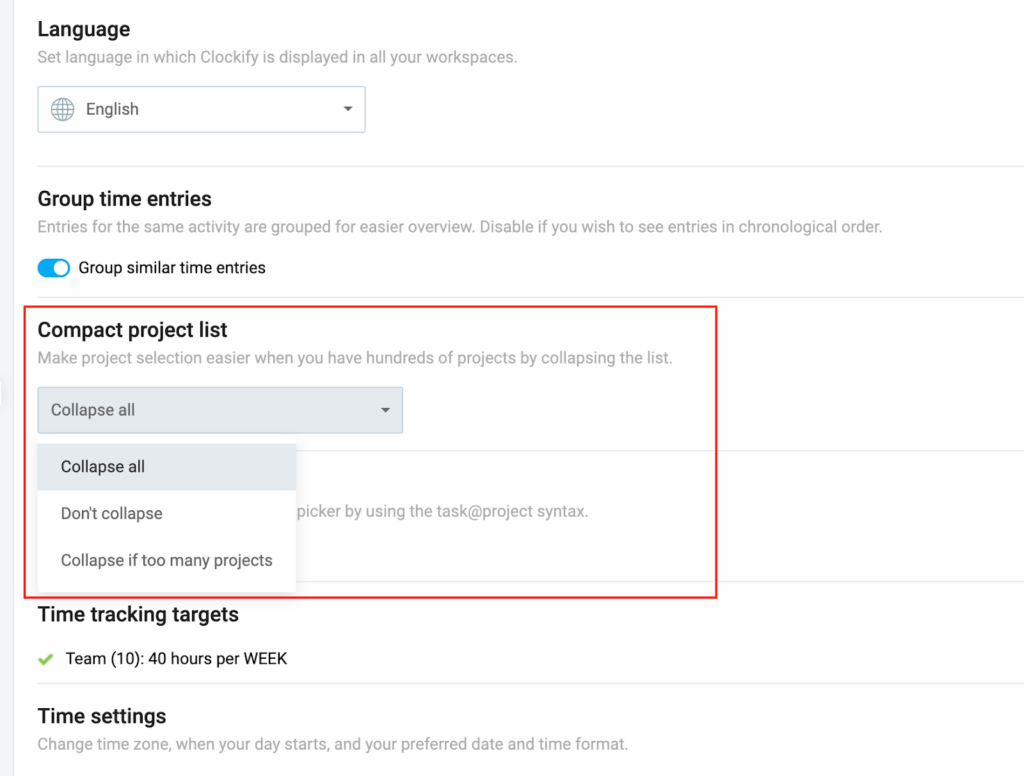
Réduire les listes de projets – Permet de réduire les projets dans le menu Projets lors de l’ajout d’une tâche/d’un projet à une saisie de temps.
Pour réduire les listes de projets :
- Accédez à Paramètres du profil > Préférences
- Sélectionnez les trois options dans le menu déroulant sous Réduire la liste des projets :
- Réduire tout – Réduit tous les projets pour tous les clients.
- Ne pas réduire – Affiche tous les projets pour tous les clients.
- Réduire s’il y a trop de projets – Définit un nombre maximum de projets avant de réduire.
Activer le filtre des tâches – Vous permet d’utiliser la syntaxe tâche@projet pour trouver rapidement des tâches.
Pour activer le filtre de tâches :
- Accédez à Paramètres du profil > Préférences
- Activez le filtre des tâches
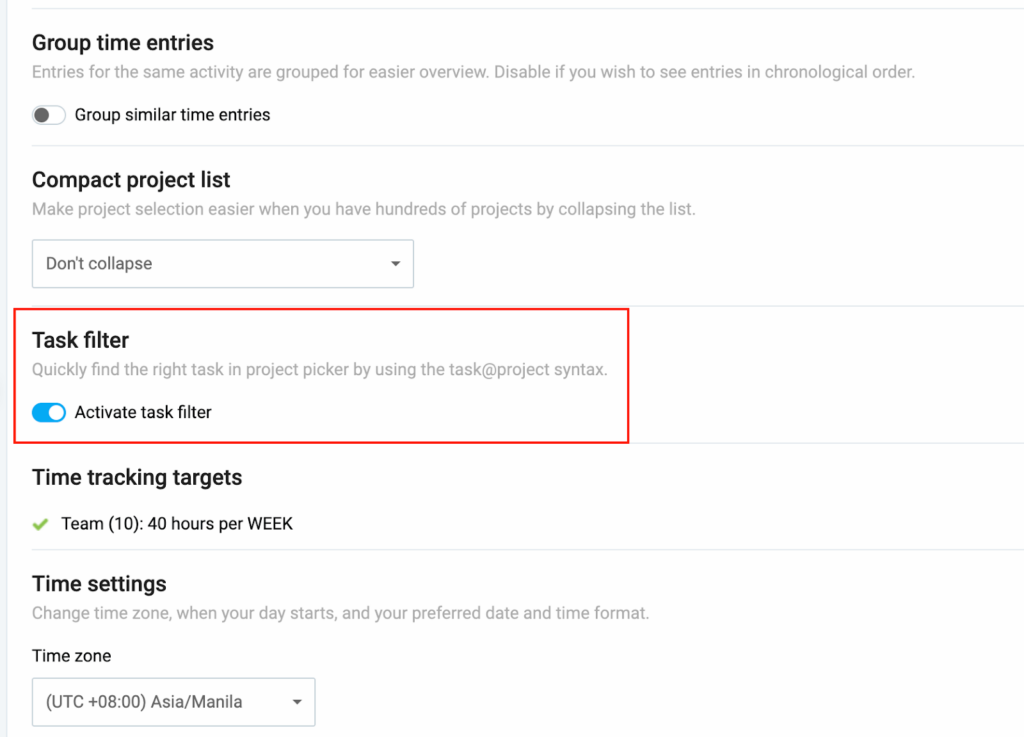
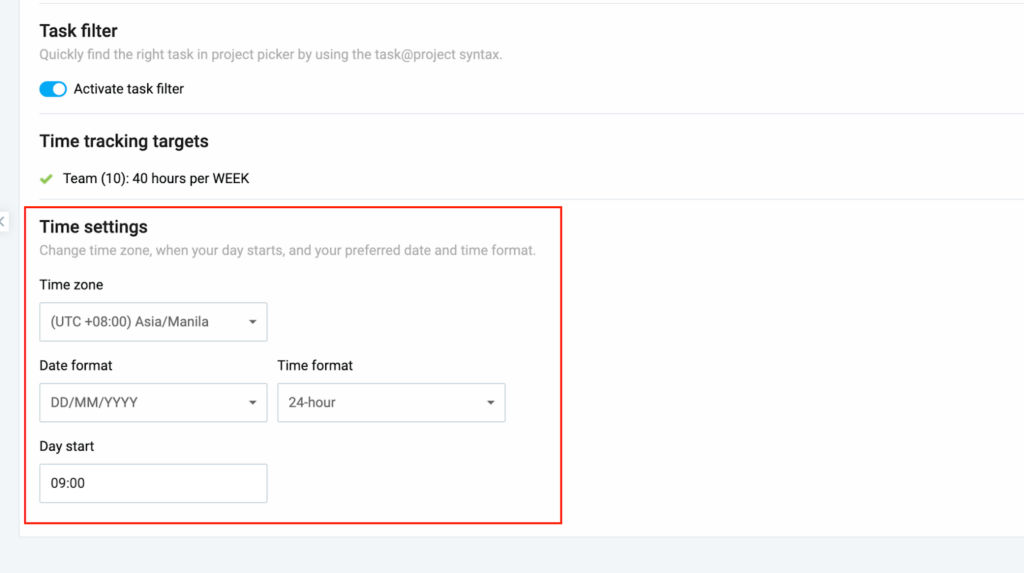
Modifier les paramètres de date et d’heure #
Pour modifier vos paramètres d’heure et de date :
- Accédez à Paramètres du profil > Préférences
- Faites défiler jusqu’aux paramètres de l’heure et modifiez les éléments suivants :
- Fuseau horaire
- Format de la date
- Format de l’heure
- Début de la journée
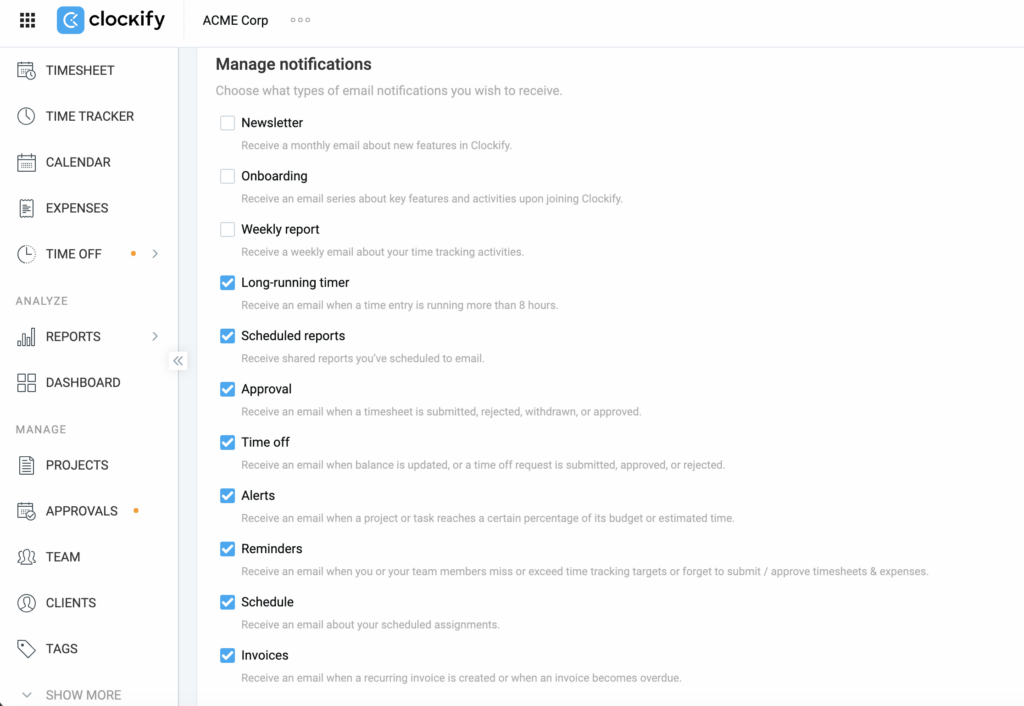
Modifier les préférences d’email #
1. Accédez à Paramètres du profil > Préférences
2. Cliquez sur l’onglet Notifications par email et cochez les notifications que vous souhaitez recevoir.
Générer une clé API #
Une clé API vous permet d’intégrer Clockify à d’autres applis ou systèmes.
Pour générer une clé API :
- Accédez à Paramètres du profil > Préférences
- Passez à l’onglet Avancé
- Cliquez sur Gérer les clés API
- Cliquez sur le bouton Générer une nouvelle clé dans le coin supérieur droit
- Entrez un nom pour votre clé et cliquez sur Générer
- Cliquez sur Copier
- Collez la clé à un autre emplacement où vous pouvez l’enregistrer
IMPORTANT : Collez la clé immédiatement après avoir cliqué sur Copier et veillez à enregistrer le document ou le fichier, car vous ne pourrez plus voir la clé une fois qu’elle aura été générée.
Si vous disposez de la formule gratuite, le nombre de requêtes est limité à 30 par heure.
Pour plus d’informations, consultez la collection Clockify API.
Créer un webhook #
Cette fonctionnalité est accessible aux propriétaires et aux administrateurs d’espaces de travail. Les utilisateurs de la formule gratuite sont limités à 3 webhooks par espace de travail.
Les webhooks vous permettent d’envoyer automatiquement des données depuis Clockify vers d’autres applis ou systèmes lorsque des événements spécifiques se produisent (p. ex. lorsqu’une saisie de temps est créée ou mise à jour).
Pour créer un webhook :
1. Accédez à Paramètres du profil > Préférences
2. Passez à l’onglet Avancé
3. Cliquez sur Gérer les webhooks
4. Cliquez sur le bouton Créer nouveau en haut à droite
5. Saisissez les informations suivantes :
- Nom du webhook
- URL du point de terminaison
- Événement
6. Cliquez sur Créer
Pour plus d’informations sur la création de webhooks, consultez les paramètres API et webhook.
FAQ #
Comment fonctionne le filtre des tâches ?
Une fois activé, vous pouvez rapidement localiser une tâche en saisissant son nom dans le champ de description d’une page de saisie des temps, puis en utilisant le symbole « @ » pour rechercher le projet spécifique. Consultez la section Trouver rapidement des projets/tâches pour plus d’informations.
Est-il possible de modifier le format de la date et de l’heure ?
Oui, vous pouvez modifier le format de la date et de l’heure dans les paramètres de l’heure.
Est-il possible de modifier les informations d’une autre personne ?
Non. Vous ne pouvez mettre à jour que votre nom, votre adresse email, votre photo de profil et vos préférences. Cependant, certains paramètres peuvent être modifiés par les administrateurs pour les membres de l’équipe. Consultez l’article Modification des informations personnelles d’un membre de l’équipe pour en savoir plus.