Defina as taxas e estimativas do projeto
Se você estiver trabalhando em um projeto com preço fixo, o controle do tempo é crucial para determinar o custo real e manter a lucratividade. Sabendo o tempo efetivamente gasto, você pode avaliar a precisão das suas estimativas iniciais e definir preços mais adequados para trabalhos futuros.
Por exemplo:
Um projeto tem um preço fixo e levará 50 horas para ser concluído (por exemplo: 20 horas para design e 30 horas para programação). Se o trabalho levar 70 horas para ser concluído, ou seja, 20 horas a mais do que a estimativa inicial, então você sabe que ultrapassou estimativa.
O controle de tempo permite que você:
- Negocie com o cliente um preço mais alto ou menos trabalho, se necessário
- Utilize dados precisos para definir melhores estimativas para projetos futuros, garantindo a manutenção da rentabilidade
Antes de iniciar o projeto, configure seu espaço de trabalho do Clockify para categorizar e rastrear as entradas de tempo com precisão. Você pode fazer isso da seguinte forma:
- Criar etiqueta para representar diferentes tipos de atividades (por exemplo, gerenciamento de projetos).
- Especificar o nome do cliente na página Clientes.
Definir estimativa manual do projeto #
Project estimate is a paid feature, which you can enable by subscribing to Basic plan or higher.
1. Acesse a página Projetos
2. Clique em um projeto
3. Clique em Configurações
4. Selecione Manual em Estimativa do Projeto
5. Insira o número de horas
Defina uma estimativa baseada em tarefas #
1. Acesse Configurações do projeto
2. Selecione Baseado em tarefas em Estimativa do projeto
3. Defina para recorrência e inclua tempo não faturável (opcional)
4. Acesse a aba Tarefas
5. Defina uma estimativa para cada tarefa da lista
Defina a taxa faturável do projeto #
Billable hours is a paid feature, which you can enable by subscribing to Basic plan or higher.
Para visualizar os campos de taxa faturável (ex.: taxa faturável do projeto), a opção Ativar horas faturáveis deve estar ativada nas configurações do espaço de trabalho. Verifique a configuração do seu espaço de trabalho acessando Configurações do Espaço de Trabalho > guia Permissões para garantir que essa opção esteja ativa. Caso contrário, os campos de taxa faturável e o ícone de faturamento ficarão ocultos.
1. Acesse Configurações do projeto
2. Clique em Alterar em Taxa faturável do projeto
3. Insira o valor
4. Clique em Salvar
Taxa de custo definida #
A taxa de custo é um recurso pago, que você pode ativar atualizando seu espaço de trabalho para o plano Pro ou Enterprise.
- Vá para a página Configurações do espaço de trabalho
- Clique em Ativar taxa de custo em Análise de custos e lucratividade
- Clique em Alterar
- Digite a taxa de custo
- Clique em Salvar
Dicas para estimativas precisas:
- Ao controlar o tempo, certifique-se de que cada registro de tempo esteja associado ao projeto correto e a uma tarefa específica.
- Verifique o status do projeto para comparar o tempo estimado com o tempo decorrido ao atingir os marcos.
Gerar relatório do projeto #
Ao concluir um projeto, utilize os relatórios para analisar a rentabilidade e aprimorar seu fluxo de trabalho futuro.
1. Acesse Relatórios
2. Selecione Relatório Resumido
3. Aplique os filtros necessários, como filtrar por um projeto específico.
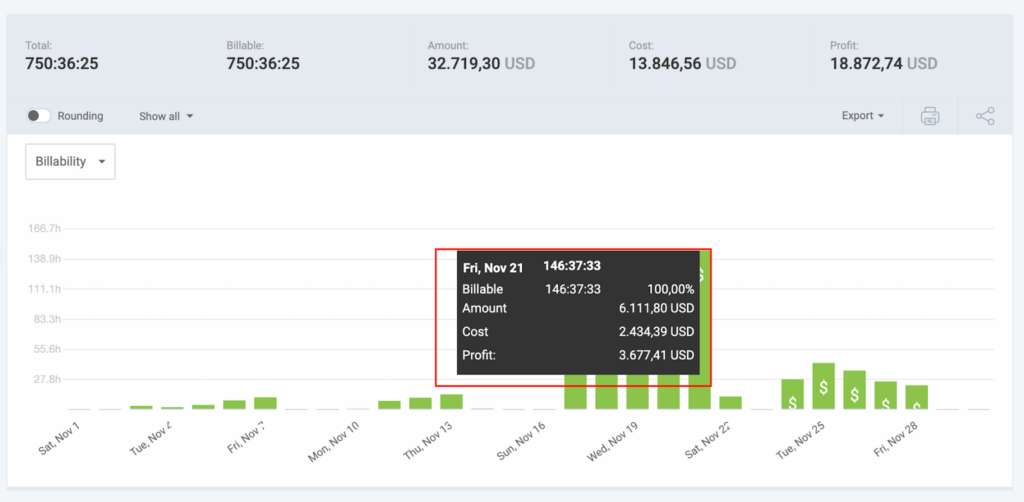
4. Abra o menu suspenso Mostrar Tudo e verifique se as opções Mostrar Valor, Mostrar Custo e Mostrar Lucro estão selecionadas.
5. Clique no menu suspenso Exportar e selecione Salvar como CSV

You can only export a report to CSV/Excel if you are subscribed to a Basic plan or higer. If you are on a Free plan, you can only export a report to PDF.
A partir do relatório gerado, você pode analisar os dados para ajudar a identificar atividades que excederam a duração planejada, encontrar a causa e melhorar as estimativas e os preços futuros. Nos relatórios, você pode examinar valores relacionados a faturamento, custo ou lucro.