Importar dados para o Clockify
Se você tiver dados históricos de folhas de ponto no Excel ou se estiver migrando de outros aplicativos, poderá importar os dados do seu espaço de trabalho, incluindo projetos, tarefas, clientes, etiquetas, registros de tempo e seus campos personalizados para o Clockify usando um arquivo CSV.
O que você encontrará neste guia: #
Tipos de importação
Antes de importar
Importar projetos, clientes, tarefas e etiquetas
Importar folhas de ponto e campos personalizados
Importar usuários
Tipos de importação
O Clockify oferece suporte a três tipos diferentes de importação:
- Projetos, Clientes, Tarefas, Etiquetas: Use isso para configurar seu espaço de trabalho, trazendo sua estrutura organizacional existente de um arquivo ou de outra ferramenta
- Planilhas de horas: Use isso quando estiver mudando de software e precisar migrar registros históricos de tempo para manter a continuidade dos relatórios e do faturamento
- Usuários: Use isso quando precisar adicionar uma equipe grande ou uma empresa em massa
Antes de importar
Para garantir que seus dados sejam mapeados corretamente e evitar falhas na importação, revise estes requisitos primeiro.
Funções e assinatura
| Dados | Função do usuário | Plano de assinatura |
| Projetos, clientes, tarefas, etiquetas | Proprietário do espaço de trabalho / administrador | Qualquer plano |
| Planilha de horas | Qualquer plano pago | |
| Usuários | Qualquer plano pago |
A importação de usuários não é suportada durante o período de teste gratuito.
Campos de dados #
Use este guia ao criar seu arquivo CSV.
| Nome do campo | Definição | Tipo de importação | Regra de formatação | Exemplo |
| Identificador único do usuário | Importação de planilha de horas | Deve corresponder a um e-mail de um usuário ativo no espaço de trabalho | dev@company.com | |
| Data inicial | Data em que o registro ocorreu | Importação de planilha de horas | Deve corresponder exatamente às configurações do seu perfil (p.ex.: MM/DD/YYYY) | 12/25/2025 |
| Horário inicial | Horário de início do registro | Importação de planilha de horas | Deve corresponder às configurações do seu perfil (12h ou 24h) | 09:00 AM ou 13:00 |
| Duração | Duração do registro de tempo | Importação de planilha de horas | Deve corresponder às configurações do espaço de trabalho (formato HH:mm ou decimal 1,5) | 01:30 ou 1,5 |
| Projeto | Nome do projeto | Opcional | Máx. 250 caracteres. Sensível a maiúsculas e minúsculas em relação aos projetos existentes | Website UI |
| Cliente | Cliente associado com o projeto | Opcional | Máx. 100 caracteres. Use a sintaxe Projeto: Cliente na coluna Projeto para vincular | ACME Corp |
| Tarefa | Subunidade de um projeto | Opcional | Máx. 1.000 caracteres. O projeto deve existir para que a tarefa seja importada | Correção de erro |
| Descrição | Notas sobre o trabalho realizado | Opcional | Máx. 3.000 caracteres. Apenas texto simples | Documentação atualizada da API |
| Etiqueta | Rótulos de categoria | Opcional | Máx. 100 caracteres. Separe múltiplas etiquetas com vírgula | Urgente, Interno |
| Faturável | Status de faturamento do registro | Opcional | Use Sim/Não. Herda do projeto se estiver em branco | Sim |
| Campos personalizados | Metadados definidos pelo usuário | Recurso pago | O cabeçalho deve corresponder exatamente ao nome do campo criado no Clockify | Escritório-NY |
Requisitos de formatação #
- Formato do arquivo: Deve ser um arquivo CSV (tamanho máximo de 10 MB)
- Import files have a limit of 200,000 rows
- Cabeçalhos: Todos os nomes das colunas devem estar em inglês e corresponder exatamente às convenções de nomenclatura do Clockify, mesmo que o aplicativo esteja em outro idioma
- Campos obrigatórios: Se você tiver campos obrigatórios (como Tarefa ou Etiqueta) ativados nas configurações do espaço de trabalho, essas colunas devem ser preenchidas no seu CSV
- Limite de caracteres:
- Descrição: 3000
- Tarefas: 1000
- Projetos: 250
- Cliente/Etiqueta: 100
Clockify corresponde automaticamente seus dados, incluindo configurações de data e hora, com base nas configurações do seu perfil e do espaço de trabalho.
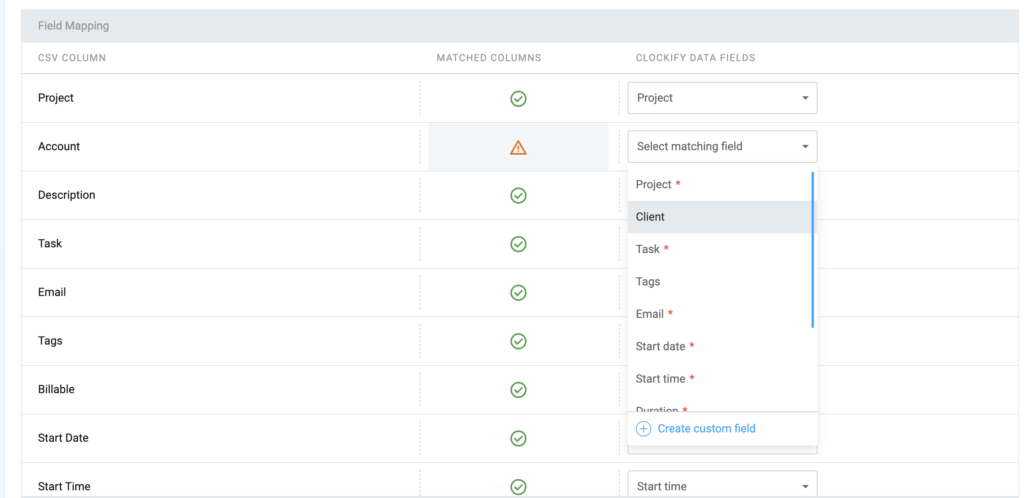
Como mapear campos na importação #
O mapeamento de campos permite associar diretamente as colunas do seu arquivo CSV às entidades correspondentes no Clockify, garantindo que todos os seus dados sejam importados com sucesso.
Após enviar seu arquivo CSV, o Clockify irá comparar os cabeçalhos do seu arquivo (coluna da esquerda) com os seus campos de dados (coluna da direita).
Os campos de dados variam dependendo do tipo de importação. Você pode alterar os campos de dados usando o menu suspenso para que correspondam aos cabeçalhos do seu arquivo CSV.
Se um campo ou cabeçalho do seu arquivo CSV não tiver um campo de dados correspondente no Clockify, você pode criar um campo personalizado (recurso pago disponível apenas para proprietários e administradores do espaço de trabalho) ou removê-lo do arquivo e tentar a importação novamente.
Importar projetos, clientes, tarefas e etiquetas
O que pode ser importado?
No plano Gratuito, você pode importar:
- Projetos
- Clientes
- Tarefas
- Etiquetas
1º passo: Criar seu arquivo CSV #
Você pode criar seu arquivo CSV seguindo o formato abaixo:
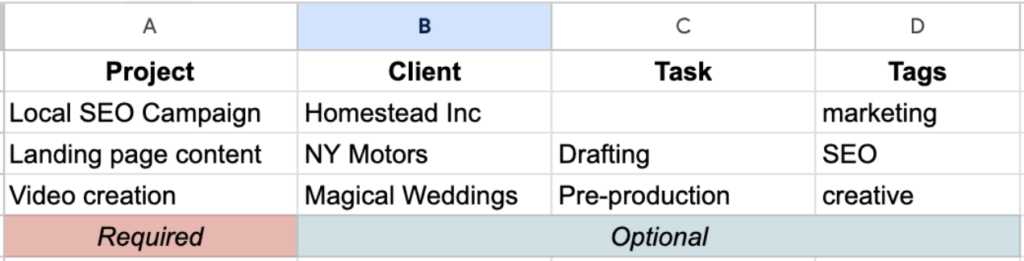
Se você não agrupar projetos por cliente, pode remover a coluna de cliente.
Você também pode baixar o modelo de Clientes e Projetos para garantir um processo de importação tranquilo.

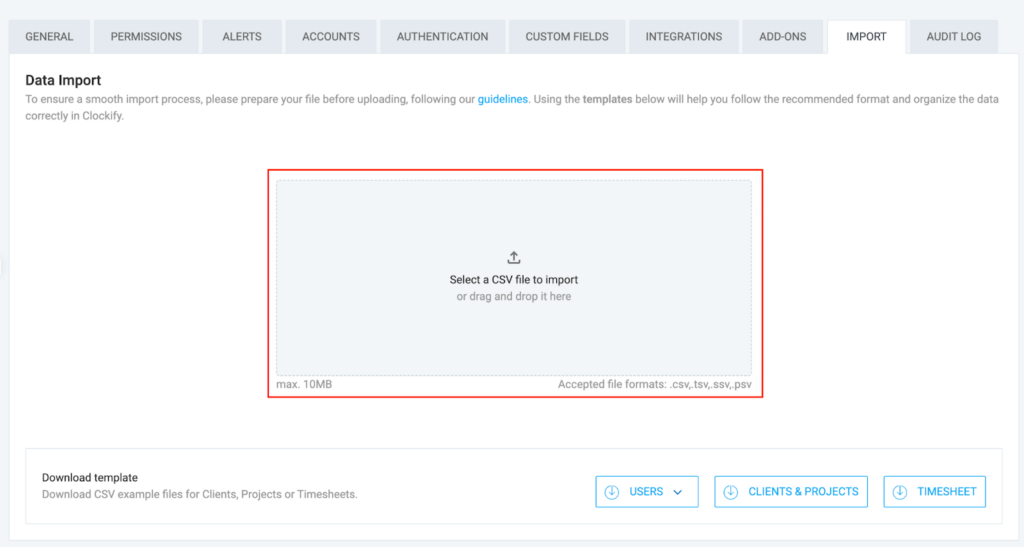
2º passo: Enviar seu arquivo #
- Clique nos três pontos (
 ) ao lado do nome do seu espaço de trabalho
 - Selecione Configurações do espaço de trabalho
- Clique na aba Importar
- Arraste e solte o arquivo na área indicada ou clique na caixa de upload para selecionar o arquivo
3º passo: Mapear seus dados
Certifique-se de que todos os campos do seu arquivo correspondam aos dados no Clockify. Caso contrário, use o menu suspenso para fazer a correspondência antes de prosseguir com a importação.
Clique em Continuar para prosseguir para a próxima etapa.
Se um campo do seu arquivo CSV não corresponder aos campos de dados do Clockify, remova-o do arquivo primeiro e tente importá-lo novamente.
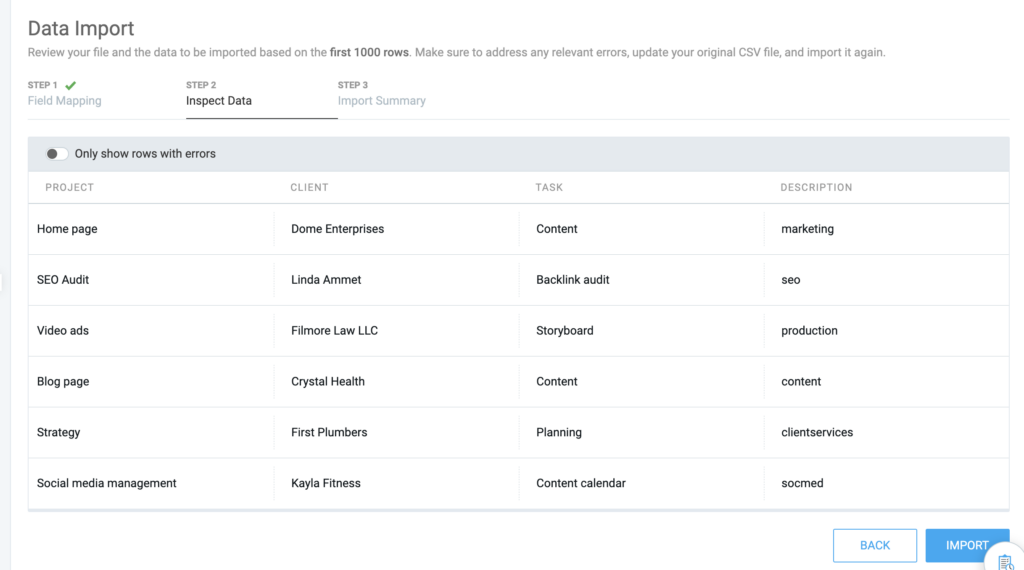
4º passo: Revisar e importar seus dados
- Revise a pré-visualização dos seus dados
- Clique em Importar se não houver nenhum erro
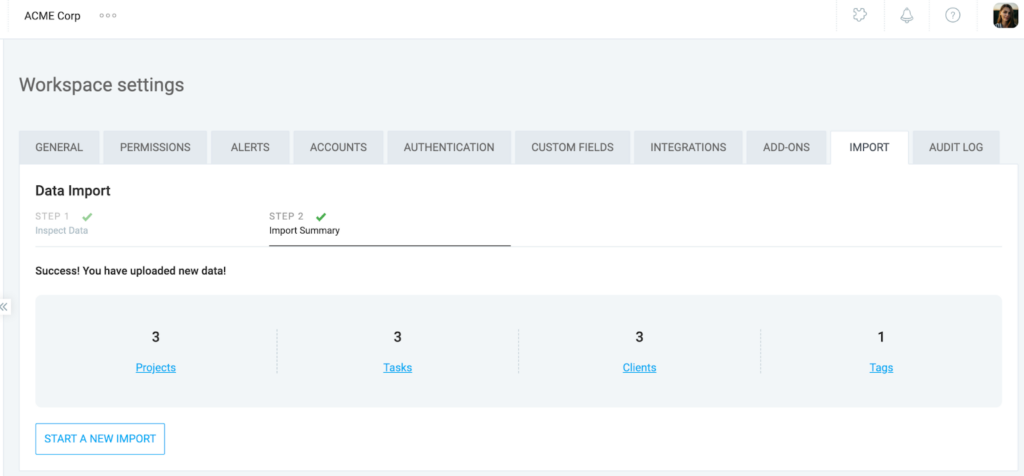
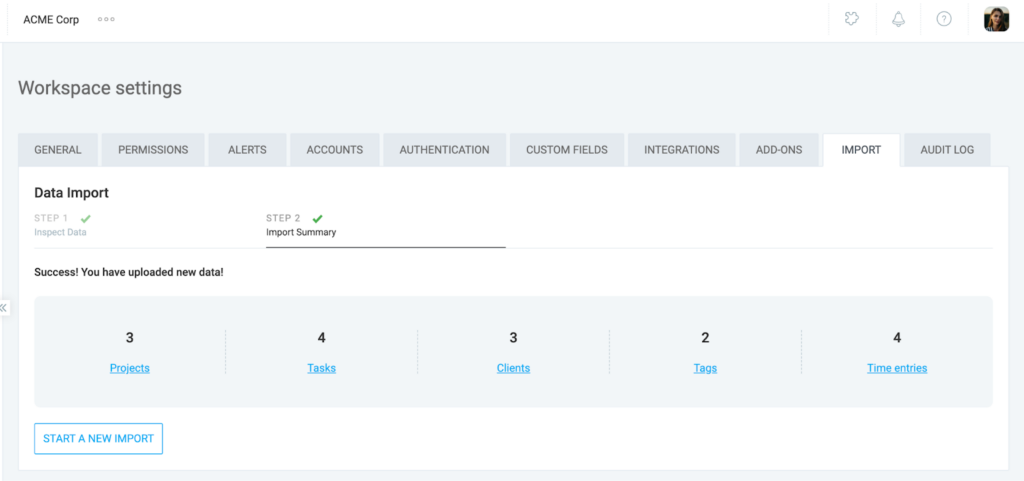
5º passo: Visualizar resumo da importação
Após a importação bem-sucedida dos seus dados, você será direcionado para a página de Resumo da Importação. Essa página detalha os dados importados, mostrando quantos projetos, clientes, tarefas e etiquetas foram incluídos. Você pode clicar nos links para visualizar esses itens com mais detalhes.
O Clockify evita projetos, clientes, tarefas e etiquetas duplicadas, comparando o nome exato do seu arquivo CSV com os itens existentes. Se um nome corresponder, os dados serão vinculados em vez de criar um novo item. Observe que essa comparação diferencia letras maiúsculas de minúsculas. Marketing e marketing são tratados como campos separados e resultarão em um item duplicado.
Importar planilhas de horas e campos personalizados
O que pode ser importado?
Nos planos pagos, você pode importar:
- Entradas de tempo
- E-mails
- Projeto
- Cliente
- Tarefa
- Etiquetas
- Faturável
- Descrição
- Data de início
- Hora de início
- Duração
- Descrição
- Campos personalizados
1º passo: Formatar dados da planilha de horas
Você pode criar seu próprio arquivo CSV com o formato abaixo:

- Colunas obrigatórias
- E-mail: Endereço de e-mail do usuário
- Data de início: Data em que o registro de tempo foi criado
- Hora de início: Horário em que o registro começou
- Duração: Número de horas registradas no registro de tempo
- Os registros de tempo são importados de acordo com o fuso horário da pessoa que realiza a importação.
Campos personalizados na importação de planilha de horas #
Campos personalizados de registros de tempo (p. ex.: ID do projeto, quilometragem, etc.) podem ser importados junto com a planilha de horas, desde que o campo personalizado já exista no seu espaço de trabalho. É importante observar que os campos personalizados importados serão visíveis apenas nos próprios registros de tempo, e não em todo o espaço de trabalho.
Exemplo de campo personalizado em arquivo CSV:
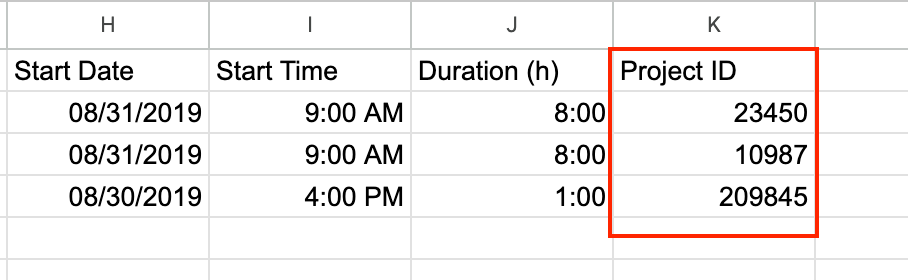
Os campos personalizados importados aparecerão nos registros de tempo no Rastreador e no Relatório detalhado.

2º passo: Iniciar a importação
- Acesse Configurações do espaço de trabalho > Importar
- Selecione seu arquivo CSV ou arraste e solte-o na área de importação de dados
- Confirme os formatos de data e hora usados no seu arquivo na janela pop-up
3º passo: Mapear seus dados
Assim como em outros tipos de importação, você pode mapear seus campos de dados com o Clockify selecionando a opção desejada no menu suspenso na coluna da direita.
4º passo: Verificar usuários
O Clockify vai notificá-lo se o seu CSV contiver e-mails de usuários que ainda não estão no seu espaço de trabalho.
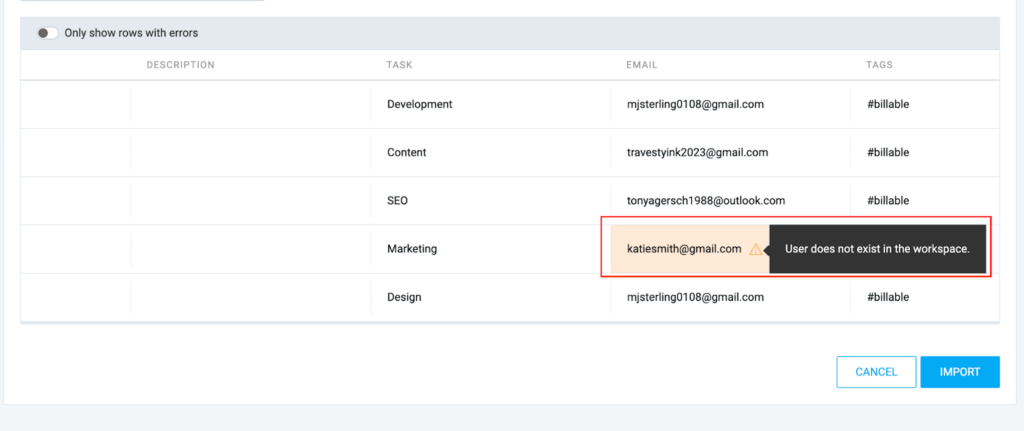
Certifique-se de que todos os membros da equipe tenham aceitado seus convites para o espaço de trabalho antes de importar seu registro de tempo; caso contrário, as entradas desses usuários não poderão ser importadas.
5º passo: Revisão resumida
- Revise os dados na pré-visualização
- Clique em Importar
Após a conclusão, o Resumo da importação fornecerá links para os dados importados no seu Relatório detalhado.
Se você não especificar o status Faturável no CSV, o registro herdará automaticamente o status de faturamento do projeto ao qual está atribuído.
Importar usuários
O que pode ser importado?
- Usuários limitados: Para usuários com acesso restrito
- Nome
- Usuários completos: Para membros padrão da equipe
- Nome
- Função
- Projetos gerenciados
- Grupos gerenciados
- Funcionários gerenciados
- Gerente de equipe designado
- Grupo
- Valor de faturação
- Valor de custo
- Início da semana
- Dias úteis
- Capacidade diária de trabalho (horas)
- Campo personalizado (ex.: Departamento, Localização, etc.)
Campos personalizados de usuário só podem ser importados para novos usuários e não para usuários já existentes no seu espaço de trabalho.
1º passo: Criar arquivo CSV
Inclua todas as colunas obrigatórias ao criar seu arquivo.
O endereço de e-mail é obrigatório para importações de usuários completos. Se um usuário estiver sendo adicionado como gerente, você também deverá preencher as colunas Projetos gerenciados/Grupos gerenciados/Funcionários gerenciados.
Exemplo de CSV para importação completa de usuários

Na importação de usuários limitados, o nome é o único campo obrigatório.
Baixe o modelo de usuários para evitar erros de importação.

Valores múltiplos
Para atribuir várias funções, gerenciar projetos, gerenciar funcionários ou grupos a um único usuário, separe cada entrada com uma vírgula.
Associação de projeto e cliente
Se um projeto pertence a um cliente específico (ex.: Projeto A sob o Cliente A), use o seguinte formato na coluna Projetos Gerenciados:
Nome do projeto:Nome do cliente

O sistema reconhecerá automaticamente o projeto e o cliente associado usando essa sintaxe.
Quando deixados em branco, os campos opcionais herdarão as configurações padrão do seu espaço de trabalho.
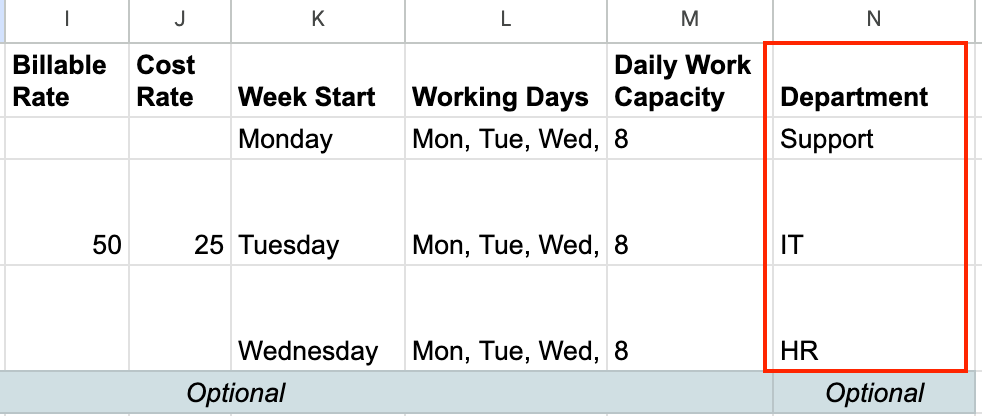
Campo personalizado de usuário na importação de usuários #
Ao importar usuários, você pode incluir campos personalizados de usuário, como Departamento, Localização ou ID do funcionário. Certifique-se apenas de que esses campos personalizados já estejam configurados no seu espaço de trabalho antes de iniciar a importação.
Exemplo de campo personalizado do usuário em CSV
2º passo: Enviar seu arquivo
- Acesse Configurações do espaço de trabalho > Importar
- Clique no botão de upload (
 )
) - Selecione o arquivo CSV que você deseja importar
3º passo: Mapear seus dados
Use o mapeamento de campos para garantir que todos os seus dados correspondam aos do Clockify. Clique em Continuar para prosseguir para a próxima etapa.
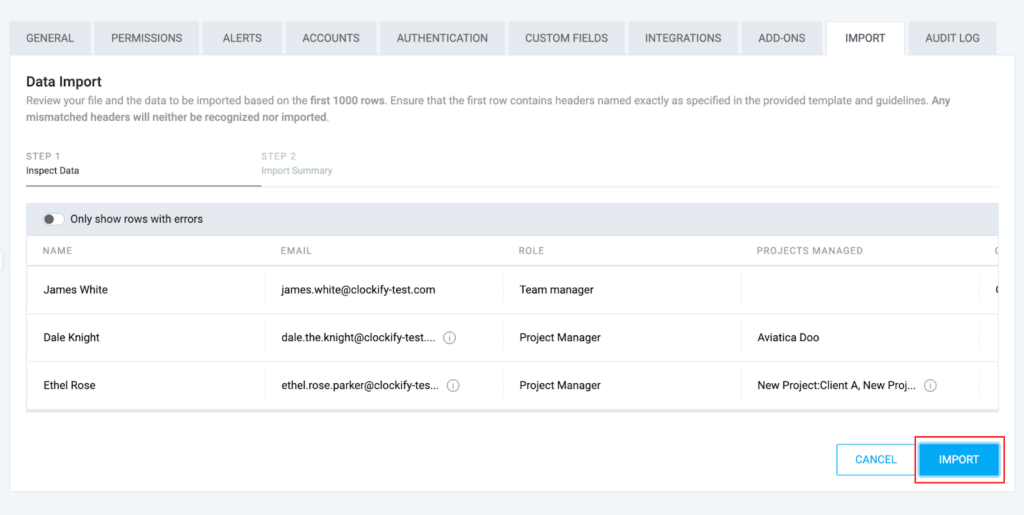
4º passo: Revisar seus dados
- Verifique se todos os dados estão corretos e corretamente mapeados na tabela
- Clique em Importar se não houver erros
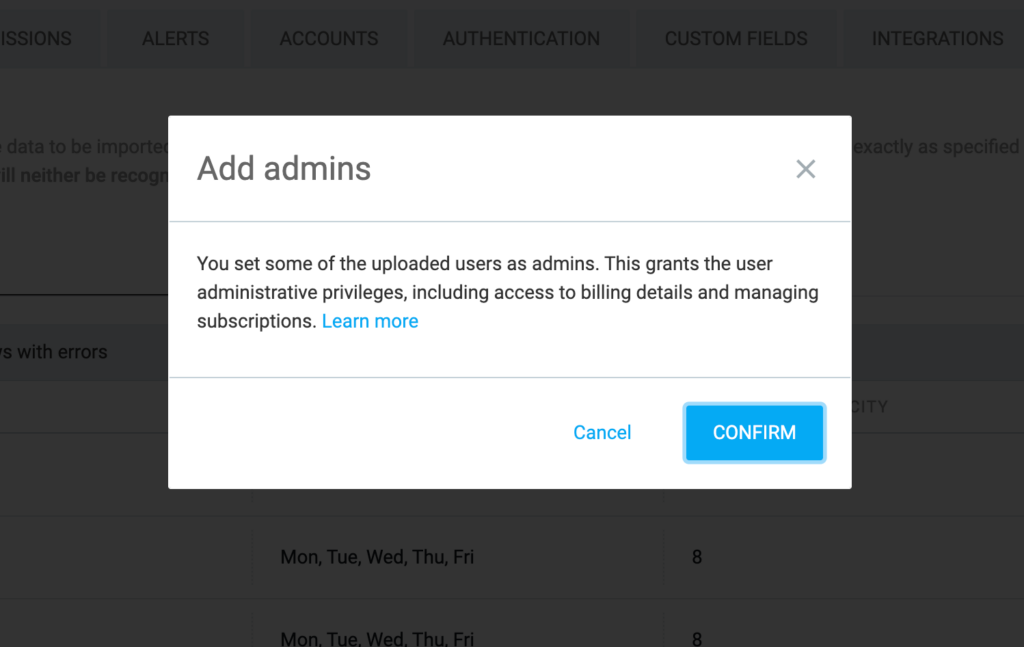
Adicionar administradores acionará uma janela pop-up informando sobre seus privilégios. Clique em Confirmar para continuar.
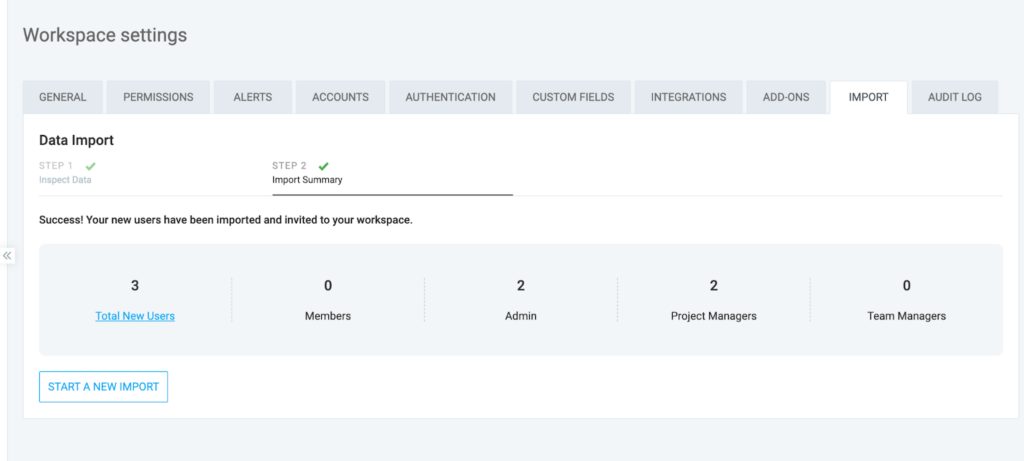
5º passo: Visualizar resumo da importação
Após a importação ser concluída com sucesso, a página Resumo da importação exibirá o número de usuários adicionados. Clique em Total de novos usuários para acessar a página Equipe e visualizar os usuários recém-importados.
Para verificar se a importação do campo personalizado do usuário foi bem-sucedida, clique no ícone de três pontos (![]() ) ao lado do novo usuário e, em seguida, selecione Editar perfil.
) ao lado do novo usuário e, em seguida, selecione Editar perfil.
Reverter dados importados #
Você pode desfazer ou reverter uma importação se cometeu um erro ou se não precisar mais dos dados.
Veja como:
- Clique no ícone de três pontos () ao lado do nome do seu espaço de trabalho
- Selecione Configurações do espaço de trabalho
- Clique em Importar
- Localize a importação que deseja reverter
- Clique em Reverter
- Digite REVERTER na janela de confirmação que aparecerá
- Clique em Reverter
Os dados importados só podem ser revertidos nas primeiras 48 horas após a importação.
Perguntas frequentes #
Posso importar os dados do cliente (endereço, e-mail)?
Não. Atualmente, a ferramenta de importação CSV suporta apenas a importação do nome do cliente. Detalhes adicionais, como endereço, e-mail ou notas, devem ser adicionados manualmente editando o perfil do cliente após sua criação.
Cometi um erro. Como desfazer/excluir dados importados?
Para remover dados importados incorretamente, você deve excluir as entradas manualmente. Para remoção em massa, vá até a página correspondente (ex: Rastreador, Projetos ou Clientes), use o recurso de Edição em massa para selecionar os itens e escolha Excluir.
O que acontece se já existir um projeto com o mesmo nome? Ele será duplicado?
Não. O Clockify identifica projetos pelo nome (diferenciando letras maiúsculas de minúsculas). Se o nome do projeto no seu arquivo CSV corresponder exatamente a um projeto existente no seu espaço de trabalho, o sistema o reconhecerá e atribuirá as tarefas ou registros de tempo importados a esse projeto existente, em vez de criar um duplicado.
Posso importar despesas usando a ferramenta CSV?
Não. A ferramenta de importação atualmente oferece suporte a registros de tempo, projetos, clientes, tarefas, etiquetas e usuários. As despesas não podem ser importadas via CSV e devem ser adicionadas manualmente ou por meio da API do Clockify.
Posso importar folgas ou solicitações de ausência?
Não. O processo de importação CSV foi projetado para planilhas de horas históricas e metadados do espaço de trabalho (como projetos e usuários). Registros de folga e saldos não podem ser importados via CSV e devem ser gerenciados no recurso de Folga ou por meio da API.
O importador verifica automaticamente entradas duplicadas?
Não. O Clockify não possui detecção automática de duplicatas para importações CSV. Se o seu arquivo contiver entradas que já existem no seu espaço de trabalho, o sistema as importará novamente, resultando em duplicatas. Recomenda-se revisar cuidadosamente o arquivo CSV antes de enviá-lo.