Create projects & clients
Projects are useful for grouping and categorizing time entries that belong to the same type of work. Projects make it easier to analyze data, generate more useful reports, and see where and how you spend time.
Each project typically belongs to some client, but you can create a project without a client (e.g. internal company stuff). A client can have multiple projects, but a project can belong to only one client.
You can also import projects and clients from a file.
For an overall guidance on projects, watch the video and follow the instructions below.
Create projects #
By default, only admins can create projects. However, this set of permissions can be modified if Who can create projects and clients is set to Admins and managers or Anyone in the Workspace settings.
This setting is set to Anyone and can not be changed on a Free plan.
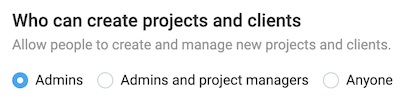
Who can create projects if selected:
- Admins (default): admins
- Admins and project managers: admins and project manager
- Anyone: admins, projects managers, team managers, regular users
The person who creates the project automatically becomes its project manager meaning that they can view all tracked time on their projects, set estimates, add tasks, manage project access and modify all other aspects of the project.
To create a project:
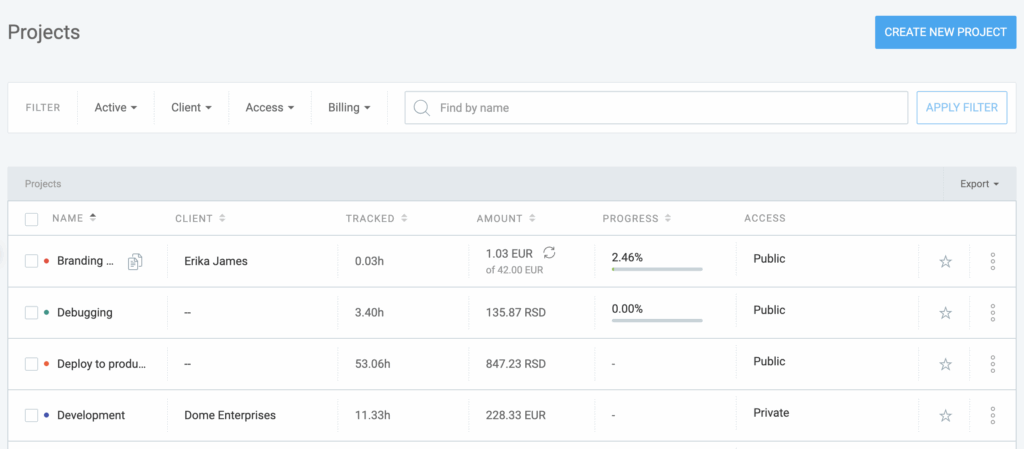
- Go to Projects and click Create new project
- Name the project
- Select client (you can also create a new client here, by typing a name and clicking Create client)
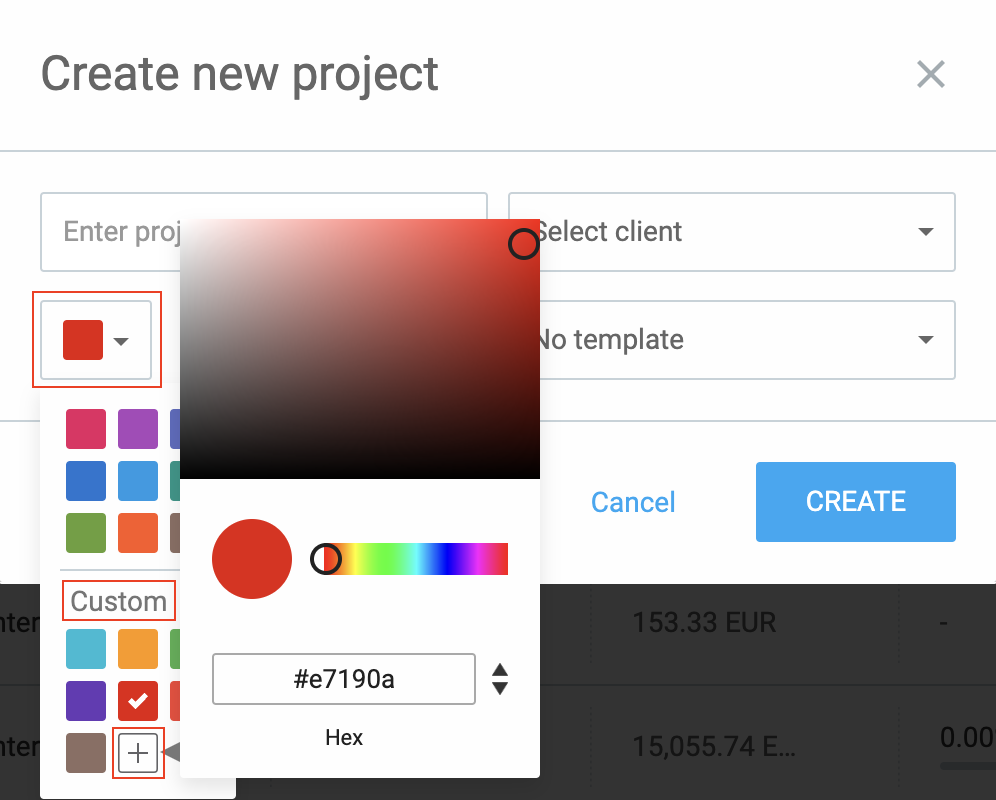
- Choose a project color from the Custom section or color picker
- Choose visibility (public or private)
- Click Create
Once you’ve created a project, you can select it when tracking time. If you’ve set the project as private (visible only to a certain group), then only people who are on the project will be able to select it when tracking time. You can also adjust the size of columns (name, client, status, access) to make sure all data is properly displayed.
If you use the Clockify browser extension, you can track time on projects and tasks from the Projects page.
Free plan users can only set project visibility to Public. Upgrade to any paid plan to enable the Private option when creating projects.
For more information, check out the Browser extension page.
Quick create #
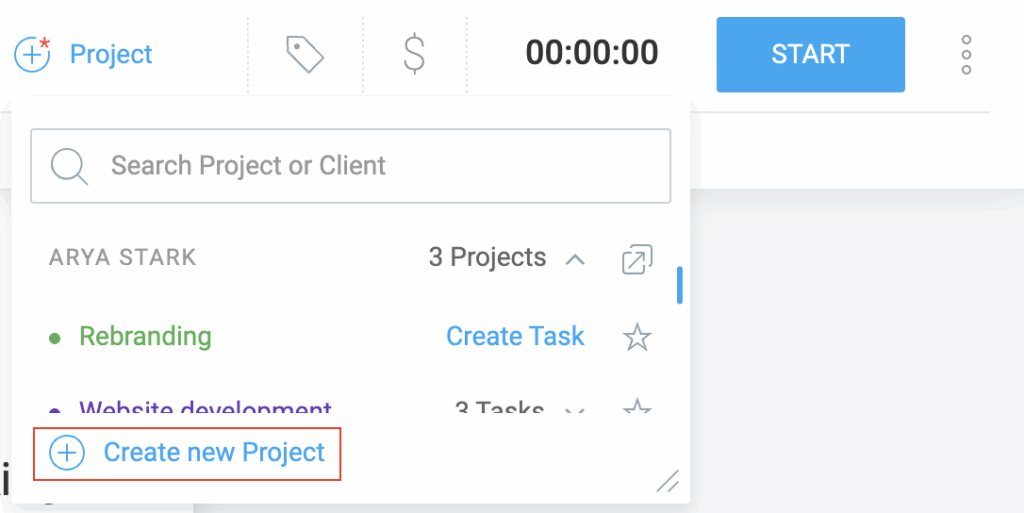
You can also add a project directly from the project picker while creating a new time entry.
Click on the +Project field to get a drop-down list of projects and start typing the name of your new project. Once you start typing the drop-down list will try to suggest a matching (existing) project name.
If that project does not exist, you will be offered the option to create a new project.
Click on the + Create new project button and a popup window with additional options will appear allowing you to name your project, assign a client, apply a project template and select if the project will be public or private.
You can also use a keyboard shortcut Ctrl / ^ (Control) + Enter to quickly create a project without additional details.
Color picker #
The Custom section in the color picker for Projects allows you to save up to 8 custom colors.
If you haven’t used custom colors yet, the section will show a + sign prompting you to add new ones.
Custom colors are consistent across all devices and modes.
Archive projects #
Once you complete a project, you can archive it, so it’s no longer visible when tracking time.
To archive a project:
- Go to the Projects page
- Click three dots next to the project you want to archive
- Select Archive
You can check the Also mark all tasks as done box in a screen that pops up requiring you to confirm the action and all the tasks in the archived project will be marked as done.
Once the project is archived you will be able to delete it.

To see archived projects, click the Active filter at the top of the page, change it to Archived and click APPLY FILTER to confirm the action.

To restore an archived project, click three dots next to it and select Restore.
When you archive a project:
- All its data is still available
- Project’s time entries will still be shown in reports
- Archived projects won’t appear in reports as filters unless you select All or Archived
- Archived projects won’t be available in the project picker when creating new time entries
- Archived projects won’t appear on Projects page (unless you select Archived in the filter)
You can also archive tags and clients the same way you can archive projects.
Delete projects #
Projects can only be deleted once they are archived.
To delete a project:
- Go to Projects page
- Select Archived or All from the drop-down menu
- Click three dots next to the archived project’s name
- Select Delete
- Confirm the action
Deleting a project will remove it from all time entries it is assigned to, but time will remain.
Merge projects #
While it’s not possible to merge projects, you can filter entries of one of the projects you want to merge and assign it to the other project in the Detailed report.
It is also possible to update multiple time entries at the same time with the Bulk edit feature in the Detailed report.
Then, simply archive and delete the project you don’t need.
Manage people on projects #
To see how to change the project’s privacy settings, manage user access to a project, or set users as project managers, visit this help article.
Project status #
When you and your team start tracking time for projects and tasks, you’ll be able to track progress on each project using Project status.
To learn more about how to use project status, visit this help article.
Project note #
You can add additional information to projects by using a project note. To learn more about how to format a project note, visit this help article.
Project name/client/color #
If you need to edit project name, client, color, or any other type of project setting, you can do that in the Settings tab.
- Go to the Projects page
- Choose the project
- Switch to the Project settings tab
- Edit project name, change/add client/project color
Changes you make will be immediately visible.
Set project’s billable rate #
Billable rate is a paid feature available on any paid plan.
Clockify has 4 types of billable rates, one of which is the project billable rate. If set, this billable rate gets applied to each time entry created for this project.
The project billable rate can be overwritten by Projects’ member rate which you define in the projects’ Access tab if you want different users on the project to have different billable rates.
To set a billable rate for a specific project:
- Go to the Projects page
- Click on the name of the specific project
- Switch to the Project settings tab
- Set billable rate for the project
To set different pricing per client at the project level:
- Create different projects
- Assign them to respective clients
- Go to Projects and click the project name (which will bring you to Project edit page)
- Switch to the Project Settings tab
- Set the desired billable rate for the project.
- Repeat for each project for the specific client
Filter and sort projects #
When you have a lot of projects, it can be difficult finding what you need. That’s when filters come in handy.
You can filter projects by their active status, client, users who are part of it, billability, and name.
You can sort projects alphabetically by clicking Name on the header of the project table. It is possible to sort projects by Client and Status as well.
Create project from a template #
Project templates are a paid feature, which you can enable once you upgrade your account.
If you have a lot of similar projects, it’s a good idea to set up a template so you don’t have to create the same project over and over.
Projects you create with an existing template will have settings such as Billable Rates, Estimates, Tasks and Team already applied.
Add and edit tasks in a bulk #
Admins and owners can add and edit multiple tasks to multiple projects in a bulk. This option is available with all paid subscription plans.
After selecting projects, user can modify visibility, access, client, color, billability and tasks in the Bulk edit screen.
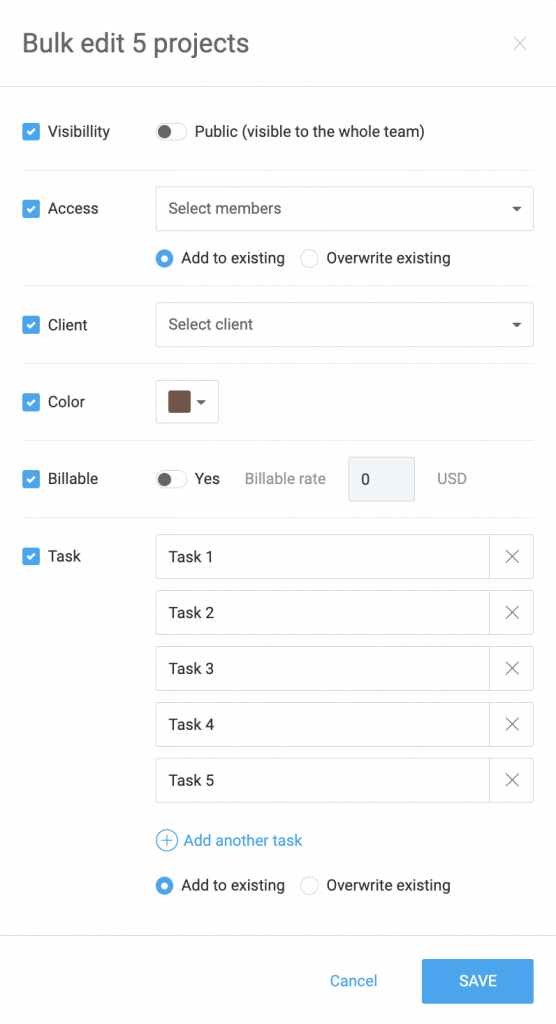
By modifying tasks, user can be adding and editing the tasks in the selected projects.
If the Add to existing option is selected, user is adding a task to all the selected projects. Up to 20 tasks can be added.
If the Overwrite existing option is selected, user is deleting all active and completed tasks in the selected projects and adding the newly created tasks.
After all the changes are saved, the newly added tasks will be visible in the task list in the alphabetical order.
Manage clients #
By default, owners and admins can create clients. However, this set of permissions can be modified if Who can create projects and clients is set to Admins and managers or Anyone in the Workspace settings.

Who can create clients if selected:
- Admins (default): admins
- Admins and project managers: admins and project manager
- Anyone: admins, projects managers, team managers, regular users
Regular users will be able to create clients when they create a new project. However, they still won’t be able to see the Clients page.
How owners and admins can create clients #
If you’re the owner or an admin of the workspace, to create a client simply:
- Go to Clients page from sidebar
- Enter the client’s name in the Add new client field
- Click Add

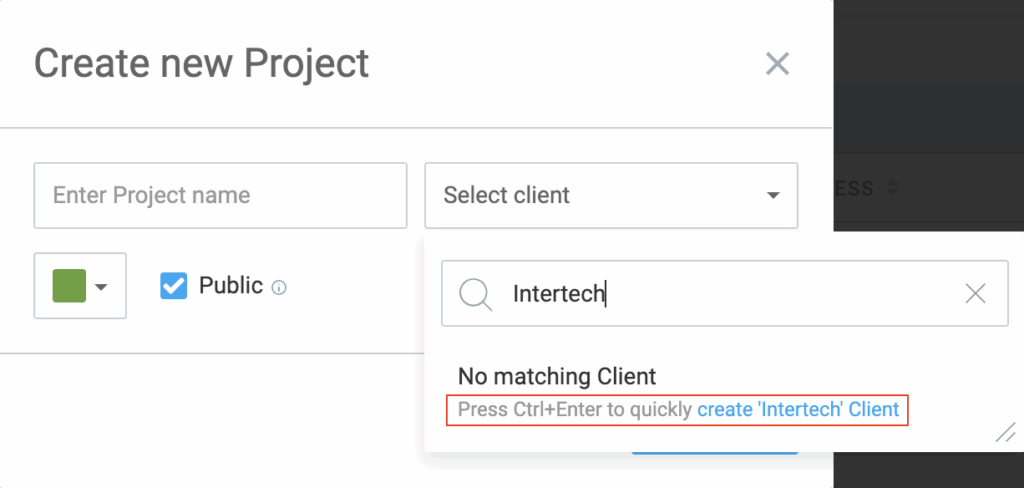
How project managers can create clients #
Project managers can create clients from the project picker when creating new time entry:
- Start tracking time from the Time tracking page
- Click the +Project button to create new project
- In Create new project screen:
- Enter project name
- Select client name, or add new:
- Type client name in the search field
- Click Add <client_name> client
or - Use Ctrl / ^ (Control) + Enter shortcut
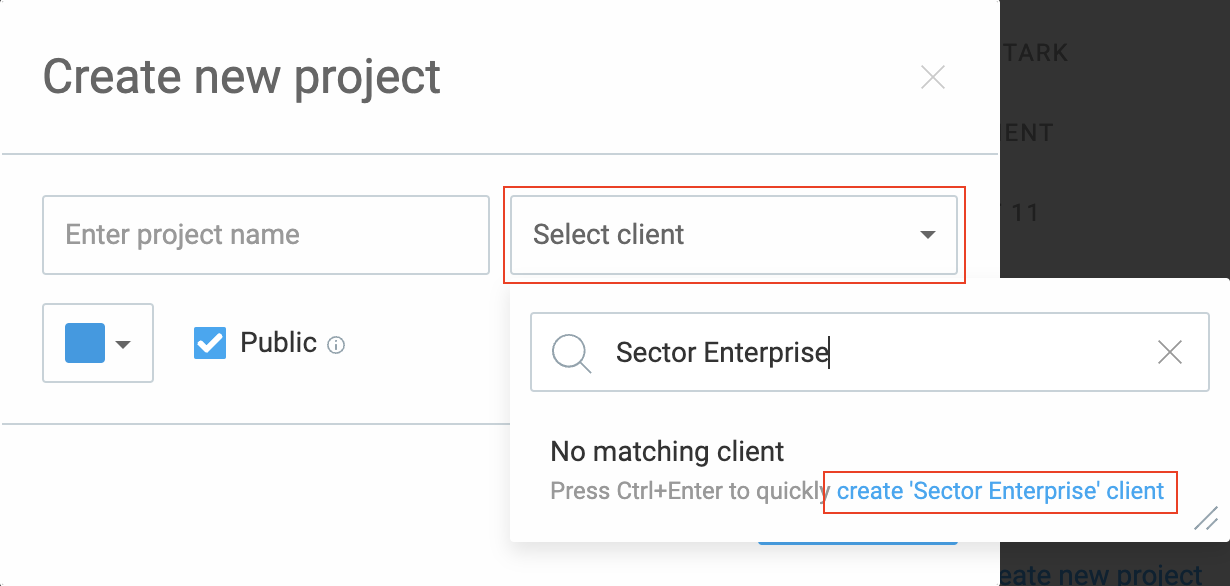
How regular users can create clients #
If you want regular users to be able to add clients:
- Admin or owner needs to set Who can create projects and clients to Anyone
- A regular user can then go to the Projects page to create a project
- Click Select client
- Enter client name
- Click Create client or press Ctrl / ^ (Control) + Enter
If you want to create a client only, simply create the client with the mentioned steps above and cancel the project creation.
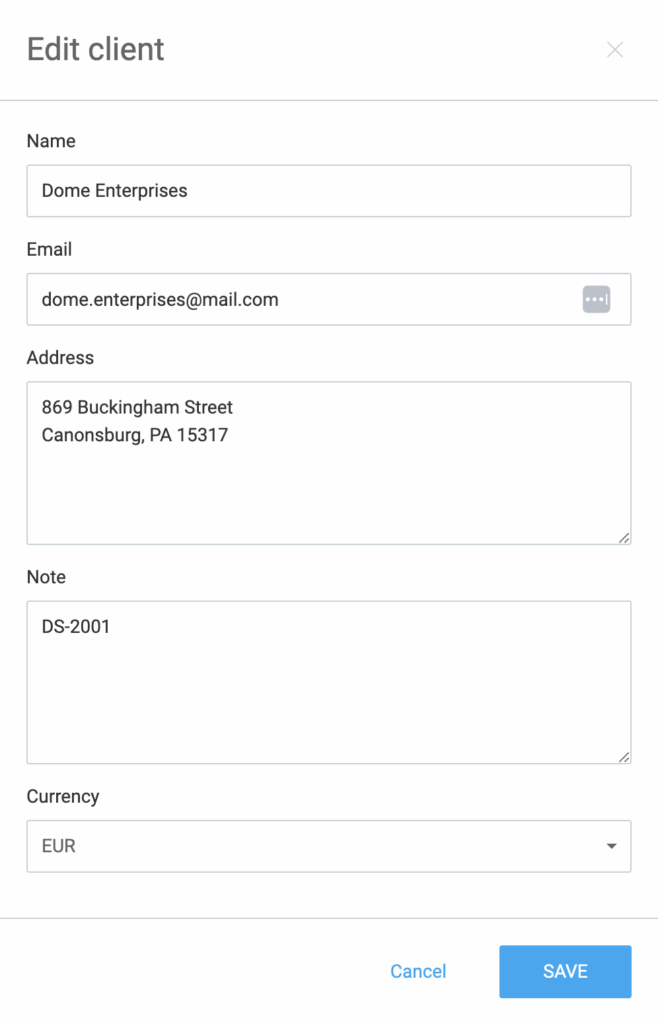
How to edit already existing clients #
- Go to the Clients page from the sidebar
- Click the pen icon for the Client you’d like to edit
- Edit: Client Name, Client Address, Client Note (An additional note related to the client such as the most important information, instructions, links to important document and much more), Currency
Archive clients #
Only owners and admins of the workspace can archive clients. Only after the client is archived you will be able to delete it.
- Go to Clients page from sidebar
- Click on three dots next to the client’s name
- Choose Archive
- Confirm the action in the pop-up window. There you will also have the option to archive all projects assigned to that client
Delete clients #
Only owners and admins of the workspace can delete clients. Clients can only be deleted after being archived.
- Go to Clients page from sidebar
- Select Show archived or Show all from the drop-down menu
- Click on three dots next to the archived client’s name
- Choose Delete
- Confirm the action