Invitar a usuarios y asignar roles en tu espacio de trabajo
Los administradores y propietarios del espacio de trabajo son responsables de gestionar a los usuarios dentro de su espacio. Esto incluye invitar a los miembros del equipo, asignar roles y gestionar los perfiles de usuario. Con estas funciones, puedes garantizar que tu equipo tenga el acceso adecuado para gestionar el tiempo de forma eficaz.
Invita a usuarios a tu espacio de trabajo #
Para empezar, necesitarás invitar a los miembros del equipo a tu espacio de trabajo, para que puedan registrar el tiempo. Como administrador o propietario, puedes invitar a usuarios al espacio de trabajo.
Puedes invitar dos tipos de miembros:
- Completo: Para los miembros que necesitan acceso a la mayoría de las funciones del espacio de trabajo (lo más común)
- Limitado: Para los miembros que solo necesitan fichar la entrada y la salida a través del Quiosco
Quiosco y miembros limitados son funciones de pago disponibles en cualquier plan de pago.
Invita a un miembro completo #
Para invitar a un miembro completo a tu espacio de trabajo:
- Ve a la página Equipo
- Haz clic en Añadir miembro completo
- Introduce las direcciones de correo electrónico de los usuarios que quieres invitar
- Haz clic en Enviar la invitación
Una vez que el usuario acepta la invitación, se convierte en miembro del espacio de trabajo.
Puedes invitar hasta 4 usuarios con el plan Gratis. Si necesitas invitar a más de 4 usuarios, actualiza a cualquier plan de pago.
Invita a un miembro limitado #
Para añadir a un miembro limitado a tu espacio de trabajo:
1. Ve a la página Equipo
2. Haz clic en la pestaña Limitado
3. Haz clic en Añadir miembro limitado
4. Escribe el nombre del usuario que estás añadiendo
5. Haz clic en Añadir
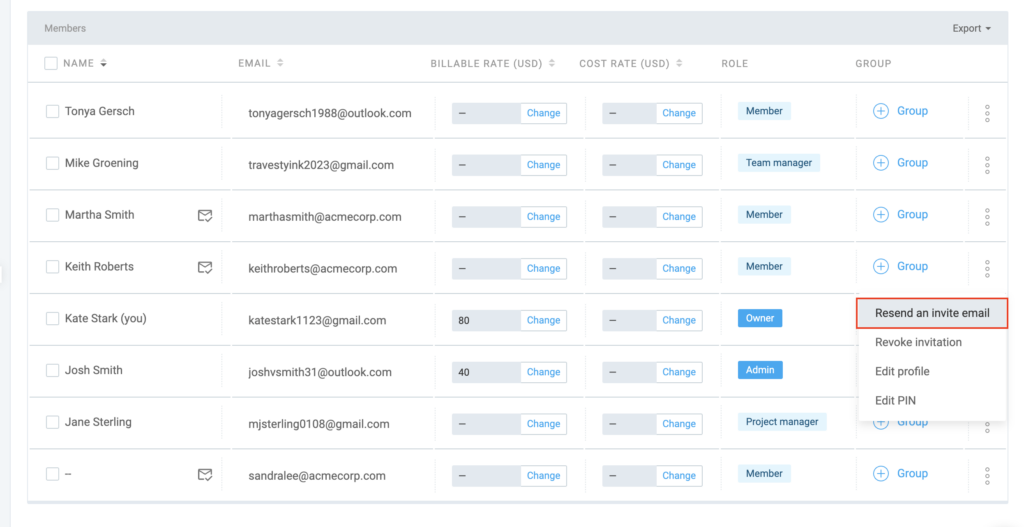
Reenviar invitaciones #
Si has añadido usuarios, pero no han recibido una invitación por correo electrónico, puedes volver a enviar la invitación manualmente:
- Ve a la página de Equipo
- Haz clic en los tres puntos al lado del nombre del usuario
- Selecciona Reenviar un correo electrónico de invitación
Los miembros con una invitación pendiente pueden registrarse con el mismo correo electrónico usado para invitarles, y podrán aceptar la invitación y formar parte de tu espacio de trabajo.
Aceptar la invitación #
Una vez invitados, los usuarios recibirán un correo electrónico con un enlace de activación.
Para aceptar la invitación:
- Haz clic en el enlace de activación en el correo
- Sigue los prompts para iniciar sesión en el panel de Clockify
Gestiona los perfiles de usuario #
Como administrador o propietario, puedes editar los perfiles de los miembros directamente en la página Equipo.
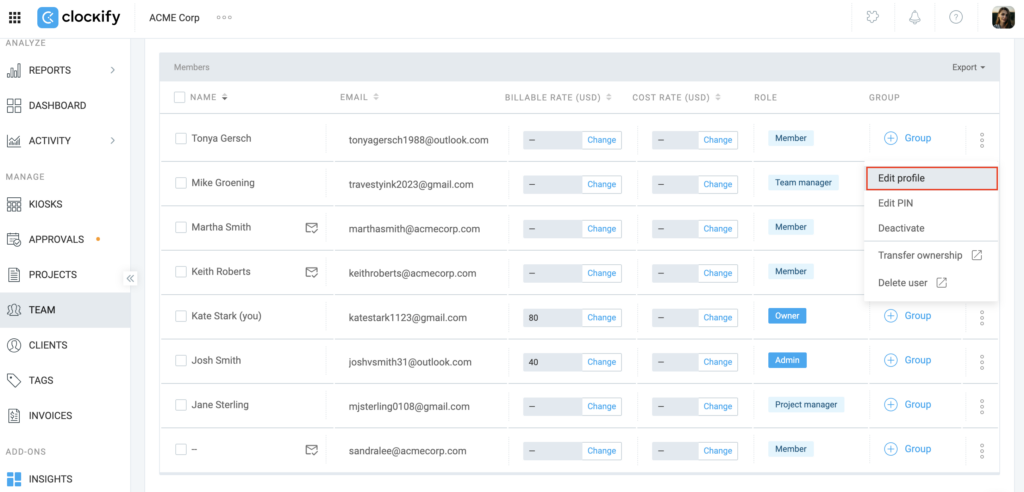
Para editar el perfil de un miembro:
- Ve a la página de Equipo
- Haz clic en los tres puntos al lado del nombre del miembro
- Selecciona Editar perfil
- Edita los siguientes ajustes:
- Inicio de semana
- Días laborables
- Capacidad diaria de trabajo (horas)
- Gerente de equipo asignado
5. Haz clic en Guardar
Asigna roles #
Solo el propietario del espacio de trabajo puede quitar el rol de administrador de alguien.
Puedes asignar diferentes roles, cada con su propio nivel de acceso, a las personas en tu espacio de trabajo.
Para asignar roles:
- Ve a la página de Equipo
- Haz clic en Miembro al lado del usuario que quieres convertir en administrador
- Selecciona el rol que quieres asignar
- Miembro: El rol predeterminado para todos en el espacio de trabajo (habilitado por defecto)
- Administrador: Puede gestionar la configuración del espacio de trabajo, los permisos de usuario y la administración general del espacio de trabajo
- Gerente de proyecto: Puede ver el tiempo registrado en sus proyectos, gestionar los detalles del proyecto, lanzar el Quiosco si está activado y aprobar las planillas de horarios enviadas
- Gerente de equipo: Puede ver todo el tiempo de sus miembros de equipo, editar el tiempo de su equipo (si está activado) y aprobar las planillas de horarios enviadas
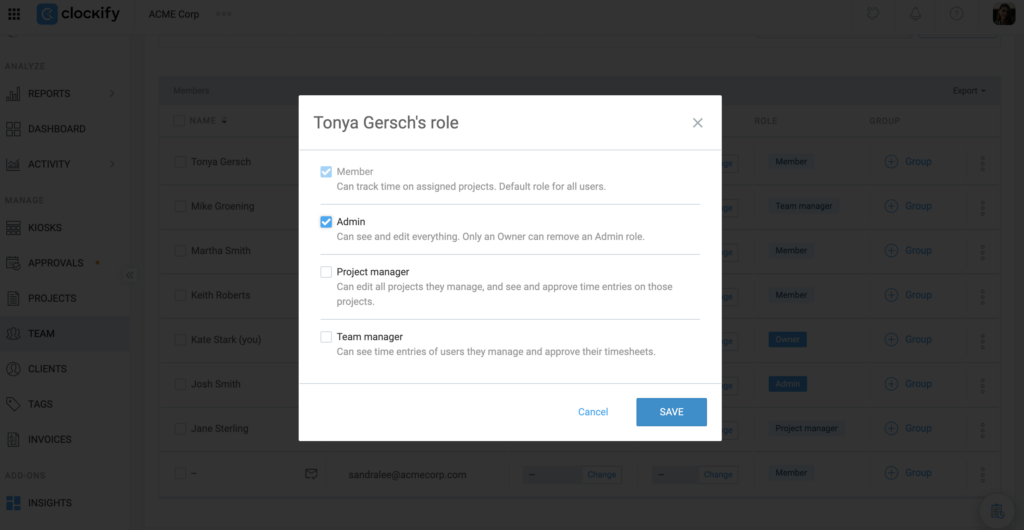
4. Haz clic en Guardar
El gerente de proyectos es una función de pago disponible en cualquier plan de pago.
Desactivar un usuario #
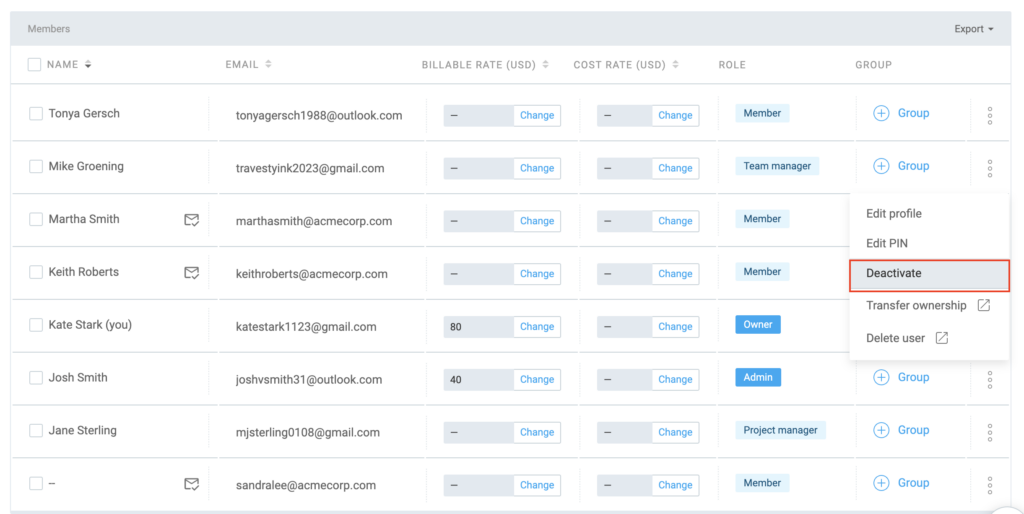
- Ve a la página de Equipo
- Haz clic en los tres puntos al lado del nombre del usuario
- Selecciona Desactivar
Una vez desactivado un usuario, su temporizador se detendrá, y no podrán controlar el tiempo hasta que vuelvan a activarse.
Todas las entradas, descripciones y etiquetas anteriores permanecen en el sistema, pero no aparecerán en los informes por defecto. Tendrás que usar el filtro Inactivo activo para ver sus datos.
Los usuarios deben ser desactivados antes de ser eliminados del espacio de trabajo/organización.
Reactivar un usuario #
Puedes reactivar un usuario para restaurar su acceso a un espacio de trabajo. Reactivando un usuario le permite iniciar sesión, seguir su tiempo y ver el panel. Todos sus datos pasados se restauran automáticamente en los informes actuales.
Para reactivar un usuario:
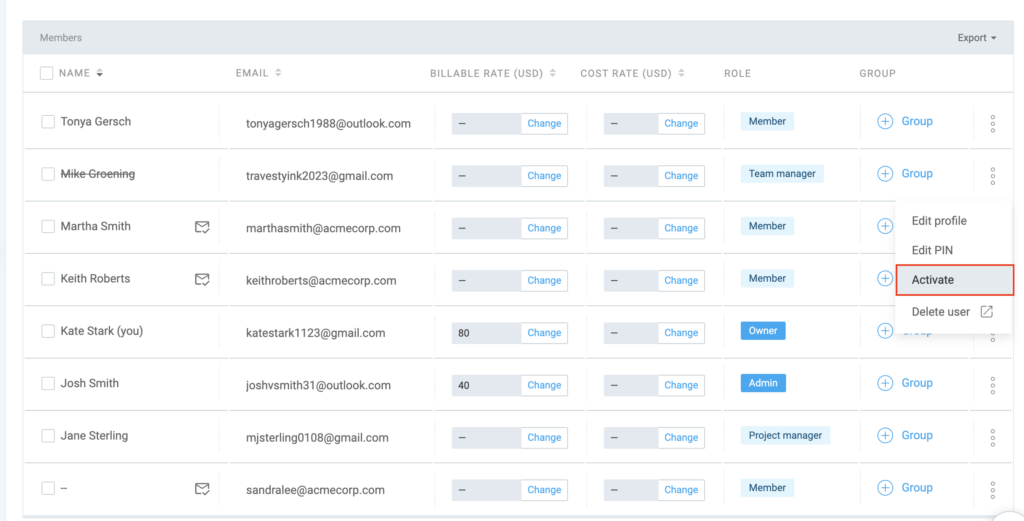
- Ve a la página de Equipo
- Selecciona Todo o Inactivo del menú desplegable de usuarios
- Haz clic en Activar al lado del usuario que quieres volver a activar
Los usuarios inactivos no recibirán una notificación por correo electrónico cuando se reactiven.
Eliminar un usuario #
Para eliminar un usuario:
- Ve a la página de Equipo
- Busca el miembro que quieres eliminar
- Abre el menú de tres puntos
- Haz clic en Eliminar usuario
Se te redirigirá al perfil del usuario en tu cuenta CAKE.com donde puedes completar la acción.
O puedes ir directamente a tu cuenta CAKE.com:
- Ve al menú de aplicaciones en la esquina superior izquierda
- Selecciona tu cuenta de CAKE.com
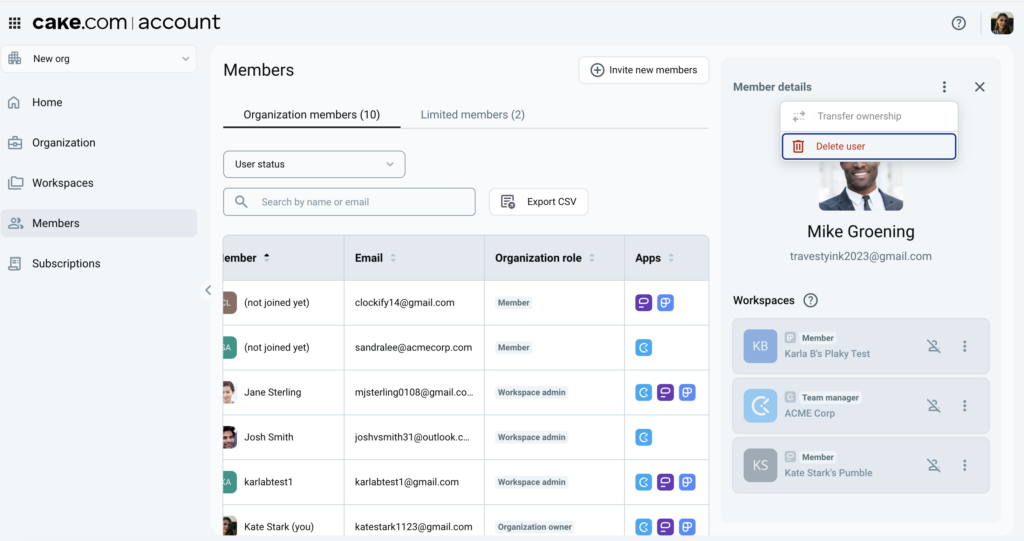
- Ve a la página de Miembros (Members)
- Haz clic en el miembro del espacio de trabajo desactivado que te gustaría eliminar
- Abre el menú de tres puntos a la derecha
- Selecciona Eliminar
El usuario ya no tendrá acceso al espacio de trabajo y su nombre se eliminará de la página Equipo.
Desactivar vs. Eliminar #
Aquí se ven las diferencias entre desactivar y eliminar un usuario:
| Desactivar usuario | Eliminar usuario |
| El usuario no puede iniciar sesión o registrar el tiempo en el espacio de trabajo | El usuario se elimina permanentemente y pierde el acceso al espacio de trabajo |
| Todas las entradas de tiempo permanecen en los informes y todavía se pueden filtrar por ese usuario | Las entradas de tiempo permanecen en los informes, pero ya no puedes filtrar los datos por el nombre de ese usuario específico |
| Si un temporizador está en marcha, se detendrá automáticamente | El usuario debe ser desactivado antes de poder eliminarlo |
| Puedes reactivar el usuario en cualquier momento desde la página Equipo | Para que el usuario vuelva, debes enviarle una invitación completamente nueva |
| Libera un puesto para un nuevo miembro (en los planes de pago) | Elimina permanentemente el registro del usuario del espacio de trabajo/organización |
| El nombre del usuario se mueve a la lista “Inactivo” | El nombre del usuario se elimina completamente de la página Equipo |
Transferir propiedad #
Ojo: Para evitar transferir accidentalmente la propiedad a la persona equivocada, confirma que los detalles del nuevo propietario sean correctos antes de seguir con la transferencia.
Si eres un propietario del espacio de trabajo y quieres transferir la propiedad a otro usuario, debes hacerlo en tu cuenta de CAKE.com.
Para transferir la propiedad:
- Abre tu Configuración del perfil en la esquina superior derecha
- Haz clic en Gestionar la cuenta CAKE.com
- Ve a la página de Miembros (Members)
- Selecciona el miembro del espacio de trabajo al que te gustaría transferir la propiedad
- Abre el menú de tres puntos en la esquina superior derecha
- Selecciona Transferir propiedad (Transfer ownership)
- Selecciona Transferir (Transfer)
¿Qué pasa a continuación?
- El nuevo propietario obtiene control total del espacio de trabajo, incluyendo derechos exclusivos que ni siquiera los administradores tienen, como la posibilidad de eliminar el espacio de trabajo, configurar Inicio de sesión único (SSO) y gestionar la suscripción a nivel más alto.
- El propietario anterior pasa automáticamente a ser administrador. No pierde el acceso al espacio de trabajo, pero pierde los permisos específicos del propietario mencionados anteriormente.
Para obtener más información sobre cómo transferir propiedad a otro usuario, consulta este artículo.
Preguntas frecuentes #
¿Puedo invitar a usuarios sin enviar un correo electrónico inmediatamente?
No, una vez que hagas clic en el botón Enviar invitación, el correo electrónico de invitación se envía automáticamente.
¿Por qué un usuario al que acabo de invitar sigue apareciendo como “Inactivo”?
Un usuario permanece “Pendiente” o “Inactivo” hasta que haga clic en su correo de invitación y verifique su cuenta. Si no lo han recibido, comprueba su carpeta de spam o vuelve a enviar la invitación.
¿Me devolverán el dinero si desactivo una cuenta de usuario a mitad de mes?
No, Clockify no ofrece reembolsos prorrateados para puestos eliminados. Cuando desactivas un usuario, simplemente liberas un puesto. Entonces puedes invitar a una nueva persona para que ocupe ese puesto sin cargos adicionales durante el resto del ciclo de facturación.
¿Qué pasa con mis puestos si paso al plan Gratis?
Si bajas de categoría, pierdes el acceso a las funciones de pago, pero todavía tienes tus usuarios. El plan Gratis permite usuarios y proyectos ilimitados.
¿Por qué no puedo invitar a alguien desde la aplicación móvil?
De momento, la posibilidad de invitar a nuevos miembros a un espacio de trabajo está disponible solo en la versión web, para garantizar que todos los roles administrativos y permisos del espacio de trabajo estén configurados correctamente durante el proceso de incorporación. Usa el navegador de desktop para acceder a la página Equipo para las invitaciones.