Invite users & assign roles in your workspace
Workspace Admins and Owners are responsible for managing users within their workspace. This includes inviting team members, assigning roles, and managing user profiles. With these capabilities, you can ensure your team has the proper access to track and manage time efficiently.
Invite users to your workspace #
To get started, you’ll need to invite team members to your workspace, so they can track time. As an Admin or Owner, you can invite users to the workspace.
You can invite two types of members:
- Full – For members who need access to most workspace features [Most common use case]
- Limited – For members who only need to clock in and out via Kiosk
Kiosk and Limited members are paid features available on any paid plan.
Invite a Full member #
To invite a full member to your workspace:
- Go to the Team page
- Click Add Full Member
- Enter the email addresses of the users you want to invite
- Click Send invite
Once the user accepts the invitation, they become a member of the workspace.
You can invite up to 4 users on the Free plan. Upgrade to any paid plan if you need to invite more than 4 users.
Invite Limited member #
To add a Limited member to your workspace:
1. Go to Team
2. Click the Limited tab
3. Click Add Limited Member
4. Type in the name of the user that you’re adding
5. Click Add
Resend invites #
If you’ve added users but they haven’t received an email invitation, you can manually resend the invitation:
- Go to the Team page
- Click the three dots next to the user’s name
- Select Resend an invite email
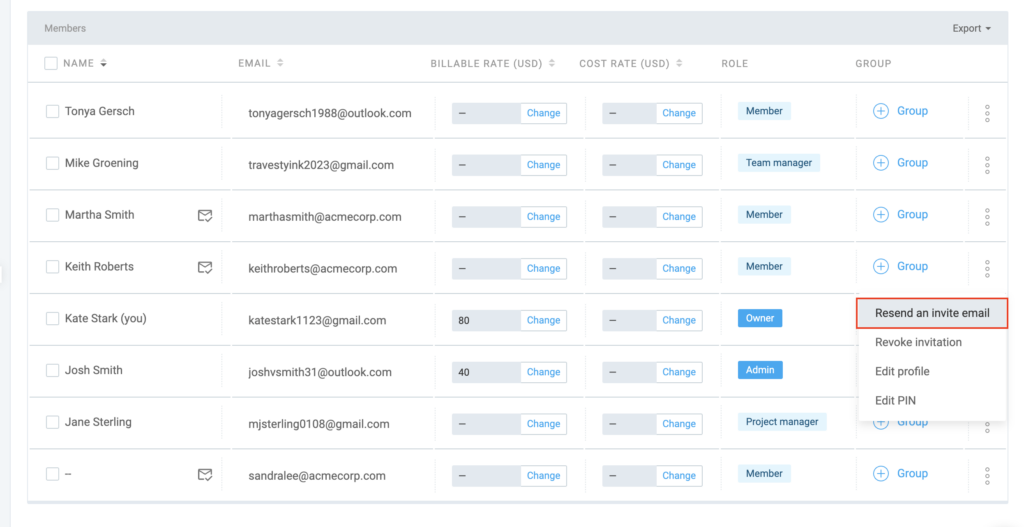
Members with a pending invite can sign up with the same email address used to invite them, and they’ll be able to accept the invite and be part of your workspace.
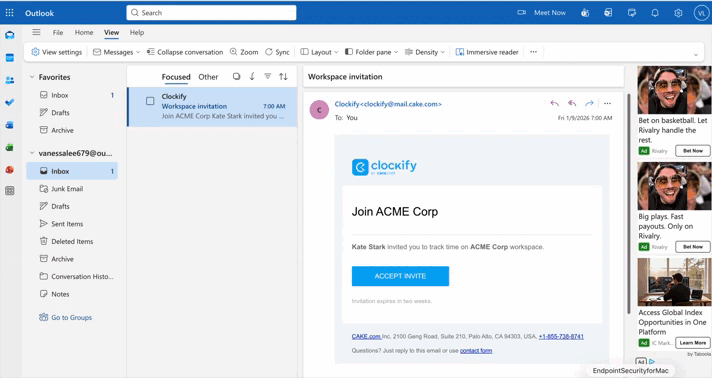
Accept the invite #
Once invited, users will receive an email with an activation link.
To accept the invite:
- Click the activation link in the email
- Follow the prompts to log in to the Clockify dashboard
Manage user profiles #
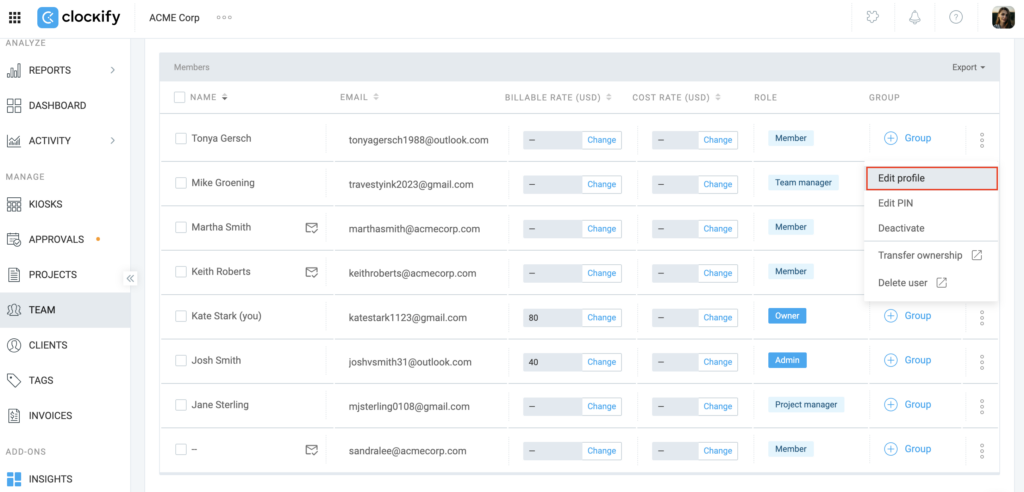
As an Admin or Owner, you can edit team members’ profiles directly from the Team page.
To edit a team member’s profile:
- Go to the Team page
- Click the three-dot icon next to the member’s name
- Select Edit profile
- Edit the following settings:
- Week start
- Working days
- Daily work capacity (hours)
- Assigned team manager
5. Click Save
Assign roles #
Only the Workspace Owner can remove the Admin role from someone.
You can assign different roles, each with its own level of access, to people in your workspace.
To assign roles:
- Go to the Team page
- Click Member next to the user you want to make an Admin
- Select the role you want to assign
- Member – The default role for everyone in the workspace (enabled by default)
- Admin – Can manage workspace settings, user permissions, and overall workspace administration
- Project Manager (Paid feature) – Can view tracked time on their projects, manage project details, launch the Kiosk if enabled, and approve submitted timesheets
- Team Manager – Can view all tracked time of their team members, edit their team’s time if enabled, and approve submitted timesheets
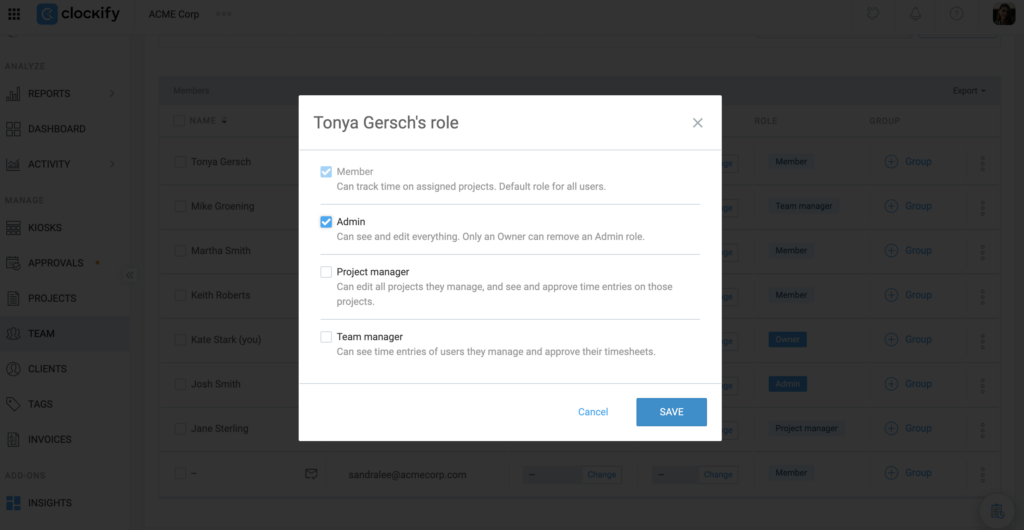
4. Click Save
Project manager is a paid feature available on any paid plan.
Deactivate a user #
- Go to the Team page
- Click the three-dot icon next to the user’s name
- Select Deactivate
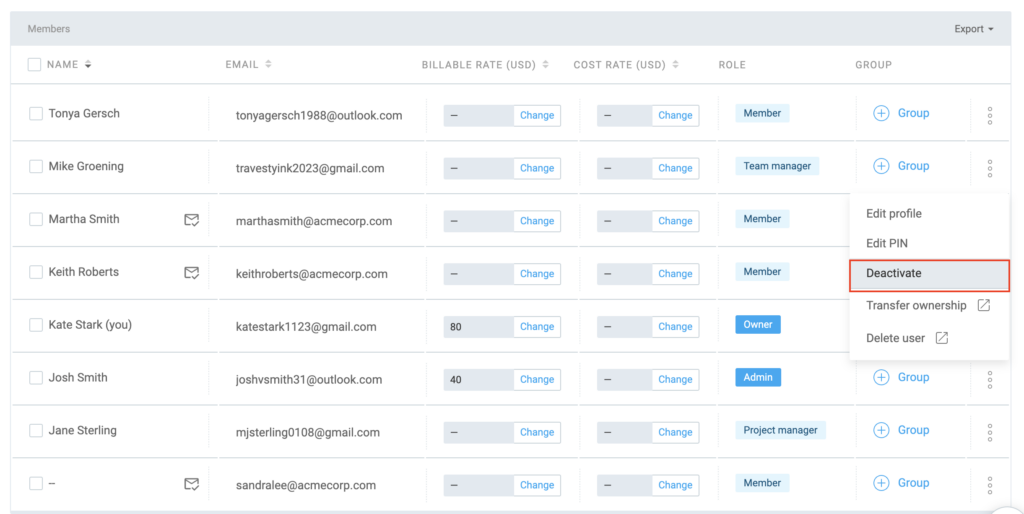
When a user is deactivated, they are instantly logged out of the workspace across all devices, and their active timer is automatically stopped.
All past time entries, descriptions, and tags remain in the system, but these won’t appear in reports by default. You would need to use the Inactive filter to see their data.
A user must be deactivated before they can be deleted from the workspace/organization.
Reactivate a user #
You can reactivate a user to restore their access to a workspace. Reactivating a user allows them to log in, track their time, and see their dashboard again. All their past data is automatically restored into the current reports.
To reactivate a user:
- Go to the Team page
- Select Show All or Show Inactive Users from the dropdown
- Click Activate next to the user you want to reactivate
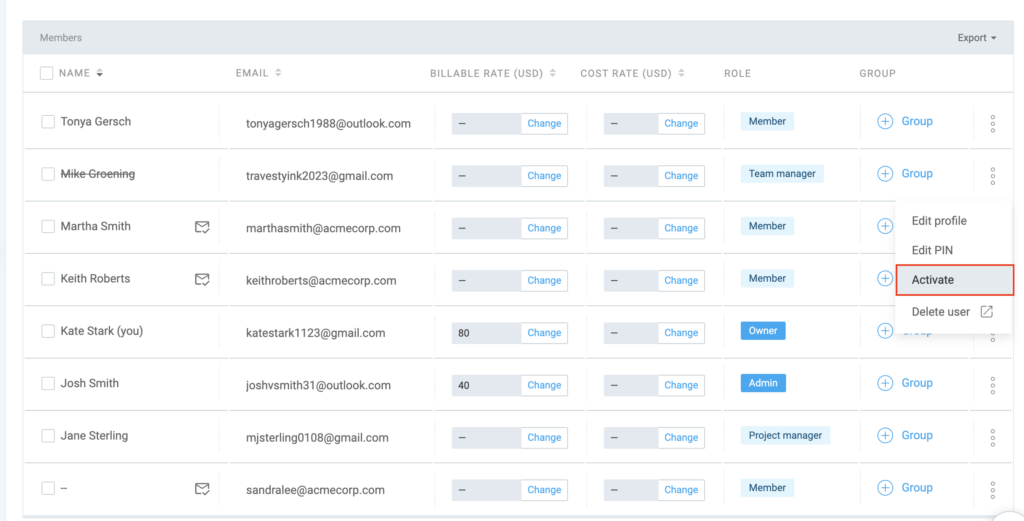
Inactive users won’t receive an email notification when they are reactivated.
Delete a user #
To delete a user:
- Go to the Team page
- Find the member you want to delete
- Open the three-dot icon
- Click Delete user
You’ll be redirected to the user’s profile in your CAKE.com Account page, where you can complete the action.
Or you can go directly to your CAKE.com Account:
- Navigate to the app switcher at the top left corner of the screen
- Choose your CAKE.com Account
- Go to the Members page
- Click on the deactivated workspace member you’d like to delete
- Open the three-dot icon on the right
- Choose Delete
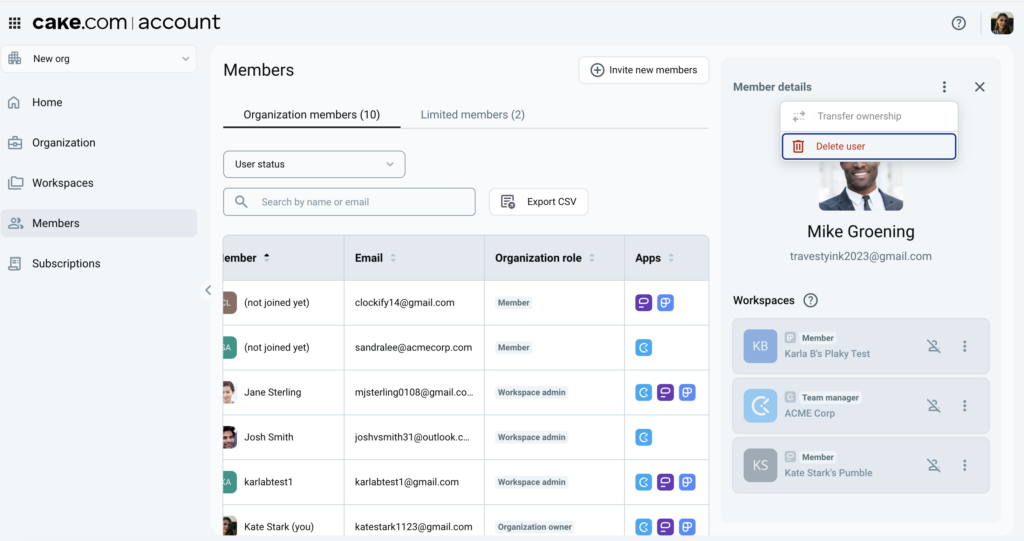
The user will no longer have access to the workspace, and their name will be deleted from the Team page.
Deactivation vs. deletion #
Here are the differences between deactivating and deleting a user:
| Deactivate User | Delete User |
| User can no longer log in or track time in the workspace | User is permanently removed and loses access to the workspace |
| All time entries remain in reports can still be filtered by that user | Time entries remain in reports, but you can no longer filter data by that specific user’s name |
| If a timer is running, it will be automatically stopped | User must be deactivated first before they can be deleted |
| You can reactivate the user at any time from the Team page | To bring the user back, you must send a completely new invitation |
| Frees up a seat/slot for a new member (on paid plans) | Permanently removes the user record from the workspace/organization |
| User’s name is moved to the “Inactive” list | User’s name is completely deleted from the Team page |
Transfer ownership #
Caution: To avoid accidentally transferring ownership to the wrong person, confirm the new owner’s details are accurate before proceeding with the transfer.
If you’re a Workspace Owner and want to transfer ownership to another user, you’ll need to do it in your CAKE.com account.
To transfer ownership:
- Open your Profile settings at the top right corner
- Click the Manage CAKE.com account button
- Go to the Members page
- Select the workspace member you’d like to transfer the ownership to
- Open the three-dot icon in the top right corner
- Choose Transfer ownership
- Click Transfer
What happens next?
- The new Owner gains full workspace control, including exclusive rights that even Admins don’t have, such as the ability to delete the workspace, set up Single Sign-On (SSO), and manage the subscription at the highest level.
- The former Owner is automatically downgraded to an Admin. They won’t lose access to the workspace, but they lose the Owner-specific permissions mentioned above.
For more information on transferring ownership to another user, check out this article.
FAQs #
Can I invite users without sending an email immediately?
No, once you click the Send invite button, the email invitation is sent automatically.
Why does a user I just invited still show as “Inactive”?
A user remains “Pending” or “Inactive” until they click the link in their invitation email and verify their account. If they haven’t received it, check their spam folder or resend the invite.
Do I get a refund if I deactivate a user halfway through the month?
No, Clockify does not offer prorated refunds for removed seats. When you deactivate a user, you simply free up a seat. You can then invite a new person to take that seat at no extra cost for the remainder of the billing cycle.
What happens to my seats if I downgrade to the Free plan?
If you downgrade, you lose access to paid features but you can still keep all your users. The Free plan allows for unlimited users and projects.
Why can’t I invite someone from the mobile app?
Currently, the ability to invite new members to a workspace is restricted to the web version to ensure all administrative roles and workspace permissions are correctly configured during the onboarding process. Use a desktop browser to access the Team page for invitations.