Inviter des utilisateurs et attribuer des rôles dans son espace de travail
En tant qu’administrateur ou propriétaire d’un espace de travail, l’une de vos principales responsabilités est de gérer les utilisateurs de votre espace de travail. Cela comprend l’invitation des membres de l’équipe, l’attribution des rôles et la gestion des profils d’utilisateurs. Grâce à ces fonctionnalités, vous pouvez vous assurer que votre équipe dispose de l’accès approprié pour suivre et gérer efficacement le temps.
Inviter des utilisateurs à son espace de travail #
Pour commencer, vous devez inviter les membres de votre équipe à accéder à votre espace de travail, afin qu’ils puissent suivre leur temps. Les administrateurs et les propriétaires sont les seuls à pouvoir inviter des utilisateurs à l’espace de travail.
Vous pouvez inviter deux types de membres :
- Membre standard – Pour les membres qui ont besoin d’accéder à la plupart des fonctionnalités de l’espace de travail
- Membre limité – Pour les membres qui ont uniquement besoin de pointer leur arrivée et leur départ via le kiosque
Le kiosque et les membres limités sont des fonctionnalités payantes disponibles dans tous les abonnements payants.
Inviter le membre standard #
Étapes à suivre pour inviter des utilisateurs :
- Allez sur la page Équipe
- Cliquez sur Ajouter un membre standard
- Saisissez les adresses email des utilisateurs que vous souhaitez inviter
- Cliquez sur Envoyer l'invitation
Une fois que l’utilisateur accepte l’invitation, il devient membre de l’espace de travail.
Avec la formule gratuite, vous pouvez inviter jusqu’à 4 utilisateurs. Passez à une formule payante si vous souhaitez inviter plus de 4 utilisateurs.
Inviter les membres limités #
Pour ajouter un membre à accès limité à votre espace de travail :
1. Accédez à l’onglet Équipe
2. Cliquez sur l’onglet Limité
3. Cliquez sur Ajouter un membre limité
4. Saisissez le nom de l’utilisateur que vous souhaitez ajouter
5. Cliquez sur Ajouter
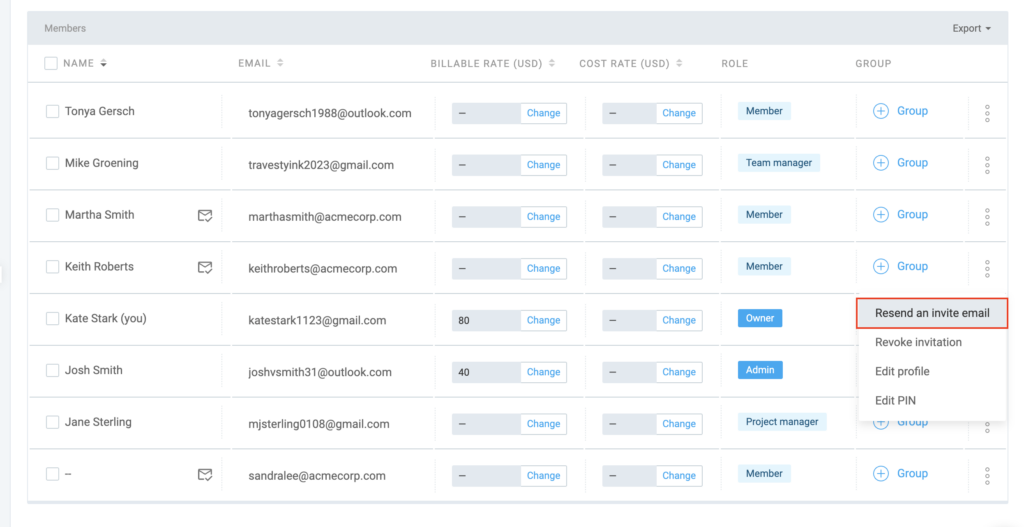
Renvoyer les invitations #
Si vous avez ajouté des utilisateurs mais qu’ils n’ont pas reçu d’invitation par email, vous pouvez renvoyer manuellement l’invitation :
- Allez sur la page Équipe
- Cliquez sur les trois points à côté du nom de l’utilisateur
- Sélectionnez Renvoyer un email d’invitation
Les membres dont l’invitation est en attente peuvent finaliser leur inscription en utilisant l’adresse email avec laquelle ils ont été invités, ce qui leur permettra d’accepter l’invitation et de rejoindre votre espace de travail.
Accepter l’invitation #
Une fois invités, les utilisateurs recevront un email contenant un lien d'activation.
Pour accepter l’invitation :
- Cliquez sur le lien d’activation dans l’email
- Suivez les instructions pour vous connecter au tableau de bord Clockify
Gérer les profils des utilisateurs #
En tant qu’administrateur ou propriétaire, vous pouvez modifier les profils des membres de l’équipe directement depuis la page Équipe.
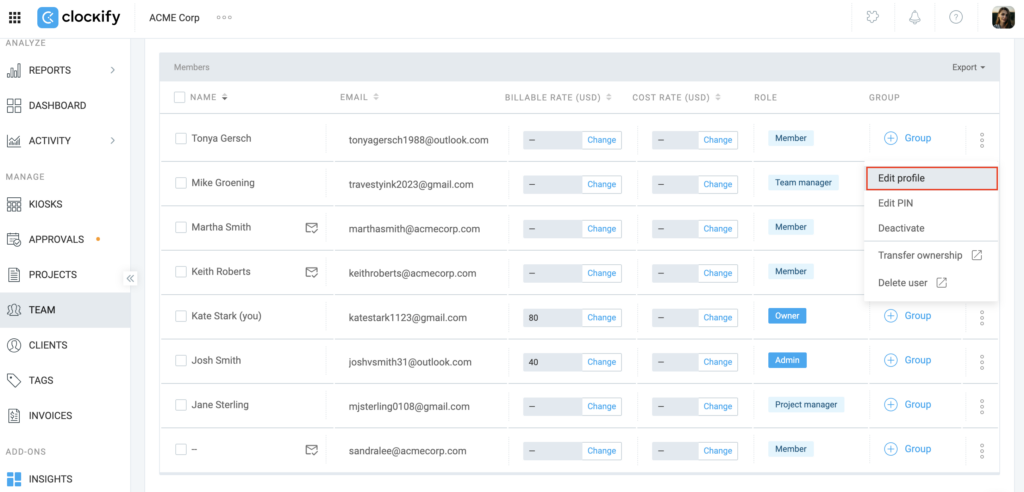
Pour modifier le profil d’un membre de l'équipe :
- Allez sur la page Équipe
- Cliquez sur les trois points à côté du nom du membre
- Sélectionnez Modifier le profil
- Modifiez les paramètres suivants :
- Début de la semaine
- Jours ouvrables
- Capacité de travail quotidienne (heures)
- Chef d’équipe désigné
5. Cliquez sur Enregistrer
Attribuer des rôles #
Seul le propriétaire de l’espace de travail peut retirer le rôle d’administrateur à quelqu’un.
Vous pouvez attribuer différents rôles aux utilisateurs, ce qui leur donne différents niveaux d’accès à votre espace de travail.
Voici comment attribuer des rôles :
- Allez sur la page Équipe
- Click Member next to the user you want to make an Admin
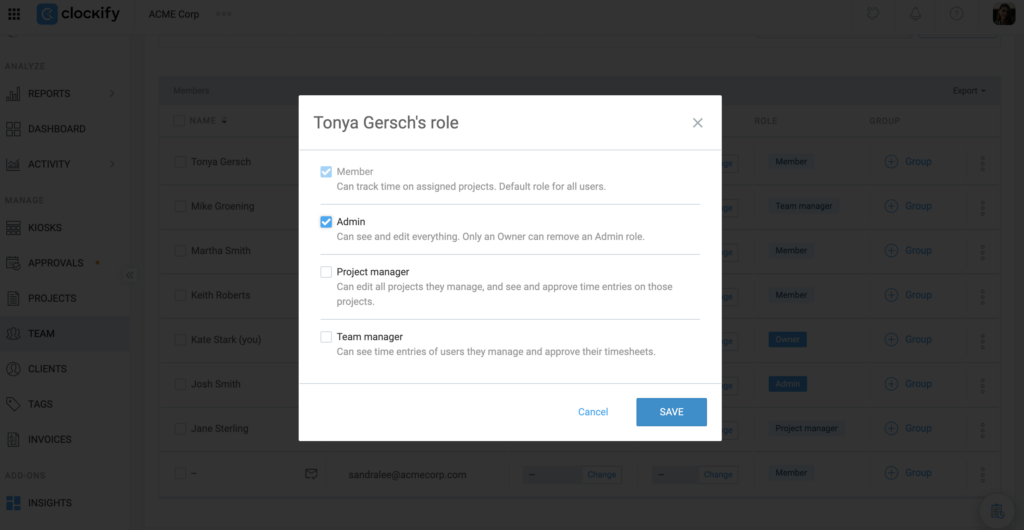
- Select the role you want to assign
- Member – The default role for everyone in the workspace (enabled by default)
- Admin – Can manage workspace settings, user permissions, and overall workspace administration
- Project Manager (Paid feature) – Can view tracked time on their projects, manage project details, launch the Kiosk if enabled, and approve submitted timesheets
- Team Manager – Can view all tracked time of their team members, edit their team’s time if enabled, and approve submitted timesheets
4. Cliquez sur Enregistrer
La fonctionnalité Chef de projet est disponible dans toutes les formules payantes.
Désactiver un utilisateur #
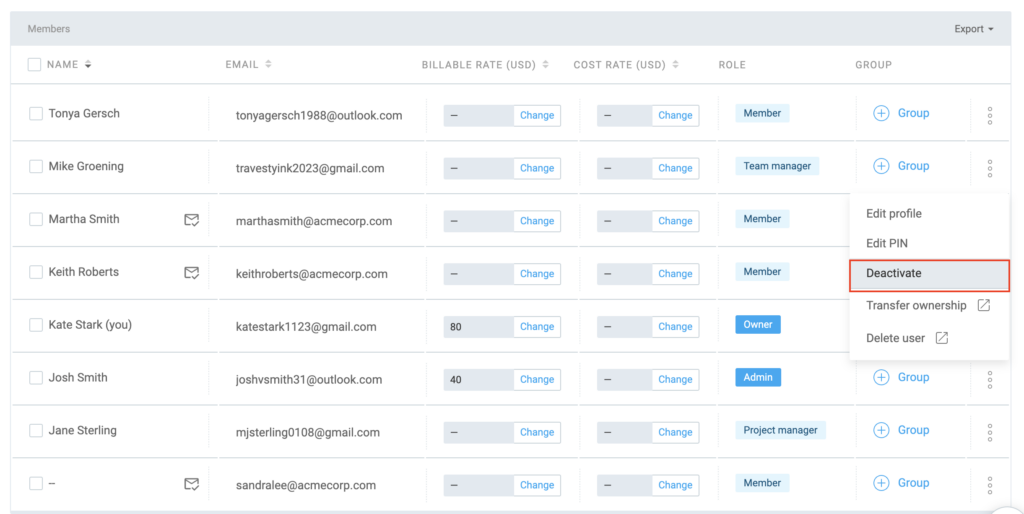
- Allez sur la page Équipe
- Cliquez sur les trois points à côté du nom de l’utilisateur
- Sélectionnez Désactiver
Lorsqu’un utilisateur est désactivé, il est immédiatement déconnecté de l’espace de travail sur tous ses appareils, et son compteur de temps actif est automatiquement arrêté.
Toutes les saisies de temps, descriptions et balises antérieures restent dans le système, mais elles n’apparaîtront pas dans les rapports par défaut. Vous devrez utiliser le filtre Inactif pour consulter ces données.
L’utilisateur doit être désactivé avant de pouvoir être supprimé de l’espace de travail ou de l’organisation.
Réactiver un utilisateur #
Vous avez la possibilité de réactiver un utilisateur pour lui restaurer l’accès à votre espace de travail. Cette action lui permet de se reconnecter, d’enregistrer ses heures de travail et de consulter son tableau de bord comme auparavant. De plus, toutes ses données historiques sont automatiquement réintégrées dans les rapports existants.
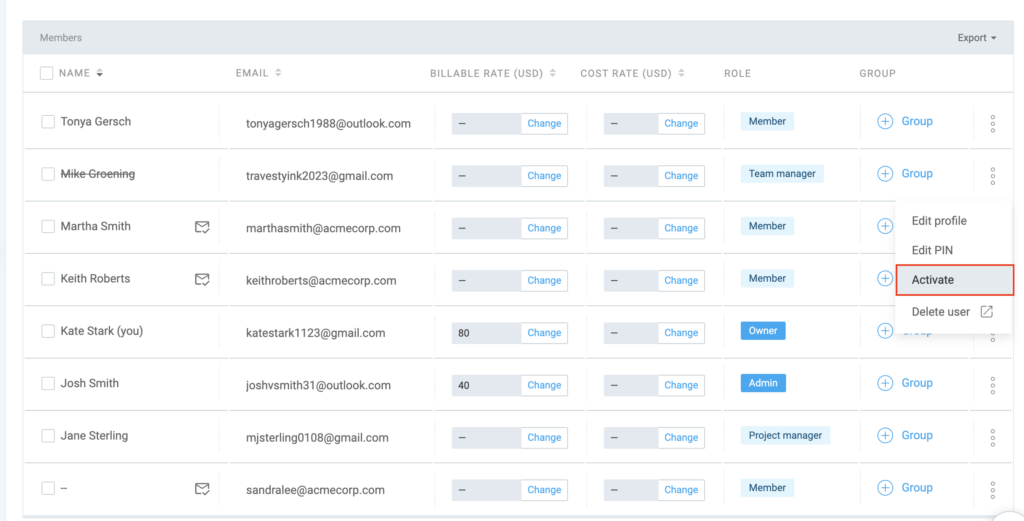
Pour réactiver un utilisateur :
- Allez sur la page Équipe
- Sélectionnez Afficher tout ou Afficher les utilisateurs inactifs dans le menu déroulant
- Cliquez sur Activer à côté de l’utilisateur que vous souhaitez réactiver
Les utilisateurs inactifs ne recevront pas de notification par email lorsqu’ils seront réactivés.
Supprimer un utilisateur #
Pour supprimer un utilisateur :
- Allez sur la page Équipe
- Recherchez le membre que vous souhaitez supprimer
- Cliquez sur les trois points
- Cliquez sur Supprimer l’utilisateur
Vous serez redirigé vers le profil de l’utilisateur dans la page de votre compte CAKE.com, où vous pourrez effectuer l’opération.
Vous pouvez également vous rendre directement sur votre compte CAKE.com :
- Accédez au sélecteur d’applis dans le coin supérieur gauche de l’écran
- Choisissez votre compte CAKE.com
- Allez à la page Membres
- Cliquez sur le membre de l’espace de travail désactivé que vous souhaitez supprimer
- Cliquez sur les trois points à droite
- Choisissez Supprimer
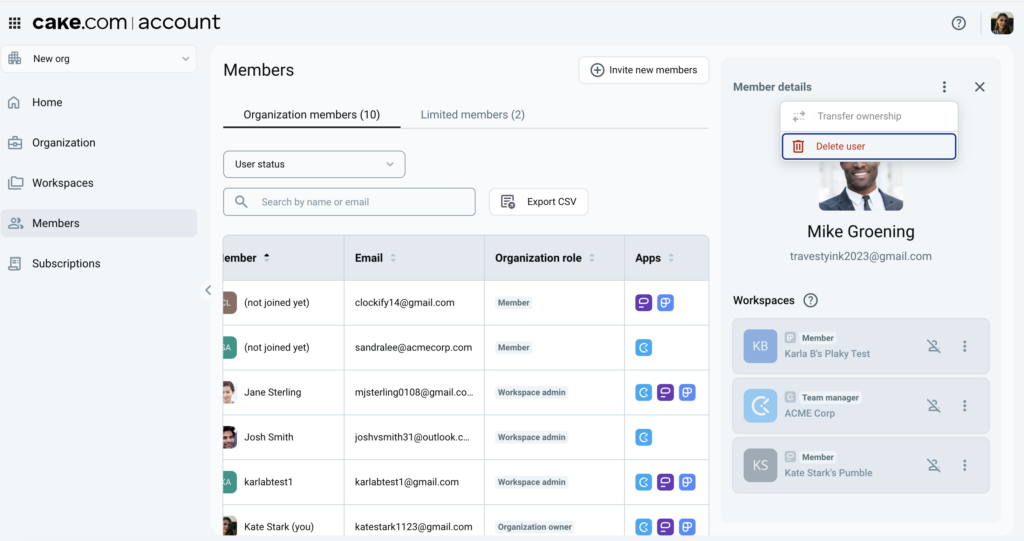
L’utilisateur n’aura plus accès à l’espace de travail et son nom sera supprimé de la page Équipe.
Désactivation et suppression #
Voici les différences entre la désactivation et la suppression d’un utilisateur :
| Deactivate User | Delete User |
| User can no longer log in or track time in the workspace | User is permanently removed and loses access to the workspace |
| All time entries remain in reports can still be filtered by that user | Time entries remain in reports, but you can no longer filter data by that specific user’s name |
| If a timer is running, it will be automatically stopped | User must be deactivated first before they can be deleted |
| You can reactivate the user at any time from the Team page | To bring the user back, you must send a completely new invitation |
| Frees up a seat/slot for a new member (on paid plans) | Permanently removes the user record from the workspace/organization |
| User’s name is moved to the “Inactive” list | User’s name is completely deleted from the Team page |
Transfert de propriété #
Attention : pour éviter de transférer accidentellement la propriété à la mauvaise personne, vérifiez que les coordonnées du nouveau propriétaire sont exactes avant de procéder au transfert.
Si vous êtes propriétaire d’un espace de travail et que vous souhaitez transférer la propriété à un autre utilisateur, vous devrez effectuer cette opération depuis votre compte CAKE.com.
Pour transférer la propriété :
- Ouvrez les paramètres de votre profil dans le coin supérieur droit
- Cliquez sur le bouton Gérer le compte CAKE.com
- Allez à la page Membres
- Sélectionnez le membre de l’espace de travail auquel vous souhaitez transférer la propriété
- Cliquez sur les trois points dans le coin supérieur droit
- Choisissez Transférer la propriété
- Cliquez sur Transférer
Et ensuite ?
- Le nouveau propriétaire dispose d’un contrôle total sur l’espace de travail, y compris des droits exclusifs dont même les administrateurs ne bénéficient pas, tels que la possibilité de supprimer l’espace de travail, de configurer l’authentification unique (SSO) et de gérer l’abonnement au plus haut niveau.
- L’ancien propriétaire est automatiquement rétrogradé au rang d’administrateur. Il conserve l’accès à l’espace de travail, mais perd les autorisations spécifiques au propriétaire mentionnées ci-dessus.
Pour plus d’informations sur le transfert de propriété à un autre utilisateur, consultez cet article.
FAQ #
Est-il possible d’inviter des utilisateurs sans envoyer immédiatement un email ?
Non, une fois que vous avez cliqué sur le bouton Envoyer l’invitation, l’invitation par email est envoyée automatiquement.
Pourquoi un utilisateur récemment invité apparaît-il toujours comme « Inactif » ?
Un utilisateur reste en statut « En attente » ou « Inactif » jusqu’à ce qu’il clique sur le lien figurant dans son email d’invitation et valide son compte. S’il ne l’a pas reçu, vérifiez son dossier de courrier indésirable ou renvoyez-lui l’invitation.
Est-il possible d’obtenir un remboursement si je désactive un utilisateur en cours de mois ?
Non, Clockify ne propose pas de remboursement au prorata pour les licences supprimées. Lorsque vous désactivez un utilisateur, vous libérez simplement une licence. Vous pouvez ensuite inviter une nouvelle personne à occuper cette licence sans frais supplémentaires pour le reste du cycle de facturation.
Comment mes places seront-elles gérées si je passe à la formule gratuite ?
Si vous passez à la formule gratuite, vous perdrez l’accès aux fonctionnalités payantes, mais vous pourrez conserver tous vos utilisateurs. La formule gratuite permet d’avoir un nombre illimité d’utilisateurs et de projets.
Pourquoi n’est-il pas possible d’inviter quelqu’un depuis l’appli mobile ?
Pour l’instant, la possibilité d’inviter de nouveaux membres dans un espace de travail est réservée à la version Web afin de garantir que tous les rôles d’administration et les autorisations de l’espace de travail soient correctement configurés lors du processus d’intégration. Utilisez un navigateur sur ordinateur pour accéder à la page Équipe et envoyer des invitations.