Benutzer einladen und Rollen im Arbeitsbereich zuweisen
Als Admin oder Besitzer im Arbeitsbereich ist deine Hauptaufgabe, Benutzer in deinem Arbeitsbereich zu verwalten. Dazu gehören das Einladen von Teammitgliedern, das Zuweisen von Rollen und die Verwaltung von Benutzerprofilen. Mit diesen Funktionen kannst du sicherstellen, dass dein Team den richtigen Zugriff hat, Zeiten effizient erfasst und verwaltet.
Benutzer in den Arbeitsbereich einladen #
Um loszulegen, musst du zuerst Teammitglieder in deinen Arbeitsbereich einladen, damit sie Zeit erfassen. Als Admin oder Besitzer kannst du Benutzer in einen Arbeitsbereich einladen.
Du kannst zwei Arten von Mitgliedern einladen:
- Vollbenutzer – Für Mitglieder, die Zugriff auf die meisten Arbeitsbereichsfunktionen benötigen. [Häufigster Anwendungsfall]
- Eingeschränkt – Für Mitglieder, die lediglich ihre Zeit über den Kiosk erfassen (ein- und ausstempeln) müssen
Kiosk- und eingeschränkte Mitglieder sind kostenpflichtige Funktionen, die in jedem kostenpflichtigen Plan verfügbar sind.
Vollbenutzer einladen #
So lädst du Vollbenutzer in deinen Arbeitsbereich ein:
- Gehe zur Teamseite
- Klicke auf Vollmitglied hinzufügen
- Gib die E-Mail-Adresse des Benutzers, den du einladen möchtest
- Klicke auf Einladung senden
Sobald ein Benutzer die Einladung annimmt, wird er zum Mitglied des Arbeitsbereichs.
Im Free-Plan kannst du bis zu 4 Benutzer gleichzeitig einladen, während dir in jedem kostenpflichtigen Abonnement eine unbegrenzte Anzahl an Benutzern zur Verfügung steht.
Eingeschränkte Benutzer einladen #
So fügst du deinem Arbeitsbereich eingeschränkte Mitglieder hinzu:
1. Gehe zur Seite Team
2. Klicke auf den Tab Eingeschränkt
3. Klicke auf Eingeschränkte Mitglieder hinzufügen
4. Tippe den Namen des Benutzers ein, den du hinzufügen möchtest
5. Klicke auf Hinzufügen
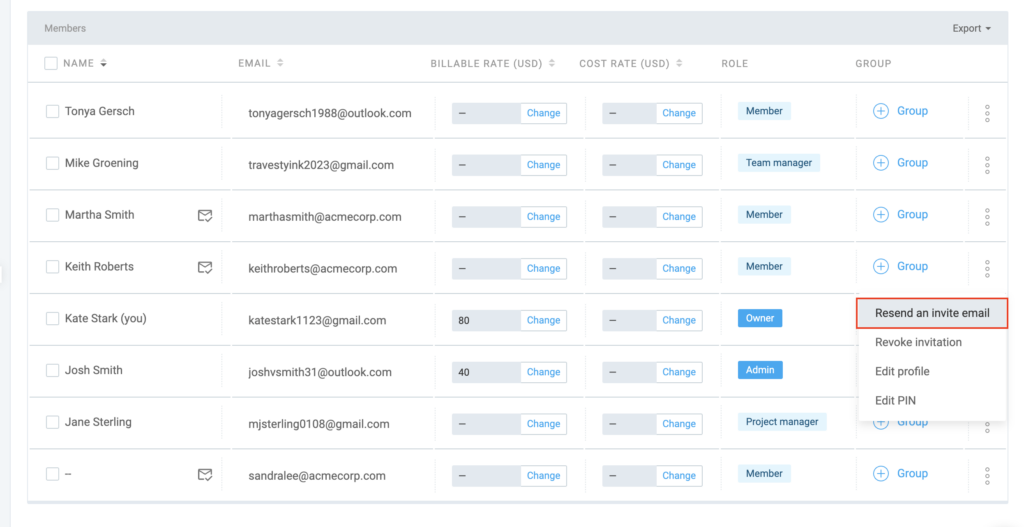
Einladungen erneut senden #
Wenn du Benutzer hinzugefügt hast, aber diese keine E-Mail-Einladung erhalten haben, kannst du die Einladung manuell erneut senden:
- Gehe zur Seite Team
- Klicke auf die drei Punkte neben dem Benutzernamen
- Wähle Einladungs-E-Mail erneut senden
Mitglieder mit einer ausstehenden Einladung können sich mit derselben E-Mail-Adresse registrieren, an die die Einladung gesendet wurde. Sobald sie registriert sind, können sie die Einladung annehmen und werden Teil deines Arbeitsbereichs.
Einladung annehmen #
Sobald Benutzer eingeladen werden, erhalten sie eine E-Mail mit dem Aktivierungslink.
So nimmst du die Einladung an:
- Klicke auf den Aktivierungslink in der E-Mail
- Folge den Anweisungen, um dich im Clockify-Dashboard anzumelden
Benutzerprofile verwalten #
Als Administrator oder Inhaber kannst du die Profile von Teammitgliedern direkt auf der Seite Team bearbeiten.
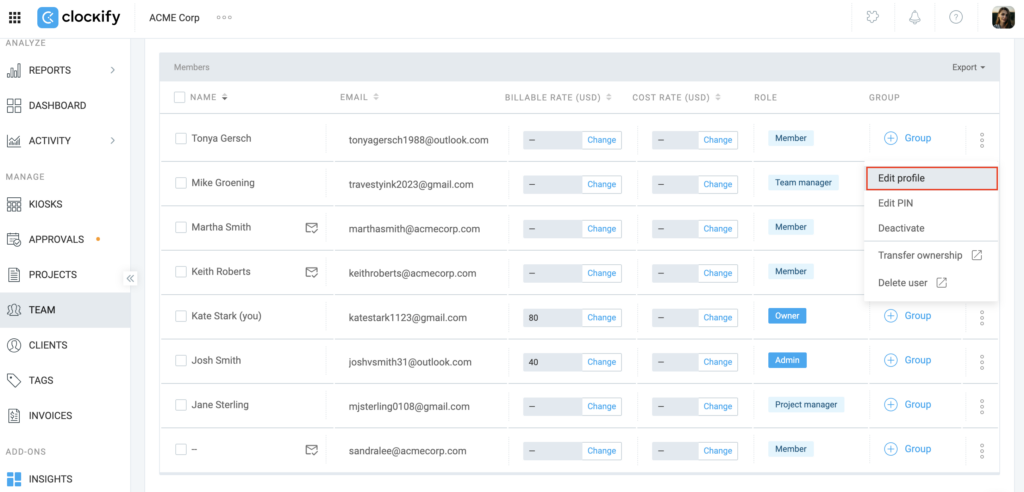
So bearbeitest du Profile deiner Teammitglieder:
- Gehe zur Seite Team
- Klicke auf das Drei-Punkte-Symbol neben dem Mitgliedsnamen
- Wähle Profil bearbeiten aus
- Bearbeite die folgenden Einstellungen:
- Wochenstart
- Arbeitstage
- Tägliche Arbeitskapazität (Stunden)
- Zugewiesene Teammanager
5. Klicke auf Speichern
Rollen zuweisen #
Nur der Besitzer des Arbeitsbereichs kann die Administrator-Rolle entziehen.
Du kannst Personen in deinem Arbeitsbereich verschiedene Rollen zuweisen, von denen jede über eigene Zugriffsberechtigungen verfügt.
So weist du Rollen zu:
- Gehe zur Seite Team
- Klicke neben dem Benutzer, den du zum Admin machen möchtest, auf Mitglied
- Wähle die Rolle aus, die du zuweisen möchtest:
- Mitglied – Die Standardrolle für jeden im Arbeitsbereich (standardmäßig aktiviert)
- Admin – Kann Arbeitsbereichseinstellungen, Benutzerrechte und die gesamte Arbeitsbereich-Verwaltung verwalten
- Projektmanager (Kostenpflichtige Funktion) – Kann erfasste Zeiten für seine Projekte einsehen, Projektdetails verwalten, den Kiosk starten (falls aktiviert) und eingereichte Arbeitszeittabellen genehmigen
- Teammanager – Kann alle erfassten Zeiten seiner Teammitglieder einsehen, die Zeiten seines Teams bearbeiten (falls aktiviert) und eingereichte Arbeitszeittabellen genehmigen
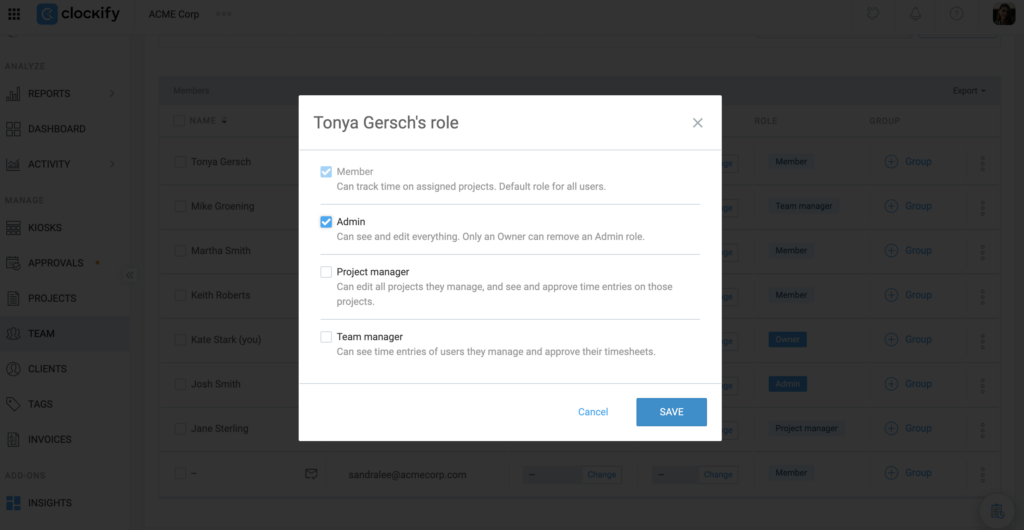
4. Klicke auf Speichern
Die Rolle Projektmanager ist eine kostenpflichtige Funktion, die in jedem kostenpflichtigen Plan verfügbar ist.
Benutzer deaktivieren #
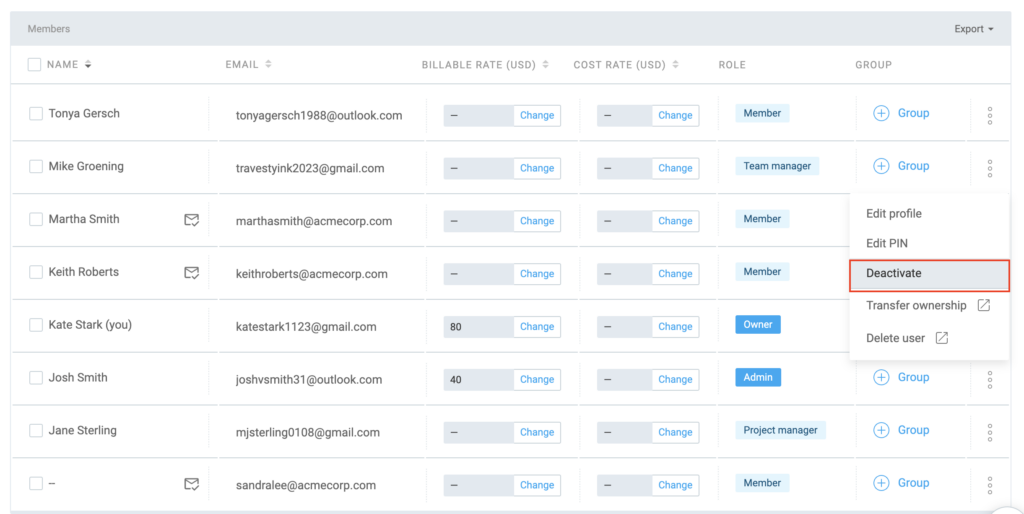
- Gehe zur Seite Team
- Klicke auf das Drei-Punkte-Symbol neben dem Benutzernamen
- Wähle Deaktivieren
Wenn ein Benutzer deaktiviert wird, wird er sofort auf allen Geräten aus dem Arbeitsbereich ausgeloggt und sein laufender Timer wird automatisch gestoppt.
Alle vergangenen Zeiteinträge, Beschreibungen und Tags bleiben im System erhalten, erscheinen jedoch standardmäßig nicht in den Berichten. Du musst den Filter Inaktiv verwenden, um deren Daten einzusehen.
Ein Benutzer muss zuerst deaktiviert werden, bevor er aus dem Arbeitsbereich oder der Organisation gelöscht werden kann.
Benutzer reaktivieren #
Du kannst einen Benutzer reaktivieren, um seinen Zugriff auf den Arbeitsbereich wiederherzustellen. Die Reaktivierung ermöglicht es dem Benutzer, sich erneut anzumelden, seine Zeit zu erfassen und sein Dashboard einzusehen. Alle seine vergangenen Daten werden automatisch wieder in die aktuellen Berichte aufgenommen.
So reaktivierst du einen Benutzer:
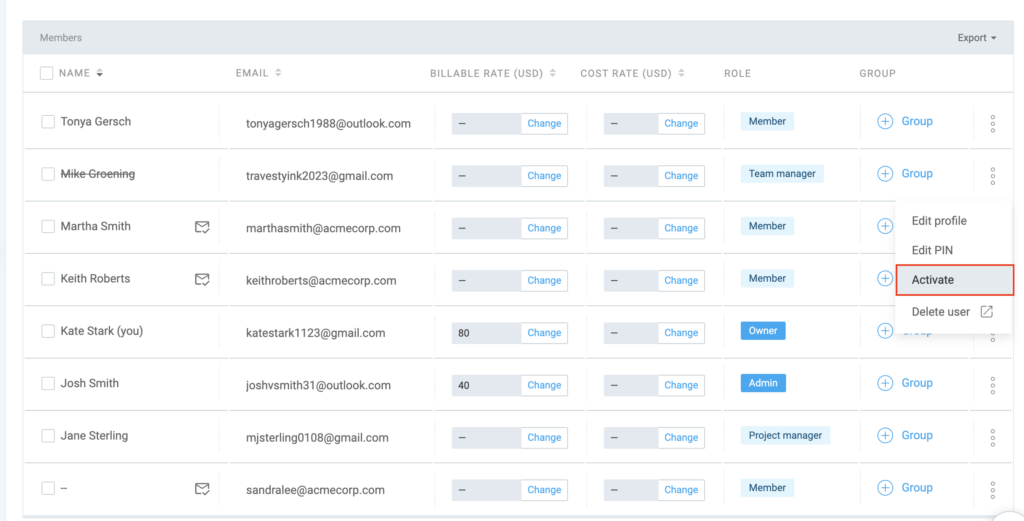
- Gehe zur Seite Team
- Wähle Alle anzeigen oder Inaktive Benutzer anzeigen aus dem Dropdown-Menü aus
- Klicke auf Aktivieren neben dem Benutzer, den du reaktivieren möchtest
Inaktive Benutzer erhalten keine E-Mail-Benachrichtigung, wenn sie reaktiviert werden.
Benutzer löschen #
So löschst du einen Benutzer:
- Gehe zur Seite Team
- Finde das Mitglied, da du löschen möchtest
- Öffne das Drei-Punkte-Symbol
- Klicke auf Benutzer löschen
Du wirst zum Profil des Benutzers auf deiner CAKE.com-Kontoseite weitergeleitet, wo du den Vorgang abschließen kannst.
Oder gehe direkt zu deinem CAKE.com-Konto:
- Navigiere zum App-Umschalter in der oberen linken Ecke des Bildschirms
- Wähle dein CAKE.com-Konto aus
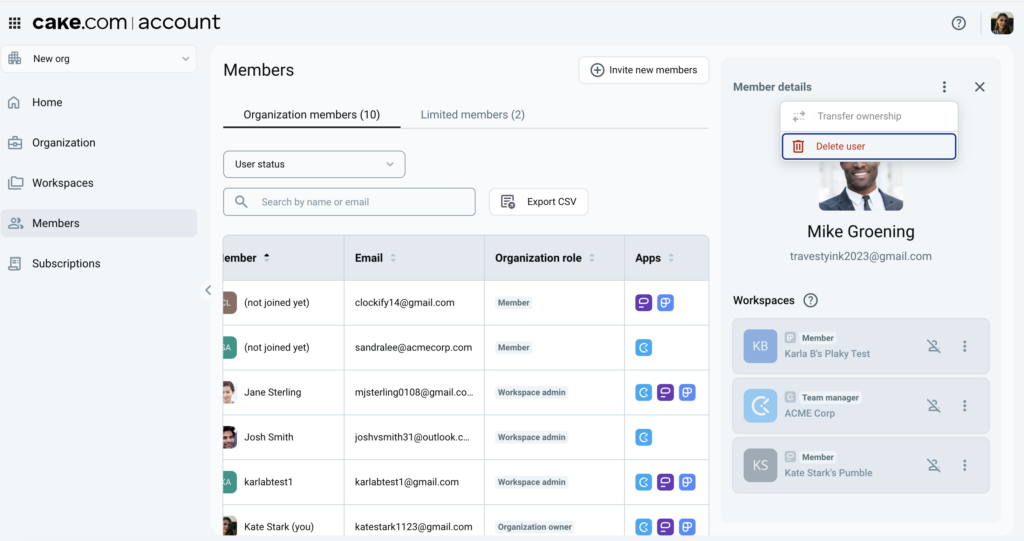
- Gehe zur Seite Members (Mitglieder)
- Klicke auf das deaktivierte Arbeitsbereich-Mitglied, das du löschen möchtest
- Öffne das Drei-Punkte-Symbol rechts
- Wähle Löschen aus
Der Benutzer hat keinen Zugriff mehr auf den Arbeitsbereich und sein Name wird von der Teamseite gelöscht.
Deaktivierung vs. Löschung #
Hier sind die Unterschiede zwischen dem Deaktivieren und dem Löschen eines Benutzers:
| Benutzer deaktivieren | Benutzer löschen |
| Der Benutzer kann sich nicht mehr anmelden oder Zeit im Arbeitsbereich erfassen | Der Benutzer wird dauerhaft entfernt und verliert den Zugriff auf den Arbeitsbereich |
| Alle Zeiteinträge bleiben in den Berichten erhalten und können weiterhin nach diesem Benutzer gefiltert werden | Zeiteinträge bleiben in den Berichten erhalten, aber die Daten können nicht mehr nach dem Namen dieses spezifischen Benutzers gefiltert werden |
| Falls ein Timer läuft, wird dieser automatisch gestoppt | Ein Benutzer muss zuerst deaktiviert werden, bevor er gelöscht werden kann |
| Du kannst den Benutzer jederzeit über die Seite „Team“ reaktivieren. | Um den Benutzer zurückzuholen, musst du eine komplett neue Einladung senden |
| Gibt einen Platz (Slot) für ein neues Mitglied frei (in kostenpflichtigen Plänen) | Entfernt den Benutzerdatensatz dauerhaft aus dem Arbeitsbereich/der Organisation. |
| Der Name des Benutzers wird in die Liste „Inaktiv“ verschoben | Der Name des Benutzers wird vollständig von der Seite „Team“ gelöscht |
Inhaberschaft übertragen #
Vorsicht: Um eine versehentliche Übertragung der Inhaberschaft an die falsche Person zu vermeiden, überprüfe die Daten des neuen Besitzers sorgfältig auf Richtigkeit, bevor du mit der Übertragung fortfährst.
Wenn du Arbeitsbereich-Besitzer bist und die Inhaberschaft an einen anderen Besitzer übertragen möchtest, musst du dies in deinem CAKE.com tun.
So wird du die Inhaberschaft übertragen:
- Öffne deine Profileinstellungen oben rechts
- Klicke auf die Schaltfläche CAKE.com-Konto verwalten
- Gehe zur Seite Members (Mitglieder)
- Wähle das Arbeitsbereich-Mitglied aus, auf das du die Inhaberschaft übertragen möchtest
- Öffne das Drei-Punkte-Menü oben rechts
- Wähle Inhaberschaft übertragen aus
- Klicke auf Übertragen
Was passiert als Nächstes?
- Der neue Besitzer erhält die volle Kontrolle über den Arbeitsbereich, einschließlich exklusiver Rechte, die selbst Administratoren nicht haben. Dazu gehören die Möglichkeit, den Arbeitsbereich zu löschen, Single Sign-On (SSO) einzurichten und das Abonnement auf höchster Ebene zu verwalten.
- Der bisherige Besitzer wird automatisch zum Administrator herabgestuft. Er verliert nicht den Zugriff auf den Arbeitsbereich, verliert jedoch die oben genannten besitzerspezifischen Berechtigungen.
Weitere Informationen zur Übertragung der Inhaberschaft an einen anderen Benutzer findest du in diesem Artikel.
Häufig gestellte Fragen #
Kann ich Benutzer einladen, ohne sofort eine E-Mail zu senden?
Nein, sobald du auf die Schaltfläche Einladung senden klickst, wird die E-Mail-Einladung automatisch verschickt.
Warum wird ein Benutzer, den ich gerade eingeladen habe, immer noch als „Inaktiv“ angezeigt?
Ein Benutzer behält den Status „Ausstehend“ oder „Inaktiv“, bis er auf den Link in seiner Einladungs-E-Mail klickt und sein Konto verifiziert. Falls der Benutzer die E-Mail nicht erhalten hat, überprüfe bitte den Spam-Ordner oder sende die Einladung erneut.
Erhalte ich eine Rückerstattung, wenn ich einen Benutzer in der Mitte des Monats deaktiviere?
Nein, Clockify bietet keine anteiligen Rückerstattungen für entfernte Plätze an. Wenn du einen Benutzer deaktivierst, gibst du lediglich einen Platz frei. Du kannst dann für den Rest des Abrechnungszeitraums ohne zusätzliche Kosten eine neue Person einladen, die diesen Platz einnimmt.
Was passiert mit meinen Benutzerplätzen, wenn ich auf den kostenlosen Plan herabstufte?
Wenn du ein Downgrade durchführst, verlierst du den Zugriff auf die kostenpflichtigen Funktionen, kannst aber weiterhin alle deine Benutzer behalten. Der kostenlose Plan erlaubt eine unbegrenzte Anzahl an Benutzern und Projekten.
Warum kann ich niemanden über die mobile App einladen?
Derzeit ist die Funktion, neue Mitglieder zu einem Arbeitsbereich einzuladen, auf die Web-Version beschränkt. Dies stellt sicher, dass alle Administratorrollen und Berechtigungen während des Onboarding-Prozesses korrekt konfiguriert werden. Bitte verwende einen Desktop-Browser, um auf die Seite Team zuzugreifen und Einladungen zu versenden.