Controlar tiempo
Con Clockify, puedes controlar fácilmente el tiempo que dedicas a diversas actividades, ya sea usando la aplicación web, la extensión del navegador, la aplicación de escritorio o la aplicación móvil. Esta guía cubre los fundamentos del control de tiempo, incluyendo cómo iniciar y detener temporizadores, gestionar las entradas de tiempo y utilizar funciones adicionales que facilitan el seguimiento.
Configurar el control de tiempo #
Antes de comenzar a seguir tu tiempo, debes asegurarte de que el Rastreador de tiempo esté activado y accesible en tu espacio de trabajo.
Para acceder a la página del Rastreador de tiempo:
- Inicia sesión en tu cuenta y navega a tu espacio de trabajo
- En la barra lateral, haz clic en Rastreador para acceder a la página
Una vez que estés en la página Rastreador, estarás listo para empezar a controlar tu tiempo.
Elige tu plataforma de seguimiento de tiempo #
Puedes seguir tu tiempo usando una de las siguientes plataformas:
- Aplicación web
- Extensión de navegador (Chrome/Firefox)
- Aplicación de escritorio (Mac, Windows, Linux)
- Aplicación móvil (iOS/Android)
Todos los datos rastreados se sincronizan en línea, para que puedas acceder a tus entradas de tiempo desde cualquier dispositivo.
Controla el tiempo con el temporizador #
Iniciar temporizador #
Para empezar a seguir tu tiempo, sigue estos pasos:
- Ve a la página Rastreador
- Haz clic en el ícono del reloj en la esquina superior derecha para acceder al modo de Temporizador
- Introduce los detalles de la actividad (opcional):
- ¿En qué estás trabajando?: Describe tu tarea
- Proyecto/Tarea: Selecciona o crea un proyecto/tarea
- Facturabilidad: Selecciona Facturable/No facturable
- Etiquetas: Añade cualquier etiqueta relevante para categorizar la actividad (opcional)
Haz clic en INICIAR para empezar a registrar el tiempo.
Por favor, consulta con tu gerente si existe algún flujo de trabajo predefinido que debas seguir a la hora de crear entradas de tiempo.
Detener el temporizador #
Para detener el temporizador al finalizar tu tarea:
- Ve a la página Rastreador
- Haz clic en el botón DETENER para detener el temporizador
El temporizador seguirá funcionando hasta que lo detengas manualmente.
Si sales de la página o cierras el navegador, el temporizador seguirá a menos que uses la extensión del navegador, que tiene la opción de detener el temporizador al cerrar el navegador.
Ícono de temporizador en la pestaña del navegador #
Para ayudarte a seguir el tiempo activo, el ícono de pestaña Clockify en tu navegador cambia cuando el temporizador está en marcha. Esta señal visual evita que olvides accidentalmente que el temporizador está activo.
Continuar con una entrada anterior #
Si necesitas continuar con el control del tiempo de una tarea anterior:
- Ve a la página Rastreador
- Encuentra la entrada de tiempo que quieres continuar
- Haz clic en el ícono de reproducción junto a la entrada
El temporizador se reiniciará con todos los datos que has introducido previamente copiados automáticamente.
Editar entradas en masa #
Para editar múltiples entradas:
- Ve al Rastreador
- Haz clic en el ícono de Edición masiva
- Marca las casillas al lado de las entradas que quieres editar
- Edita los siguientes detalles si hace falta:
- Descripción
- Proyecto
- Etiquetas
- Facturable (Sí/No)
- Hora de inicio/fin
- Fecha
Haz clic en Guardar para aplicar los cambios
Dividir entradas de tiempo #
Tiempo dividido es una función de pago disponible en cualquier plan de pago.
Para dividir una entrada de tiempo:
- Ve al Rastreador
- Haz clic en el ícono de tres puntos al lado de la entrada que quieres dividir
- Haz clic en Dividir
- Mueve el control deslizante para especificar dónde quieres dividir el tiempo
- Haz clic en Guardar
Duplicar entradas de tiempo #
Para duplicar entradas de tiempo:
- Ve al Rastreador
- Haz clic en el ícono de tres puntos al lado de la entrada que quieres duplicar
- Haz clic en Duplicar
Eliminar una entrada de tiempo #
Para eliminar una entrada de tiempo:
- Ve al Rastreador
- Haz clic en el ícono de tres puntos al lado de la entrada que quieres eliminar
- Haz clic en Eliminar
- Para confirmar, haz clic en ELIMINAR en la ventana emergente
Después de eliminar una entrada, aparece una ventana verde. Dentro de 20 segundos después de hacer clic en Eliminar, puedes hacer clic en el botón Deshacer en esta ventana para restaurar la entrada y revertir la acción.
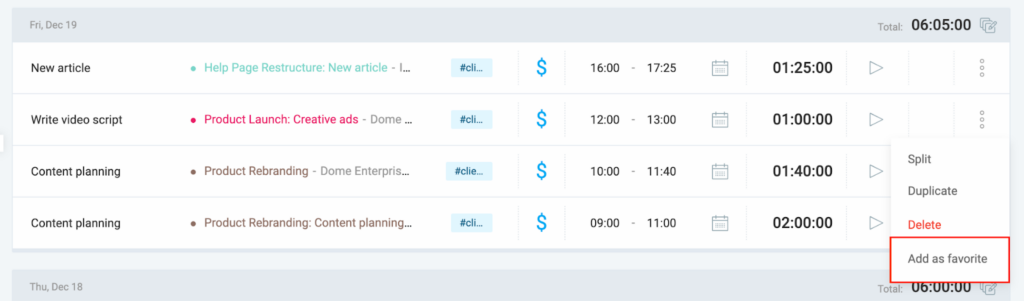
Marcar tiempo como favorito #
Esta función está disponible para los usuarios con cualquier plan de pago, y para los usuarios en período de prueba.
Puedes marcar entradas de tiempo que usas frecuentemente como favoritas para acceder fácilmente:
- Haz clic en el botón de tres puntos de esa entrada
- Selecciona la opción Añadir como favorita en el menú desplegable
- Introduce un nuevo nombre para la entrada de tiempo favorita o déjala tal cual
- Haz clic en Añadir
Las entradas de tiempo favoritas aparecen como pestañas bajo el campo de entrada de tiempo en la página Rastreador. Pasa el cursor sobre la entrada de tiempo y haz clic en el ícono de reproducción para continuar el temporizador.

Preguntas frecuentes #
¿Cómo puedo controlar el tiempo si olvido iniciar el temporizador?
Si olvidas iniciar el temporizador, no te preocupes. Aquí tienes dos maneras sencillas para corregir tu seguimiento de tiempo:
- Simplemente edítalo: Haz clic en la entrada de tiempo que quieres cambiar e introduce la hora de inicio correcta.
- Ve a Planilla de horarios: Pasa a la página de Planilla para añadir cualquier entrada faltante o comprobar tu tiempo pasado registrado.
¿Puedo seguir el tiempo en varios proyectos a la vez?
Solo puedes tener un temporizador activo por espacio de trabajo a la vez. Sin embargo, si se permite el seguimiento de tiempo simultáneo en múltiples proyectos, debería usarse un espacio de trabajo separado.
¿Qué sucede si olvido detener el temporizador?
Si el temporizador funciona durante un período prolongado, Clockify puede enviarte un recordatorio por correo electrónico. Puedes activar o desactivar esta notificación en la Configuración de tu perfil.
¿Puedo cambiar el proyecto o la tarea mientras el temporizador está en marcha?
Sí, puedes actualizar el proyecto, la tarea, la descripción y otros detalles mientras el temporizador está en marcha editando los campos directamente en la página Rastreador.
¿Cómo puedo añadir tiempo manualmente?
Si necesitas añadir tiempo manualmente, cambia al Modo manual. En este modo, puedes introducir los detalles del tiempo, incluyendo la hora de inicio y fin y la información del proyecto sin usar un temporizador activo.
¿Por qué no veo la opción de dividir o duplicar entradas de tiempo?
Las funciones de dividir y duplicar están desactivadas cuando el Temporizador forzado está activado. Puedes desactivar el Temporizador forzado en la Configuración del espacio de trabajo > Permisos.