Track your time
With Clockify, you can easily track the time you spend on various activities, whether you’re using the Web app, Browser extension, Desktop app, or Mobile app. This guide covers the basics of time tracking, including how to start and stop timers, manage time entries, and use additional features that make tracking easier.
Set up time tracking #
Before you can start tracking time, you need to ensure that the Time Tracker is activated and accessible in your workspace.
To access Time Tracker page:
- Log in to your account and navigate to your workspace
- From the sidebar, click on the Time Tracker to access the page
Once you’re on the Time Tracker page, you’re ready to start tracking your time.
Choose your time tracking platform #
You can track time using one of the following platforms:
- Web app
- Browser extension (Chrome/Firefox)
- Desktop app (Mac, Windows, Linux)
- Mobile app (iOS/Android)
All tracked data syncs online, so you can access your time entries from any device.
Track time with timer #
Start timer #
To begin tracking your time, follow these steps:
- Go to the Time Tracker page
- Click the clock icon in the upper-right corner to enter Timer mode
- Enter activity details (Optional):
- What are you working on? – Describe your task
- Project/Task – Select or create a project/task
- Billability – Select Billable/Non-billable
- Tags – Add any relevant tags to categorize the activity (optional)
4. Click START to start tracking time
Please check with your manager if there’s a predefined workflow that you should follow when creating time entries.
Stop timer #
To stop the timer when you finish your task:
- Go to the Time Tracker page
- Click the STOP button to stop the timer
The timer will continue running until you manually stop it.
If you leave the page or close the browser, the timer will keep running unless you’re running the timer from the browser extension, which has an option to stop the timer when you close the browser.
Timer icon on browser tab #
To help you track active time, the Clockify tab icon in your browser changes when the timer is running. This visual cue prevents you from accidentally forgetting that the timer is active.
Continue previous entry #
If you need to continue tracking time for a previous task:
- Go to the Time Tracker page
- Locate the time entry you want to resume
- Click the play icon next to the entry
The timer will restart with all the details you previously entered automatically copied.
Bulk edit time entries #
To edit multiple entries:
- Go to Time Tracker
- Click the Bulk edit icon
- Check the boxes next to the entries you want to edit
- Edit the following details as needed:
- Description
- Project
- Tags
- Billable (Yes/No)
- Start/end time
- Date
5. Click Save to apply the changes
Split time entries #
Split time is a paid feature available when you upgrade to any paid plan.
To split a time entry:
- Go to Time Tracker
- Click on the three-dot icon next to the entry you want to split
- Click Split
- Move the slider to specify where you want to split the time
- Click Save
Duplicate time entries #
To duplicate time entries:
- Go to Time Tracker
- Click on the three-dot icon next to the entry you want to duplicate
- Click Duplicate
Delete time entry #
To delete a time entry:
- Go to Time Tracker
- Click on the three-dot icon next to the entry you want to delete
- Click Delete
- Click DELETE again on the pop-up to confirm
After deleting an entry, a green pop-up appears. Within 20 seconds of clicking Delete, you can click the Undo button in this pop-up to restore the entry and reverse the action.
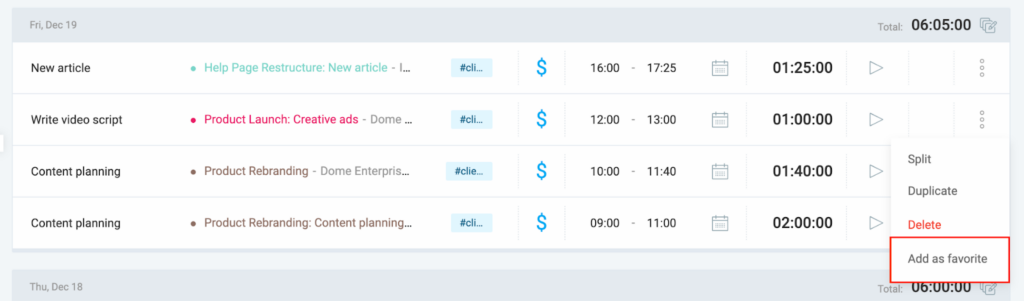
Mark time as favorite #
This feature is available to users on any paid plan, and for users on trial.
You can mark frequently used time entries as favorites for easy access:
- Click on the three-dots button of that entry
- Choose Add as favorite option from the dropdown
- Enter a new name for the favorite time entry or leave it as is
- Click Add
Favorite time entries appear as tabs below the time entry field in the Time Tracker page. Hover over the time entry and click the play icon to resume the timer.

FAQ #
How do I track time if I forget to start the timer?
If you forget to hit the timer, no worries! You have two simple ways to fix your time tracking:
- Just edit it: Click on the time entry you want to change and put in the right start time.
- Go to the Timesheet: Head over to the Timesheet page to add any missing entries or check on your past tracked time.
Can I track time on multiple projects at the same time?
Only one active timer is permitted within a single workspace. However, if simultaneous time tracking on multiple projects is required, a separate workspace should be used.
What happens if I forget to stop the timer?
If the timer runs for an extended period of time, Clockify can send you an email reminder. You can turn this notification on or off in your Profile settings.
Can I change the project or task while the timer is running?
Yes, you can update the project, task, description, and other details while the timer is running by editing the fields directly on the Time Tracker page.
How can I add time manually?
If you need to add time manually, switch to Manual mode. In this mode, you can input the time details including start/end time and project info without using a live timer.
Why don’t I see an option to split or duplicate time entries?
Split and duplicate features are disabled when Force Timer is enabled. You can disable Force Timer in Workspace settings > Permissions.