Como monitorar suas horas
Com o Clockify, você pode monitorar facilmente o tempo gasto em diversas atividades, seja usando o aplicativo Web, a extensão para navegador, o aplicativo para desktop ou o aplicativo móvel. Este guia aborda os princípios básicos do controle de tempo, incluindo como iniciar e parar cronômetros, gerenciar entradas de tempo e usar recursos adicionais que facilitam o controle.
Configurar o controle de tempo #
Antes de começar a monitorar o tempo, você precisa garantir que o Rastreador esteja ativado e acessível no seu espaço de trabalho.
Para acessar a página do Rastreador de tempo:
- Faça login na sua conta e navegue até seu espaço de trabalho
- Na barra lateral, clique em Rastreador para acessar a página.
Quando estiver na página do Rastreador de tempo, você estará pronto para começar a monitorar seu tempo.
Escolha sua plataforma de controle de tempo #
Você pode controlar o tempo usando uma das seguintes plataformas:
- Aplicativo web
- Extensão do navegador (Chrome/Firefox)
- Aplicativo Desktop (Mac, Windows, Linux)
- Aplicativo móvel (iOS/Android)
Todos os dados rastreados são sincronizados on-line, para que você possa acessar suas entradas de tempo de qualquer dispositivo.
Acompanhe o tempo com o cronômetro #
Iniciar cronômetro #
Para começar a monitorar seu tempo, siga estas etapas:
- Vá até a página Rastreador
- Clique no ícone de relógio no canto superior direito para entrar no modo Cronômetro.
- Insira os detalhes da atividade (opcional):
- Em que você está trabalhando? – Descreva sua tarefa
- Projeto/Tarefa –Selecione ou crie um projeto/tarefa
- Faturamento – Selecione Faturável/Não faturável
- Etiquetas –Adicione quaisquer etiquetas relevantes para categorizar a atividade (opcional)
4. Clique em INICIAR para começar a registrar o tempo.
Consulte seu gerente para verificar se existe um fluxo de trabalho predefinido que você deve seguir ao criar registros de tempo.
Parar o cronômetro #
Para parar o cronômetro quando você terminar sua tarefa:
- Vá até a página Rastreador
- Clique no botão PARAR para interromper o cronômetro.
O cronômetro continuará funcionando até que você o interrompa manualmente.
Se você sair da página ou fechar o navegador, o cronômetro continuará rodando, a menos que você esteja executando o cronômetro a partir da extensão do navegador, que possui uma opção para interromper o cronômetro quando você fecha o navegador.
Ícone de cronômetro na aba do navegador #
Para ajudar você a controlar o tempo ativo, o ícone da aba Clockify no seu navegador muda quando o cronômetro está em execução. Esse indicador visual evita que você se esqueça acidentalmente de que o cronômetro está ativo.
Continuar a entrada anterior #
Se você precisa continuar monitorando o tempo de uma tarefa anterior:
- Acesse a página do Rastreador
- Localize o registro de tempo que deseja retomar
- Clique no ícone de reprodução ao lado do registro
O cronômetro será reiniciado com todos os dados inseridos anteriormente copiados automaticamente.
Entradas de tempo para edição em massa #
Para editar várias entradas:
- Acesse o Rastreador de tempo
- Clique no ícone Edição em massa
- Marque as caixas ao lado das entradas que deseja editar.
- Edite os seguintes detalhes conforme necessário:
- Descrição
- Projeto
- Etiquetas
- Faturável (Sim/Não)
- Horário de início/término
- Dados:
5. Clique em Salvar para aplicar as alterações.
Dividir entradas de tempo #
O recurso de divisão de tempo está disponível em qualquer plano pago.
Para dividir um registro de tempo:
- Acesse o Rastreador de tempo
- Clique no ícone de três pontos ao lado da entrada que deseja dividir
- Clique em Dividir
- Mova o controle deslizante para especificar onde você deseja dividir o tempo
- Clique em Salvar
Registros de tempo duplicados #
Para duplicar registros de tempo:
- Acesse o Rastreador de tempo
- Clique no ícone de três pontos ao lado da entrada que deseja duplicar
- Clique em Duplicar
Excluir entrada de tempo #
Para excluir uma entrada de tempo:
- Acesse o Rastreador de tempo
- Clique no ícone de três pontos ao lado da entrada que deseja excluir
- Clique em Excluir
- Clique em EXCLUIR novamente na janela pop-up para confirmar
Após excluir uma entrada, uma janela pop-up verde aparece. Dentro de 20 segundos após clicar em Excluir, você pode clicar no botão Desfazer nessa janela para restaurar a entrada e reverter a ação.
Marcar hora como favorita #
Este recurso está disponível para usuários de qualquer plano pago e para usuários em período de teste.
Você pode marcar entradas de tempo usadas com frequência como favoritas para fácil acesso:
- Clique no botão de três pontos da entrada
- Escolha a opção Adicionar como favorito no menu suspenso
- Insira um novo nome para o registro de tempo favorito ou deixe como está
- Clique em Adicionar
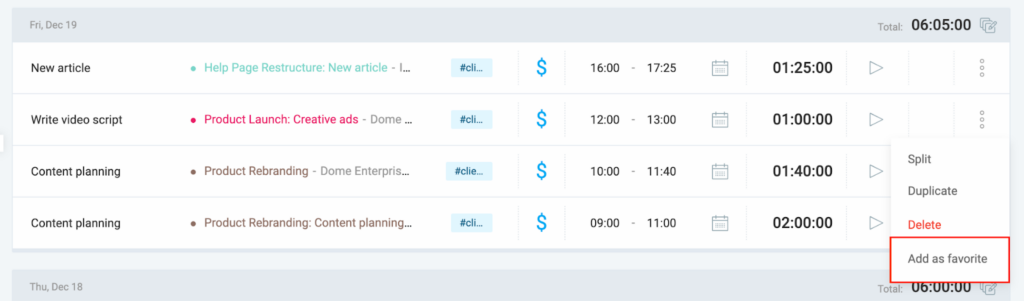
Os registros de tempo favoritos aparecem como abas abaixo do campo de registro de tempo na página do Rastreador de Tempo. Passe o cursor sobre o registro de tempo e clique no ícone de reprodução para retomar o cronômetro.

Perguntas frequentes #
Como posso controlar o tempo se eu esquecer de iniciar o cronômetro?
Se você se esquecer de ativar o cronômetro, não se preocupe! Existem duas maneiras simples de corrigir o seu controle de tempo:
- Basta editar: Clique na entrada de tempo que deseja alterar e insira o horário de início correto.
- Acesse a Planilha: Acesse a página da Planilha de horaspara adicionar quaisquer entradas ausentes ou verificar seu histórico de horas registradas.
Posso controlar o tempo em vários projetos ao mesmo tempo?
É permitido apenas um cronômetro ativo em um único espaço de trabalho. No entanto, se for necessário o controle simultâneo do tempo em vários projetos, deve-se usar um espaço de trabalho separado.
O que acontece se eu esquecer de parar o cronômetro?
Se o cronômetro estiver em execução por um período prolongado, o Clockify pode enviar um lembrete por e-mail. Você pode ativar ou desativar essa notificação nas configurações do seu perfil.
Posso alterar o projeto ou a tarefa enquanto o cronômetro estiver em execução?
Sim, você pode atualizar o projeto, a tarefa, a descrição e outros detalhes enquanto o cronômetro estiver em execução, editando os campos diretamente na página do Rastreador de Tempo.
Como posso adicionar tempo manualmente?
Se precisar adicionar tempo manualmente, mude para o modo Manual. Nesse modo, você pode inserir os detalhes de tempo, incluindo horário de início e término e informações do projeto, sem usar um cronômetro em tempo real.
Por que não vejo uma opção para dividir ou duplicar registros de tempo?
Os recursos de divisão e duplicação são desativados quando o Temporizador Forçado está ativado. Você pode desativar o Cronômetro forçado em Configurações do Espaço de Trabalho > Permissões.