Aperçu des taux horaires
Gérez vos taux horaires dans Clockify et assurez-vous que vos saisies de temps sont précis tout en reflétant vos revenus, ce qui simplifie la gestion des salaires, la facturation et la génération de rapports.
Clockify calcule vos revenus totaux en appliquant les taux horaires définis à vos saisies de temps facturables. Lorsque vous générez un rapport, Clockify multiplie la durée d’une saisie de temps facturable par le taux horaire correspondant.
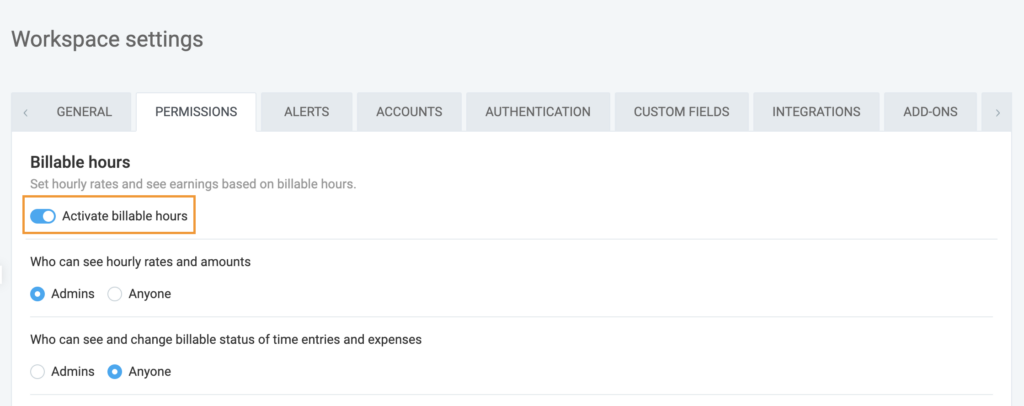
To enable billable rates in the workspace, Workspace owners/admins need to turn on the Activer les heures facturables toggle in the Paramètres de l’espace de travail > Autorisations .
Pour activer le taux facturable, cliquez sur l’icône $ dans votre saisie de temps sur la page Suivi du temps.
When Activer les heures facturables is enabled in the workspace, time entries are marked billable by default.
Si votre équipe ne facture pas à l’heure, les administrateurs de l’espace de travail peuvent désactiver le paramètre « Activer les heures facturables » dans Paramètres de l’espace de travail > onglet Autorisations. Cela masquera complètement les fonctionnalités liées à la facturation dans l’interface pour tous les utilisateurs (ou uniquement pour les utilisateurs standard, selon vos préférences).
Autorisations #
L’accès à la consultation et à la modification des taux horaires est strictement contrôlé en fonction de votre rôle d’utilisateur :
| Rôle | Peut configurer/modifier les taux horaires | Cadre |
| Administrateurs de l’espace de travail | Oui | Pour l’ensemble de l’espace de travail, tous les utilisateurs et tous les projets. |
| Chefs de projet | Oui (sous certaines conditions) | Pour les personnes travaillant sur les projets qui leur ont été attribués, à condition que le paramètre « Qui peut voir les taux facturables » dans les paramètres de l'espace de travail soit défini sur « Tout le monde ». |
| Utilisateurs standards | Non | S.O. |
Si vous souhaitez empêcher les utilisateurs standard de voir le symbole monétaire ou de modifier le statut de facturation de leurs saisies, un administrateur peut restreindre ces actions dans Paramètres de l’espace de travail > Autorisations (disponible dans les formules payantes ou la version d'essai gratuite).
Types de taux #
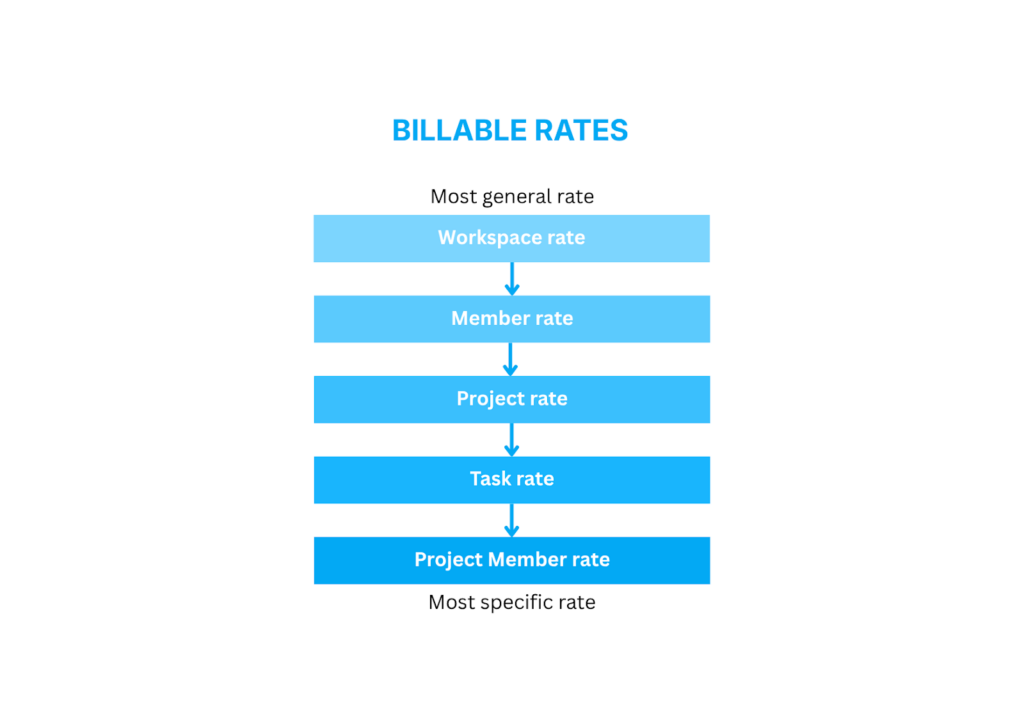
Clockify propose 5 niveaux de taux horaires pour vous offrir une flexibilité maximale. Si plusieurs taux s’appliquent à une même saisie, Clockify applique une hiérarchie stricte selon laquelle un taux plus spécifique prévaut toujours sur un taux moins spécifique.
Voici la hiérarchie, du plus général au plus spécifique :
Taux de l’espace de travail #
Le taux de l’espace de travail est le taux par défaut appliqué à l’ensemble du temps facturable au sein de cet espace, sauf indication contraire.
Apex Digital, une agence de développement web, a fixé son taux horaire facturable pour l’espace de travail à 100 $/heure.
Le taux par défaut de 100 $/heure s’applique automatiquement aux nouveaux développeurs juniors sur des tâches standards ou des demandes ponctuelles sans contrat. Cette mesure garantit qu’aucune heure travaillée n’est facturée à 0 $ par omission.
Définir le taux de l’espace de travail #
Pour définir un taux pour un espace de travail :
- Cliquez sur les trois points à côté du nom de votre espace de travail
- Sélectionnez Paramètres de l’espace de travail
- Faites défiler vers le bas jusqu'à la section Taux facturable de l’espace de travail
- Cliquez sur Modifier pour modifier le taux
- Sélectionnez l’une des options suivantes :
- Appliquer le taux à compter d’aujourd’hui
- Appliquer le taux à toutes les saisies de temps passées et futures
6. Cliquez sur Enregistrer
Taux de membre #
Le taux de membre s’applique à tout ce qu’un membre donné suit.
Sarah est la conceptrice UX/UI senior chez Apex. En raison de sa grande expérience et de la forte demande dont elle fait l’objet, son temps de travail est rémunéré à un taux supérieur à la moyenne de l’agence.
L’administrateur fixe le taux de Sarah à 150 $/heure. Qu’elle travaille pour le client A ou B, ses tâches génèrent automatiquement ce revenu, alors que l’équipe reste au taux de base de 100 $/heure. Ce réglage peut s’appliquer à tout membre selon son rôle.
Pour définir le taux d’un membre :
- Allez sur la page Équipe
- Repérez le champ Taux facturable situé à côté du nom du membre, dans la colonne Taux facturable
- Cliquez sur Modifier
- Saisissez le taux facturable
- Cliquez sur Enregistrer
Taux de projet #
Le taux du projet s'applique à toutes les heures enregistrées dans le cadre d'un projet spécifique.
Apex Digital se charge de la refonte du site web d’une association locale à but non lucratif « City Rescue Mission ». Afin de soutenir cette association, Apex propose un taux forfaitaire réduit pour l’ensemble du projet.
Le chef de projet fixe le taux horaire du projet « City Rescue Mission Redesign » à 75 $/heure. Même si Sarah (dont le taux horaire est de 150 $/heure) consacre du temps à ce projet, ses heures seront facturées au taux négocié de 75 $/heure. Cela permet de garantir que le client est facturé avec précision, conformément à son contrat spécifique, sans qu’il soit nécessaire de modifier les profils individuels de chacun.
Définir le taux du projet #
Pour définir le taux du projet :
- Accédez à Projets
- Cliquer sur le projet
- Allez dans l’onglet Paramètres
- Trouvez le taux facturable du projet
- Cliquez sur Modifier
- Indiquez le montant du taux du projet (par heure)
- Sélectionnez pour appliquer le taux :
- À partir d’aujourd’hui ou
- Aux saisies de temps passées et futures
8. Cliquez sur Enregistrer
Taux de tâche #
Un taux de tâche est un taux défini pour une tâche spécifique au sein d’un projet.
Dans le cadre de ce grand projet de commerce électronique, il est nécessaire de mettre en place un moteur de recommandation de produits personnalisés, ce qui implique l’entraînement complexe de modèles d’IA sur mesure. Il s’agit d’un service haut de gamme dont le coût est supérieur à celui du développement web standard.
Le chef de projet crée une tâche intitulée « Formation du modèle d’IA personnalisé » et fixe son taux horaire à 200 $/heure. Si un développeur standard ou Sarah, la graphiste, consacre du temps à cette tâche spécifique pour aider à préparer l’interface utilisateur ou à mettre en forme les données, leur temps est majoré et facturé au client au taux horaire de 200 $/heure.
Définir le taux de tâche #
Pour définir le taux de tâche :
- Accédez à Projets
- Cliquer sur le projet
- Cliquez sur Modifier à côté de la tâche pour laquelle vous souhaitez définir un taux
- Saisissez le taux dans la fenêtre contextuelle
- Cliquez sur Enregistrer
Taux de membre du projet #
Le taux de membre du projet est un taux applicable à un membre spécifique au sein d’un projet.
Apex fait appel à Elliot, un data scientist externe d'élite hautement spécialisé, pour mener à bien cette mission d'IA. Le contrat d'Elliot stipule qu'il est facturé à un taux préférentiel, quelle que soit la nature de son intervention sur le projet.
L’administrateur a fixé le taux horaire d’Elliot pour le projet de commerce électronique à 350 $/heure. Même lorsque Elliot enregistre des heures dans le cadre de la tâche « Formation de modèles d’IA personnalisés » (pour laquelle le taux horaire est généralement plafonné à 200 $/heure pour le reste de l’équipe), son taux horaire prévaut. Son temps est facturé à 350 $/heure, ce qui permet à l’agence de facturer correctement son expertise, quelle que soit la tâche effectuée.
Définir le taux de membre du projet #
Pour définir le taux de membre du projet :
- Accédez aux Projets et sélectionnez le projet
- Cliquez sur l’onglet Accès
- Recherchez le nom du membre et cliquez sur Modifier à côté du champ Montant
- Saisissez le nouveau taux
- Sélectionnez la date à partir de laquelle les taux s’appliqueront
- Cliquez sur Enregistrer
Définir un taux personnalisé pour un client #
Si vous facturez à un client particulier un taux différent de votre taux standard pour l’espace de travail, procédez comme suit :
- Allez à la page Projets
- Créez un nouveau projet et attribuez-le à un client
- Cliquez sur le nom du projet pour l’ouvrir
- Naviguez jusqu'à l'onglet Paramètres
- Dans la section Taux facturable du projet, saisissez le taux horaire souhaité
Taux uniques #
Vous ne pouvez pas attribuer un taux facturable personnalisé directement à une seule saisie de temps spécifique.
Si vous avez besoin d’un taux particulier pour une saisie unique, utilisez un tag pour l’identifier, afin de savoir exactement quel montant facturer lors de la préparation de votre facture finale.
Pour ce faire :
1. Rendez-vous sur la page Suivi du temps
2. Saisissez la tâche ou le projet
3. Cliquez sur l’icône du tag
4. Cliquez sur le tag correspondant au taux unique
Si vous ne l’avez pas encore fait, vous pouvez créer un tag en saisissant son nom (p. ex. #80parheure) puis en cliquant sur Créer un tag.
Définir des devises personnalisées #
Seuls les propriétaires et les administrateurs de l’espace de travail peuvent modifier la devise. Une fois modifiée, cette devise s’applique à l’ensemble du compte, y compris à tous les taux facturables.
Par défaut, Clockify utilise le dollar américain (USD). Vous pouvez toutefois modifier la devise de votre espace de travail.
Pour ce faire :
- Accédez aux paramètres de l’espace de travail
- Recherchez la section intitulée Devises
- Cliquez sur Modifier
- Saisissez la nouvelle devise
- Cliquez sur Fermer
- Sélectionnez la devise que vous venez de créer dans le menu déroulant
Les modifications sont enregistrées automatiquement.
Facturation des projets et des tâches #
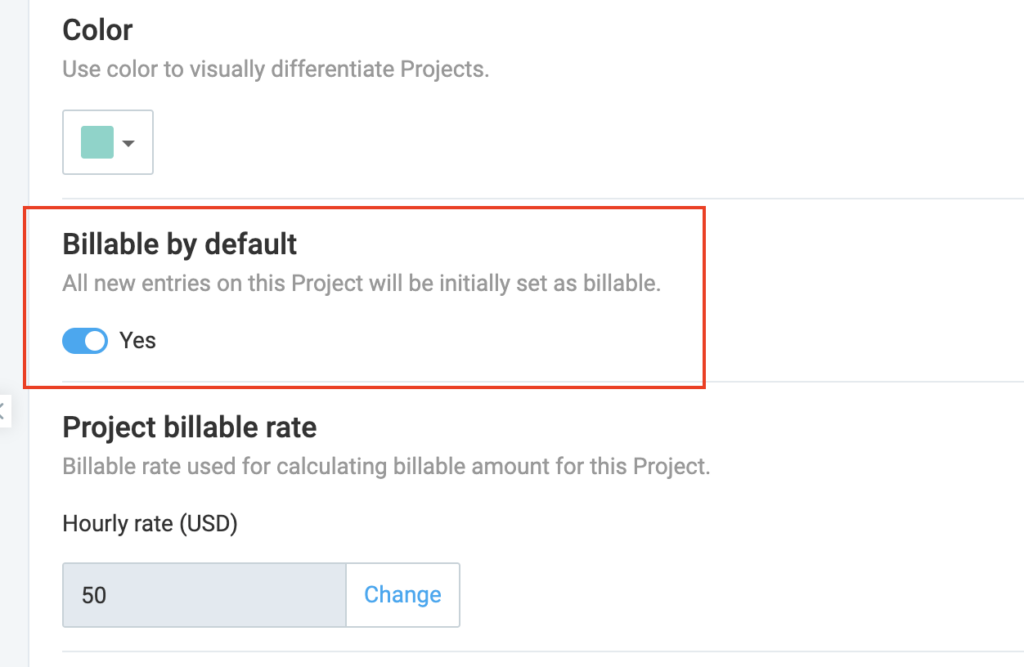
Vous pouvez définir par défaut si les projets ou les tâches individuelles sont facturables ou non, ce qui signifie que toutes les nouvelles saisies seront initialement configurées selon votre choix. Cela évite à votre équipe d'avoir à cliquer manuellement sur l’icône $ à chaque saisie de temps.
Pour ce faire :
- Rendez-vous sur la page Projets et sélectionnez un projet
- Allez dans l’onglet Paramètres
- Activez ou désactivez le statut de facturation par défaut du projet
Comment traiter les taux historiques #
Lorsque vous modifiez un taux horaire (p. ex. en augmentant le salaire d’un membre de l’équipe de 20 $/h à 40 $/h), le nouveau taux ne s’applique qu’aux nouvelles saisies de temps effectuées à partir de ce moment-là.
Les saisies existantes conserveront l’ancien taux afin de garantir l’exactitude juridique et financière de vos rapports et factures antérieurs.
Remarque : vous pouvez consulter le taux horaire exact de chaque saisie historique en passant la souris sur le montant dans le rapport détaillé ou en exportant les données au format CSV/Excel.
Appliquer les nouveaux taux rétroactivement #
Si vous souhaitez remplacer un taux historique et appliquer un taux récemment mis à jour aux saisies de temps antérieures, deux options s'offrent à vous :
Option A : Mise à jour rétroactive (disponible dans toutes les formules payantes)
- Lorsque vous modifiez un taux dans l’écran des paramètres, une option vous sera proposée pour appliquer le nouveau taux rétroactivement à toutes les saisies existantes en une seule fois.
Option B : Actualisation manuelle
Étant donné que les saisies de temps reprennent le dernier taux valide dès que leur statut de facturation est mis à jour, vous pouvez forcer une actualisation manuelle :
- Accédez au suivi du temps ou au rapport détaillé
- Cliquez sur le symbole $ (icône facturable) pour marquer la saisie comme non facturable
- Cliquez à nouveau dessus pour la marquer à nouveau comme facturable. Cette action réinitialise la saisie afin d’appliquer le dernier taux en vigueur
Vous pouvez effectuer cette opération individuellement ou utiliser la fonction Modification en bloc pour en traiter plusieurs à la fois.
Pour éviter toute perte accidentelle des données historiques due à des modifications manuelles effectuées par les utilisateurs, utilisez la fonction Verrouiller les feuilles de temps afin que les utilisateurs standard ne puissent pas modifier les saisies de temps antérieures. Vous pouvez également utiliser la fonction Approbation pour verrouiller les feuilles de temps une fois qu’elles ont été vérifiées.
Au-delà des taux facturables, vous avez la possibilité de définir des taux de coûts, ce qui vous permet de comparer les facturations aux clients avec les coûts de l'équipe et de suivre la rentabilité globale. En savoir plus sur les taux de coûts.