¿Estás empezando a utilizar Clockify by CAKE.com? Te tenemos cubierto. Esta nueva guía de usuario de Clockify te explica cómo crear una cuenta de Clockify y cómo empezar y configurar todo.
- Al crear una cuenta nueva en Clockify, solo ciertas funciones están visibles. Si quieres utilizar otras funciones, como las planillas de horarios, primero debes habilitarlas en la Configuración del espacio de trabajo.
- En Clockify, existen 4 tipos de roles: Propietario, Administradores, Gerentes y Usuarios regulares. Puedes configurar estos roles en la Configuración del espacio de trabajo.
- En cuanto a los proyectos, existen proyectos públicos (accesibles para todos) y proyectos privados (visibles solo para ciertos usuarios).
- Clockify ofrece 5 tipos de tarifas: Tarifa de espacio de trabajo, Tarifa de miembro, Tarifa de proyecto, Tarifa de tarea y Tarifa de miembro de proyecto.
Registración en Clockify by CAKE.com
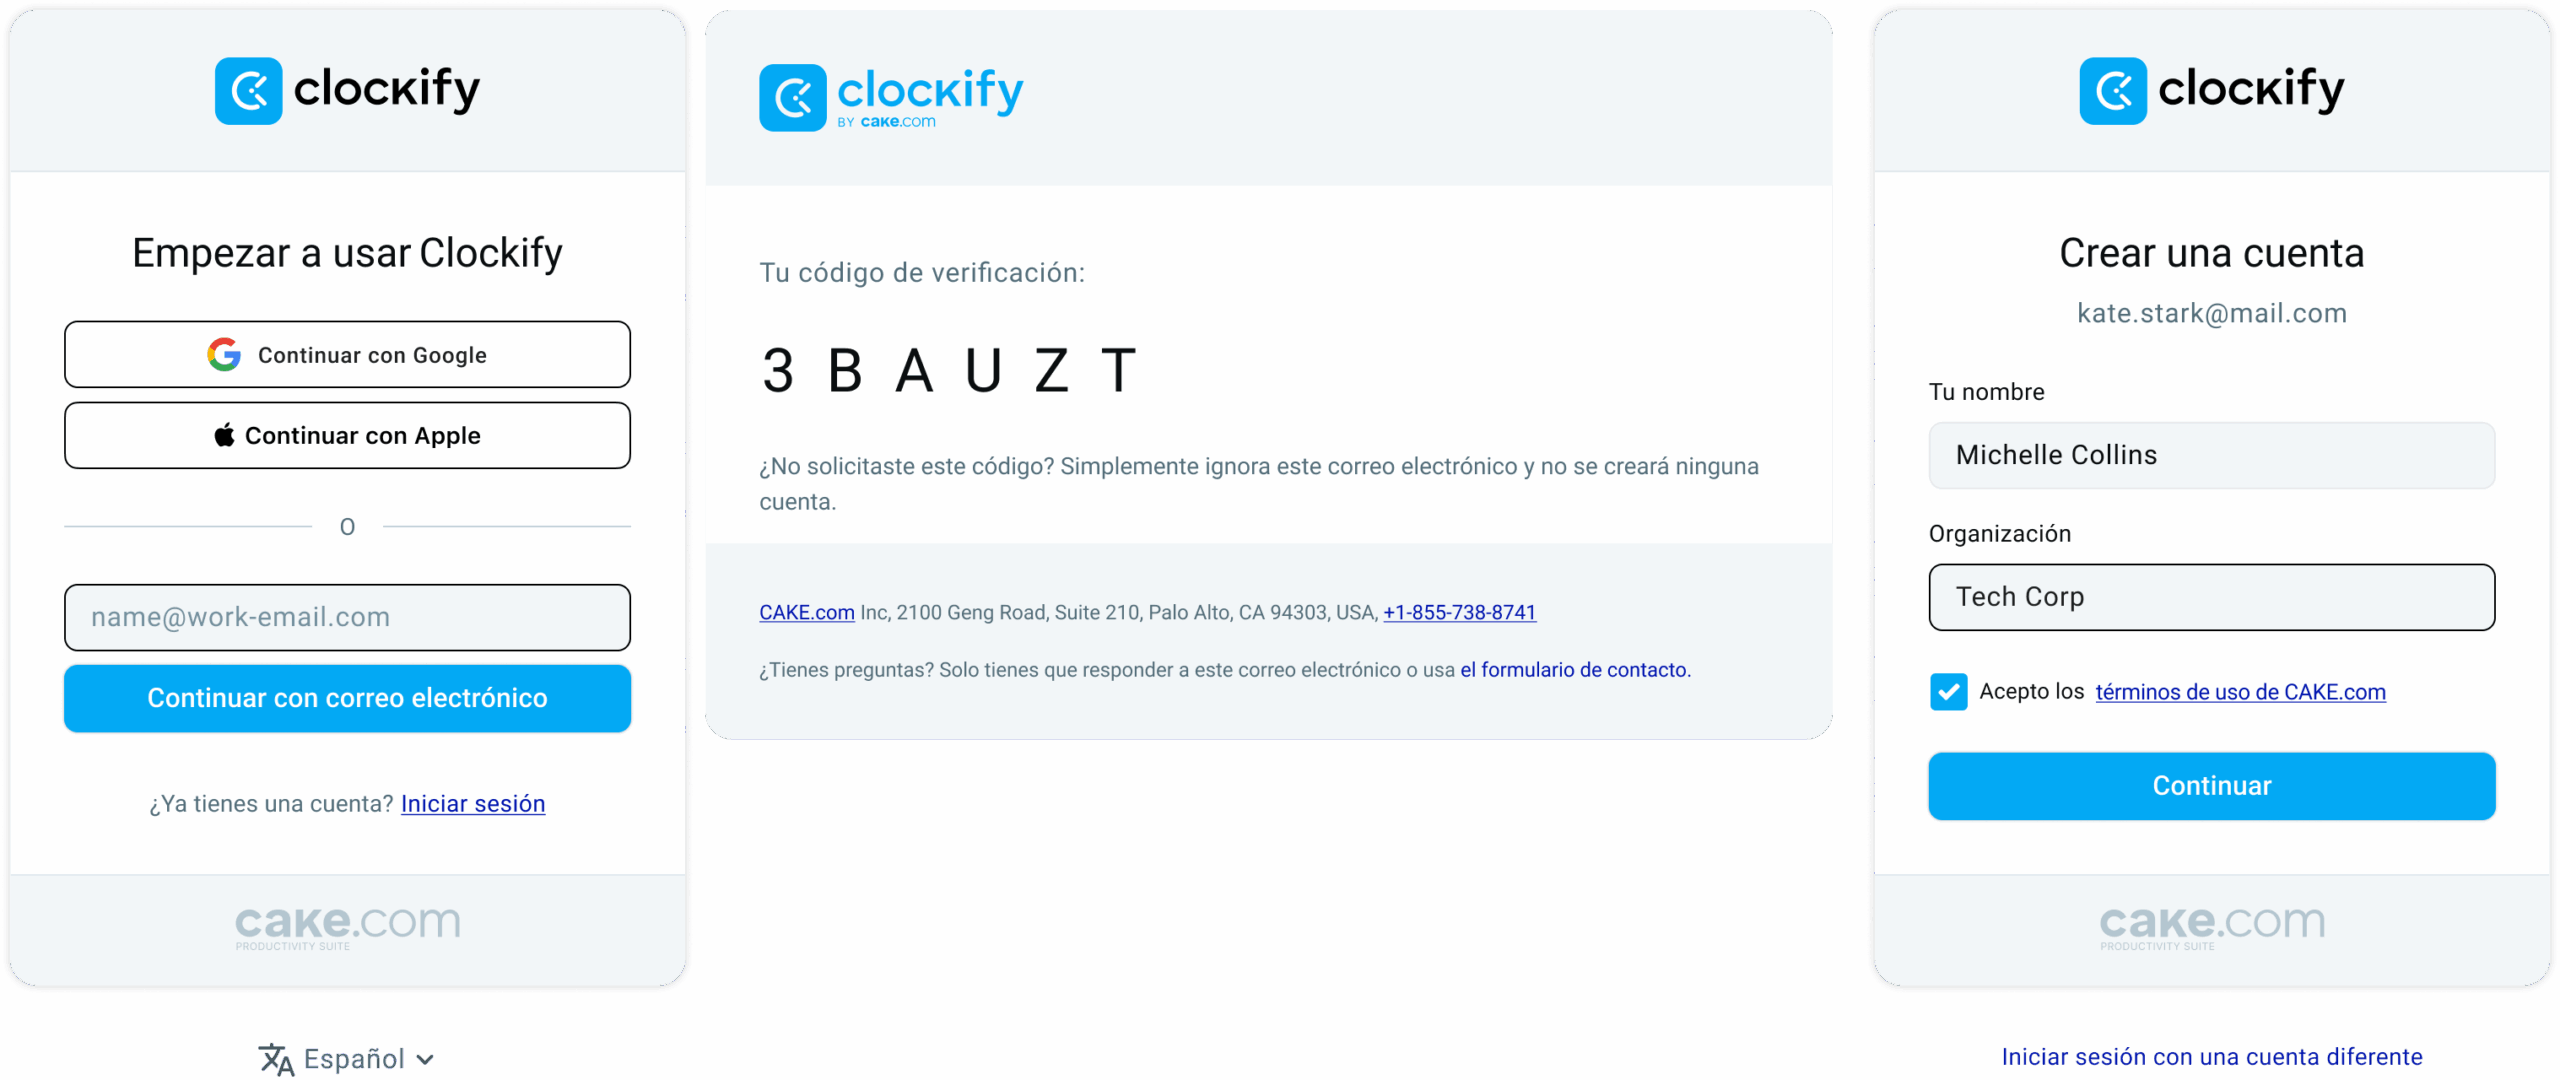
Para registrar una nueva cuenta gratis y empezar a utilizar Clockify:
- Ve a https://clockify.me/es/
- Haz clic en "Regístrate gratis" en la pantalla de inicio de Clockify (esquina superior derecha)
- Introduce tu correo electrónico en el modal de registración, haz clic en Continuar con correo electrónico
- Introduce el código de verificación que recibiste en el correo electrónico
- Introduce tu nombre y el nombre de la organización
Si necesitas más detalles sobre cómo organizar tu espacio de trabajo en uno o múltiples espacios de trabajo, consulta esta guía.
La elección de un plan
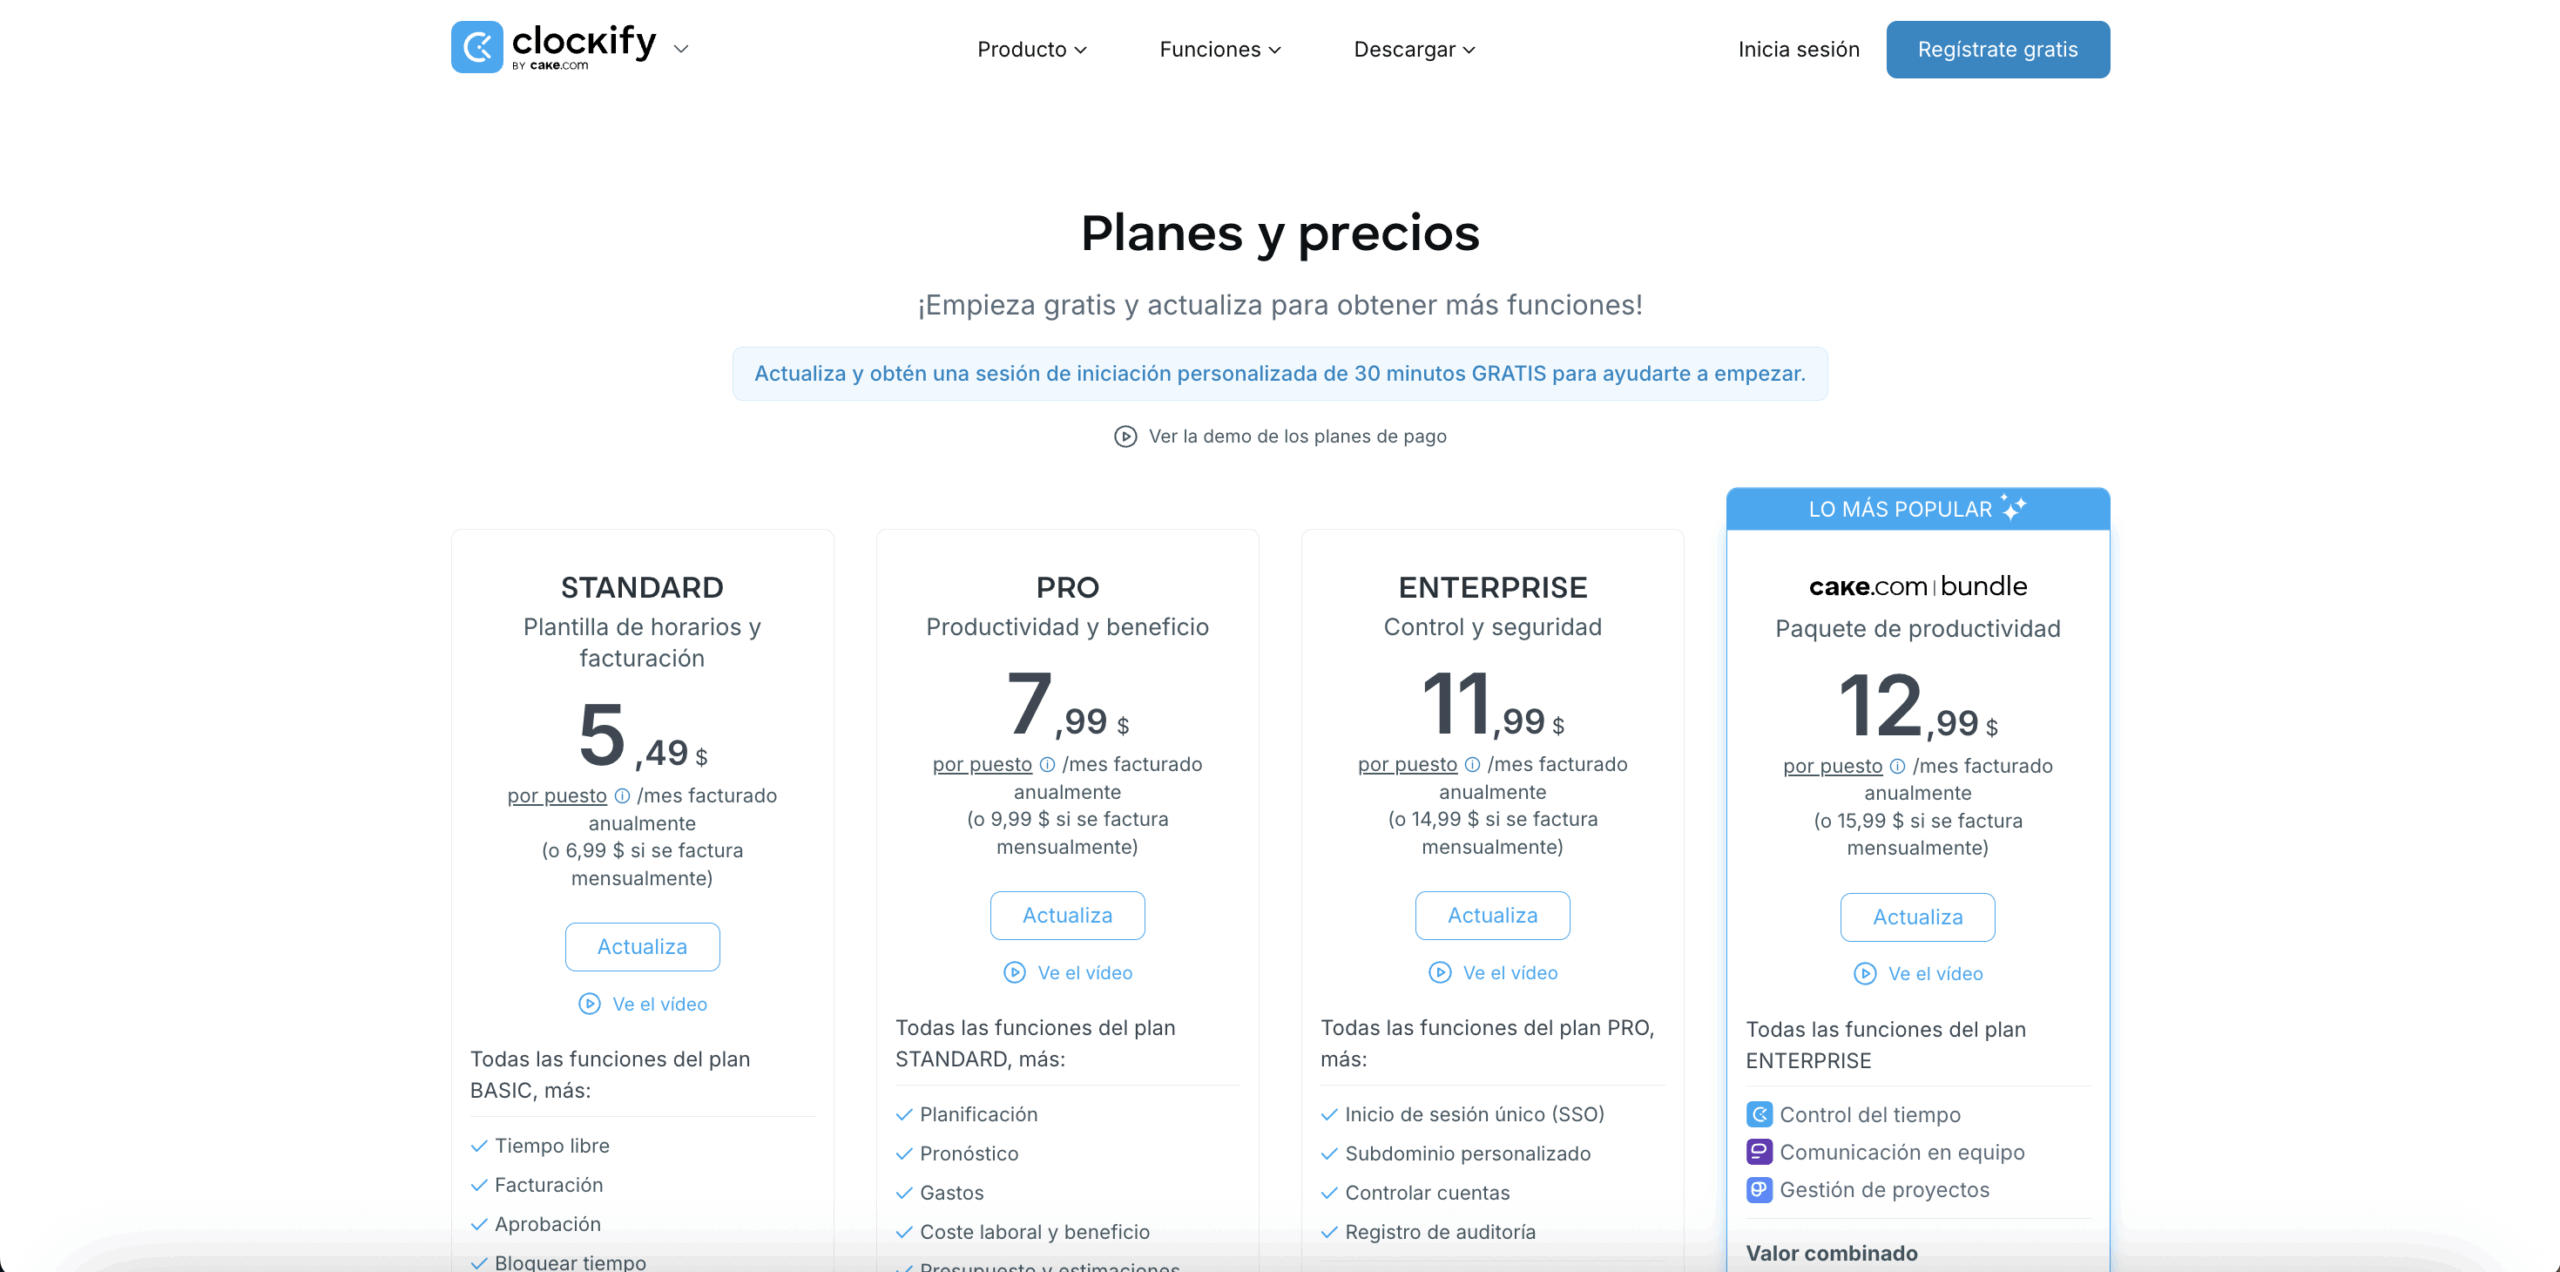
Si abriste una cuenta gratuita y ahora quieres cambiar a uno de nuestros planes de pago, puedes hacerlo desde la pantalla de inicio.
Cuando haces clic en el botón Actualizar, tendrás la opción de elegir entre los planes y la opción de suscripción (anual o mensual).
La suscripción anual proporciona un precio de puesto más rentable con el tiempo en comparación con la opción de facturación mensual.
Después de hacer clic en “Actualizar” en un plan de suscripción que elegiste y confirmar la acción, debes introducir toda la información necesaria para completar la acción:
- Información de cliente: Si estás utilizando Clockify como un individuo o una empresa/organización, el país en que operas
- Información de factura: Nombre de la empresa, correo electrónico, dirección y otros detalles de la empresa
- Información de pago: Número de tarjeta y detalles
Luego, podrás añadir el número de puestos (personas) que quieres incluir y finalizar la actualización después de aceptar los términos de uso de CAKE.com.

¿Cómo configurar tu espacio de trabajo en Clockify?
Cuando creas una cuenta, un espacio de trabajo se creará automáticamente para ti.
La configuración de espacio de trabajo es única para cada espacio de trabajo, así que no estás seguro si necesitas uno o más, lee nuestra guía Cómo organizar un espacio de trabajo en Clockify.
Puedes empezar a configurar tu cuenta explorando tu Configuración de perfil personal y personalizarla según tus necesidades.
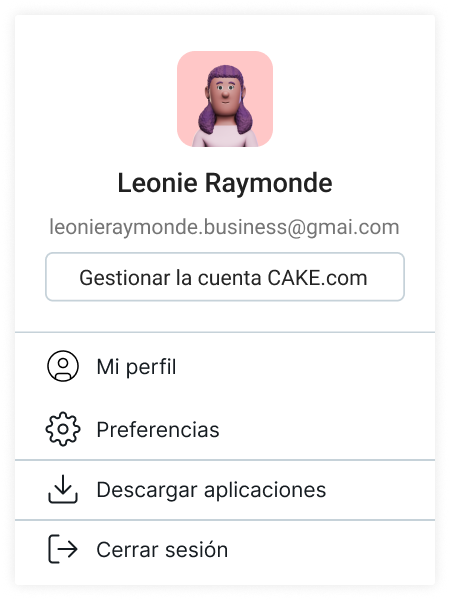
La configuración de perfil
La configuración de perfil te ofrece la posibilidad de configurar tu información y preferencias personales, por ejemplo, zona horaria, idioma, formato de fecha o fecha de inicio de semana.
Tu correo electrónico, foto de perfil y nombre de usuario se gestionan a través de la opción “Mi perfil” y te redireccionará a la página de tu Cuenta de CAKE.com, mientras que las preferencias se configuran a través de la opción “Preferencias” en Clockify.
Todos los demás usuarios de Clockify en tu espacio de trabajo también tendrán la opción de configurar sus propias preferencias que afectarán su vista de espacio de trabajo.
Cuando estás seguro de que toda la configuración está configurada correctamente, puedes empezar a prepararte para organizar tus datos empresariales y seguir el tiempo.
La configuración del espacio de trabajo
La primera cosa que debes configurar es la lista de funciones activas en tu espacio de trabajo. Algunas funciones, como Rastreador de tiempo, se activan automáticamente cuando creas una cuenta. Mientras que otras funciones, como Planilla de horarios, deben estar habilitadas primero para ser visibles.
Puedes explorar la configuración de espacio de trabajo para encontrar las funciones activas/inactivas por ti mismo, o leer nuestra lista completa de funciones que se deben habilitar en esta guía.
La siguiente función que debes configurar es cómo se organizan tus datos de registro de tiempo en tu espacio de trabajo.
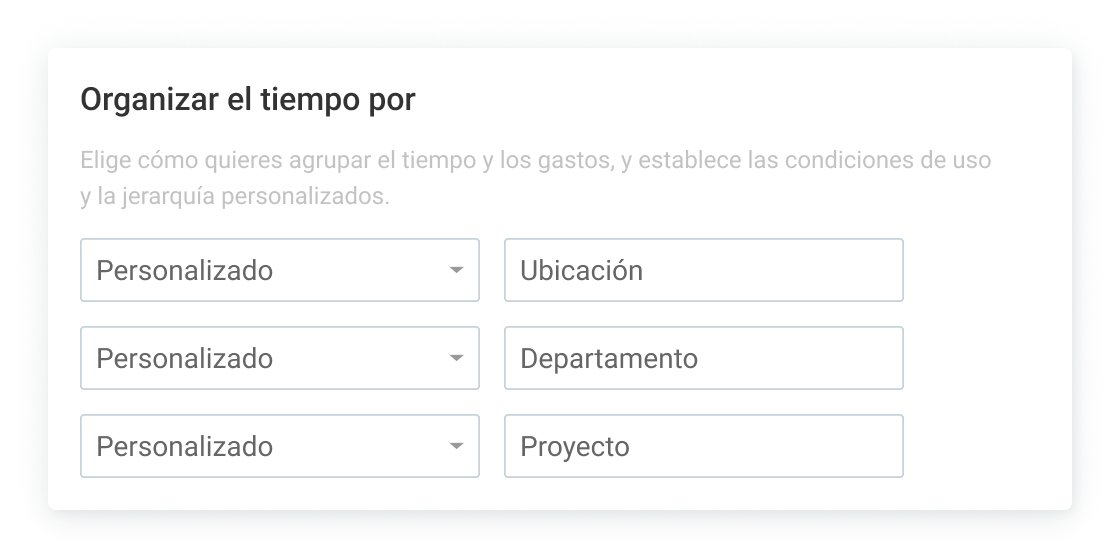
La categorización de tiempo
Por defecto, el tiempo en Clockify se categoriza a través de tareas, proyectos y clientes. Pero los nombres de estas etiquetas se pueden cambiar.
Por lo tanto, si quieres seguir el tiempo en, por ejemplo Trabajos, Ubicaciones, Departamentos en vez de Tareas, Proyectos, Clientes, puedes cambiar los nombres de estas etiquetas.
Para una categorización adicional, también puedes usar etiquetas que funcionan independientemente de la jerarquía.
Puedes crear etiquetas para cualquier tipo de entradas que quieres filtrar después, con mucho más fácilmente en los informes.
Por ejemplo, puedes crear una etiqueta “Tiempo extra”, y cuándo registras tu trabajo tus horas extras se pueden marcar con una etiqueta Tiempo extra.

Además, en la Configuración de espacio de trabajo, puedes configurar toda la configuración general relacionada a tu espacio de trabajo, como estado de facturación predeterminado para proyectos, tarifas facturables y de coste para todo el espacio de trabajo, formato de moneda, formato de fecha, formato de número, etc.
Permisos y roles
Antes de invitar a todos los miembros del equipo y asignarles roles adecuados, asegúrate de que todos los permisos para roles específicos están establecidos como tú quieras en la pestaña Permisos en la Configuración de espacio de trabajo.
En breve, hay cuatro tipos de roles en Clockify:
- Propietario: una persona que crea un espacio de trabajo y que puede añadir/ eliminar administradores
- Administradores: pueden ver y editar todo
- Gerentes: gestionan la gente y los proyectos
- Usuarios regulares: pueden controlar el tiempo y ver los informes
Una vez que hayas configurado todos los permisos para los roles, puedes proceder a invitar a los miembros del equipo.
La gestión de miembros de equipo
Clockify by CAKE.com te permite añadir usuarios completos o limitados. Un usuario completo puede acceder a todas las funciones activas de Clockify, mientras que un usuario limitado solo puede usar Clockify a través del quiosco para fichar la entrada y salida de horas de trabajo.
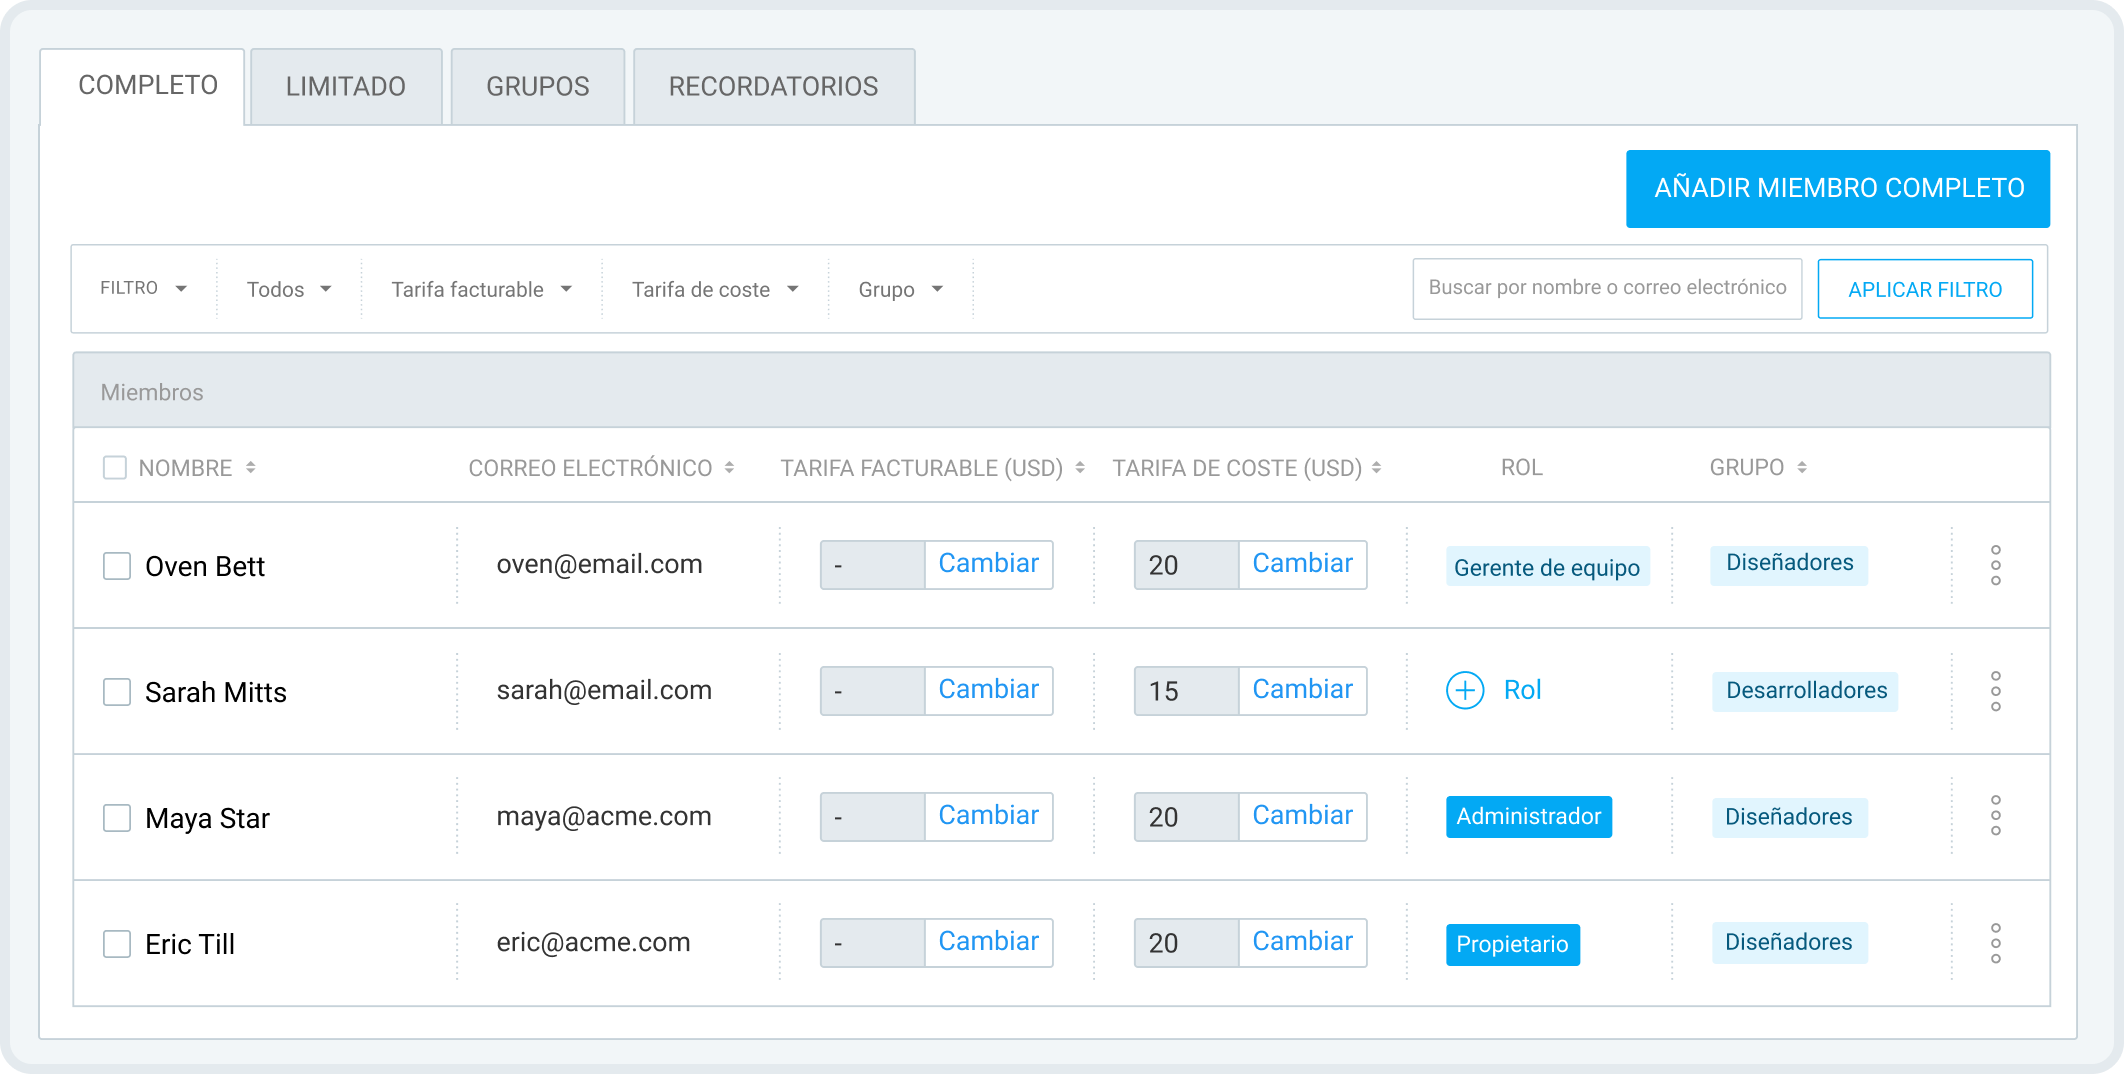
Para añadir un usuario completo, necesitas su dirección de correo electrónico. Para usuarios limitados, solo necesitas añadir su nombre.
Mientras añades miembros del equipo, puedes asignarles de inmediato roles adecuados en Clockify para manejar quién puede hacer qué.
También puedes organizar miembros del equipo en grupos, y cuando un nuevo miembro del equipo se une, puedes darle acceso a ciertos proyectos simplemente asignándole a un grupo, en vez de hacerlo manualmente.
En la página de equipo puedes personalizar y editar el perfil de cada miembro.
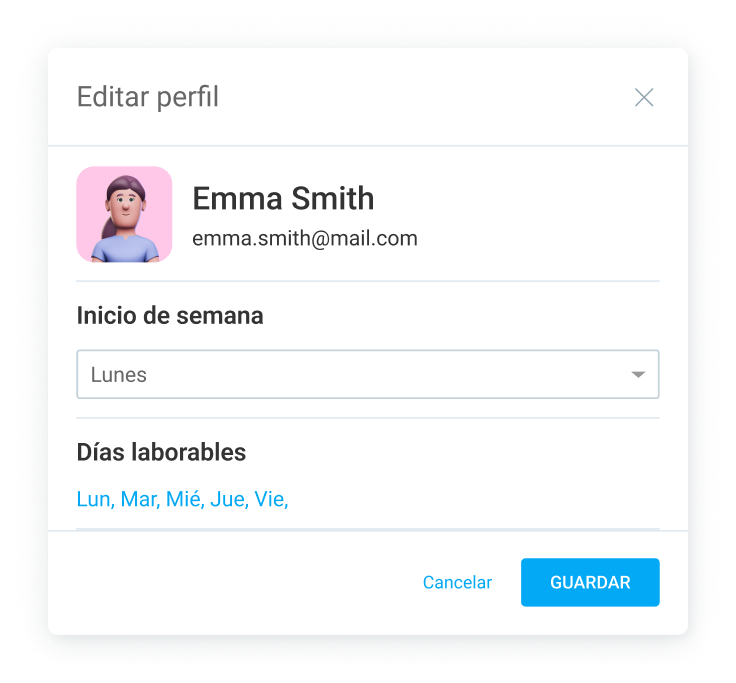
Puedes establecer diferentes días laborables y capacidades diarias de trabajo (por ejemplo, 4 horas para empleados a tiempo parcial) para cada miembro.
Si necesitas información adicional sobre cada empleado, ve a la configuración del espacio de trabajo y crea campos personalizados de usuario.
Cuando añades tus campos de usuarios personalizados activos verás esa información en la configuración de su perfil.

La gestión de clientes
Puedes crear tantos clientes (departamentos, o cualquier otra categoría que hayas configurado) para agrupar el trabajo hecho en proyectos.
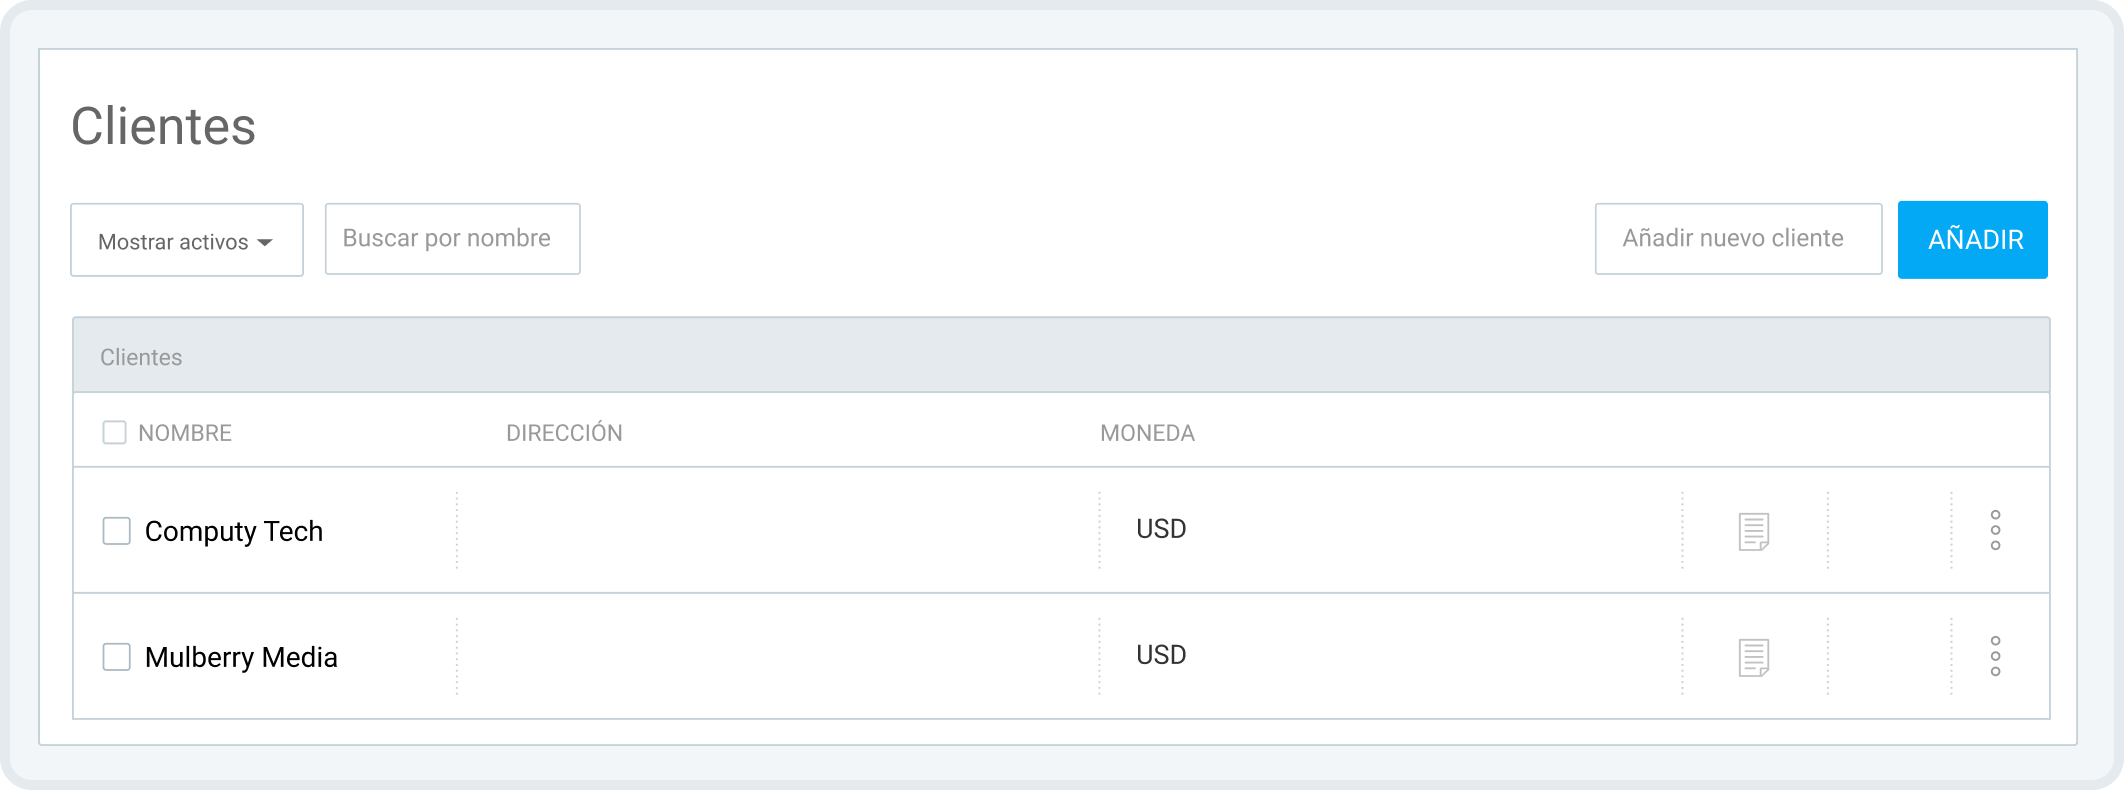
Cuando ingresas el nombre de un nuevo cliente, obtendrás la opción de añadir otra información, como una dirección de correo electrónico, dirección postal, moneda del cliente y notas personalizadas.
La vinculación de horas registradas a proyectos y clientes te ayudará filtrar solo la información que necesitas en los informes.
La gestión de proyectos
Los proyectos en Clockify agruparán tu tiempo registrado total, te ayudarán a filtrar los informes y te dan información sobre el trabajo asociado con un proyecto o un cliente.
Cuando creas un proyecto, puedes asignarlo a un cliente específico, darle un color para distinguirlo de otros proyectos con facilidad y configurarlo como público o privado para determinar quién puede controlar el tiempo en él.
Los proyectos públicos serán accesibles a todos, mientras que los proyectos privados serán visibles solo a ciertos usuarios.
Por ejemplo, puedes crear un proyecto especial para planificar una fiesta sorpresa para un compañero y marcarlo visible solo para personas que participarán en la planificación.
Para asegurarte de mantenerte dentro del presupuesto, cumplir las fechas límites y registrar el progreso de un proyecto, necesitas añadir las estimaciones del tiempo y presupuesto.
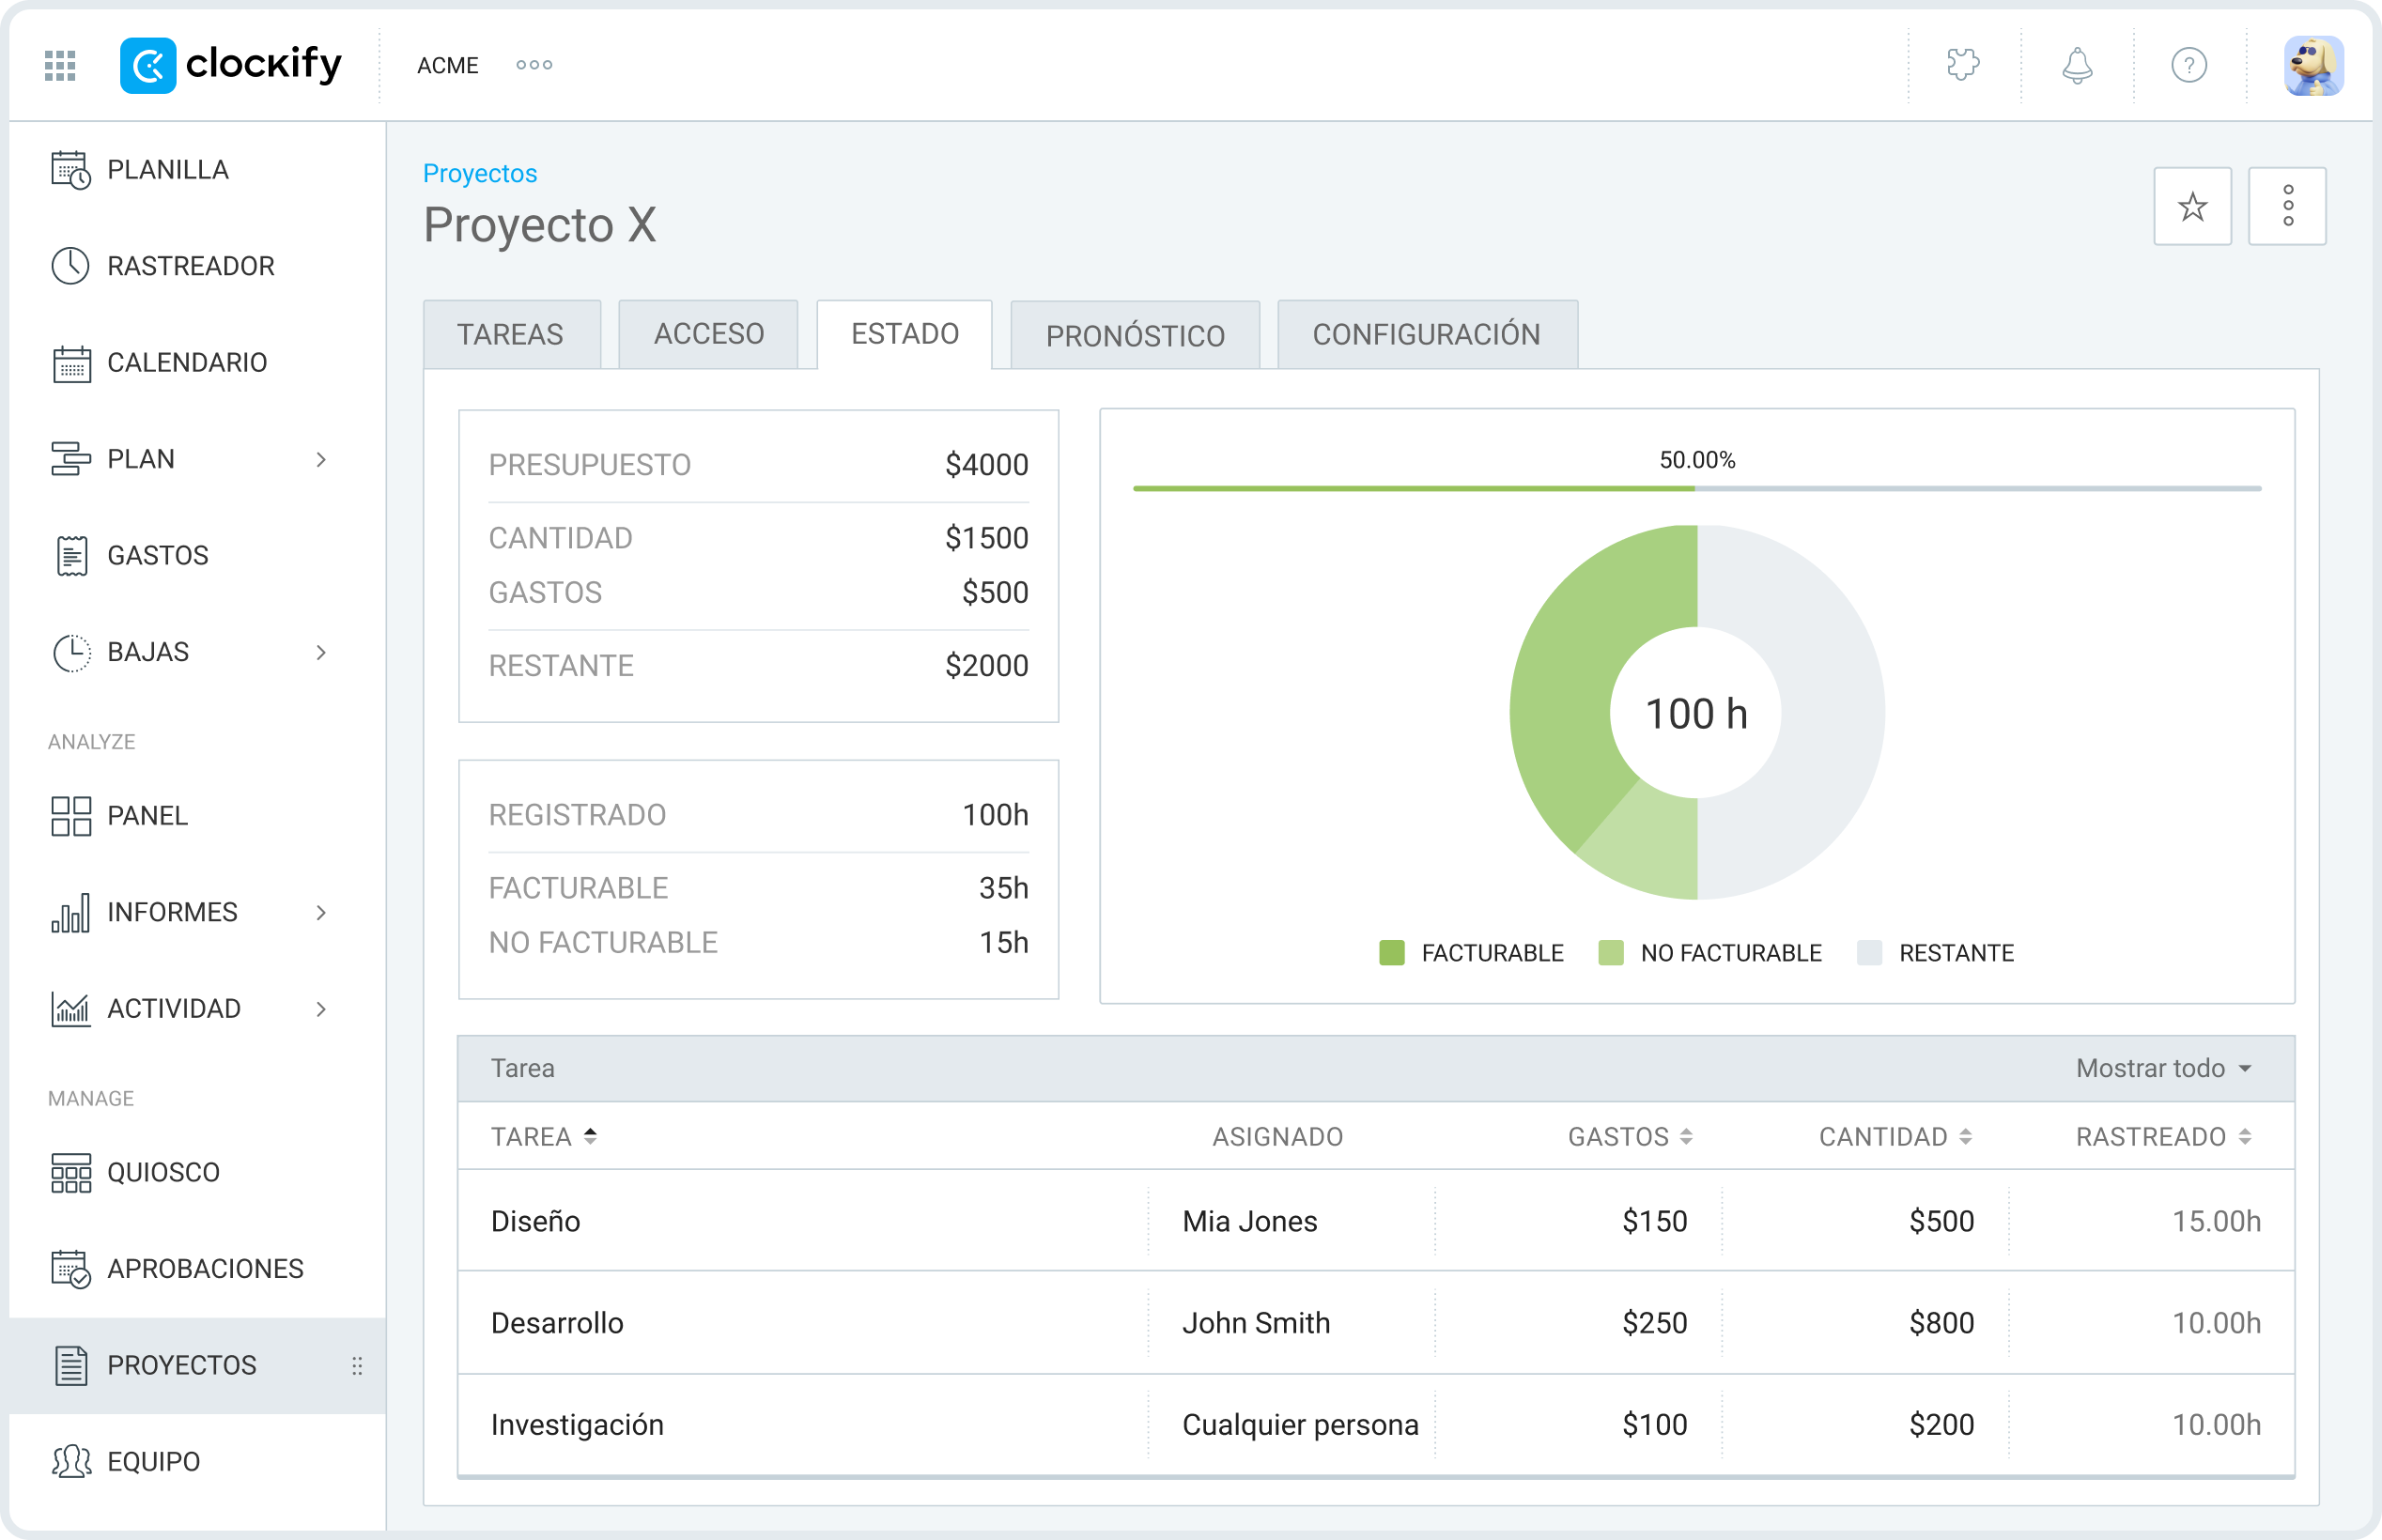
Las estimaciones de presupuesto solo funcionan si tienes habilitadas las “horas facturables” en la Configuración de espacio de trabajo.
Puedes establecer las estimaciones para un proyecto completo, o para cada tarea individual. De todo modo, podrás seguir cuánto tiempo o dinero tienes disponible para finalizar el proyecto.
Y si usas la función de pronóstico, Clockify te avisará también sobre la fecha límite o el presupuesto excedente, para poder ajustar tus horarios o estimaciones en acordancia.
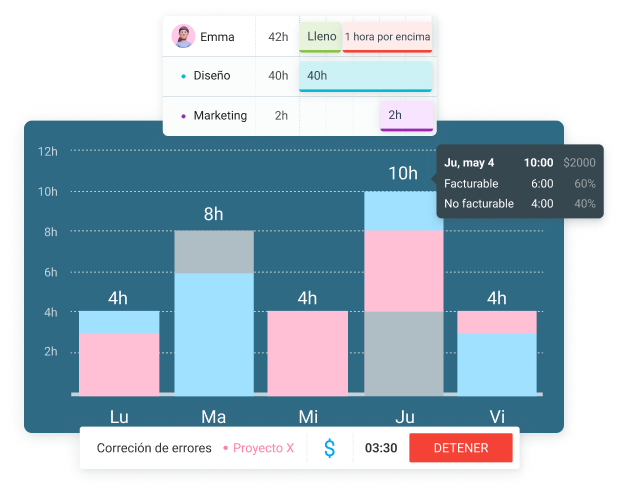
Para ver y comparar la rentabilidad de proyectos, tienes que establecer tanto las tarifas facturables como de coste. Veamos cómo esto funciona.
La gestión de tarifas
Las tarifas te ayudan a ver qué proyectos son los más rentables calculando los ingresos, los costes laborales y las ganancias de cada proyecto o una tarea específica.
Los ingresos se calculan primero al establecer las tarifas facturables, y las tarifas laborables se calculan al establecer las tarifas de coste.
Las tarifas facturables se aplican solo a entradas de tiempo facturables, mientras que las tarifas de coste se aplican a todas las entradas de tiempo.
Dependiendo de qué tan especifico quieres configurar tus tarifas, puedes gestionarlas en diferentes niveles:
- Tarifas del espacio de trabajo, que defines en la configuración del espacio de trabajo.
- Tarifa de miembro, que defines en la página del equipo para cada miembro del equipo.
- Tarifa de proyecto, que defines para cada proyecto en la configuración de proyectos.
- Tarifa de tarea, que defines para cada tarea en un proyecto, pero primero debe activarse en la configuración del espacio de trabajo.
- Tarifa de miembro de proyecto, que se define en la pestaña Acceso para cada miembro en un proyecto.
La regla general es que la tarifa más específica anula la tarifa menos específica. En esta jerarquía, la tarifa menos específica es la tarifa de espacio de trabajo y la tarifa más específica es la tarifa de miembro de proyecto.
Por ejemplo, si configuras la Tarifa de tarea, pero tu equipo experimenta problemas con su ejecución, es posible que tengas que involucrar un miembro del equipo más experimentado y configurar la Tarifa de miembro de proyecto – incluso si esta persona está trabajando en la misma tarea.
Cuando estableces las tarifas y tu equipo comienza a seguir el tiempo, podrás analizar la rentabilidad en los Informes de tiempo de Clockify.

La sincronización de calendario
Clockify te permite tener todas las reuniones y eventos programados en un Calendario al sincronizar tus calendarios de Outlook y Google con Clockify.
Al sincronizarlos en Clockify, podrás iniciar un temporizador directamente en un evento o crear una entrada de tiempo de él.
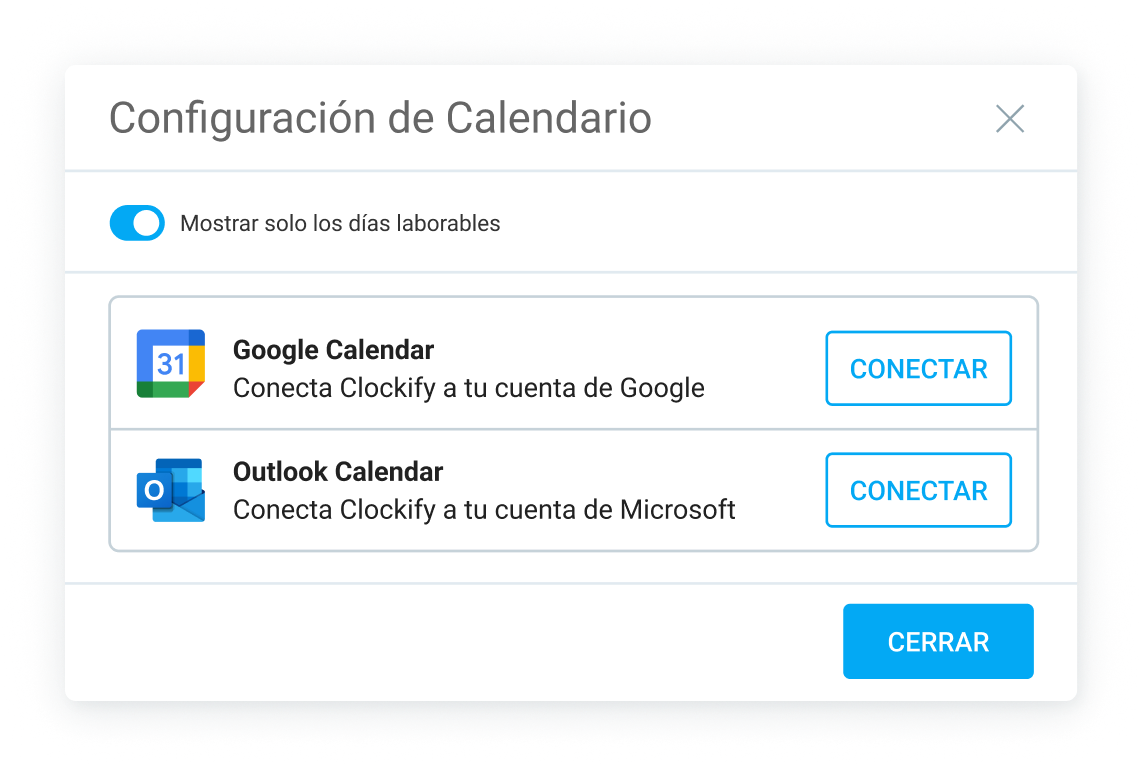
Puedes usar también Calendario para crear nuevas entradas de tiempo, visualmente seguir tu día y organizarlo en bloques de tiempo.
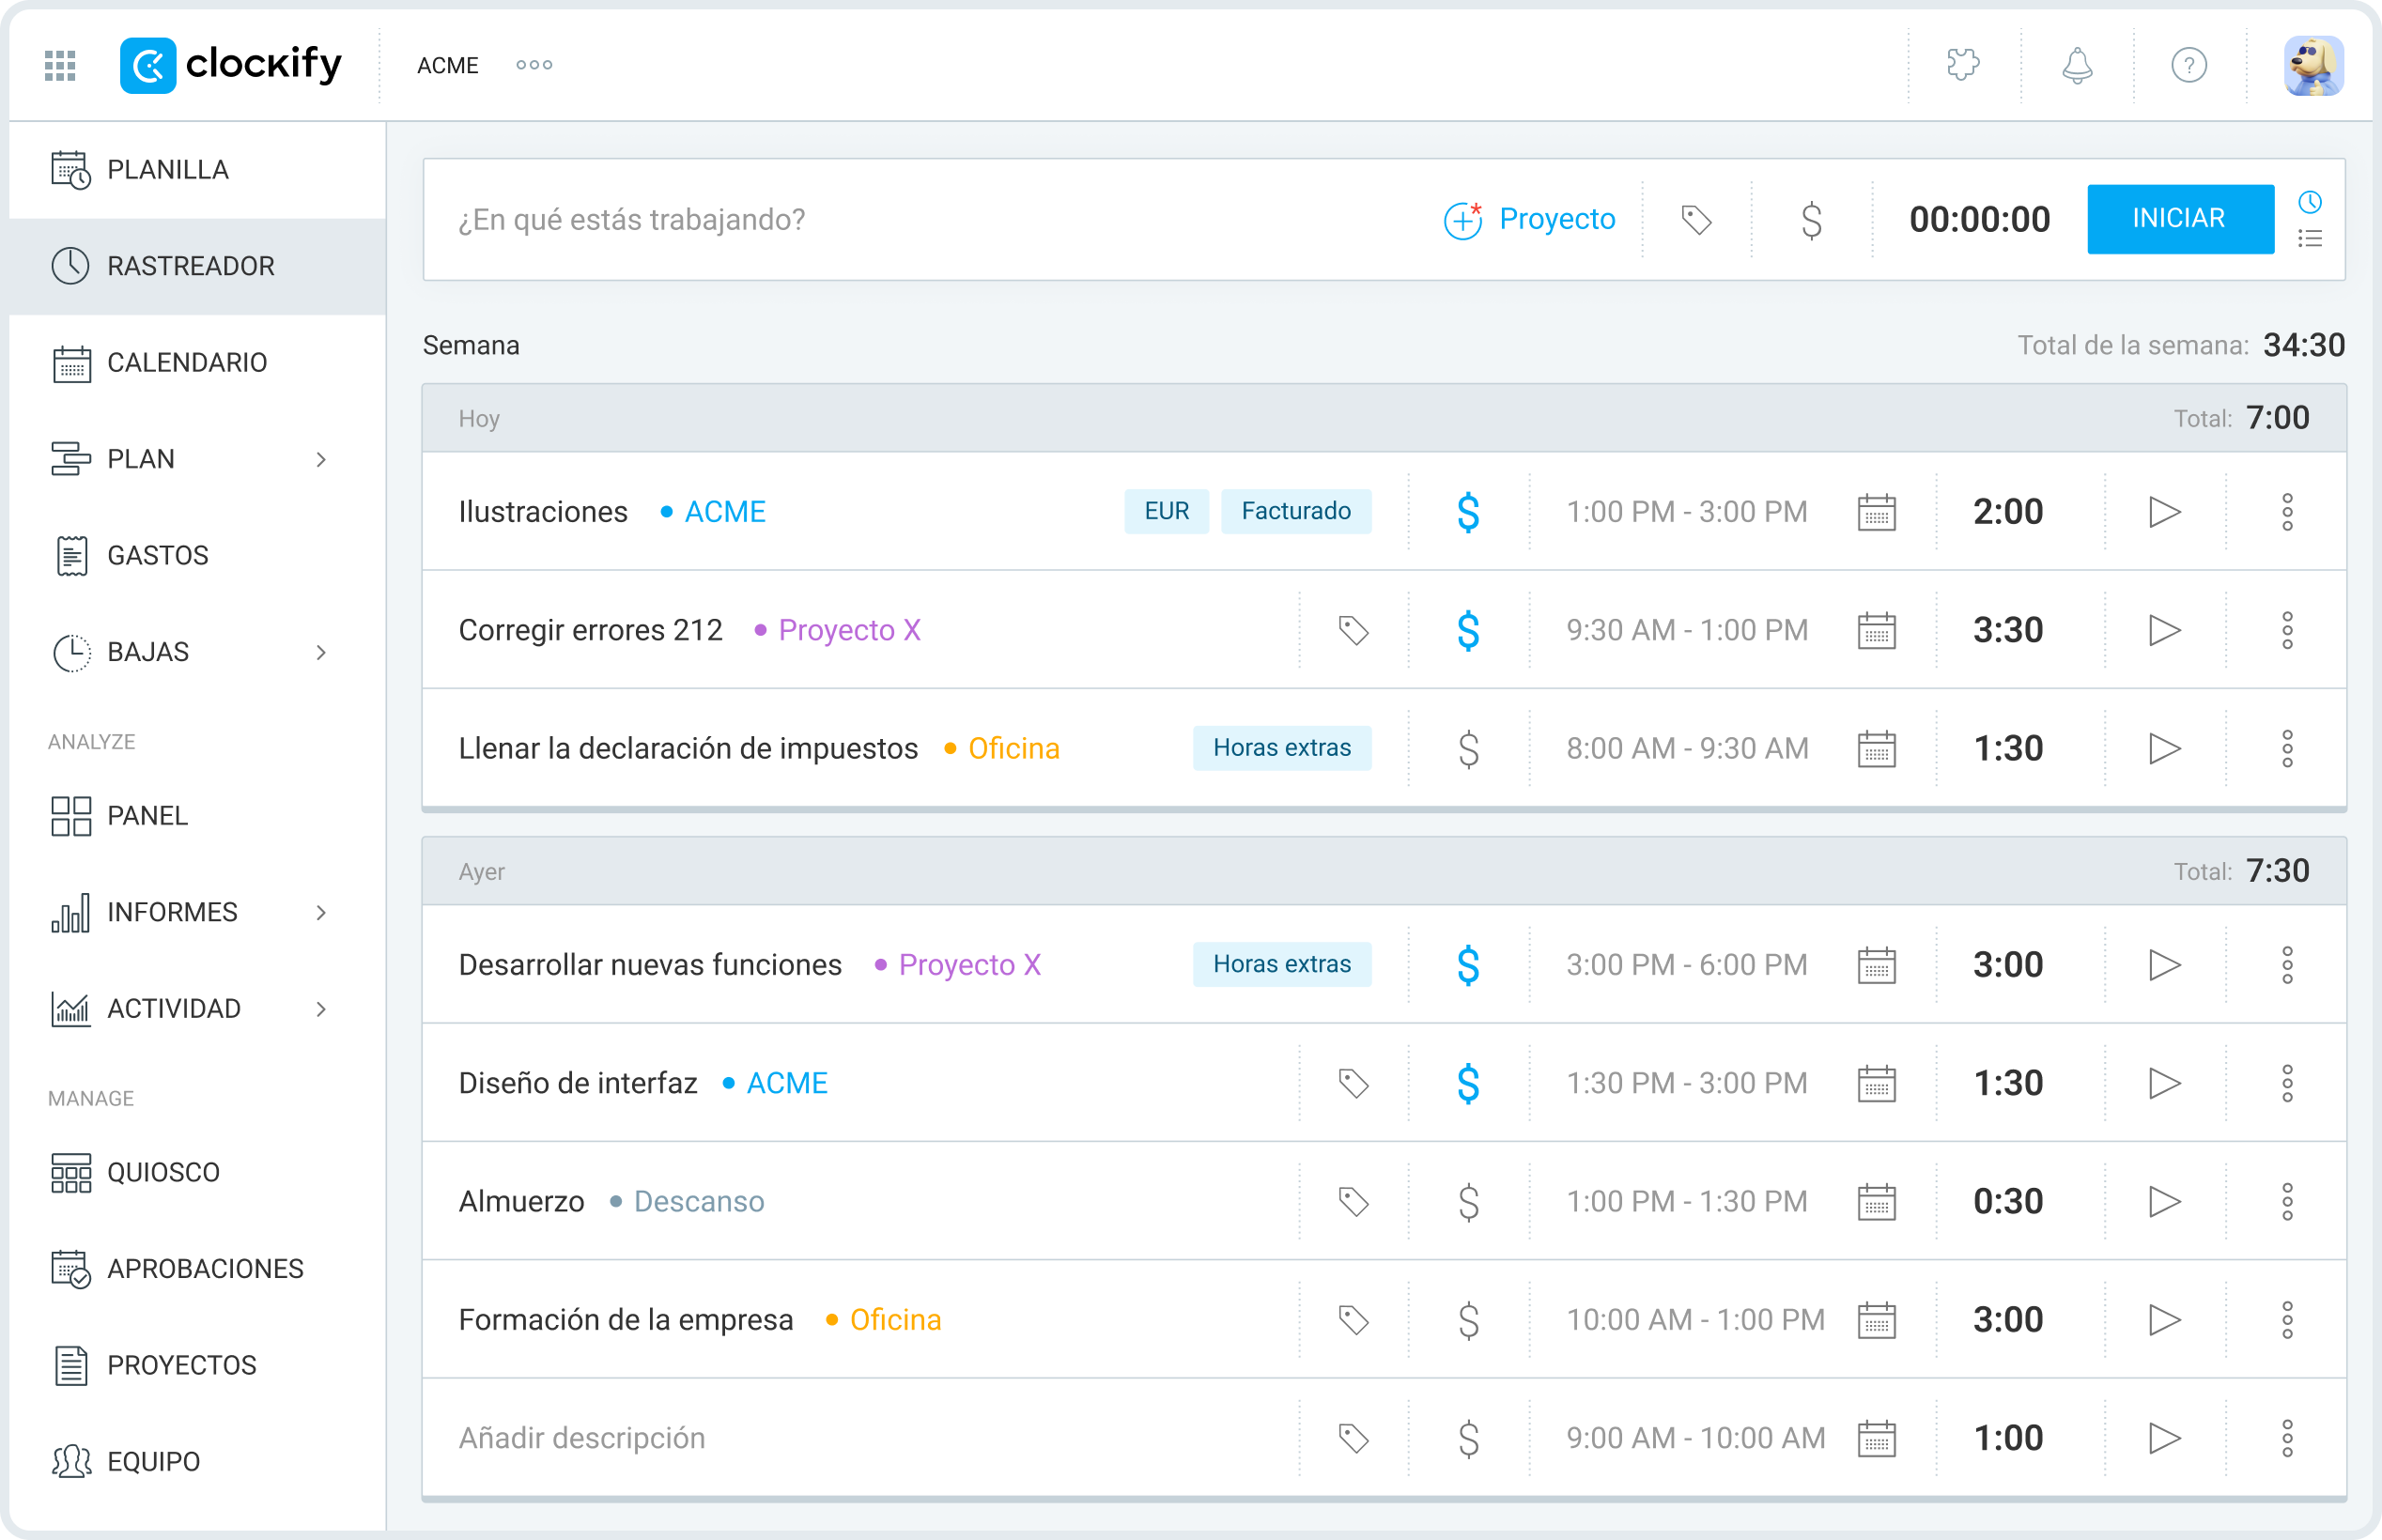
Control del tiempo
El rastreador se activa automáticamente cuando creas una nueva cuenta, pero si quieres usar la Plantilla de horarios o un Quiosco, primero necesitas habilitarlos en la Configuración de espacio de trabajo.
De la misma manera que registras tus horas de trabajo, puedes también registrar descansos a través del Rastreador y Quiosco. Sin embargo, los descansos primero se deben habilitar en la Configuración de espacio de trabajo.
Si quieres usar el rastreador automático, necesitas descargar la aplicación de escritorio para tu ordenador (Windows, Mac, o Linux).
El Rastreador te permite iniciar y detener el temporizador cuando comienzas y finalizas tu trabajo en una actividad específica, y marcarlo como facturable o no facturable.
Puedes elegir el proyecto y una tarea en qué estás trabajando y ser tan específico como desees al describir la actividad.
Puedes usar el modo de temporizador con un botón, o el modo manual para introducir, tú mismo, la hora de inicio y de finalización.
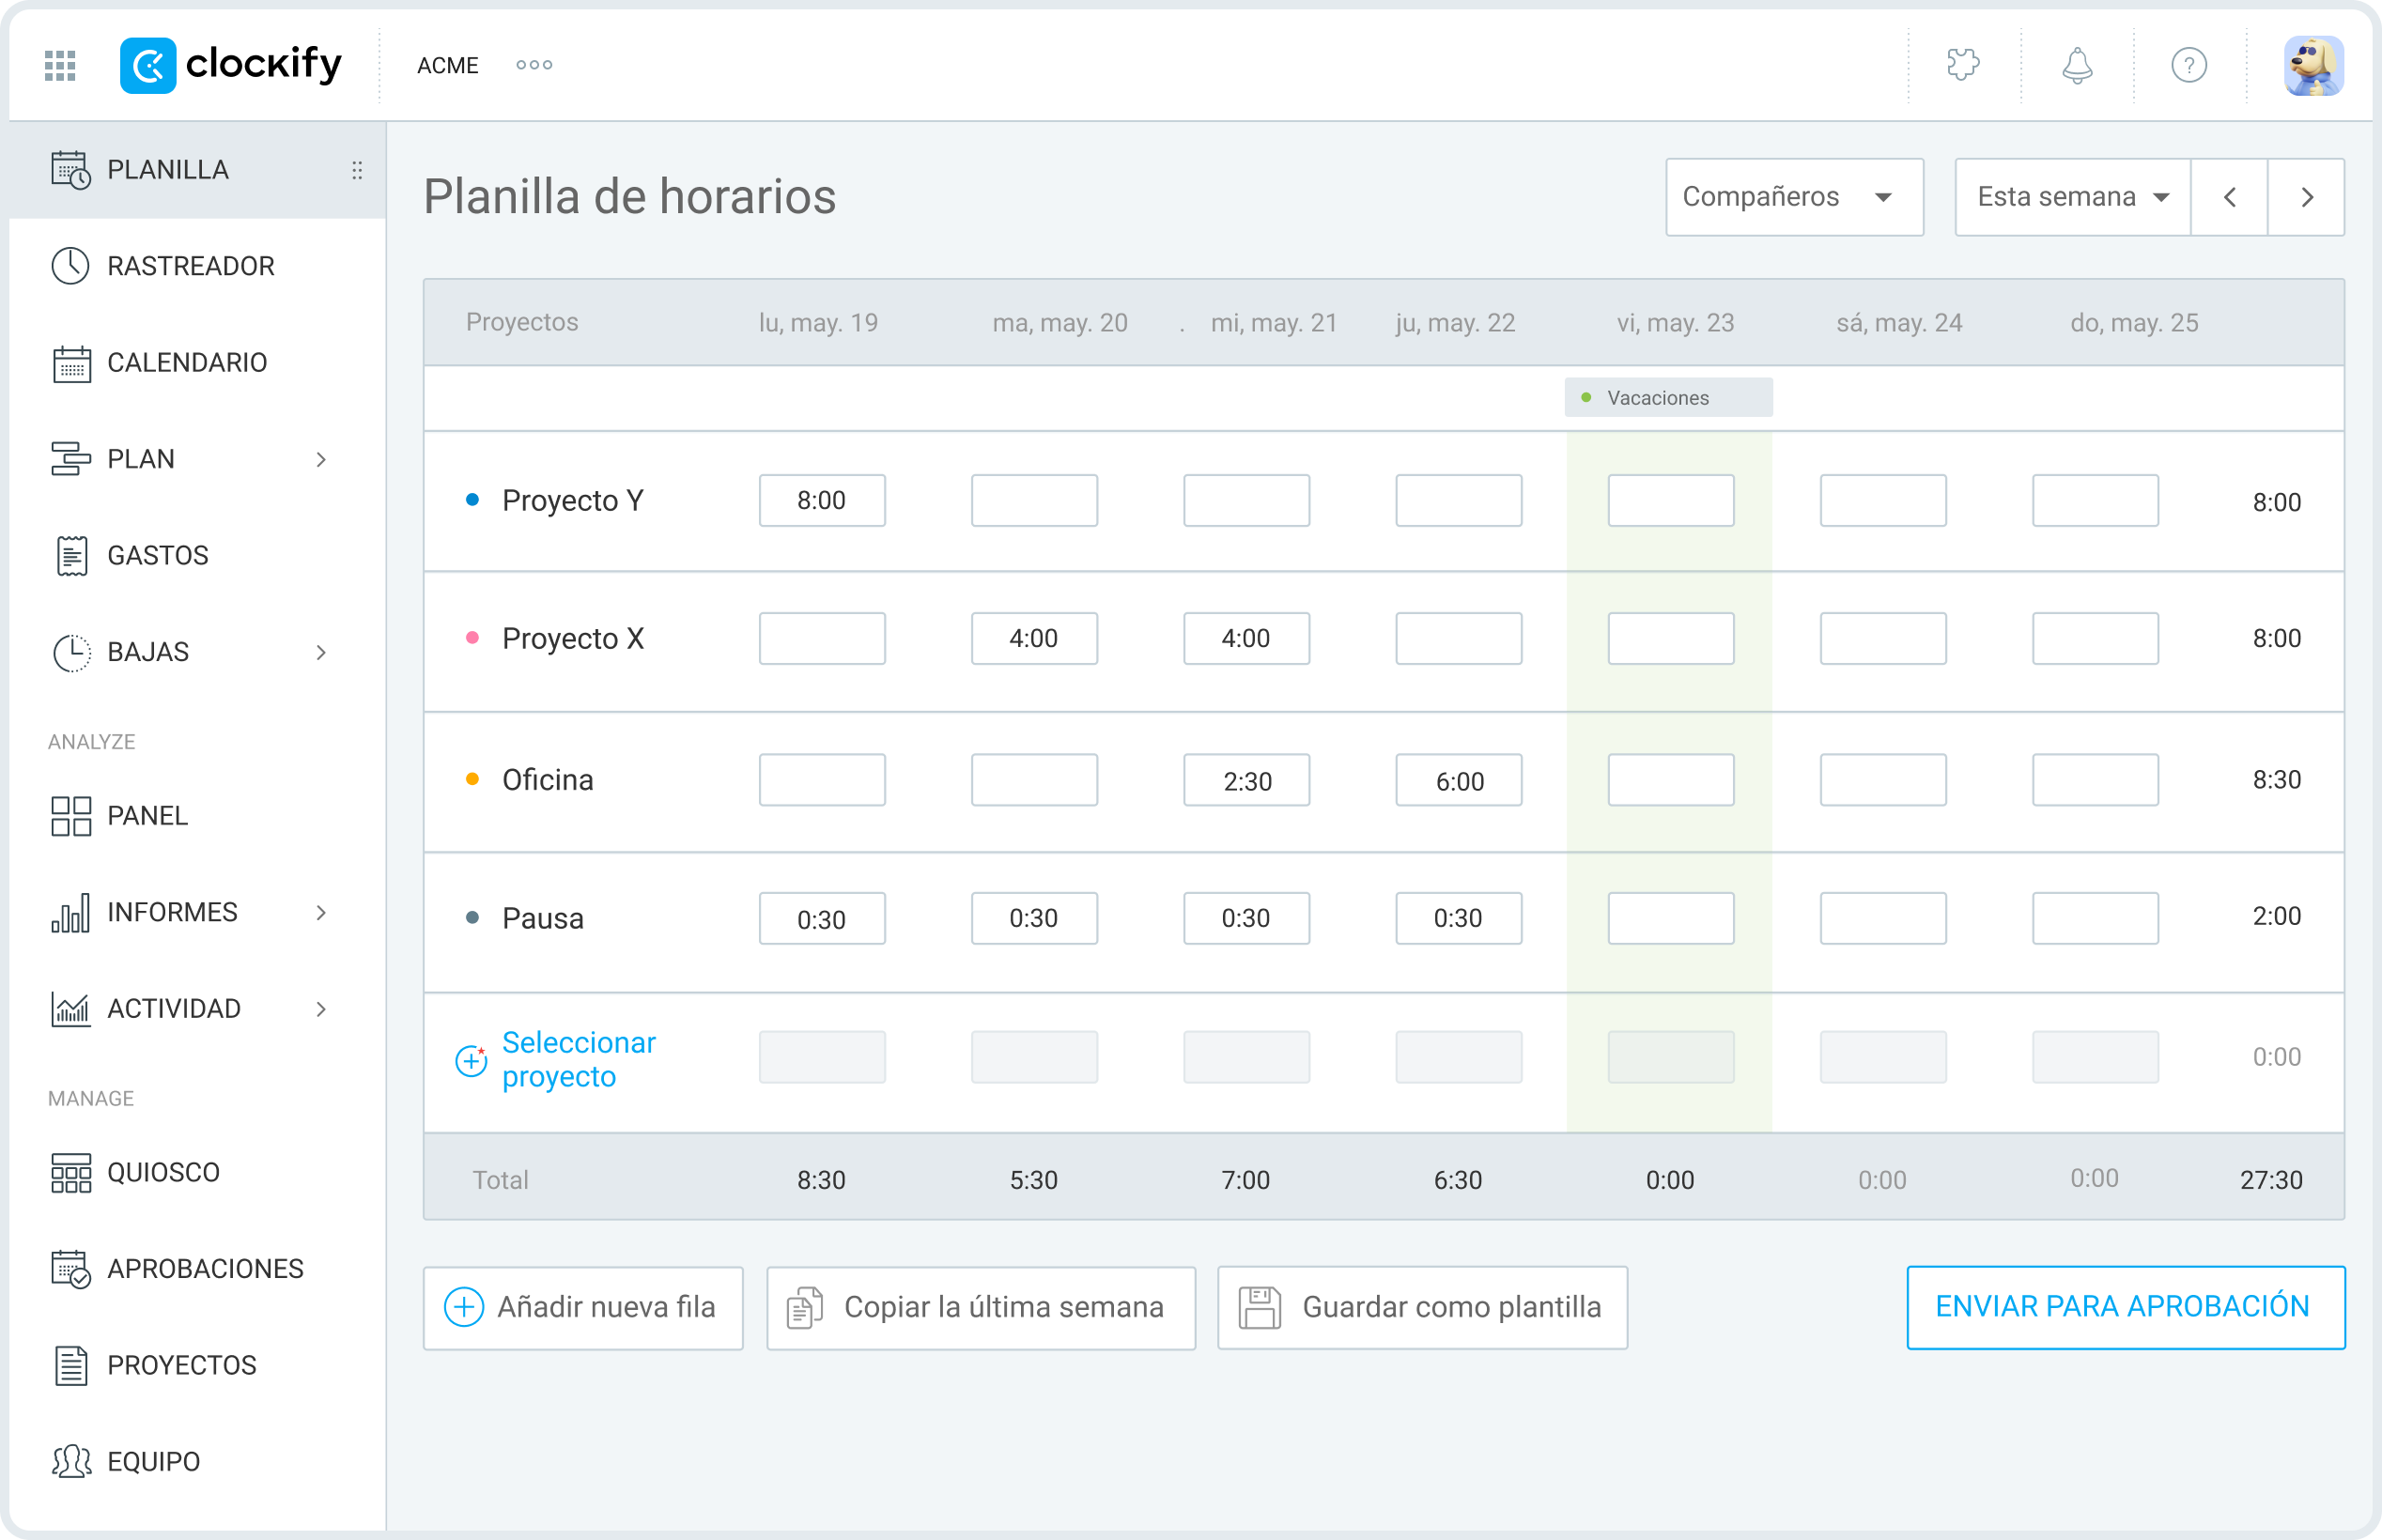
La Planilla de horarios te permite introducir las horas totales dedicadas a proyectos. Si sabes que vas a trabajar en un proyecto o una tarea la semana entera, la manera más rápida de registrar tus horas será a través de la Planilla de horarios.
Puedes usar la opción “Copiar la semana pasada” o las Plantillas de planillas de horarios para registrar tus actividades semanales rápidamente.
Otra manera de seguir tus horas de trabajo es a través de la aplicación de escritorio. El temporizador de escritorio de Clockify se puede configurar automáticamente tan pronto como tu ordenador esté activo, así que no tienes que recordarte a iniciarlo.
La app de escritorio de Clockify ofrece algunas funciones y recordatorios útiles. También ofrece un Rastreador automático integrado, que automáticamente cuenta el tiempo dedicado a cada página web o aplicación, así que es útil a la hora de cambiar entre herramientas y pestañas.
Los registros de rastreador automático son visibles solo para ti, y puedes elegir qué registros se importarán como entradas de tiempo a la aplicación web de Clockify.
Seguir el tiempo con un quiosco te permite fichar la entrada y salida fácilmente para seguir las horas de trabajo y descanso.
Las aplicaciones móviles te proporcionan también un modo de temporizador y un modo manual, y con una función de planilla de horarios.
Un Quiosco es excelente para un control de tiempo simple en lugares de trabajo basados en turnos. La duración del tiempo activo para el quiosco se puede personalizar, y los empleados pueden fichar la entrada con o sin un código PIN.
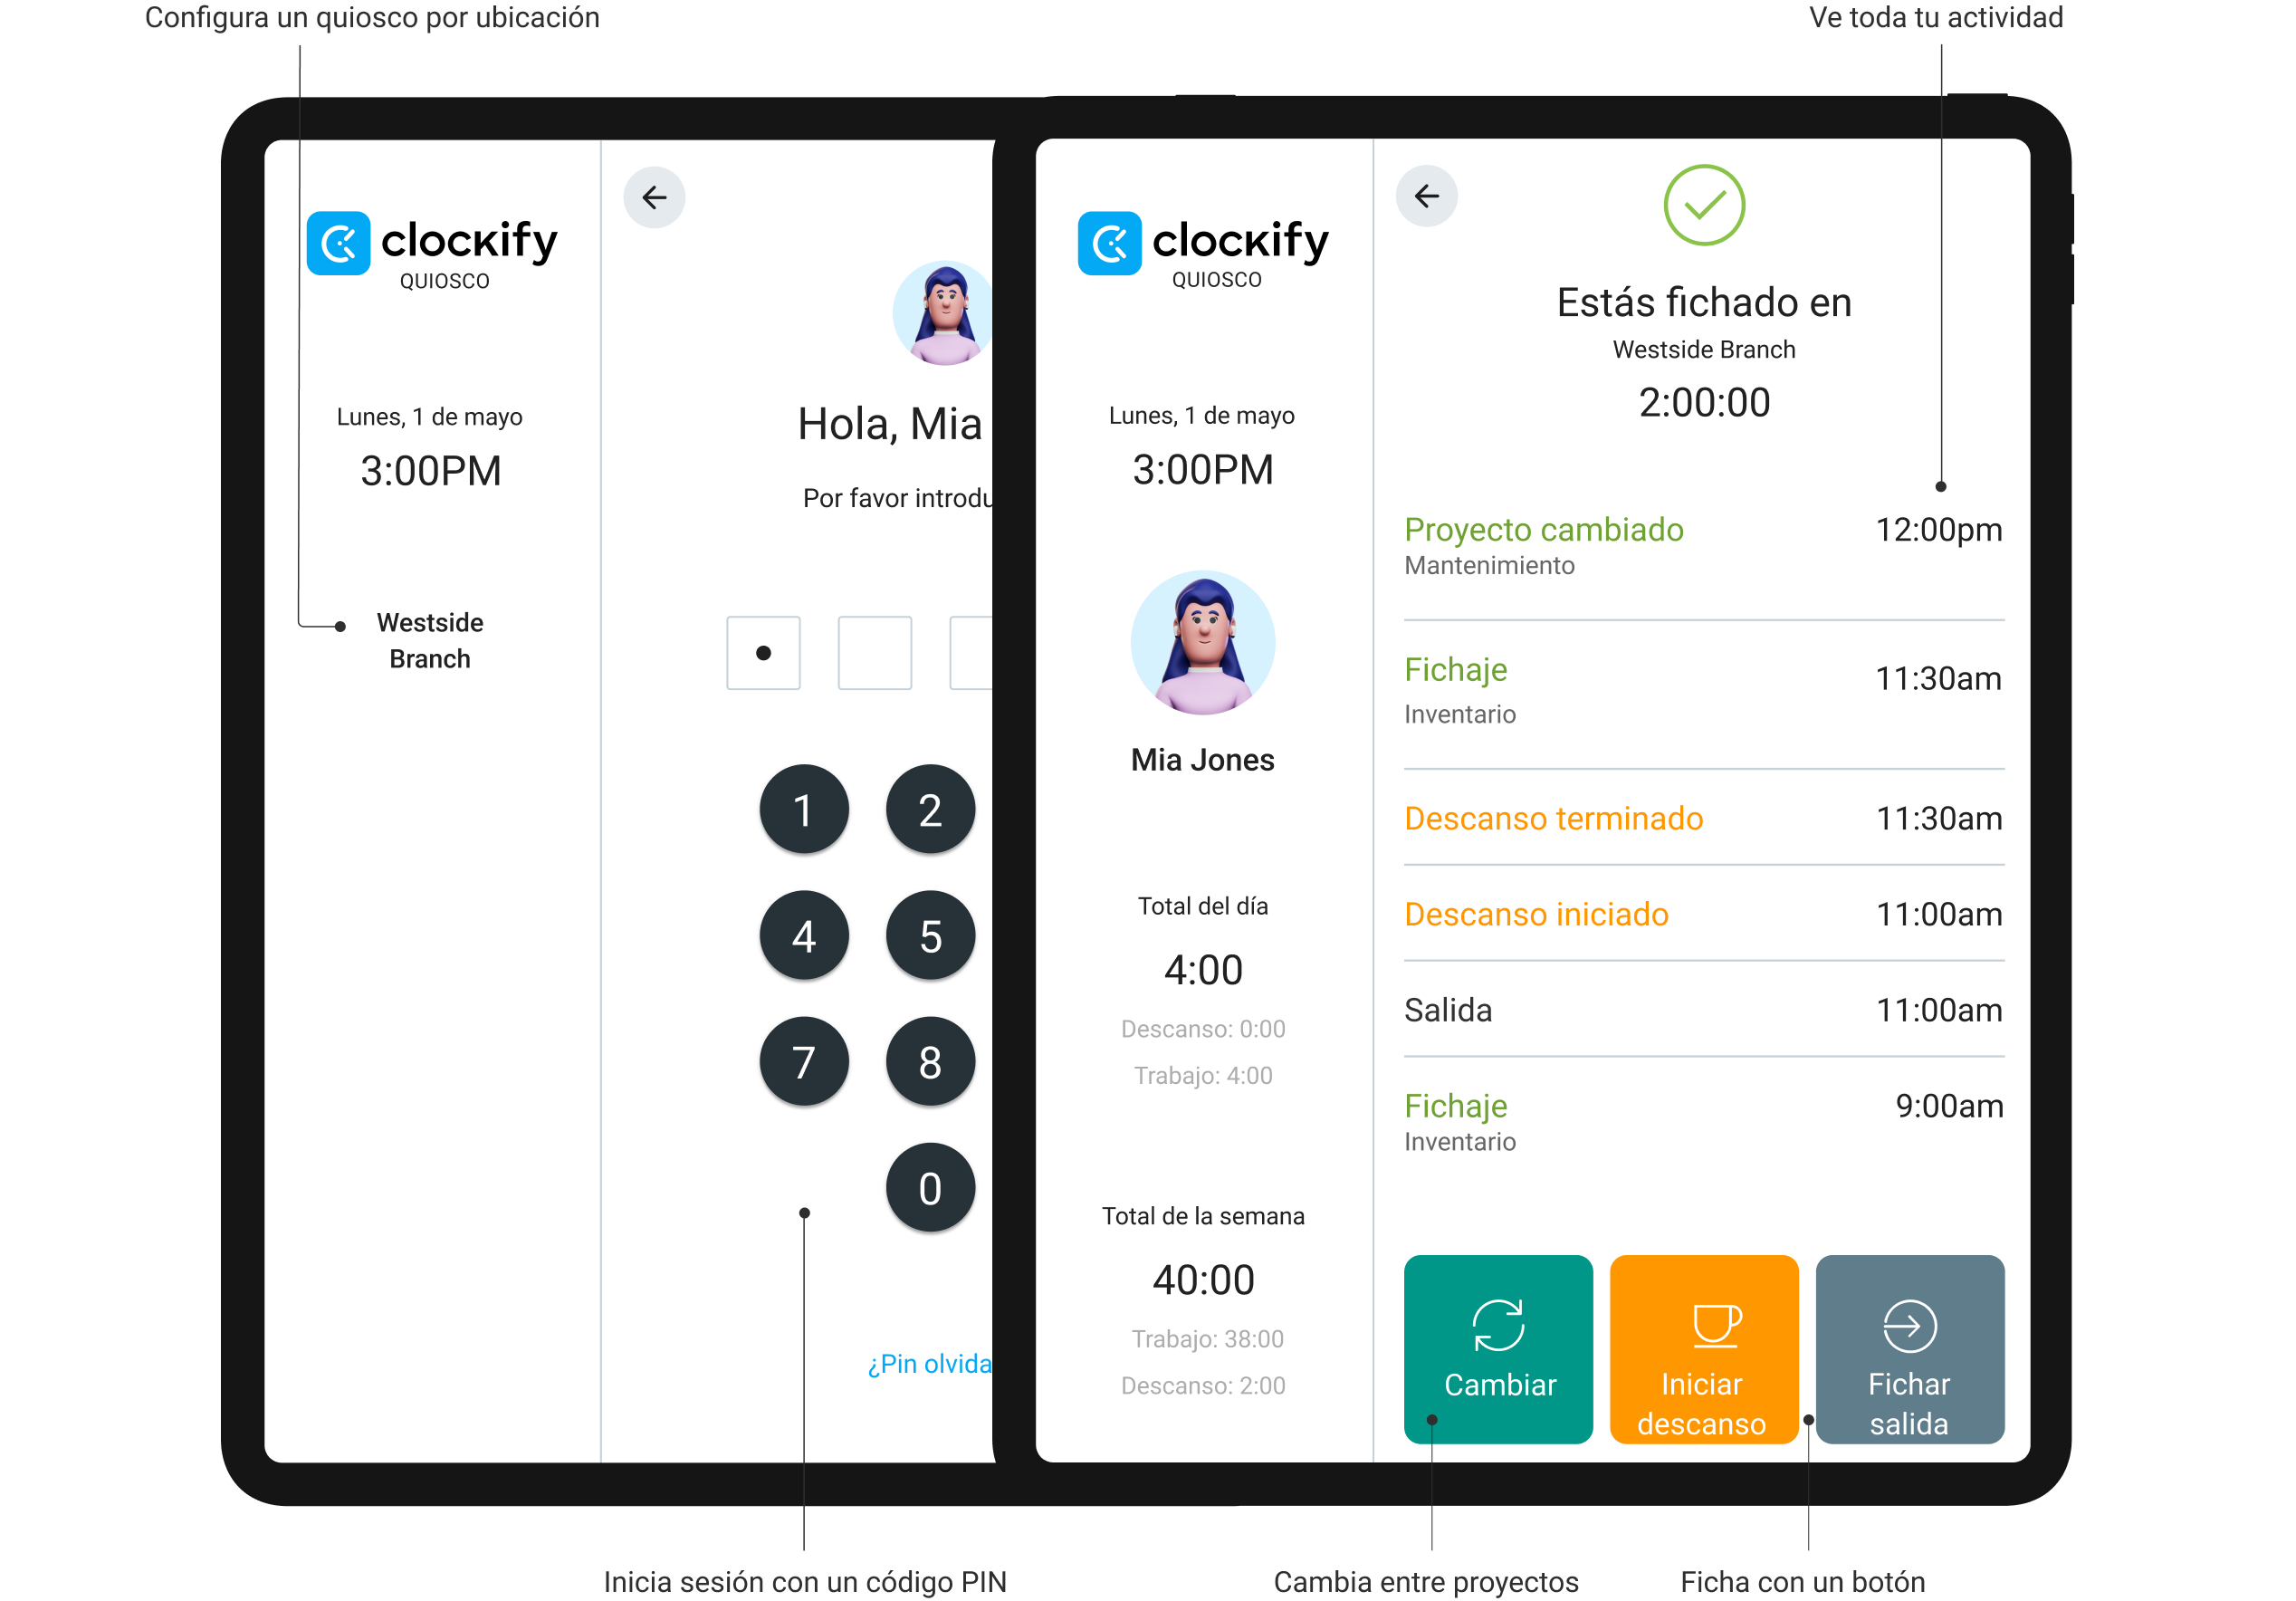
Puedes crear múltiples quioscos y seleccionar un proyecto predeterminado para cada uno. Pero cuando los empleados fichan la entrada, pueden cambiar entre proyectos, tareas o trabajos.

Un quiosco se puede iniciar en cualquier dispositivo conectado al internet, así que se puede configurar fácilmente como una estación de fichar de entrada en tabletas, ordenadores o teléfonos móviles.
Preguntas frecuentes sobre la configuración de cuentas
¿Cómo configurar el seguimiento del tiempo de inactividad en Clockify by CAKE.com?
El seguimiento del tiempo de inactividad está disponible mediante la extensión del navegador o la aplicación de escritorio de Clockify. Para habilitarlo, ve a la Configuración de Clockify en la extensión de navegador o Preferencias en la aplicación de escritorio.
Luego, configura los parámetros: la cantidad de minutos que tarda el temporizador para registrar la inactividad para habilitar o deshabilitar las capturas de pantalla, y si quieres que el rastreador automático registre las aplicaciones y sitios web que utilizas.
Sigue el tiempo de inactividad
¿Qué es el tiempo de aprobación y bloqueo?
Seguir las entradas de tiempo con Clockify está disponible para todos los usuarios dentro de una sola organización. Sin embargo, los gerentes y administradores de espacio de trabajo pueden optar por revisar las entradas de tiempo individuales una vez que se envían por los empleados. Adicionalmente, pueden establecer un período de tiempo para reseñas de forma semanal, bisemanal o mensual, todo a través de la función de aprobación.
Por otro lado, la funcionalidad de bloqueo de tiempo simplemente bloquea los usuarios de añadir nuevos o editar existentes entradas de tiempo después de un período específico.
¿Cuál es la mejor manera de gestionar proyectos y equipos dentro de Clockify by CAKE.com?
Para gestionar mejor tus proyectos, equipos y tiempo, establecer un flujo de trabajo del proyecto es esencial. Una vez que creas una cuenta de Clockify, asegúrate de seguir estos pasos:
- Define y crea tus proyectos,
- Establece estimaciones y recordatorios,
- Añade tareas a tus proyectos,
- Añade los miembros de tu equipo,
- Sigue el tiempo en tus proyectos y tareas, y
- Genera informes una vez que el proyecto se finalice.
Una vez que tengas tus informes (disponibles en formatos PDF, CSV, o Excel), podrás analizar tu flujo de trabajo e identificar brechas para mejorar tu eficiencia general.
Instala las aplicaciones de Clockify
Si prefieres usar la app en vez de la versión web, puedes descargar e instalar la app en tu ordenador (Windows, Mac, Linux) o dispositivo móvil (iOS, Android).
Si no, puedes usar Clockify exclusivamente a través de la extensión de web o navegador (Chrome, Firefox, Edge).
Cualquiera que sea el método que te resulte más cómodo, todos los datos se sincronizarán.
Si necesitas ayuda para entender las funciones de Clockify, o si quieres explorar otras funciones, como planificación, gestión de gastos, facturación, aprobación, o gestión de tiempo libre, asegúrate de visitar nuestro sitio web o explorar nuestros vídeos de YouTube.
Clockify forma parte de CAKE.com Bundle, que te da acceso a 3 herramientas de productividad, Clockify, Pumble y Plaky, a un precio muy rebajado de 12,99 $. Así, podrás gestionar fácilmente los proyectos de tu equipo, tu tiempo y la comunicación en general.
Cómo revisamos esta publicación: Nuestros escritores y editores monitorean las publicaciones y las actualizan cuando hay nueva información disponible, para mantenerlas frescas y relevantes.