Planilha de horas
A visualização de Planilha de horas no Clockify foi projetada para usuários que preferem inserir o tempo manualmente no final do dia ou da semana.
Ativar Planilha de horas #
Antes de poder usar a Planilha de horas, um administrador do espaço de trabalho deve habilitá-la.
1. Click on the ![]() three-dot icon next to the workspace name
three-dot icon next to the workspace name
2. Select Workspace settings
3. Enable the Activate timesheet option under Timesheet
Uma vez ativado, o campo Projeto torna-se automaticamente um campo obrigatório para todas as entradas de tempo.

Ao usar a Planilha de horas, os projetos precisam estar visíveis para você antes que possa adicionar tempo a eles. Se um projeto estiver:
- Público, aparecerá automaticamente na sua lista
- Private, an Admin or Project Manager can assign you to that project
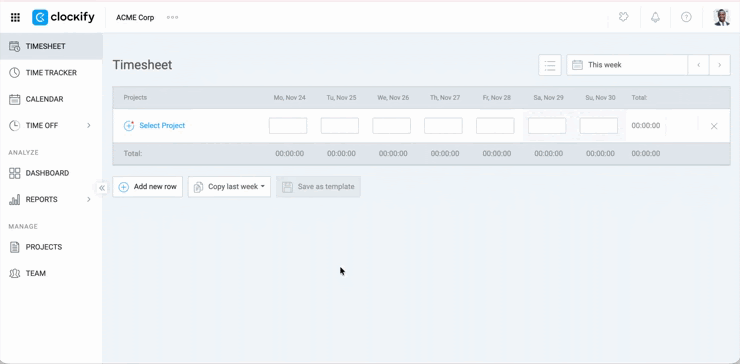
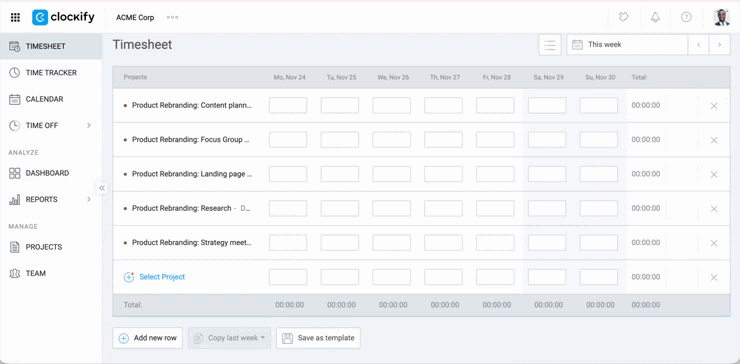
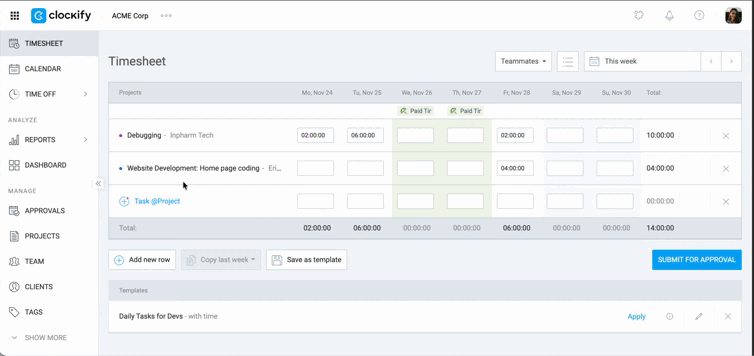
Adicionar tempo #
1. Click ![]() Select Project and choose the project/task you worked on
Select Project and choose the project/task you worked on
2. Enter the amount of time you worked in the cell corresponding to that day
3. Click the Add row button to add a new line (optional)
4. Switch to a different week using the date navigation in the top-right corner
Se você excluir um registro de tempo na Planilha de horas, todo o tempo associado àquela tarefa, naquela semana, será excluído.
Editar/adicionar detalhes da entrada #
Para adicionar mais detalhes a um período de tempo específico:
- Passe o cursor sobre a célula que contém o tempo registrado.
- Click on the
 three dots that appear
 - Insira os detalhes que deseja adicionar na janela pop-up (descrição, tags, status de faturamento, horário de início/término).

A entrada é baseada na sua configuração nas definições do Espaço de Trabalho:
| Input | Duration format is set to minutes/hours | Duration format is set to decimal |
| 1 | Becomes 1 minute | Becomes 1 hour |
Copiar as atividades da semana anterior #
A opção Copiar semana passada permite copiar atividades ou copiar atividades com o respectivo tempo da semana anterior.
- Acesse a página Planilha de Horas
- Click the Copy last week button on the bottom
- Choose your preference:
- Copy activities only – Imports the projects/tasks list
- Copy activities and time – Imports the projects/tasks list and time logged for those entries
Criar modelos #
Os modelos permitem salvar e aplicar listas predefinidas de projetos e tarefas. Você pode salvar o tempo e as tarefas de uma semana específica como um modelo.
Para criar um modelo:
- Escolha a semana que deseja salvar como modelo
- Clique em Salvar como modelo na parte inferior da página.
A planilha de horas será preenchida automaticamente com os projetos e tarefas do modelo.
A planilha de horas será preenchida automaticamente com os projetos e tarefas do modelo.
- Adicionar – Incorporar registros de tempo do modelo aos já existentes
- Replace – Overwrite existing time entries with the template’s entries
- Skip – Ignore cells where time already exists
Timesheet templates are accessible only to the user who created them.
Enviar Planilha de horas #
Você pode enviar seu registro de horas e despesas para aprovação diretamente da página de planilha de horas (dependendo da função e das permissões do usuário).
For detailed instructions on the approval process, refer to the Enviar tempo e despesas para aprovação help page.
Os indicadores de status são visíveis na visualização da planilha de horas:
| Status | Ícone | Significado e Ação |
| Aprovado | Marca de seleção verde (✓) | A entrada está bloqueada e não pode ser editada ou excluída. |
| Pendente | Marca de seleção laranja | A entrada foi enviada, mas ainda pode ser editada ou excluída. |
| Não enviado/Rejeitado | Sem status | A entrada não foi enviada ou foi rejeitada anteriormente. É totalmente editável. |
Adicione tempo para os colegas de equipe #
Esta é uma ferramenta paid feature available on qualquer plano pago.
Depending on your workspace settings, only admins or team managers can edit time for others.
- Acesse a Planilha de horas
- Clique em Colegas de equipe
- Selecione um colega de equipe para visualizar a sua planilha de horas trabalhadas.
- Selecione o projeto ou a tarefa e adicione/edite o tempo desse membro da equipe conforme necessário.

Exportar planilha de horas #
Você pode salvar a visualização como um PDF usando seu navegador ou exportar um relatório mais personalizável.
Use a opção Imprimir #
- Navegue até a página da planilha de horas que deseja salvar.
- Abra as opções do seu navegador (geralmente os três pontos no canto).
- Clique em Imprimir
- Na caixa de diálogo de impressão, selecione a opção Salvar como PDF
- Clique em Salvar
- Digite um nome para o arquivo e clique em Salvar

Exportar PDF do relatório semanal #
- Acesse a página Relatórios
- Filtre o relatório por um usuário e semana específicos.
- Clique em Exportar
- Personalize o relatório, como por exemplo, desativando a opção Mostrar subgrupo (opcional)
- Salve o relatório como um arquivo PDF.
Ocultar página do rastreador de tempo #
Se você usar apenas o modo planilha de horas, poderá ocultar a página do Rastreador de Tempo.
- Acesse Configurações do espaço de trabalho
- Ative a opção Ocultar rastreador
Ativar "Forçar cronômetro" #
O recurso Forçar cronômetro pode ser usado para desativar completamente o registro de tempo pela planilha de horas, obrigando os usuários a registrar o tempo apenas pelo cronômetro. Nesse cenário, a planilha de horas só pode ser usada para revisar os registros.