Arbeitsbereichseinstellungen
Learn how you can use each page in Clockify Arbeitsbereichseinstellungen to manage workspace defaults, configure time tracking and scheduling rules, set up billable rates and finances, and enable integrations.
Below is an overview of the workspace settings pages. Click on a page title to learn more:
- Allgemein: Adjust workspace identity, define standard workweek parameters, and establish default project behaviors.
- Zeiterfassung: Set up time entry structures, tracking rules, timesheet approval processes, and member preferences.
- Finances: Configure supported currencies, billable and cost rates, expense logging, and client billing processes.
- Time planning: Oversee team availability, establish time off policies, organize project schedules, and track scheduled financial metrics.
- User activity: Track mobile GPS location data, capture desktop screen activity, and review system audit logs.
- Kiosk: Configure shared time-clock stations, set up clock-in verification methods (PIN/QR code), and enable photo capture.
- Sicherheit: Configure data storage locations, set up Single Sign-On (SSO), create custom subdomains, and enable SCIM user provisioning.
- Konto: Create custom user fields and oversee workspace team members in a centralized directory.
- Berechtigungen: Specify access rights, feature availability, and administrative options across user roles.
- Integrations & add-ons: Control active integrations, turn optional features on or off, and browse the Marketplace.
- Import/Export: Upload external CSV data into Clockify, download pre-formatted CSV templates, and export workspace time entries.
Access to certain settings depends on your subscription tier, as some features require a paid plan.
Allgemein
The General page allows admins and workspace owners to configure core organizational defaults, including workspace identity, standard workweek settings, and default project behavior.
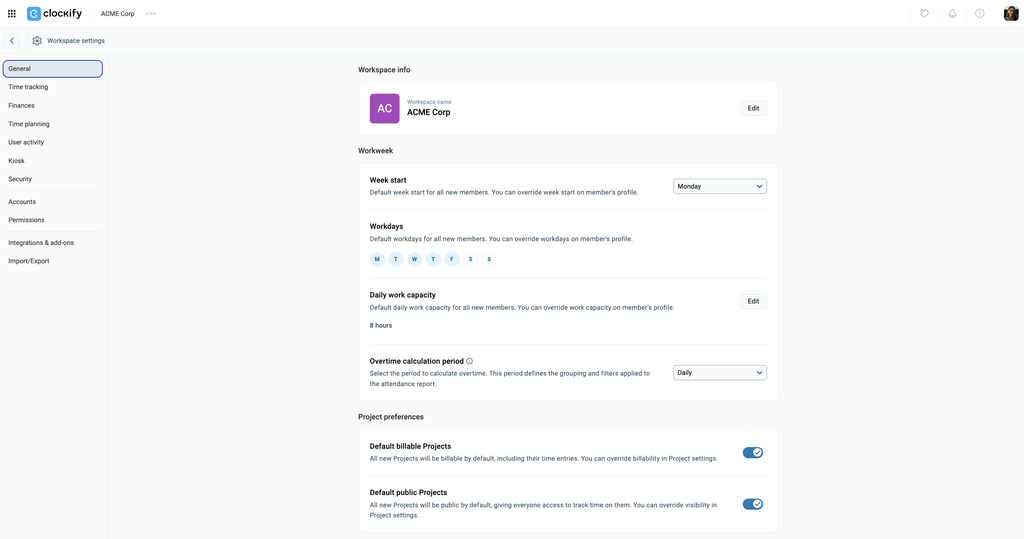
Workspace Info
Workspace Name: Displays your current workspace avatar and name, along with an Bearbeiten button to change them.
Workweek
These settings define your team’s work schedule, work capacity, and overtime calculation.
- Week start: A dropdown menu that sets the first day of the week for reports and timesheets. This acts as the default for all new members, though it can be overridden on an individual member’s profile.
- Workdays: Circular toggles representing days of the week (M, T, W, T, F, S, S) that define standard working days. Like the week start, this is a default for new members that can be overridden individually.
- Daily work capacity: Displays the standard number of working hours expected per day (e.g., 8 hours), adjustable via the Bearbeiten button. This also acts as a default for new members that can be overridden on their profile.
- Overtime calculation period: A dropdown menu (e.g., Daily) that sets the timeframe used to calculate overtime. This setting directly influences the grouping and filters applied to your workspace’s attendance report.
Project Preferences
These toggles determine how new projects behave the moment they are created.
- Default billable projects: A toggle switch that, when enabled, automatically makes all newly created projects and their time entries billable by default. You can still manually override billability within individual project settings later.
- Default public projects: A toggle switch that automatically makes all new projects visible to everyone in the workspace.
Zeiterfassung
The Time tracking page is where you customize time entry formats, set tracking rules, configure approvals, and manage user preferences.
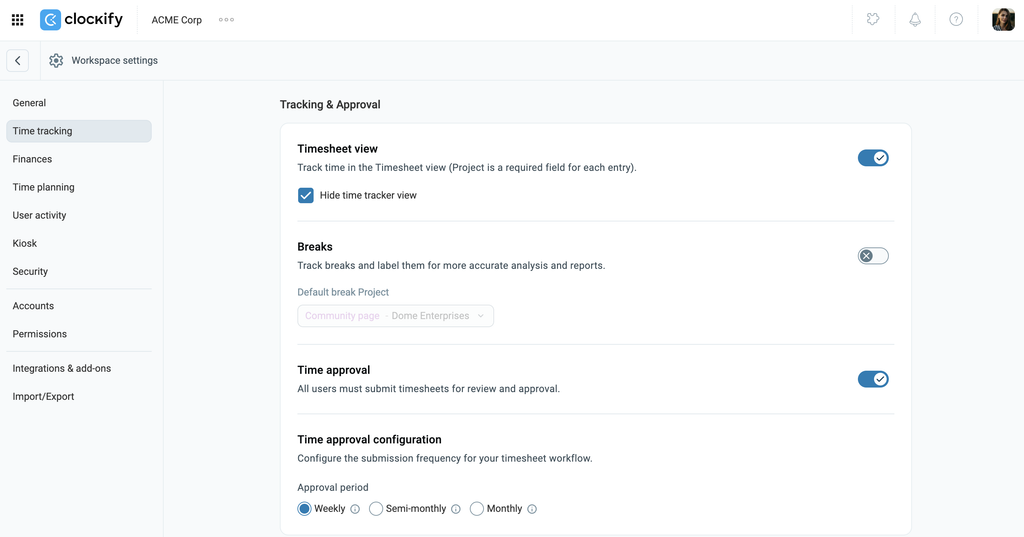
Tracking & Approval
- Timesheet view: Enables a weekly grid-style interface for entering time, requiring a project selection for every entry. Enabling this also provides the option to Hide time tracker view if you want team members to log time strictly using timesheets.
- Breaks: Allows team members to log break times separately for clearer breakdown in reports. Includes a Standard-Pausenprojekt setting to automatically assign tracked break time to a designated project.
- Time approval: Requires team members to submit their weekly, semimonthly, or monthly timesheets to managers or administrators for review and approval before entries are locked.
Time Entry Format
- Dauerformat: Controls how time durations are displayed across the workspace (e.g., hh:mm:ss).
- Customize labels: Allows you to rename standard Clockify organizational terminology (such as Kunde, Projekt, oder Aufgabe) to align with your organization’s internal language.
- Time entry custom fields: Enables adding custom data fields (such as location, project ID, or attachments) so users can log extra metadata with each entry.
- Time entry required fields: Lets you define which fields (e.g., Project, Task, Tag, Description, or Custom Fields) must be filled in before a time entry can be saved.
- Round time in reports: Configures default rounding rules (such as rounding up to 15-minute increments) when generating workspace reports.
Tracking Rules
- Lock time and expenses: Sets a cutoff rule to prevent team members from adding, editing, or deleting time entries and expenses for past dates.
- Force timer: Disables manual entry and editing of past time entries, requiring team members to track time exclusively using the live start/stop timer.
Favoritenleiste
- Project and task favorites: Allows users to mark frequently used projects and tasks so they appear at the top of selection lists for quicker time tracking.
- Favorite entries: Enables users to save recurring time entry details as shortcuts for fast, one-click reuse.
Finances
The Finances page contains settings to manage currency display formats, configure billable and cost rates, and set up expense tracking and client invoicing.
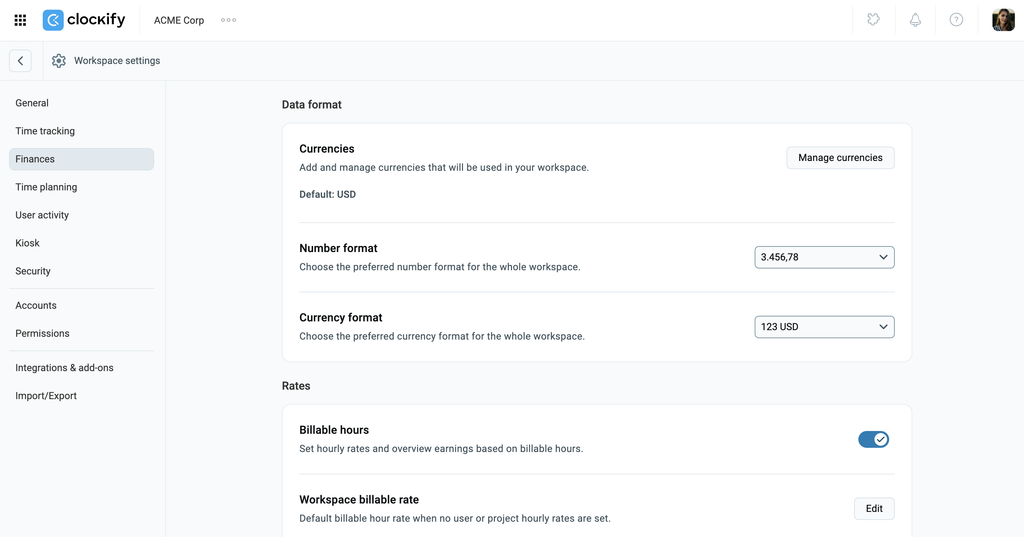
Data format
- Currencies: Lets you add and manage currencies used throughout your workspace, displaying your current default currency (e.g., USD) with an option to manage available currencies.
- Number format: Selects how numerical values and decimal separators are displayed workspace-wide (e.g., 3.456,78).
- Currency format: Selects how currency symbols and codes are positioned relative to monetary figures across reports and entries (e.g., 123 USD).
Sätze
- Billable hours: Activates hourly rate calculations, allowing you to view earnings and calculate revenue from tracked billable time.
- Workspace billable rate: Sets the fallback hourly billable rate used across the workspace whenever a specific project, task, or user rate is not defined.
- Cost rate: Enables tracking internal hourly costs to help analyze profit margins by comparing client billing against internal team costs.
- Workspace cost rate: Sets the default internal cost rate applied to tracked hours when no individual user cost rate is specified. This setting unlocks when Cost rate is enabled.
- Task rates: Allows setting unique billable rates for specific tasks within projects.
- Set default task billability: Enables the ability to set a default billable status (billable or non-billable) for tasks created within a project.
Ausgaben
- Expense tracking: Enables logging work-related expenses by fixed amount or unit count, uploading receipt attachments, and transferring expenses to client invoices.
- Expense approval: Enables an approval process for submitted expenses on a Weekly, Semimonthly, or Monthly schedule. This setting unlocks once "Ausgabenerfassung" is enabled.
Rechnungen
- Rechnungsstellung: Unlocks the capability to generate, manage, and download client invoices directly from tracked billable hours and expenses.
- Company address: Stores your organization’s legal address to display under the “Bill from” section on all generated invoices. This setting unlocks once Rechnungen is enabled.
Time planning
The Time planning page helps you manage team availability, forecast project timelines, and track scheduled costs.
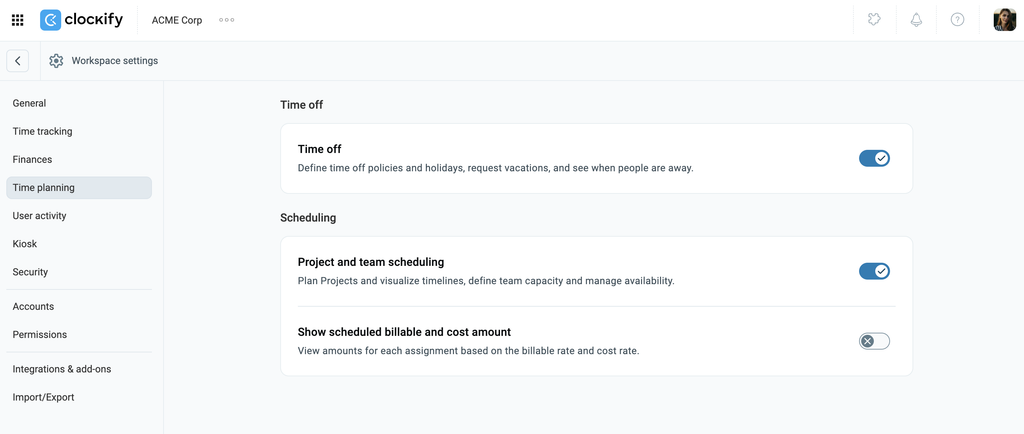
Arbeitsfreie Zeit
Arbeitsfreie Zeit: This toggle allows you to define time off policies and set up company holidays. When enabled, team members can request vacations, and you can easily see when people are away from work.
Zeitplanung
- Project and team scheduling: Enabling this toggle unlocks the scheduling features, allowing you to plan projects and visualize timelines. It also provides tools to define your team’s working capacity and manage their overall availability.
- Show scheduled billable and cost amount: Once scheduling is enabled, this secondary option lets you view financial amounts for each assignment based on the established billable rate and cost rate. Note that this option is locked and cannot be toggled until you first activate Project and team scheduling.
User activity
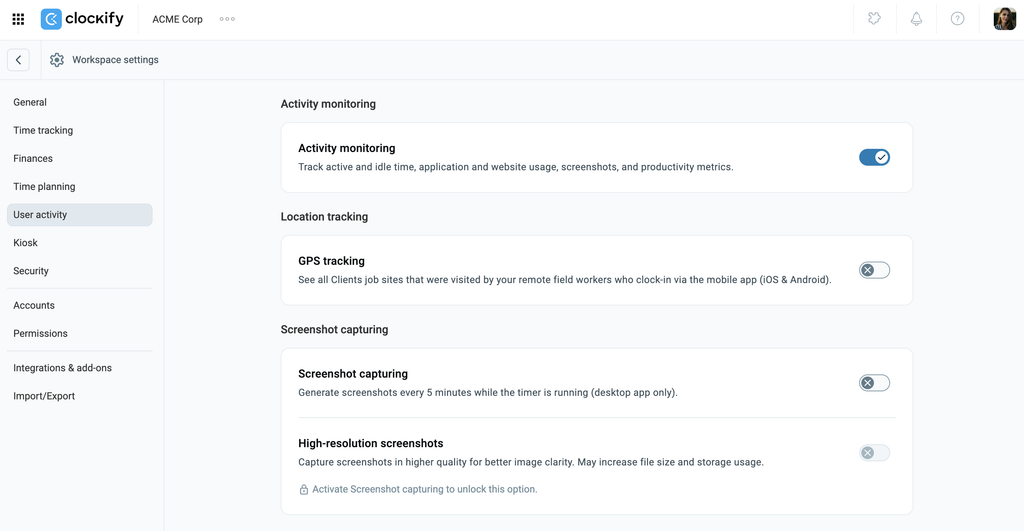
The User activity page enables admins to monitor location data for mobile users, capture screen activity during tracked desktop hours, and maintain an audit history of changes made across your workspace.
Location tracking
GPS tracking: Tracks the location of team members when they log time using the Clockify mobile app (iOS & Android).
Screenshot capturing
- Screenshot capturing: Generates a screenshot of the user’s active screen every 5 minutes while the timer is actively running in the Clockify desktop application.
- High-resolution screenshots: Increases the image quality and clarity of captured screenshots, though it may increase file sizes and storage usage. This setting requires Screenshot capturing to be activated first.
Audit-Protokoll
- Audit log: Enables workspace-wide tracking to record specific user actions and administrative activities.
- Record all changes: Lets you select which entity types (Time entries, Projects, Clients, Tags, or Expenses) will automatically log all creation, update, and deletion events. Note: This section unlocks when Audit-Protokoll is enabled.
Kiosk
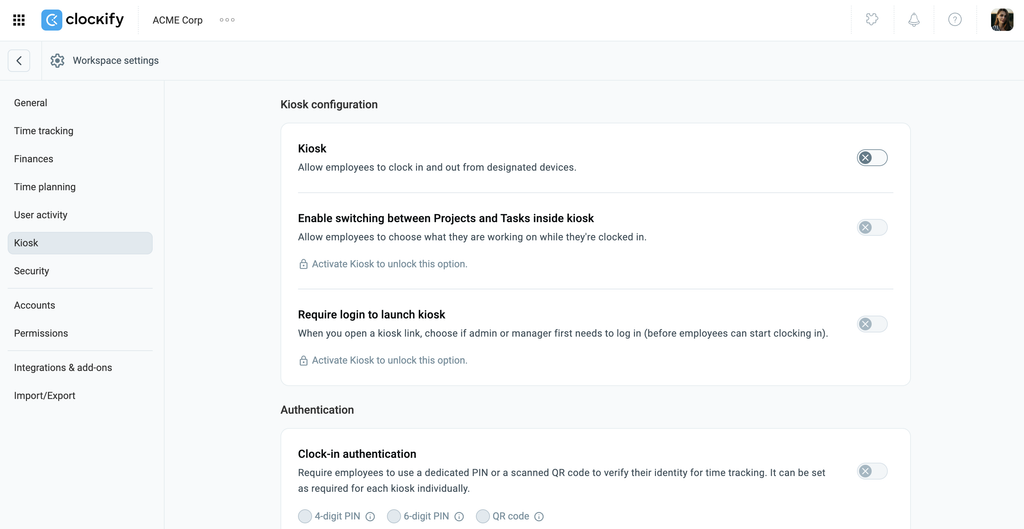
The Kiosk section lets admins set up shared clock-in stations on designated devices, configure employee authentication, and manage kiosk security.
Kiosk configuration
- Kiosk: Enables the kiosk feature, allowing employees to clock in and out from designated shared devices (such as a tablet or onsite computer).
- Enable switching between projects and tasks inside kiosk: Allows employees to select or change what project and task they are working on directly from the kiosk interface while clocked in. Note: Requires “Kiosk” to be activated first.
- Require login to launch kiosk: Requires an administrator or manager to log into their account prior to opening a kiosk link and making it available for employees to clock in. Note: Requires “Kiosk” to be activated first.
Authentifizierung
- Clock-in authentication: Requires employees to verify their identity using a dedicated credential when clocking in or out. You can select between a 4-stellige PIN, 6-digit PIN, oder QR code, with settings configurable for each kiosk individually.
- Photo capture: Takes a photo of the employee on each clock-in and clock-out to verify identity and prevent buddy punching. This requirement can be enabled per kiosk.
Sicherheit
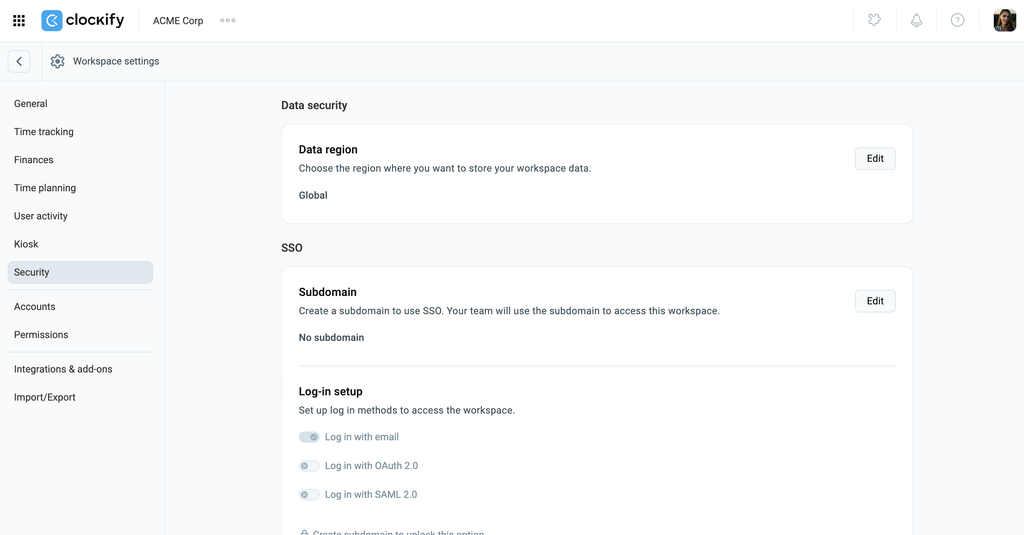
The Security lets you manage data residency, set up Single Sign-On (SSO), and automate user provisioning across your organization.
Data Security
Data region: Allows you to select the geographical server location where your workspace data is stored (e.g., Global).
SSO
- Unterdomäne: Enables you to set up a custom workspace URL, which is required to activate Single Sign-On (SSO) for your team.
- Log-in setup: Controls the allowed authentication methods for your workspace, including email login, OAuth 2.0, and SAML 2.0.
- SSO Logo: Lets you upload a company logo to display on the custom Log in with SSO gewechselt.
- SSO configuration: Connects Clockify to external identity providers (such as Google, Okta, OneLogin, or Microsoft Entra) using OAuth 2.0 or SAML 2.0 protocols.
- SCIM: Enables System for Cross-domain Identity Management (SCIM) to automatically provision, update, and deactivate user accounts and groups directly through your identity provider.
Konto
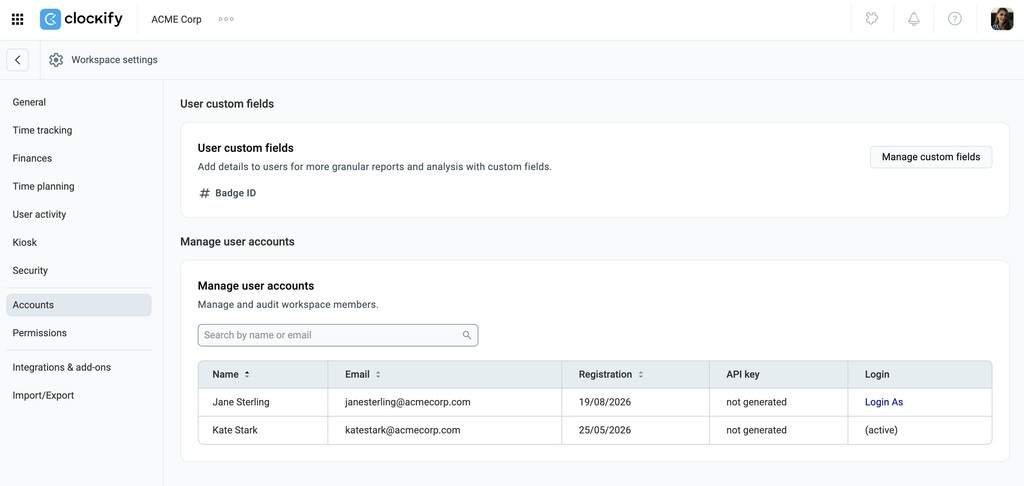
The Accounts page provides settings for user custom fields and member accounts across your organization.
User custom fields
- User custom fields: Allows you to create custom metadata fields (such as Department, Employee ID, or Job Title) that attach directly to user profiles.
- Manage custom fields: Clicking this button lets you set up, modify, or delete the custom fields applied to your team members.
Manage user accounts
- Provides a centralized directory to audit and oversee all members within your workspace.
- Displays key administrative data for each team member across several columns:
- Name & Email: The user’s registered contact information.
- Registration: The date the user joined or was registered in the workspace.
- API key: Indicates whether the user has generated an API key for custom integrations
- Login As: This lets administrators temporarily access the workspace from another user’s account for troubleshooting or account management.
Berechtigungen
These settings allow you to define exactly what different user levels can see and do within your workspace.
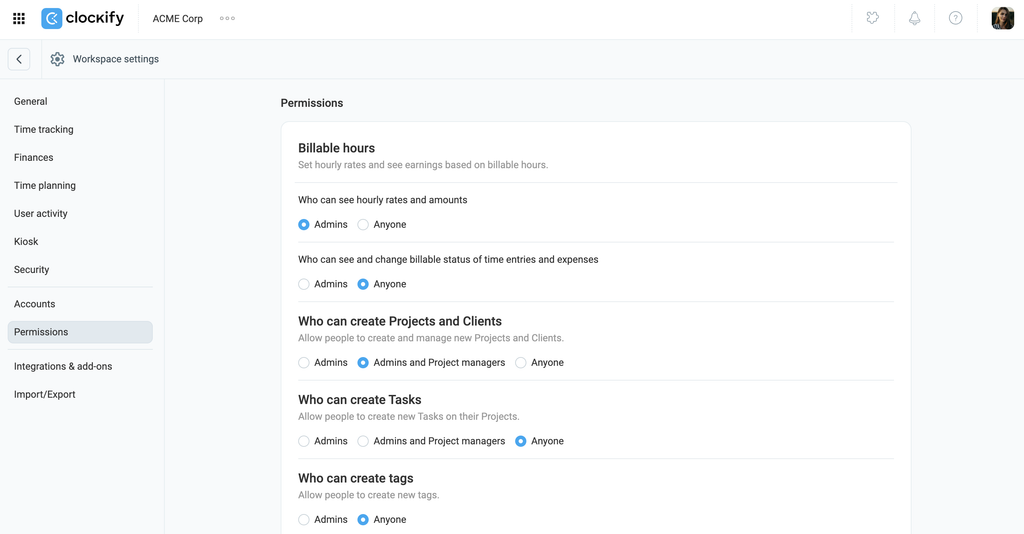
- Who can see hourly rates and amounts: Restricts visibility of financial data, such as user hourly rates and total monetary amounts, to either Admins only or Anyone.
- Who can see and change billable status of time entries and expenses: Controls whether Admins or Anyone can view and toggle the billable or non-billable status on tracked time and logged expenses.
- Who can create projects and clients: Defines the permission level required to add new projects and clients to the workspace, with options for Admins, Admins and project managers, or Anyone.
- Who can create tasks: Determines who is authorized to create tasks within projects, selectable between Admins, Admins and project managers, or Anyone.
- Who can create tags: Sets whether only Admins or Anyone can create new tags used to categorize time entries.
- Regular users can see: Sets the baseline visibility of tracked time for standard users. You can allow them to see all tracked time and expenses, limit them to time and expenses on public projects, or strictly restrict them to only viewing their own time and expenses.
- Users can access team dashboard: A toggle that allows or prevents regular users from viewing the workspace’s team dashboard.
- Who can see project status: Controls whether only Admins or Anyone can view the overall progress and status of projects.
- Hide pages from regular users: Hide specific navigation pages such as Projects, Team, or Reports, from regular users to simplify their interface or restrict access.
- Who can approve submitted timesheets: Defines who can approve timesheets submitted by team members
- Who can approve submitted expenses: Defines who can approve expenses submitted by team members
- Who can edit time and expenses for others: Determines who has the authority to modify the time entries and expenses of other team members, with options for Admins only or Admins and team managers.
- Who can manage invoices: Controls invoicing permissions. Admins have this capability by default, and you can optionally extend it to specific members.
- Who can create and edit assignments: Sets the permission level for assigning team members to projects and tasks, offering choices for Admins, Admins and project managers, or Anyone.
- Activity monitoring data access: For organizations utilizing Activity Monitoring, administrators have the option to restrict access to the activity monitoring page exclusively to Admins or broaden it to include team managers.
Integrations & add-ons
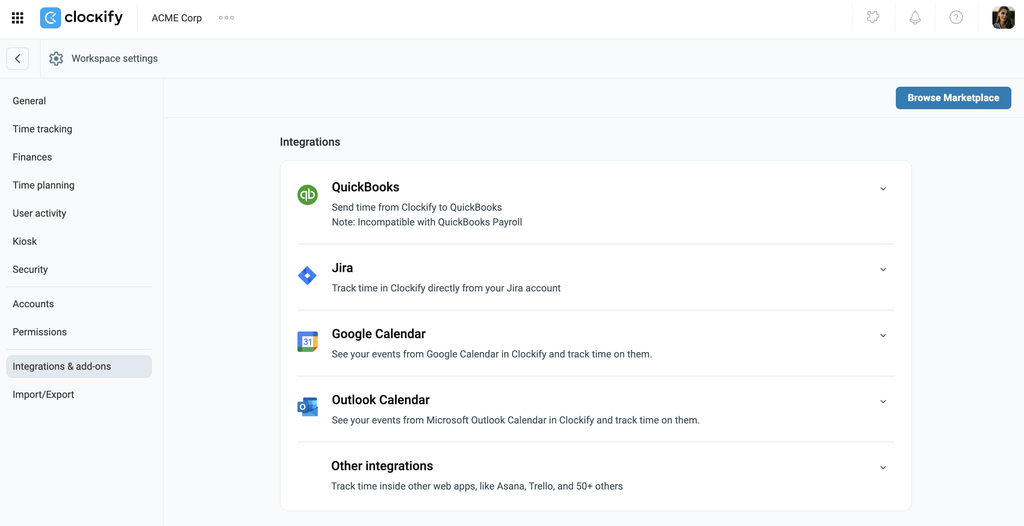
The Integrations & add-ons page lets you manage the configuration for your currently installed extensions and toggle specific integrations on or off.
Klicke auf Marketplace durchsuchen button located in the top right corner to explore and install additional features.
Import/Export
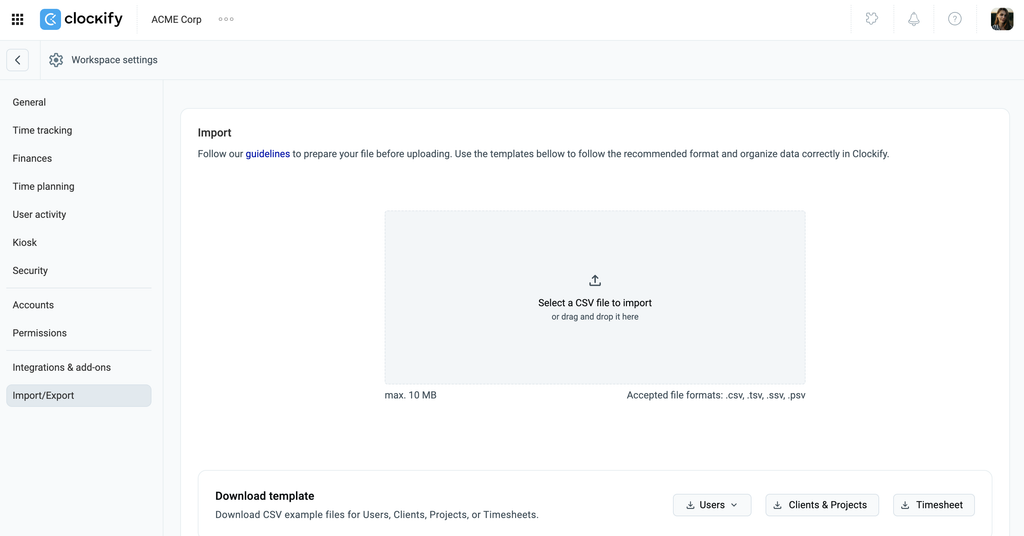
The Import/Export page within your Workspace settings provides tools to bulk upload external data into Clockify and download archives of your tracked time.
Importieren
A designated drag-and-drop zone to import data into your workspace. You can click to select a file from your device or drag it directly into the box.
Download template
Provides pre-formatted CSV example files so you can easily organize your data to match Clockify’s required structure. You can click the corresponding buttons to download specific templates for Benutzer, Clients & Projects, und Arbeitszeittabelle data.
Data export
Allows you to download a comprehensive backup of all time entries logged across your entire workspace for a specific calendar year. Simply select the target Year from the dropdown menu and click the Export time entries button to generate the export file.