Daten in Clockify importieren
Wenn du historische Zeiterfassungsdaten in Excel gespeichert hast oder von anderen Apps zu uns wechselst, kannst du deine Arbeitsbereichs-Daten – einschließlich Projekte, Aufgaben, Kunden, Tags, Zeiteinträge und deren benutzerdefinierte Felder – ganz einfach mithilfe einer CSV-Datei in Clockify importieren.
Inhalt dieses Leitfadens: #
Import-Typen
Vor dem Import
Projekte, Kunden, Aufgaben und Tags importieren
Arbeitszeittabellen und benutzerdefinierte Felder importieren
Benutzer importieren
Import-Typen
Clockify unterstützt drei verschiedene Import-Typen:
- Projekte, Kunden, Aufgaben, Tags: Nutze diese Option, um deinen Arbeitsbereich einzurichten, indem du deine bestehende Organisationsstruktur aus einer Datei oder einem anderen Tool überträgst
- Arbeitszeittabellen: Nutze diese Option, wenn du die Software wechselst und historische Zeitprotokolle migrieren musst, um lückenlose Berichte und Abrechnungsunterlagen beizubehalten
- Benutzer: Nutze diese Option, um ein großes Team oder ein ganzes Unternehmen gesammelt anzulegen
Vor dem Import
Überprüfe zuerst diese Anforderungen, um sicherzustellen, dass deine Daten korrekt zugeordnet werden und um Importfehler zu vermeiden.
Rollen und Abonnements
| Data | Benutzerrolle | Abonnement |
| Projekte, Kunden, Aufgaben, Tags | Besitzer/Admin des Arbeitsbereichs | Jedes Abonnement |
| Arbeitszeittabellen | Jedes kostenpflichtige Abonnement | |
| Benutzer | Jedes kostenpflichtige Abonnement |
Der Benutzerimport wird während des kostenlosen Testzeitraums nicht unterstützt.
Datenfelder #
Nutze diese Übersicht beim Erstellen deiner CSV-Datei.
| Feldname | Definition | Import-Typ | Formatierungsregel | Beispiel |
| Eindeutige Kennung des Nutzers | Arbeitszeittabelle-Import | Muss mit einer aktiven Nutzer-E-Mail im Arbeitsbereich übereinstimmen | dev@company.com | |
| Startdatum | Datum des Zeiteintrags | Arbeitszeittabelle-Import | Muss exakt deinen Profileinstellungen entsprechen (z. B., MM/DD/YYYY) | 12/25/2025 |
| Startzeit | Uhrzeit des Zeiteintrag-Beginns | Arbeitszeittabelle-Import | Muss deinen Profileinstellungen entsprechen (12h vs 24h) | 09:00 AM oder 13:00 |
| Dauer | Länge des Zeiteintrags | Arbeitszeittabelle-Import | Muss den Arbeitsbereichseinstellungen entsprechen (Uhrzeit HH:mm oder Dezimal 1.5) | 01:30 oder 1.5 |
| Projekt | Name des Projekts | Optional | Max 250 Zeichen. Berücksichtigt Groß-/Kleinschreibung bei bestehenden Projekten | Website UI |
| Kunde | Dem Projekt zugeordneter Kunde | Optional | Max 100 Zeichen. Nutze die Syntax Projekt: Kunde in der Projektspalte zur Verknüpfung | ACME Corp |
| Aufgabe | Untereinheit eines Projekts | Optional | Max 1,000 Zeichen. Das Projekt muss für den Aufgaben-Import bereits existieren | Fehlerbehebung |
| Beschreibung | Notizen zur erledigten Arbeit | Optional | Max 3,000 Zeichen. Nur Plain-Text erlaubt | Aktualisierte API-Dokumente |
| Tag | Kategorie-Labels | Optional | Max 100 Zeichen. Trenne mehrere Tags durch ein Komma | Dringend, Intern |
| Abrechenbar | Abrechnungsstatus des Eintrags | Optional | Nutze Ja/Nein. Wird vom Projekt übernommen, wenn das Feld leer ist | Ja |
| Benutzerdefinierte Felder | Benutzerdefinierte Metadaten | Kostenpflichtige Funktion | Header muss exakt dem Namen des in Clockify erstellten Feldes entsprechen | NYC-Office |
Formatierungsanforderungen #
- Dateiformat: Muss eine CSV-Datei sein (maximale Größe 10 MB)
- Importdateien sind auf maximal 200.000 Zeilen beschränkt.
- Spaltenüberschriften: Alle Spaltenüberschriften müssen auf Englisch sein und exakt den Benennungskonventionen von Clockify entsprechen, selbst wenn deine App auf eine andere Sprache eingestellt ist.
- Pflichtfelder: Wenn in deinen Arbeitsbereichseinstellungen Pflichtfelder (wie Aufgabe oder Tag) aktiviert sind, müssen diese Spalten in deiner CSV-Datei ausgefüllt sein
- Zeichenbegrenzungen:
- Beschreibung: 3000
- Aufgabe: 1000
- Projekt: 250
- Kunde/Tag: 100
Clockify gleicht deine Daten automatisch, einschließlich der Datums- und Zeiteinstellungen, basierend auf deinen spezifischen Profil- und Arbeitsbereich-Einstellungen ab.
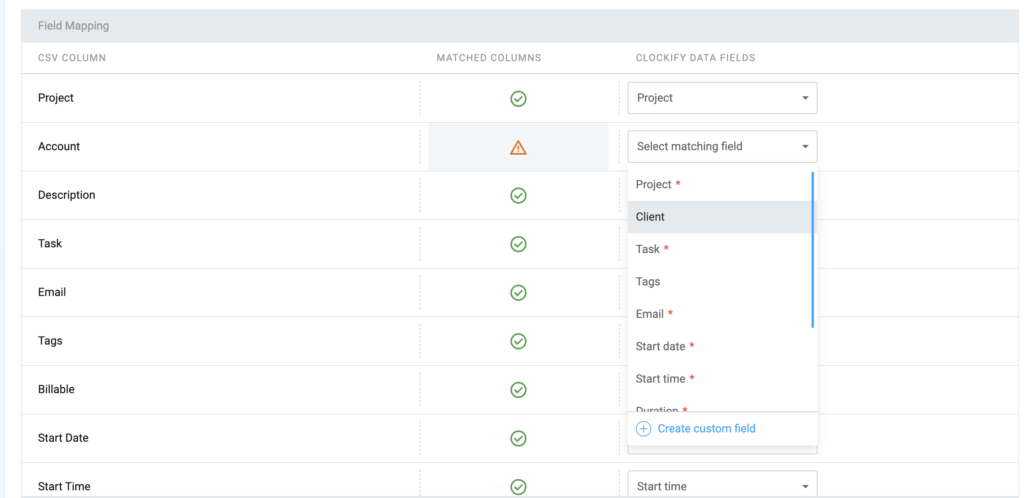
So funktioniert das Zuordnen von Feldern beim Import #
Durch die Feldzuordnung kannst du die Spalten in deiner CSV-Datei direkt mit den entsprechenden Elementen in Clockify verknüpfen. So wird sichergestellt, dass alle deine Daten erfolgreich importiert werden.
Nach dem Hochladen deiner CSV-Datei gleicht Clockify die Kopfzeilen deiner Datei (linke Spalte) mit den eigenen Datenfeldern (rechte Spalte) ab.
Die Datenfelder variieren je nach Art des Imports. Du kannst die Datenfelder über das Dropdown-Menü anpassen, um sie mit den entsprechenden Kopfzeilen in deiner CSV-Datei abzugleichen.
Wenn ein Feld oder eine Kopfzeile in deiner CSV-Datei kein passendes Datenfeld in Clockify hat, kannst du ein benutzerdefiniertes Feld erstellen (kostenpflichtige Funktion, die auf und Arbeitsbereichsbesitzer und -Admins beschränkt ist) oder es aus der Datei entfernen und den Import erneut versuchen.
Projekte, Kunden, Aufgaben und Tags importieren
Was wird importiert?
Im kostenlosen Tarif kannst du folgende Elemente importieren:
- Projekte
- Kunden
- Aufgaben
- Tags
Schritt 1: Deine CSV-Datei erstellen #
Du kannst deine CSV-Datei gemäß dem untenstehenden Format erstellen:
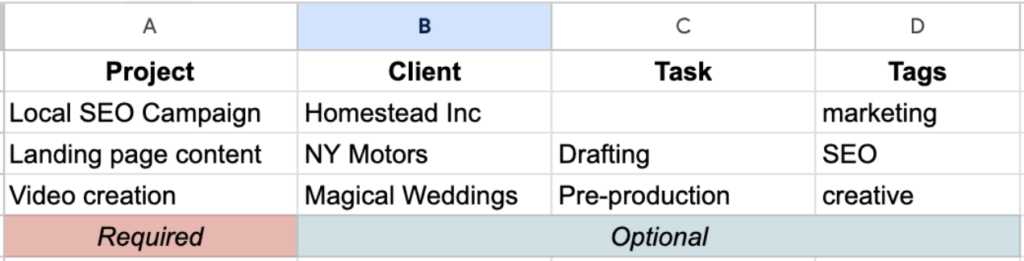
Falls du Projekte nicht nach Kunden gruppierst, kannst du die Spalte „Client“ entfernen.
Du kannst auch die Vorlage für Kunden & Projekte herunterladen, um einen reibungslosen Import zu gewährleisten.

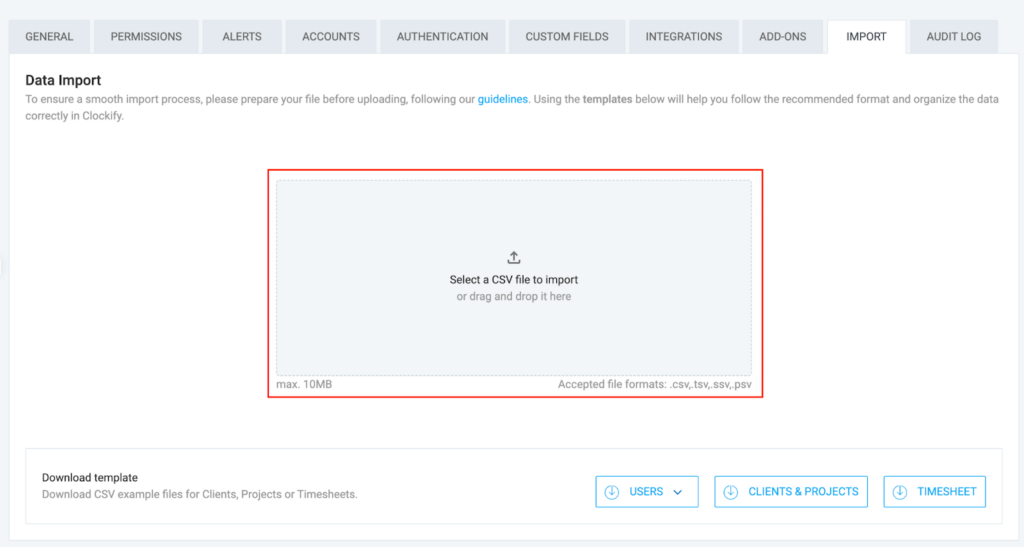
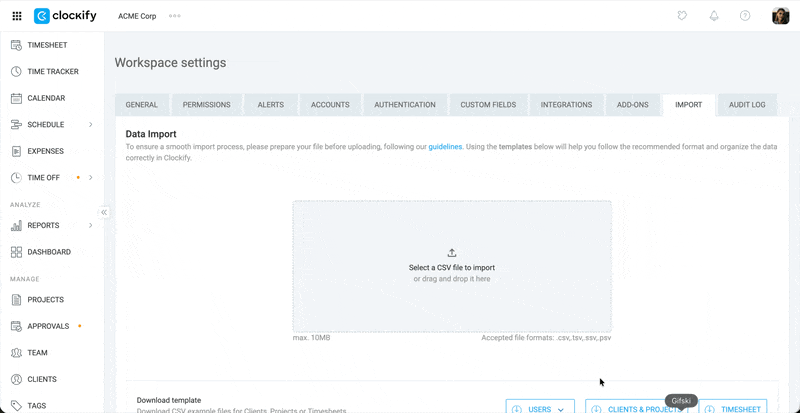
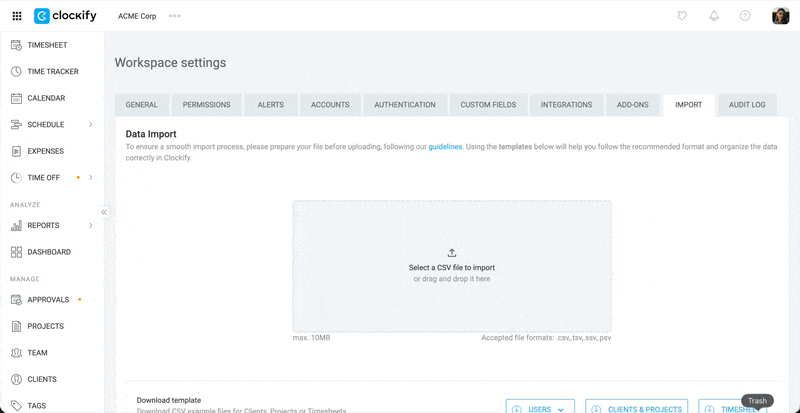
Schritt 2: Deine Datei hochladen #
- Klicke auf die
 drei Punkte neben dem Namen deines Arbeitsbereichs
 - Wähle Arbeitsbereichseinstellungen aus
- Klicke auf den Tab Import
- Ziehe deine Datei per Drag-and-drop in das markierte Feld oder klicke in das Upload-Feld, um die Datei auszuwählen
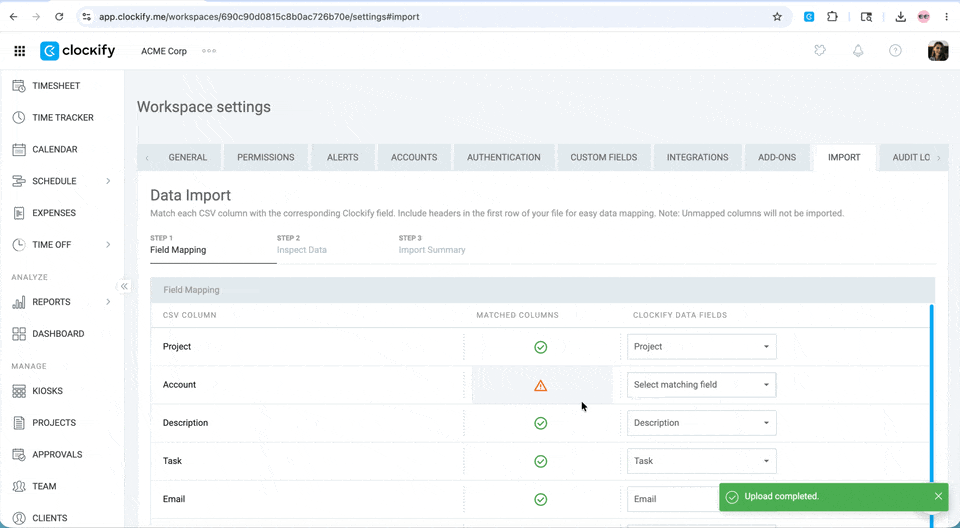
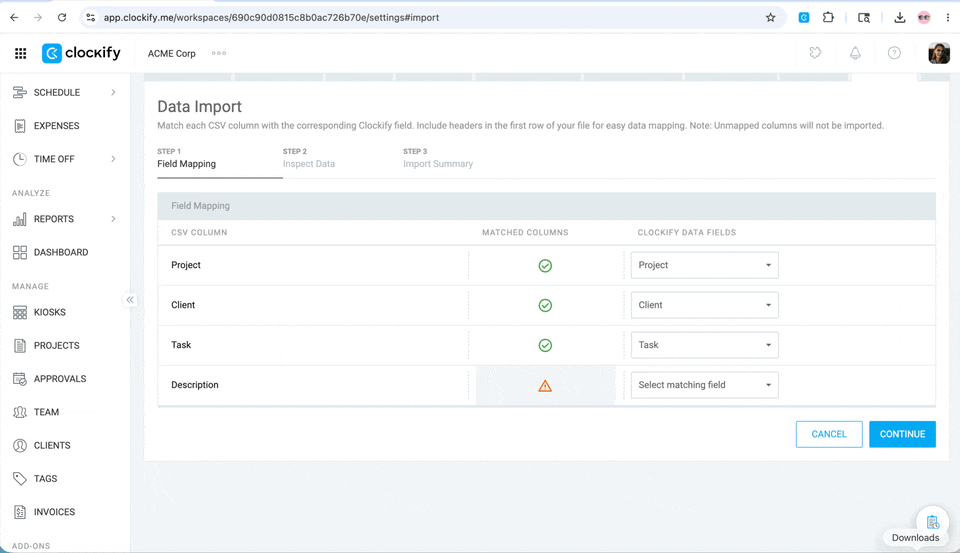
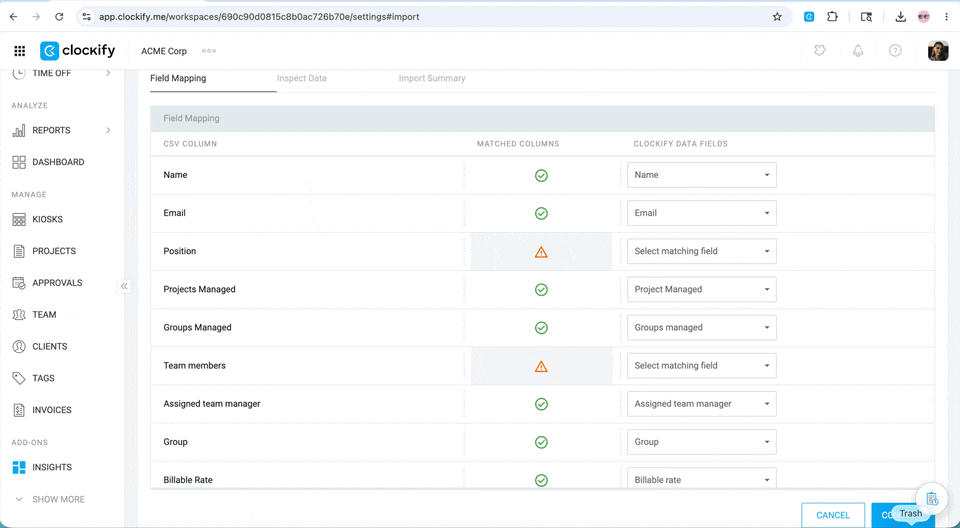
Schritt 3: Daten zuordnen
Stelle sicher, dass alle Felder in deiner Datei mit den Datenfeldern in Clockify übereinstimmen. Wenn dies nicht der Fall ist, passe sie über das Dropdown-Menü an, bevor du mit dem Import fortfährst.
Klicke auf Weiter, um zum nächsten Schritt zu gelangen.
Wenn ein Feld in deiner CSV-Datei kein passendes Gegenstück in den Datenfeldern von Clockify hat, entferne es zuerst aus deiner Datei und versuche dann erneut, sie zu importieren.
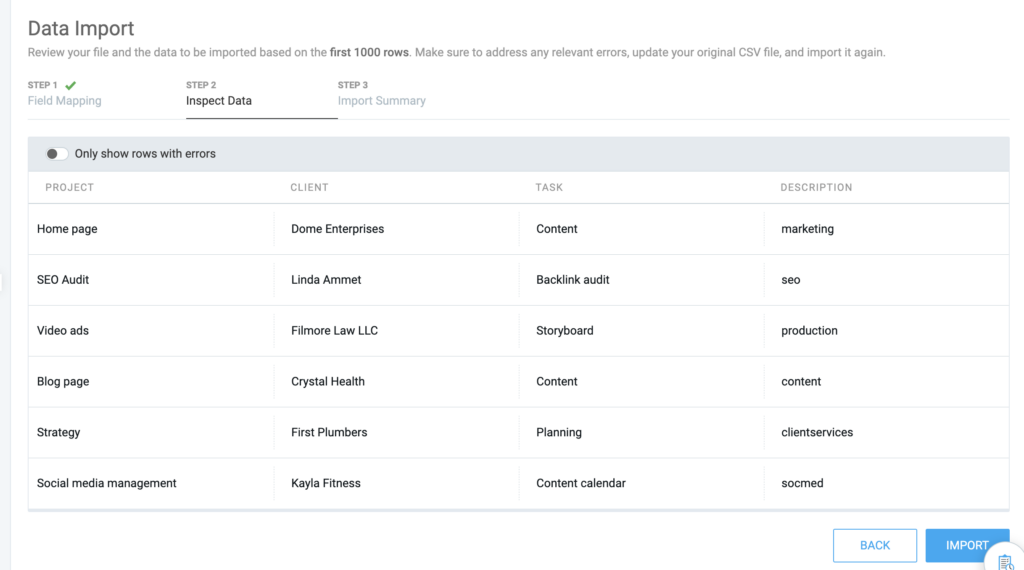
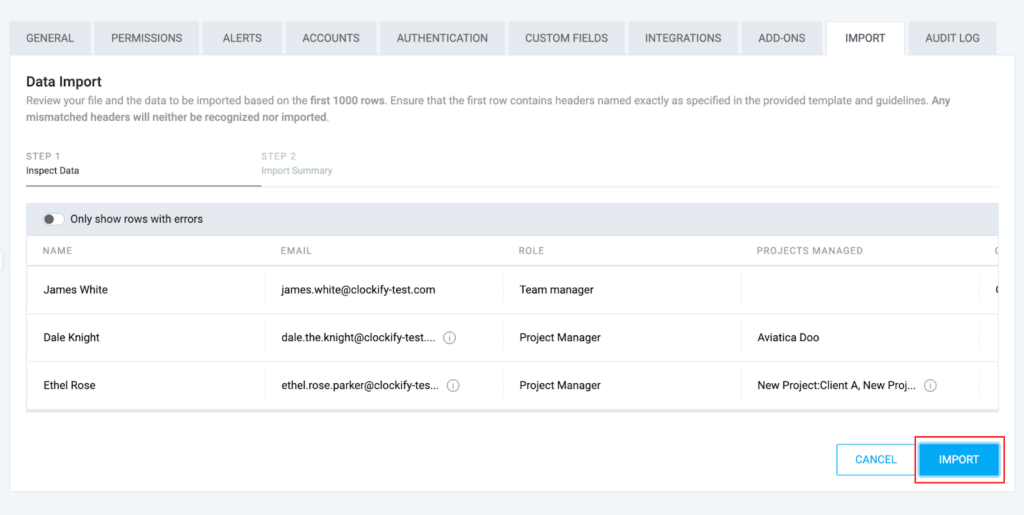
Schritt 4: Daten überprüfen und importieren
- Überprüfe die Vorschau deiner Daten
- Klicke auf Importieren, wenn keine Fehler vorhanden sind
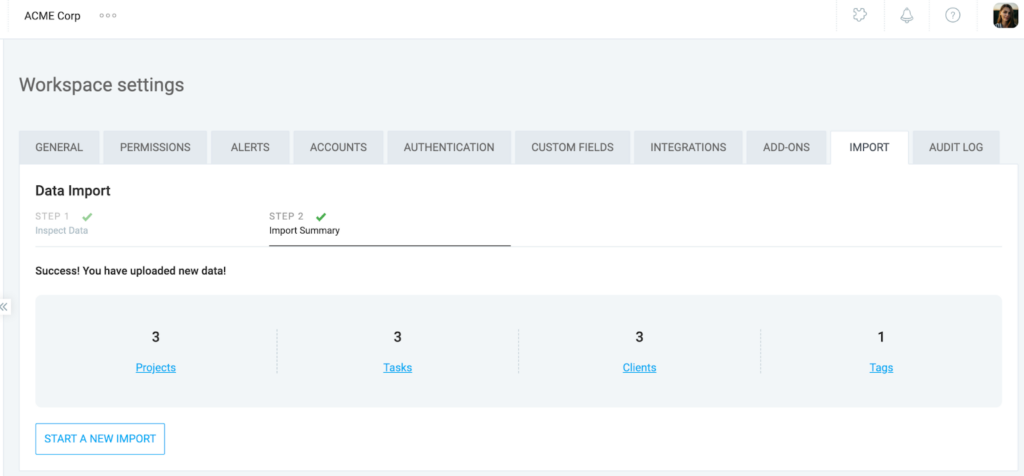
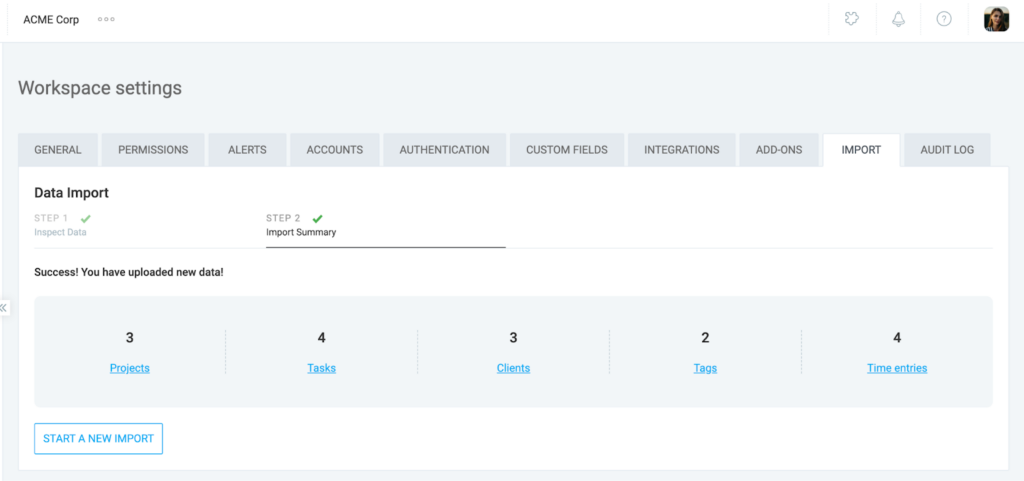
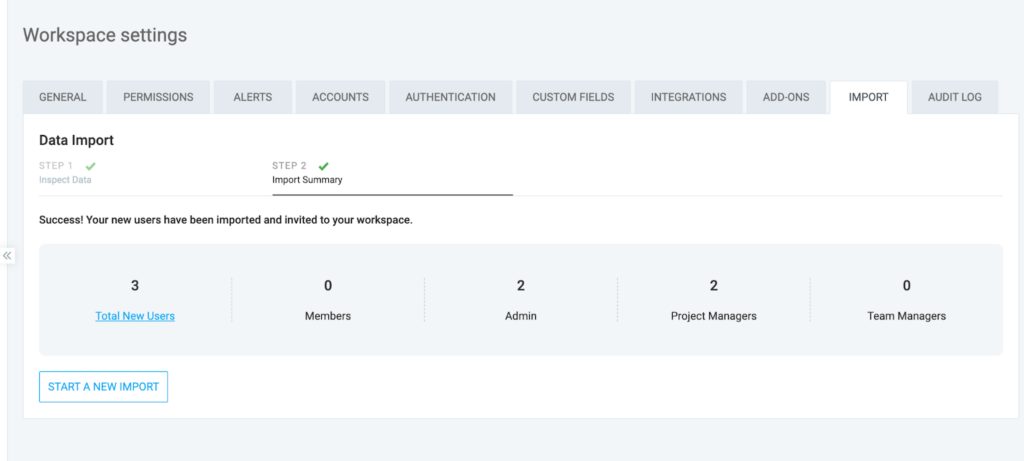
Schritt 5: Import-Zusammenfassung ansehen
Sobald deine Daten erfolgreich importiert wurden, gelangst du auf die Seite Import-Zusammenfassung. Diese Seite schlüsselt die importierten Projektdaten auf und zeigt dir, wie viele Projekte, Kunden, Aufgaben und Tags übertragen wurden. Du kannst auf die Links klicken, um dir diese Elemente im Detail anzusehen.
Clockify verhindert doppelte Projekte, Kunden, Tags und Aufgaben, indem der exakte Name in deiner CSV-Datei mit bestehenden Elementen abgeglichen wird. Bei einer Übereinstimmung werden die Daten verknüpft, anstatt ein neues Element zu erstellen. Bitte beachte, dass dieser Abgleich fallweise erfolgt. Marketing und marketing werden als unterschiedliche Felder behandelt und führen zu einem Duplikat.
Arbeitszeittabellen und benutzerdefinierte Felder importieren
Was wird importiert?
In den kostenpflichtigen Tarifen kannst du folgende Daten importieren:
- Zeiteinträge
- E-Mails
- Projekt
- Kunde
- Aufgabe
- Tags
- Abrechenbar
- Beschreibung
- Startdatum
- Startzeit
- Dauer
- Beschreibung
- Benutzerdefinierte Felder
Schritt 1: Arbeitszeittabelle-Daten formatieren
Du kannst deine eigene CSV-Datei gemäß dem untenstehenden Format erstellen:

- Pflichtspalten:
- E-Mail: E-Mail-Adresse des Nutzers
- Startdatum: Datum, an dem der Zeiteintrag erstellt wurde
- Start time: Uhrzeit, zu der der Eintrag begann
- Dauer: Anzahl der für einen Zeiteintrag protokollierten Stunden
- Zeiteinträge werden gemäß der Zeitzone der Person importiert, die den Import durchführt.
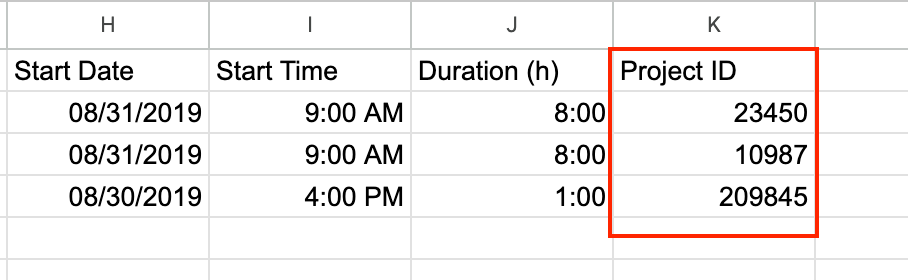
Benutzerdefinierte Felder beim Arbeitszeittabellen-Import #
Benutzerdefinierte Felder für Zeiteinträge (z. B. Projekt-ID, Kilometerstand etc.) können zusammen mit den Arbeitszeittabellen importiert werden, sofern das benutzerdefinierte Feld bereits in deinem Arbeitsbereich existiert. Wichtig zu beachten: Importierte benutzerdefinierte Felder sind nur in den Zeiteinträgen selbst sichtbar, nicht im gesamten Arbeitsbereich.
Beispiel für ein benutzerdefiniertes Feld in der CSV-Datei:
Importierte benutzerdefinierte Felder werden in den Zeiteinträgen in Timer und Detaillierter Bericht beim Import angezeigt:

Schritt 2: Import starten
- Gehe zu Arbeitsbereichseinstellungen > Import
- Wähle deine CSV-Datei aus oder ziehe sie per Drag-and-drop in das Feld für den Datenimport
- Bestätige im Pop-up-Fenster die in deiner Datei verwendeten Datums- und Zeitformate
Schritt 3: Daten zuordnen
Wie bei anderen Importarten auch kannst du deine Datenfelder mit Clockify abgleichen, indem du die entsprechende Option aus dem Dropdown-Menü in der rechten Spalte auswählst.
Schritt 4: Benutzer verifizieren
Clockify benachrichtigt dich, falls deine CSV-Datei E-Mail-Adressen von Benutzern enthält, die noch nicht in deinem Arbeitsbereich vorhanden sind.
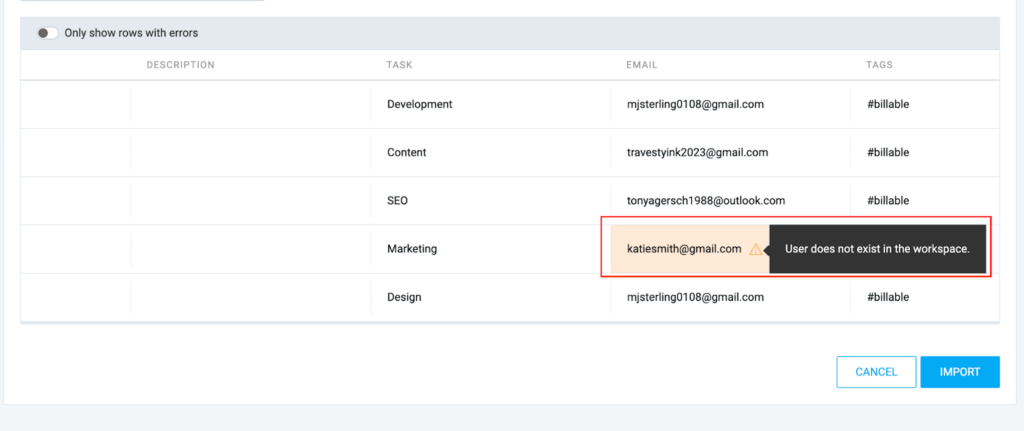
Stelle sicher, dass alle Teammitglieder ihre Einladungen zum Arbeitsbereich angenommen haben, bevor du deren Zeiten importierst. Andernfalls können die Einträge für diese Benutzer nicht importiert werden.
Schritt 5: Zusammenfassung prüfen
- Überprüfe die Daten in der Vorschau
- Klicke auf Import
Sobald der Vorgang abgeschlossen ist, zeigt dir die Import-Zusammenfassung Links zu den importierten Daten in deinem detaillierten Bericht an.
Falls du in der CSV-Datei keinen Abrechnungsstatus angegeben hast, übernimmt der Eintrag automatisch den Abrechnungsstatus des Projekts, dem er zugewiesen ist.
Benutzer importieren
Was wird importiert?
- Eingeschränkte Benutzer: Für Benutzer mit begrenztem Zugriff
- Namen
- Vollbenutzer: Für Standard-Teammitglieder
- Namen
- E-Mail-Adressen
- Rolle
- Verwaltete Projekte
- Verwaltete Gruppen
- Verwaltete Mitarbeiter
- Zugewiesene Teammanager
- Gruppe
- Abrechnungssatz
- Kostensatz
- Wochenstart
- Arbeitstage
- Tägliche Arbeitskapazität (in Stunden)
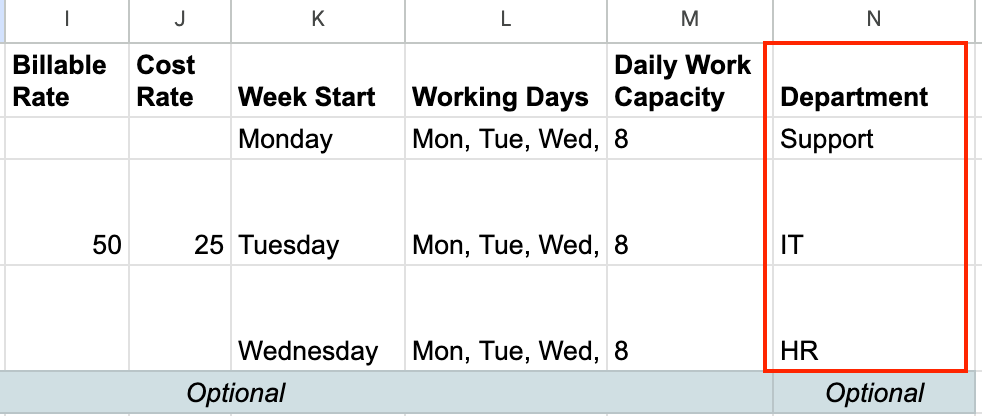
- Benutzerdefinierte Felder(z. B. Abteilung, Standort)
Benutzerdefinierte Felder für Benutzer können nur für neue Benutzer importiert werden, nicht für bereits in deinem Arbeitsbereich vorhandene Personen.
Schritt 1: CSV-Datei erstellen
Stelle sicher, dass deine Datei beim Erstellen alle erforderlichen Spalten enthält.
Für den Import von Vollbenutzern ist die E-Mail-Adresse zwingend erforderlich. Wenn ein Benutzer als Manager hinzugefügt wird, müssen auch die Spalten Verwaltete Projekte/Verwaltete Gruppen/Verwaltete Mitarbeiter ausgefüllt werden.
Beispiel-CSV für den Import von Vollbenutzern:

Beim Import eingeschränkter Benutzer ist „Name“ das einzige Pflichtfeld.
Lade die Benutzervorlage herunter, um Importfehler zu vermeiden.

Mehrere Werte
Um einem Benutzer mehrere Rollen, verwaltete Projekte, verwaltete Mitarbeiter oder Gruppen zuzuweisen, trenne die einzelnen Einträge jeweils durch ein Komma.
Projekt- und Kundenzuordnung
Wenn ein Projekt zu einem bestimmten Kunden gehört (z. B. Projekt A unter Kunde A), verwende in der Spalte Verwaltete Projekte das folgende Format:
Project Name:Client Name

Das System erkennt durch diese Schreibweise automatisch das Projekt und den dazugehörigen Kunden.
Wenn optionale Felder leer gelassen werden, übernehmen sie automatisch die Standardeinstellungen deines Arbeitsbereichs.
Benutzerdefinierte Benutzerfelder beim Benutzerimport #
Beim Importieren von Benutzern kannst du Benutzerdefinierte Felder wie Abteilung, Standort oder Mitarbeiter-ID einschließen. Stelle sicher, dass diese benutzerdefinierten Felder bereits im Arbeitsbereich angelegt wurden, bevor du mit dem Import beginnst.
Beispiel für ein benutzerdefiniertes Benutzerfeld in der CSV-Datei:
Schritt 2: Deine Datei hochladen
- Gehe zu Arbeitsbereichseinstellungen > Import
- Klicke auf den Button
 Hochladen
 - Wähle die CSV-Datei aus, die du importieren möchtest
Schritt 3: Daten zuordnen
Nutze das Feld-Mapping, um sicherzustellen, dass alle deine Daten mit Clockify übereinstimmen. Klicke auf Weiter, um zum nächsten Schritt zu gelangen.
Schritt 4: Daten überprüfen
- Kontrolliere, ob alle Daten korrekt sind und in der Tabelle richtig zugeordnet wurden
- Klicke auf Import, wenn keine Fehler vorhanden sind
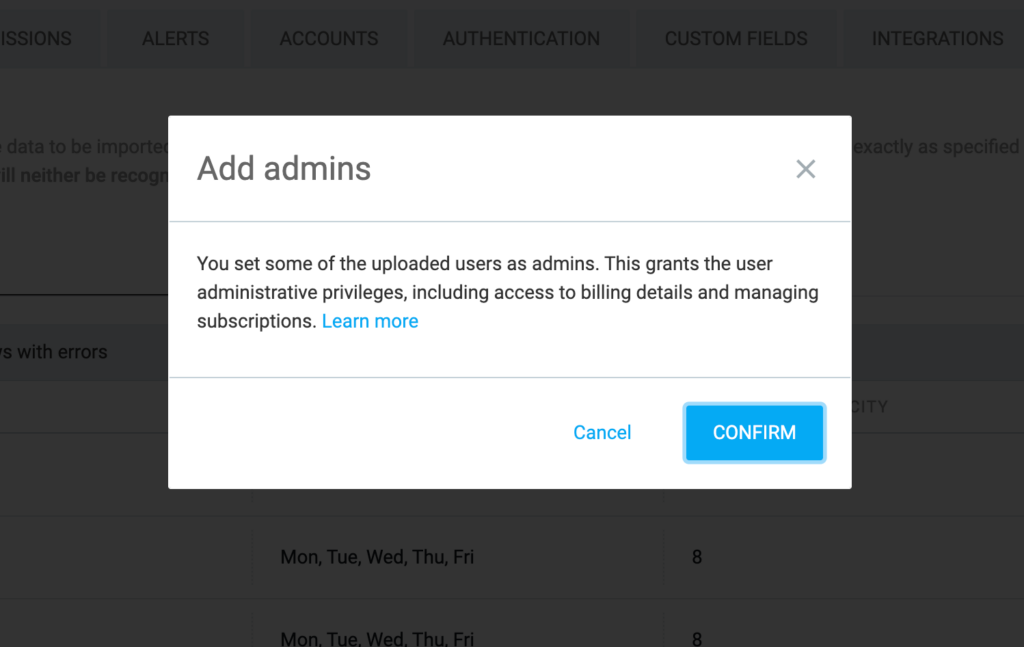
Beim Hinzufügen von Administratoren erscheint ein Pop-up-Fenster, das dich über deren Berechtigungen informiert. Klicke auf Bestätigen, um fortzufahren.
Schritt 5: Import-Zusammenfassung ansehen
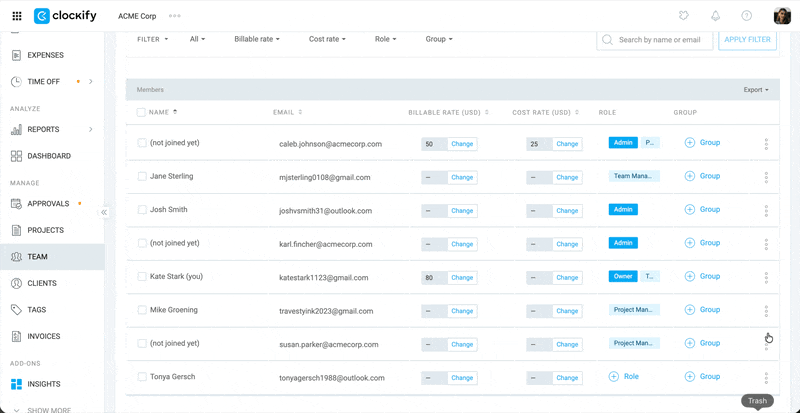
Nach dem erfolgreichen Abschluss des Imports zeigt die Seite Import-Zusammenfassung die Anzahl der hinzugefügten Benutzer an. Klicke auf Gesamtzahl neuer Benutzer, um zur Seite Team zu gelangen und die neu importierten Benutzer aufzurufen.
Um den erfolgreichen Import der benutzerdefinierten Felder zu überprüfen, klicke auf das ![]() Drei-Punkte-Symbol neben dem neuen Benutzer und wähle anschließend Profil bearbeiten.
Drei-Punkte-Symbol neben dem neuen Benutzer und wähle anschließend Profil bearbeiten.
Importierte Daten rückgängig machen #
Du kannst einen Import rückgängig machen oder zurücksetzen, falls dir ein Fehler unterlaufen ist oder du die Daten nicht mehr benötigst.
So gehst du dabei vor:
- Klicke auf das Drei-Punkte-Symbol neben dem Namen deiens Arbeitsbereichs
- Wähle Arbeitsbereichseinstellungen aus
- Klicke auf Import
- Suche den Import, den du rückgängig machen/zurücksetzen möchtest
- Klicke auf Rückgängig machen
- Gib zur Bestätigung REVERT im Pop-up-Fenster ein
- Klicke auf Rückgängig machen
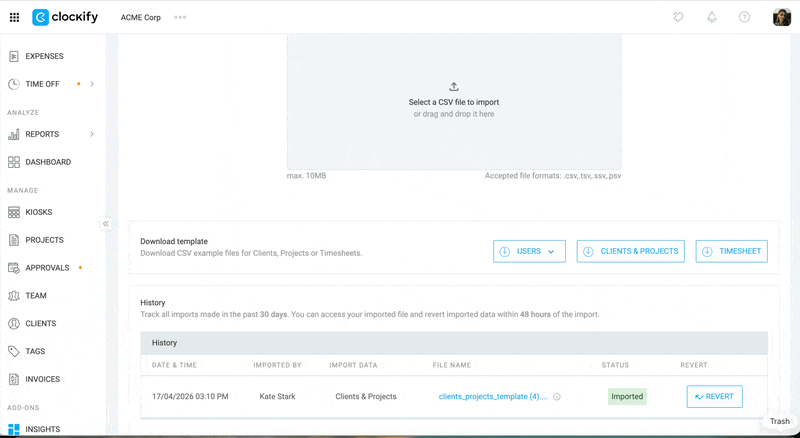
Importierte Daten können nur innerhalb der ersten 48 Stunden nach dem Import rückgängig gemacht werden.
Häufig gestellte Fragen #
Kann ich Kundendetails (Adresse, E-Mail) importieren?
Nein. Derzeit unterstützt das CSV-Import-Tool nur den Import des Kundeninamens. Zusätzliche Details wie Adresse, E-Mail oder Notizen müssen manuell hinzugefügt werden, indem du das Kundenprofil bearbeitest, nachdem es erstellt wurde.
Ich habe einen Fehler gemacht, wie kann ich importierte Daten rückgängig machen/löschen?
Um fehlerhaft importierte Daten zu entfernen, musst du die Einträge manuell löschen. Für das Löschen großer Mengen gehe auf die entsprechende Seite (z. B. Timer, Projekte, oder Kunden), nutze die Funktion Massenbearbeitung, um die Elemente auszuwählen, und wähle Löschen.
Was passiert, wenn bereits ein Projekt mit demselben Namen existiert? Wird es dupliziert?
Nein. Clockify gleicht Projekte nach Namen ab (unter Beachtung der Groß-/Kleinschreibung). Wenn der Projektname in deiner CSV-Datei exakt mit einem bestehenden Projekt in deinem Arbeitsbereich übereinstimmt, erkennt das System dies und weist die importierten Aufgaben oder Zeiteinträge diesem bestehenden Projekt zu, anstatt ein Duplikat zu erstellen.
Kann ich Ausgaben mit dem CSV-Tool importieren?
Nein. Das Import-Tool unterstützt derzeit Zeiteinträge, Projekte, Kunden, Aufgaben, Tags und Benutzer. Ausgaben können nicht per CSV importiert werden und müssen manuell oder über die Clockify-API hinzugefügt werden.
Kann ich Abwesenheiten oder Urlaubsanträge importieren?
Nein. Der CSV-Importprozess ist für historische Arbeitszeittabellen und Arbeitsbereichs-Metadaten (wie Projekte und Benutzer) konzipiert. Abwesenheitseinträge und -salden können nicht über das CSV-Tool importiert werden und sollten über die Funktion Arbeitsfreie Zeit oder die API verwaltet werden.
Prüft das Import-Tool automatisch auf doppelte Einträge?
Nein. Clockify verfügt über keine integrierte Dublettenerkennung für CSV-Imports. Wenn deine Datei Einträge enthält, die bereits in deinem Arbeitsbereich vorhanden sind, wird das System diese erneut importieren, was zu Duplikaten führt. Es wird empfohlen, deine CSV-Datei vor dem Hochladen sorgfältig zu prüfen.