Suivre son temps
Avec Clockify, vous pouvez facilement suivre le temps que vous consacrez à diverses activités, que vous utilisiez l’appli Web, l’extension de navigateur, l’appli de bureau ou l’appli mobile. Ce guide couvre les bases du suivi du temps, notamment comment démarrer et arrêter les minuteurs, gérer les saisies de temps et utiliser des fonctionnalités supplémentaires qui facilitent le suivi.
Configurer le suivi du temps #
Avant de pouvoir commencer à suivre le temps, vous devez vous assurer que le suivi du temps est activé et accessible dans votre espace de travail.
Pour accéder à la page Suivi du temps
- Connectez-vous à votre compte et accédez à votre espace de travail
- Dans la barre latérale, cliquez sur Suivi du temps pour accéder à la page
Une fois sur la page Suivi du temps, vous êtes prêt à commencer à suivre votre temps.
Choisir la plateforme de suivi du temps #
Vous pouvez suivre le temps à l’aide de l’une des plateformes suivantes :
- Appli Web
- Extension de navigateur (Chrome/Firefox)
- Appli de bureau (Mac, Windows, Linux)
- Appli mobile (iOS/Android)
Toutes les données suivies se synchronisent en ligne, vous pouvez donc accéder à vos saisies de temps depuis n’importe quel appareil.
Suivre le temps avec un minuteur #
Démarrer le minuteur #
Pour commencer à suivre votre temps, procédez comme suit :
- Accédez à la page Suivi du temps
- Cliquez sur l’icône en forme d’horloge dans le coin supérieur droit pour passer en mode Minuteur
- Saisissez les détails de l’activité (facultatif) :
- Sur quoi travaillez-vous ? – Saisissez une description de votre activité
- Projet/Tâche – Sélectionnez ou créez un projet/une tâche sur lequel/laquelle vous travaillez
- Facturabilité – Indiquez si le temps est facturable
- Balises – Ajoutez des balises pertinentes pour classer l’activité
4. Cliquez sur DÉMARRER pour lancer le chronométrage
Veuillez vérifier auprès de votre manager s’il existe un workflow prédéfini que vous devez suivre pour saisir les détails de vos heures de travail.
Arrêter le minuteur #
Lorsque vous avez terminé votre tâche :
- Accédez à la page Suivi du temps
- Cliquez sur le bouton ARRÊTER pour terminer le suivi du temps
Le minuteur continuera de fonctionner jusqu’à ce que vous l’arrêtiez manuellement.
Si vous quittez la page ou fermez le navigateur, le minuteur continuera de fonctionner, sauf si vous utilisez l’extension du navigateur, qui peut l’arrêter automatiquement.
Icône du minuteur sur l’onglet du navigateur #
Pour vous aider à suivre votre temps de travail, l’icône de l’onglet Clockify dans votre navigateur change lorsque le chronomètre est en marche. Ce repère visuel vous évite d’oublier par inadvertance que le chronomètre est activé.
Reprendre la saisie précédente #
Si vous devez continuer à suivre le temps passé sur une tâche précédente :
- Accédez à la page Suivi du temps
- Recherchez la saisie de temps que vous souhaitez reprendre
- Cliquez sur l’icône de lecture à côté de la saisie
Le minuteur redémarrera avec tous les détails que vous avez précédemment saisis automatiquement copiés.
Modifier en bloc des saisies de temps #
Pour modifier plusieurs saisies :
- Accédez au suivi du temps
- Cliquez sur l’icône Modification en bloc
- Cochez les cases situées à côté des saisies que vous souhaitez modifier
- Modifiez les informations suivantes selon vos besoins :
- Description
- Projet
- Tags
- Facturable (Oui/Non)
- Heure de début/fin
- Date
5. Cliquez sur Enregistrer pour appliquer les modifications
Diviser les saisies de temps #
La fonctionnalité « Diviser le temps » est accessible exclusivement aux utilisateurs ayant souscrit à un abonnement payant.
Pour diviser une saisie de temps :
- Accédez au suivi du temps
- Cliquez sur les trois points à côté de la saisie que vous souhaitez diviser
- Cliquez sur Diviser
- Déplacez le curseur pour indiquer où vous souhaitez diviser la saisie de temps
- Cliquez sur Enregistrer
Dupliquer les saisies de temps #
Pour dupliquer les saisies de temps :
- Accédez au suivi du temps
- Cliquez sur les trois points à côté de la saisie que vous souhaitez dupliquer
- Cliquez sur Dupliquer
Supprimer la saisie de temps #
Pour supprimer une saisie de temps :
- Accédez au suivi du temps
- Cliquez sur les trois points à côté de la saisie que vous souhaitez supprimer
- Cliquez sur Supprimer
- Cliquez à nouveau sur Supprimer dans la fenêtre contextuelle pour confirmer
Une fois la saisie supprimée, une fenêtre contextuelle verte s’affiche. Dans les 20 secondes qui suivent le clic sur « Supprimer », vous pouvez cliquer sur le bouton « Annuler » dans cette fenêtre pour restaurer la saisie et annuler l’action.
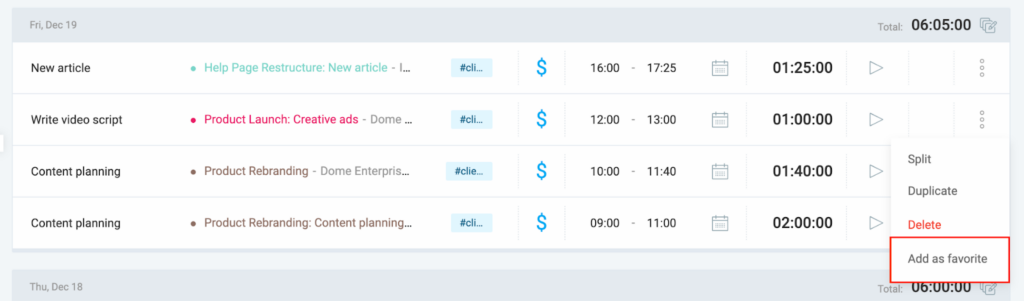
Marquer la saisie comme favorite #
Cette fonctionnalité est accessible aux utilisateurs de toutes les formules payantes, ainsi qu’aux utilisateurs en période d’essai.
Vous pouvez marquer les saisies de temps fréquemment utilisées comme favorites pour y accéder facilement :
- Cliquez sur le bouton à trois points de cette saisie
- Sélectionnez l’option Ajouter aux favoris dans le menu déroulant
- Entrez un nouveau nom pour l’enregistrement de temps favori ou conservez le nom actuel
- Cliquez sur Ajouter
Les saisies de temps favorites s’affichent sous forme d’onglets sous le champ de saisie de temps sur la page « Suivi du temps ». Passez la souris sur la saisie de temps et cliquez sur l’icône de lecture pour relancer le chronomètre.

FAQ #
Comment suivre le temps si on oublie de démarrer le minuteur ?
Si vous avez oublié d’activer le minuteur, pas de panique ! Vous disposez de deux méthodes simples pour corriger votre suivi du temps :
- Modifiez simplement la saisie – Cliquez sur la saisie que vous souhaitez modifier et indiquez l’heure de début correcte.
- Accédez à la feuille de temps – Rendez-vous sur la page « Feuille de temps » pour ajouter les saisies manquantes ou consulter vos heures enregistrées précédemment.
Est-il possible de suivre le temps passé sur plusieurs projets en même temps ?
Un seul minuteur actif est autorisé par espace de travail. Toutefois, si un suivi simultané du temps de travail sur plusieurs projets est nécessaire, il convient d’utiliser un espace de travail distinct.
Que se passe-t-il si on oublie d’arrêter le minuteur ?
Si le minuteur fonctionne pendant une période prolongée, Clockify peut vous envoyer un rappel par email. Vous pouvez activer ou désactiver cette notification dans les paramètres de votre profil.
Est-il possible de modifier le projet ou la tâche pendant que le minuteur est en cours ?
Oui, vous pouvez mettre à jour le projet, la tâche, la description et d’autres détails pendant que le minuteur est en cours d’exécution en modifiant directement les champs sur la page Suivi du temps.
Comment ajouter du temps manuellement ?
Si vous devez ajouter du temps manuellement, passez en mode Manuel. Dans ce mode, vous pouvez saisir les détails du temps, notamment l’heure de début et de fin, la description, le projet/la tâche et d’autres informations pertinentes.
Pourquoi n’y a-t-il pas d’option permettant de diviser ou de dupliquer les saisies de temps ?
Les fonctionnalités de division et de duplication sont désactivées lorsque l’option « Forcer le minuteur » est activée. Vous pouvez la désactiver dans les paramètres de l’espace de travail > Autorisations.