Android app
Install Clockify on your Android and track time while on the go.
Download Clockify for Android on the Play Store →
For step-by-step guidance on using Clockify on your Android device, watch the video and follow the instructions below.
Log in #
To start tracking time in the app, you’ll first need to log in to your Clockify account.
To log in, you can do one of the following:
- Enter email you used to create Clockify account and Continue with Email
- Choose Continue with Google if you’ve associated your Clockify account with your Google account
- Choose Continue with Microsoft and log in using your Microsoft user name and password
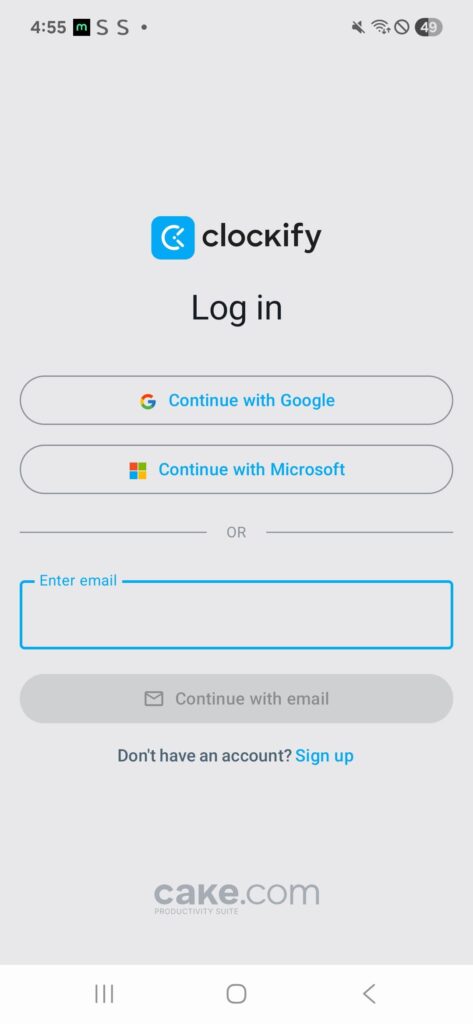
If you don’t have a Clockify account yet, you can create it by tapping the Sign up button in the upper right corner.
Continue with email #
- Enter Clockify account email
- Tap on Continue with Email
- Enter verification code you’ve got in the verification email
Continue with Google #
- Choose the Google email
- Or create one you used to create your Clockify account
You’ll be redirected to the Time Tracker screen right away and can start tracking time.
Custom domain and subdomain login #
If you use a custom domain or a subdomain, you can also use the Android app.
- Open the app and enter your Clockify account email
- Choose the workspace associated with your subdomain/custom domain
- You’ll be redirected to the subdomain in question and required to log in once again to access your workspace
After the successful verification, you’ll be redirected to the Time Tracker screen and you can start tracking time again.
Time tracking #
It is possible to track your time in Clockify Android app in two different ways, either by using a timer or adding time manually.
Clockify groups similar time entries under one expandable entry.
If you wish to see entries in chronological order, go to Profile settings > Preferences in the web app and turn off Group similar time entries.
Autocomplete
There’s an autocomplete option available when you tap on an entry and start typing a description.
Timer mode #
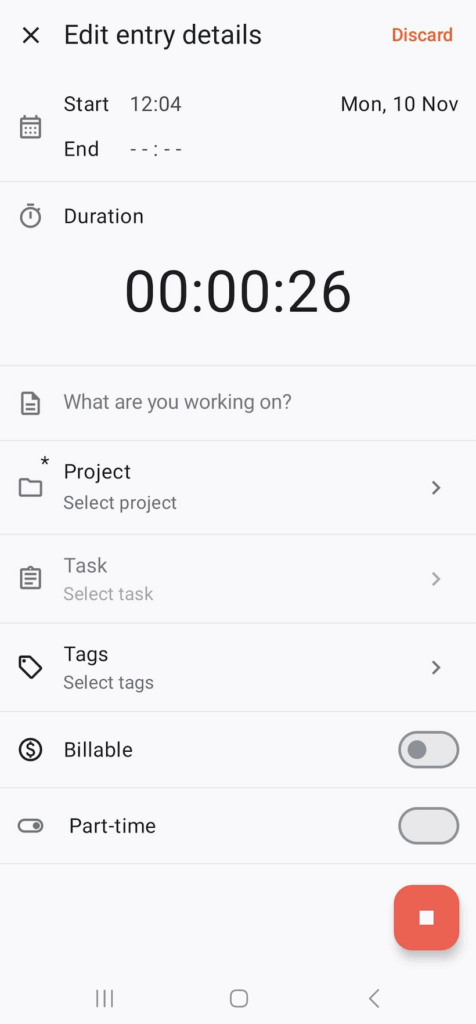
To start a timer:
- Tap + button in the lower right corner and a time entry screen will appear
- Choose and tap the Play button on the bottom right corner to begin working
- Fill the details (description, project, task, billability, tags)
- Tap the Stop button to stop the timer and save the time entry or the Discard option in the upper right corner to discard the time entry
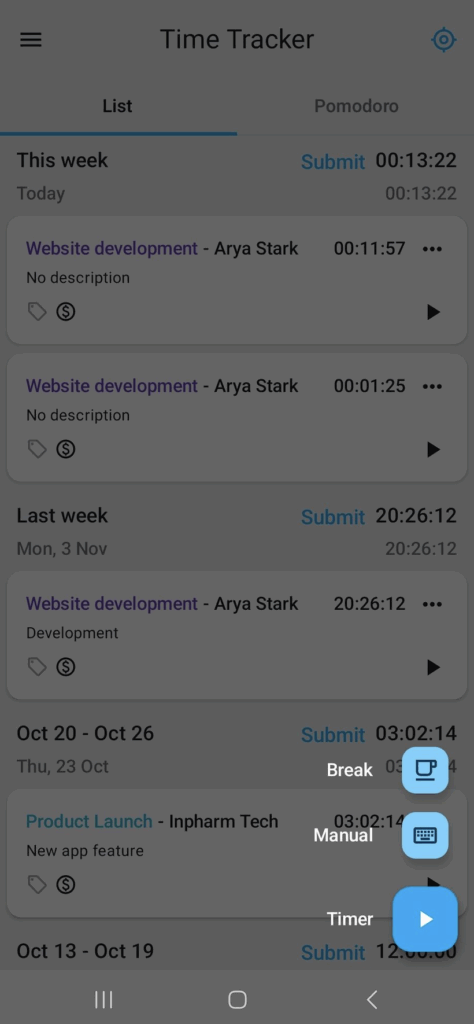

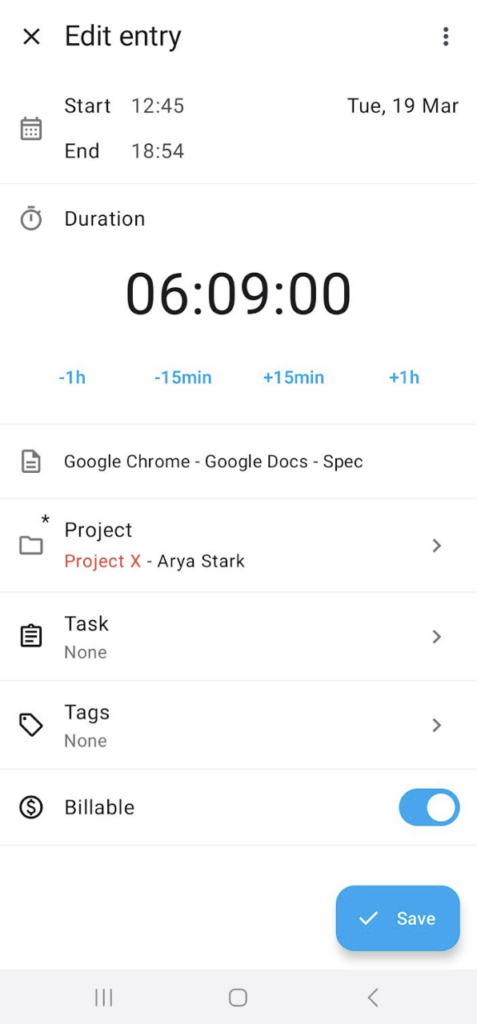
Add time manually #
To manually add a time entry:
- Tap + button in the bottom right corner
- Choose Manual option
- Type in the time to set the duration of the time entry OR
- Tap on the start/end option on the top left corner to specify start/end time, and date
- Fill in the details (description, project, task, billability, tags)
- Tap the Save button to save the time entry or the Discard button in the upper right corner to discard the time entry
You can type in the time if you tap the numbers on the scroller rather than scrolling through the numbers to get to the hour you need.
Add/subtract duration shortcuts #
In order to optimize the process of modifying entries, when adding time manually, you can easily add duration by using the shortcut buttons located below the duration field.
The following time spans can be added:
- -1h
- -0.25h
- +0.25h
- +1h
The value displayed on the shortcut buttons is based on the duration of the entry (e.g. if duration is less than an hour, the -1 button is disabled).
Click on one of the buttons, and that value will be added/subtracted from the tracked time.

Shortcut buttons are not available for running entries, only when adding time manually.
Edit time entry #
To edit a time entry simply tap on the entry itself and an Edit time entry screen will appear where you can:
- Edit start and end time, as well as the date by tapping the Start/End option in the upper left corner
- Select task and project (plus create projects and tasks from within the app)
- Edit time description
- Mark time entry as billable
- Add/remove tags (plus create them)
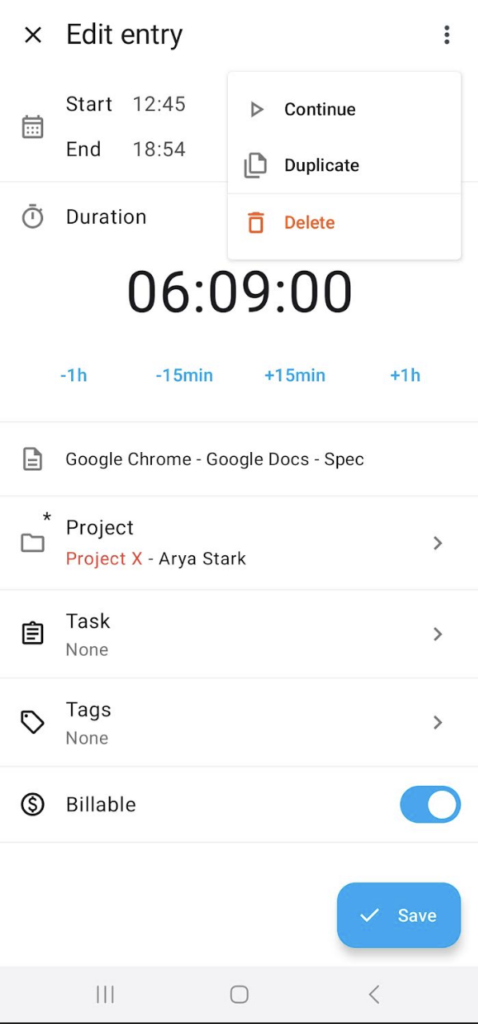
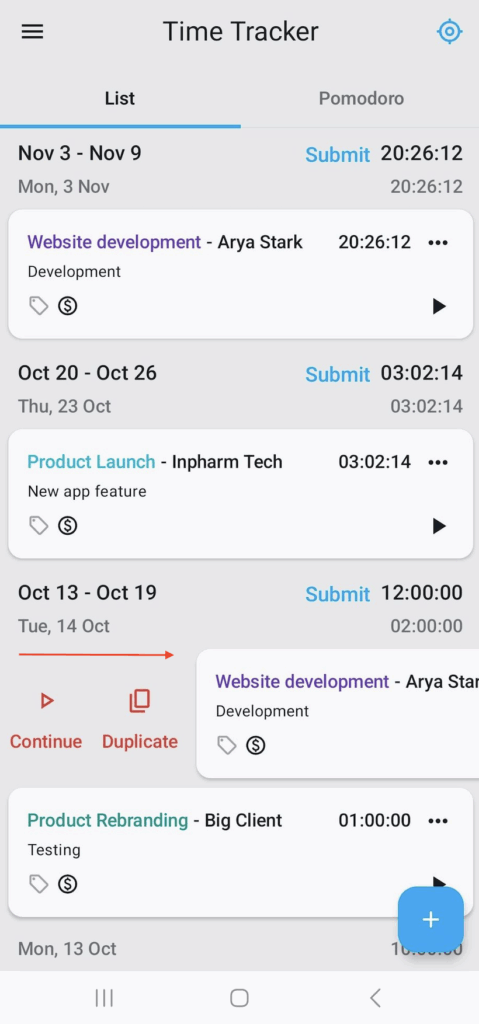
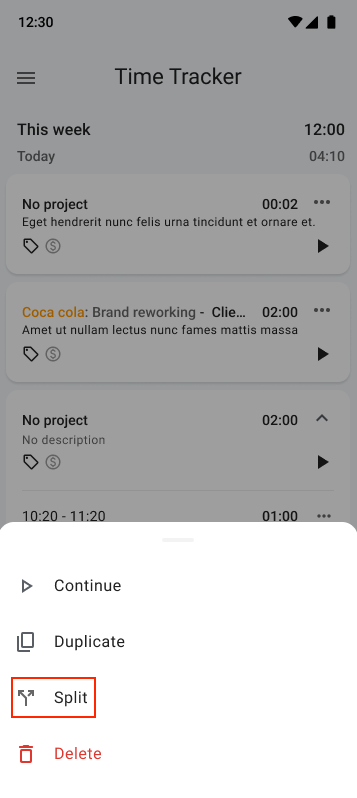
On the Time tracker screen, in the List tab, when you tap the three little dots in the time entry card you’ll find more options:
- Continue that time entry
- Duplicate that time entry
- Delete the time entry
You can also continue a previous time entry from the Time tracker list by tapping the play button on the time entry (just below the three little dots). Note that this will start a new timer with the exact same details as the entry where you tapped the play button.
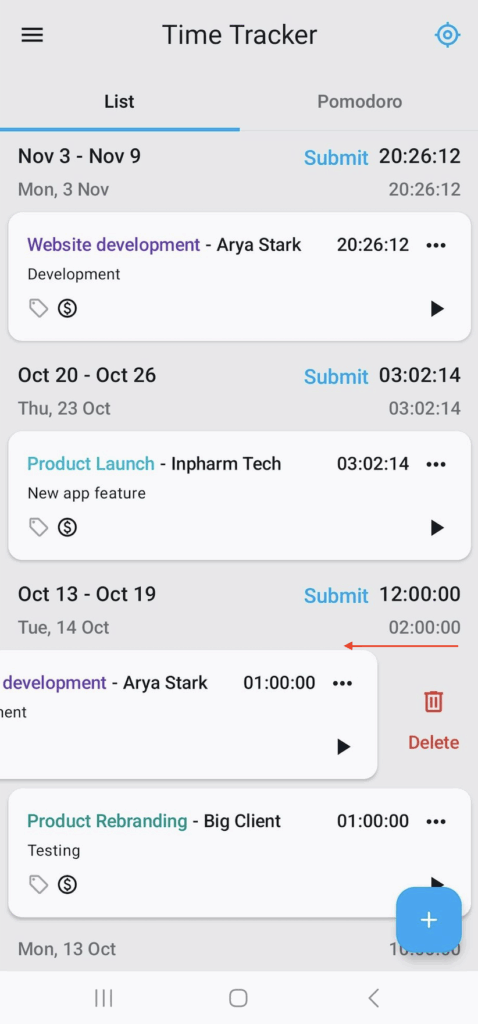
You can also do any of these actions on swipe:
- Continue time entry (swipe right)
- Duplicate time entry (swipe right)
- Delete time entry (swipe left)
Split entry #
Split entry option is available to all users on all paid plans and Free trial.
Split a time or break entry into smaller segments on the Time tracker or Calendar pages.
- Find the entry you want to split on the Time tracker or Calendar page
- Tap on the three-dots menu
- Choose the Split entry option and time where you want to split the entry option
When you split a running entry, the first entry stops at the point you choose, and a new one starts from that exact moment, continuing to run.
If you use a timeline slider, the duration of both entries will dynamically adjust as you drag it.
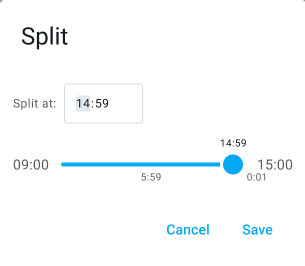
For time entries shorter than 2 minutes, you will receive a message that the entry is too short to split and won’t be able to split it.
Undo ‘delete’ action #
Clockify lets you undo deleted or discarded entries on multiple screens, regardless of your user role or subscription plan.
- Time Tracker: Undo discarding & deleting entries
- Timesheet: Undo deleting sheet
- Calendar: Undo discarding & deleting entries
- Expenses: Undo deleting expenses
To undo, click Undo in the snackbar after deletion or discard. Toast message for successful deletion lasts 4 seconds, during which the action can be undone.
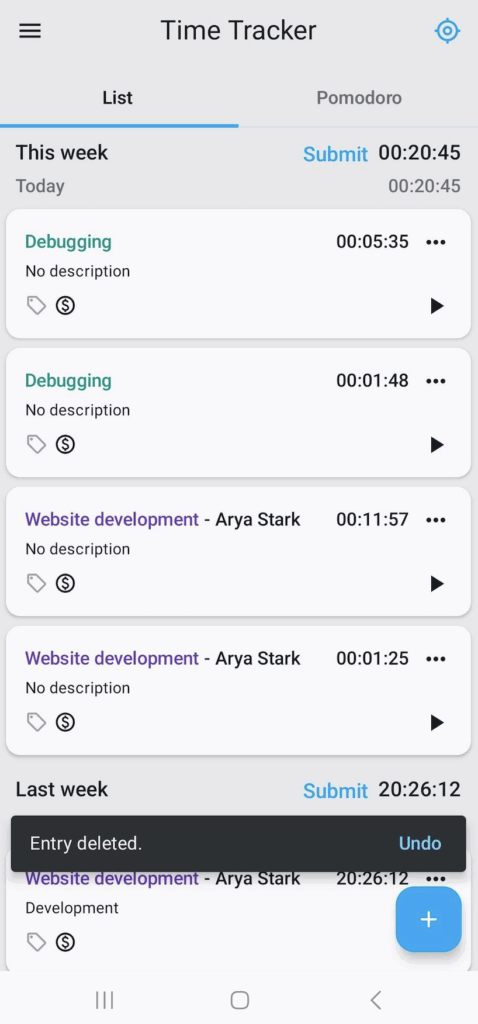
Discarded entry
When an entry is discarded, a snackbar will appear with the message Timer cancelled. If you click Undo, a snackbar will appear with the message Entry restored and the entry will be added back to the Time Tracker list.
If you leave required fields empty and click Undo on a discarded entry, the timer will resume, and you will see the Timer screen with the required fields highlighted in red, prompting you to complete the missing information.
The Undo option restores all data, including GPS location, required fields, and screenshots.
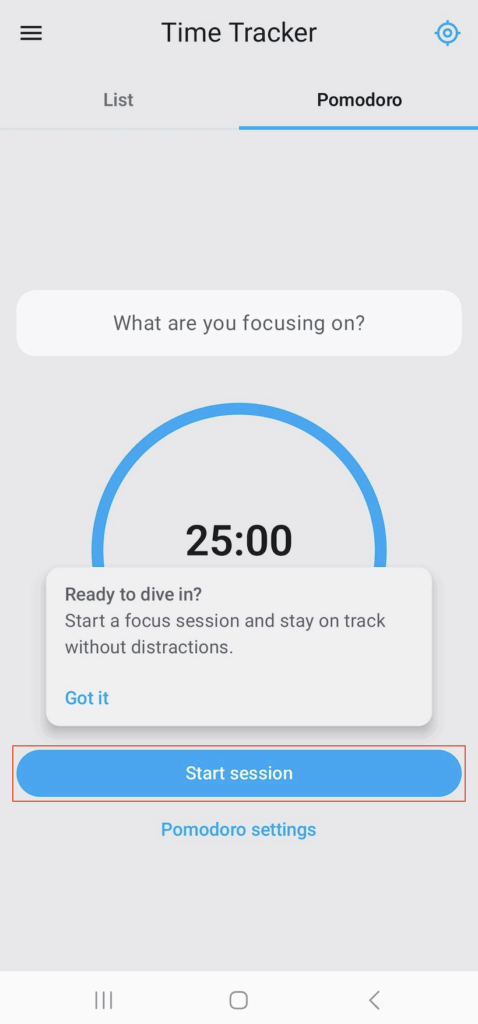
Pomodoro timer #
Pomodoro timer helps you structure your work by breaking it into focus sessions (work) and break sessions. That way, you can stay focused and productive.
Use Pomodoro #
To use Pomodoro:
- Go to the Time tracker screen
- Tap on the Pomodoro tab
- Tap Start session to begin your focus session
If you have required fields, the Edit focus details screen will appear first.
Customize Pomodoro #
Set up Pomodoro timer to match your preferences in the Pomodoro settings:
- Set intervals
Define the duration of your focus session (default 25 min) and your break session (default 5 min) - Default break project
Choose a specific project for break time entries, regardless of your workspace defaults - Automatic break
Toggle it ON or OFF
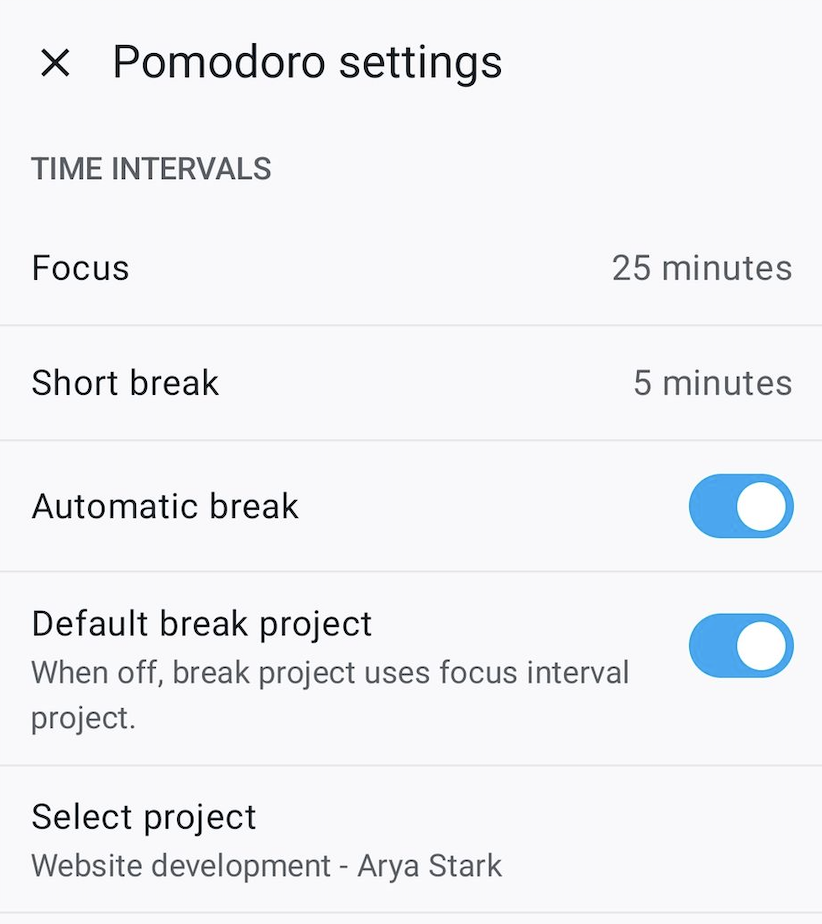
If the Automatic break option is on, the focus session ends and the break starts immediately.
If the Automatic break option is off, you receive a notification and need to manually tap Start to begin the break session.
Notifications #
You’ll receive push notifications when it’s time to start or end a session. You can even start a break directly from the notification.
If you want to stop the session early while it’s still running, you’ll be notified that the Pomodoro session will finish earlier than expected before confirming the action.
Use Skip the break manually option during a break session to immediately begin a new focus session.
Important to note #
- When a Pomodoro session is active, the timer appears in your regular list view like any other entry
- You cannot run the regular timer and the Pomodoro timer simultaneously
If you close Clockify while the session is active, the system will save the time entry for the predefined session duration. When you reopen the app, then countdown will resume if the session is still active.
Track breaks #
You can also track breaks via Time tracker. This option is available to all users with the Break feature enabled.
To start the break entry:
- Tap + on Time entry screen
- Choose and tap on Break
- Tap Stop to stop tracking break
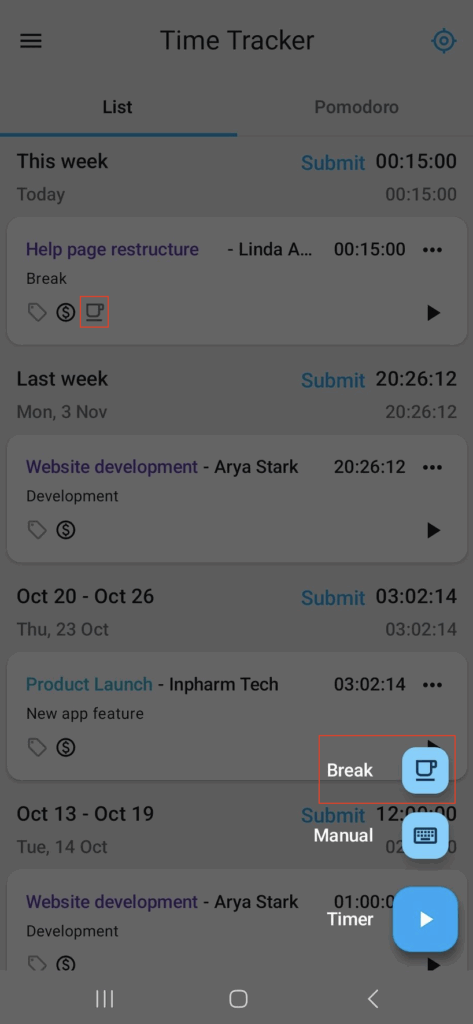
Tracked break entries are marked with a break icon. If breaks and force timer are turned on, then only timer and break options are available on a tracker.
Each break entry has a description, break, project inherited from the Workspace settings, task, also inherited from the Workspace settings, start, end time, duration, billability and custom fields if any.
Break entry can also be started in the Offline mode.
Track holidays and time off #
Apart from tracking time, expenses and breaks, you can also track time off and holiday entries of your workspace members.
Time off and holiday entries can be created by Owners and Admins on the web app.
They are distinctly displayed on Time Tracker, Timesheet, Calendar, Expenses, Time off and Reports.
For more information, check out Track holidays & time off.
Track time via widget #
This feature is available to all users on all subscription plans.
Widgets displays real-time data and provide easy access or shortcuts to certain actions for applications running on mobile devices.
To use a widget for your mobile app, you can usually just press and hold on an app icon and choose the Widgets option.
Three types of actions are available from Clockify widget:
- Start time entry with timer
- Track time again
- Track break
Timer #
With this widget, you can start and stop the timer. After you tap play, the timer starts running along with the duration. When the timer is started, there’ll be an indication if billability or tag is on and available for this time entry.
If you tap anywhere on the widget, the Time Tracker screen opens.
While Timer is running, the following time entry data is displayed:
- Description
- Project
- Task
- Client
- Tag
- Billable
If you stop the timer and all required fields are populated, this entry will be added to the Time Tracker. If all required fields are not populated, then the Timer screen opens and you will be prompted to fill out the required fields.
Custom fields are currently not available on widgets.
Track again #
This widget displays 4 most recently tracked entries. You can choose one and start the timer.
When you tap play on any of the entries, timer starts again. If you tap on any place within the widget, Clockify app opens. If you tap again on a widget with a running entry again, the timer will stop.
There is a default widget size. However, the widget can be resized (reduce size, enlarge).
If timer doesn’t have all required fields, Time entry details opens for you to fill out.
Track break #
If you’ve enabled the widget, you can see a tracking break icon alongside other icons on the widget when tracking time as a break. This way, you can easily see the difference between tracing work and break time without needing to open the app.
In this case, the time is tracked as a break entry type. The widget displays a cup that differentiates it from a regular time entry timer.
Calendar #
You can see all your time entries in a Calendar view (available in the sidebar menu).
- Tap on a time entry to edit it, or to continue a timer for it
- Add a new entry by tapping + sign at the corner
- View/edit all your running entries
- Navigate to other days by tapping on a date
- See when you have time off
After a time off request or holiday has been approved, then the whole day and the planned section will be in the color of that holiday set in the holiday policy.
Holiday policy color will also be visible in the Timeline and Balance tabs as well as in the Time off request screen.
On the days when there are time off requests or holidays, date pickers in Calendar will be disabled.
Sync Clockify and your local calendar #
Connect your phone’s calendar to track and see events in Clockify.
- Go to Settings
- Choose App tab and tap on Calendar integration
- Toggle the switch to connect with your calendar
- Configure calendar permissions and you’ll be able to access your calendar
You’ll get a list of all accounts and calendars connected to your phone. Choose which events you’d like to see in your calendar e.g. scheduled assignments/projects/tasks, calendar events.
Track time with calendar events
When you tap on one of the events on the Calendar screen, you’ll get the action sheet with the following options related to assignment:
- View details
- Start timer
- Copy as time entry (not available if Force timer is turned on)
In View details, you’ll see the duration of the assignment, project it was assigned to and check its billability.
If you choose Start timer option, you’ll start the timer for that event.
With Copy as time entry, you’ll copy the event as a time entry which you can add to a project or task.
If there is a newly created event in your calendar, go to the Calendar screen and wait for the events to sync. After the sync is done, you should be able to see them in Clockify.
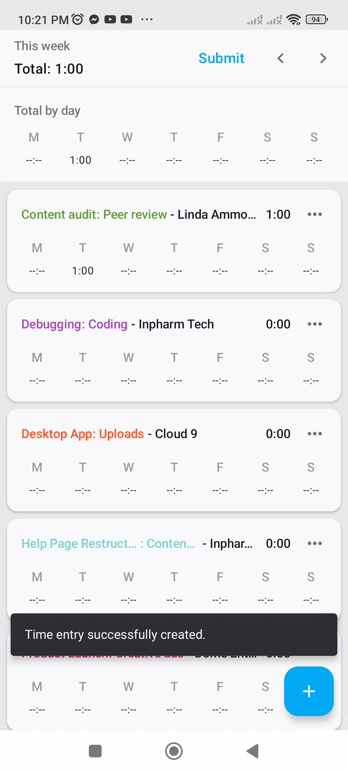
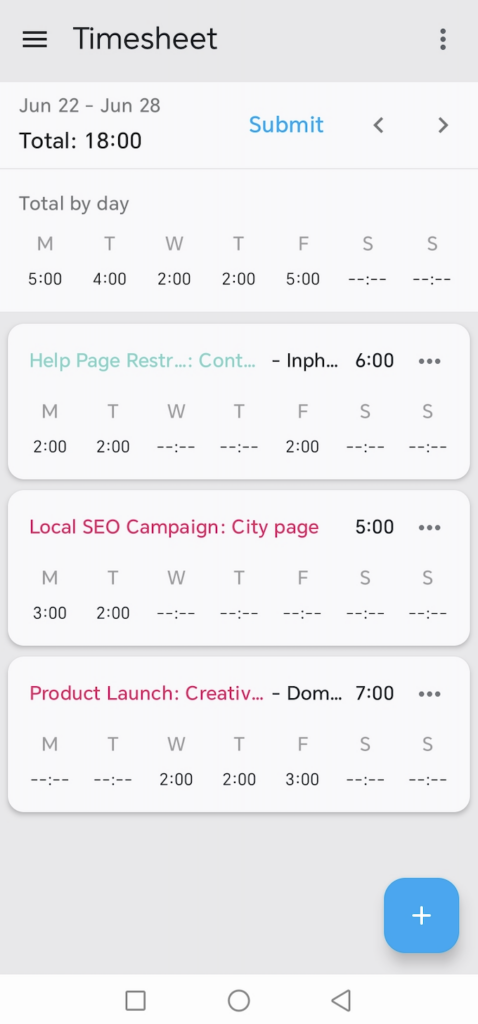
Timesheet mode #
To add time to timesheet:
- Tap on plus sign
- Select project/task
- Tap on the day you wish to add/edit time for
- Select or enter duration, start/end time, and add description/tags
- Save entry
To see the Timesheet in Android app, you first need to enable Timesheet view in Clockify’s workspace settings.
Delete entry in Timesheet #
To delete a time entry in timesheet mode:
- Tap on the time entry from the calendar
- Tap on the trash icon on the top-right corner
- Tap Delete to confirm the action
A pop-up message confirms that the entry is deleted.
Along with this pop-up, an Undo button appears on the right side. Press this to revert the deletion and restore the time entry.
Timesheet template #
If you’re often entering the same time entries in your Timesheet, you can set your Timesheet as a template, save time and reuse it as much as you like.
Set Timesheet as a template:
- Go to the Timesheet screen
- Tap on the three dots
- You have three options:
- Copy last week
- Apply template
- Save as template
Copy last week
All tasks/projects from last week will be copied in your current week. If you don’t have any activity in the current week, then you’ll have the Copy last week option.
Apply template
If you choose the Apply template option, you’ll see a list of templates extracted from the web. If you apply a template with projects that are deleted, archived, or you have no access to them, those projects won’t be inserted in the timesheet from the template.
Offline
If you’re in an offline mode, you’ll be able to apply template when you go back online.
To submit a week for approval, go to the web version of Clockify.
Submit timesheet for approval #
If your workspace has approval enabled, you’ll be able to submit weekly timesheets for approval.
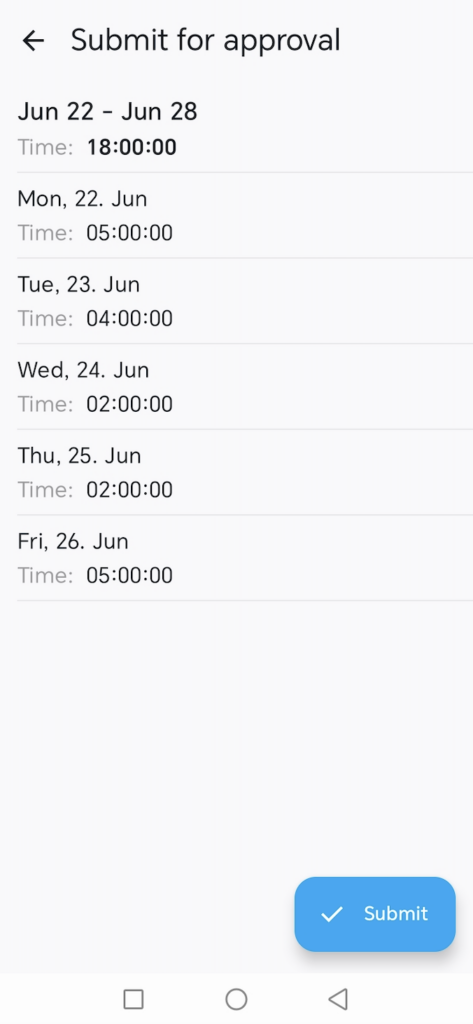
To submit timesheets:
1. Select Time Tracker or Timesheet on the sidebar
2. Navigate to the week you want to submit
3. Tap Submit at the top
4. Review the time entries and make sure everything is correct
5. Tap the Submit button on the bottom
Submit expenses for approval #
You can also submit expenses for approval.
To submit expenses:
- Select Expenses from the sidebar
2. Tap Submit at the top right corner
3. Check that your expenses are correct
4. Tap the Submit button on the bottom


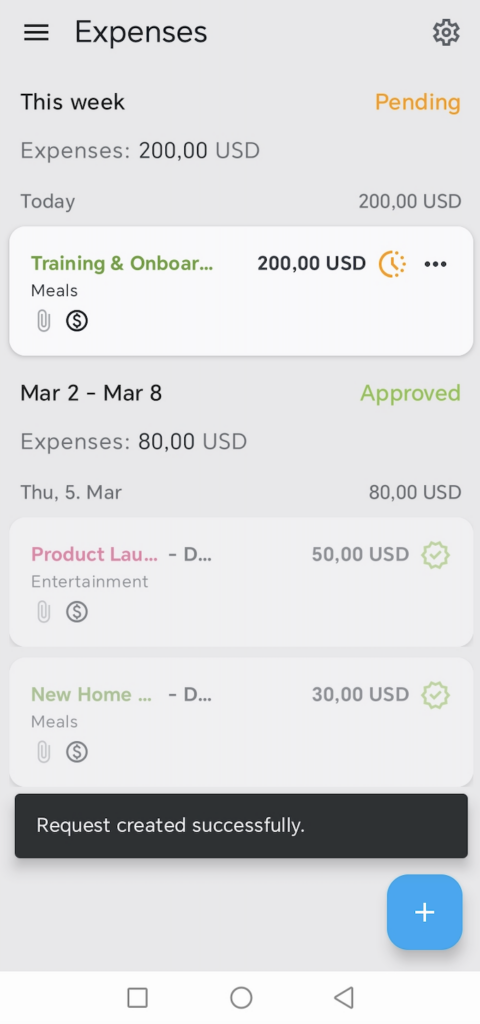
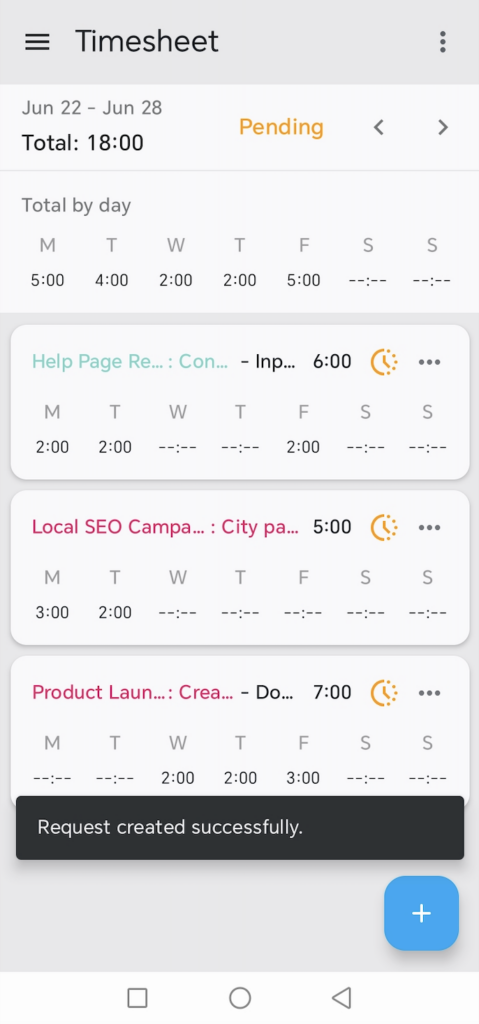
All submitted timesheets/expenses will have Pending label next to them.
All approved timesheets/expenses will have the Approved label next to them, and the entries and expenses will have the approved checkmark.
Approved time and expenses cannot be edited. However, you can add new time entries and expenses (if the week isn’t locked) and submit it for another approval.
Add/edit entries pending submission #
You can add a new entry to a group of entries that are pending submission.
To submit additional entry on a pending submission:
- Go to Timesheet or Time Tracker
- Tap the + sign to add a new entry
- Enter the details needed for the new time entry
- Click Submit changes

5. Click Submit on the confirmation page
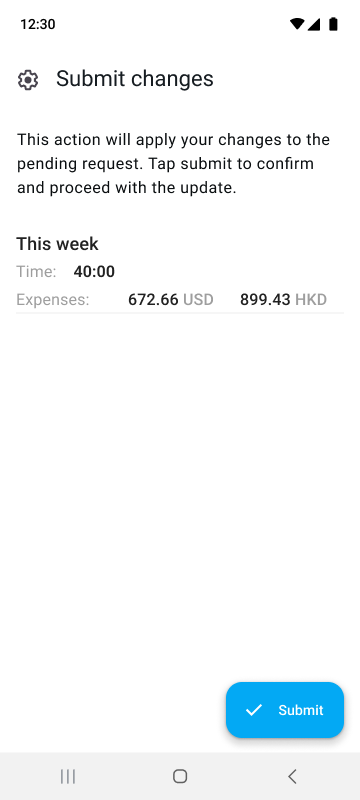
The new entry will be marked Pending along with the other time entries previously submitted.
In addition to adding a new entry, you can also edit pending or rejected entries.
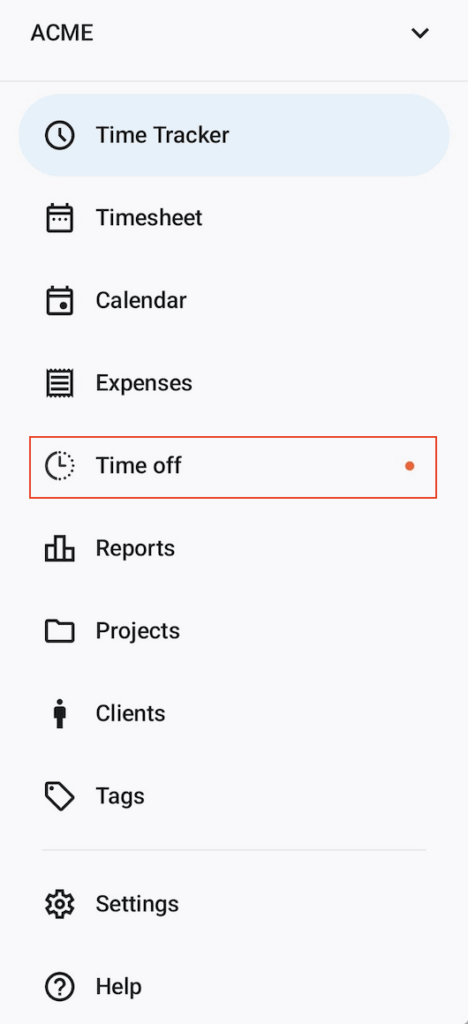
Request time off #
Time Off screen allows you to request time off, track leave balance, and successfully manage your time off.
In order to use it on your Android device, Time off needs to be enabled in the Workspace settings on the web app.
Time off requests can be managed by the following types of users in the following way:
- Workspace owners and admins can view and manage all requests
- Team managers can manage requests from their team members
- Specific users defined in the time off policy can manage requests connected to their policy
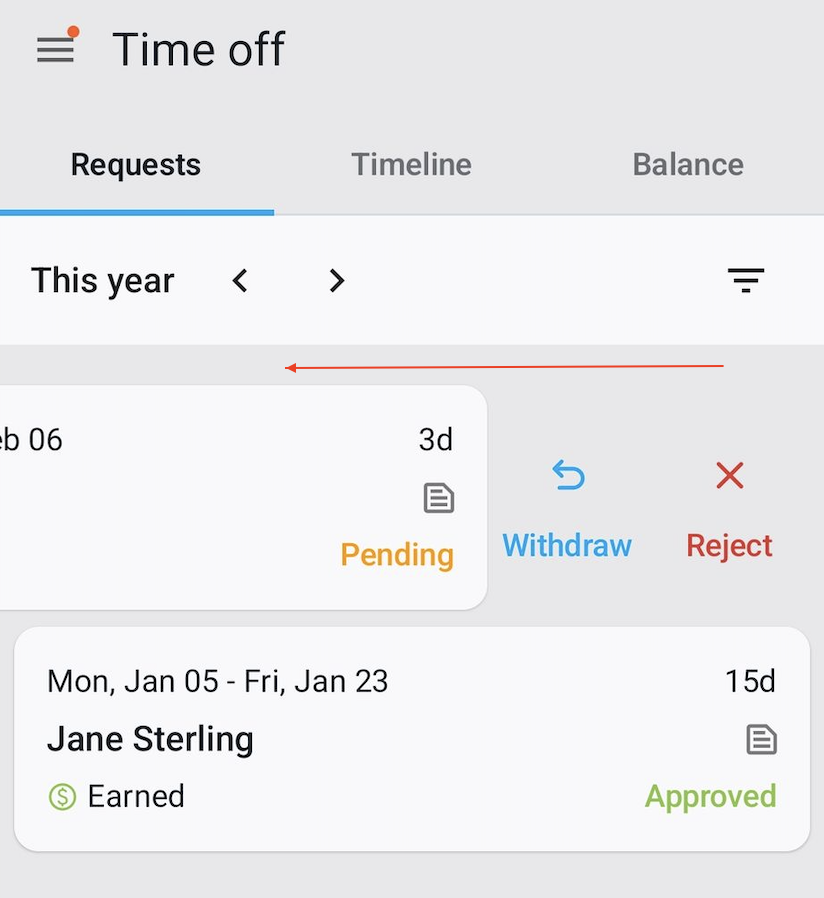
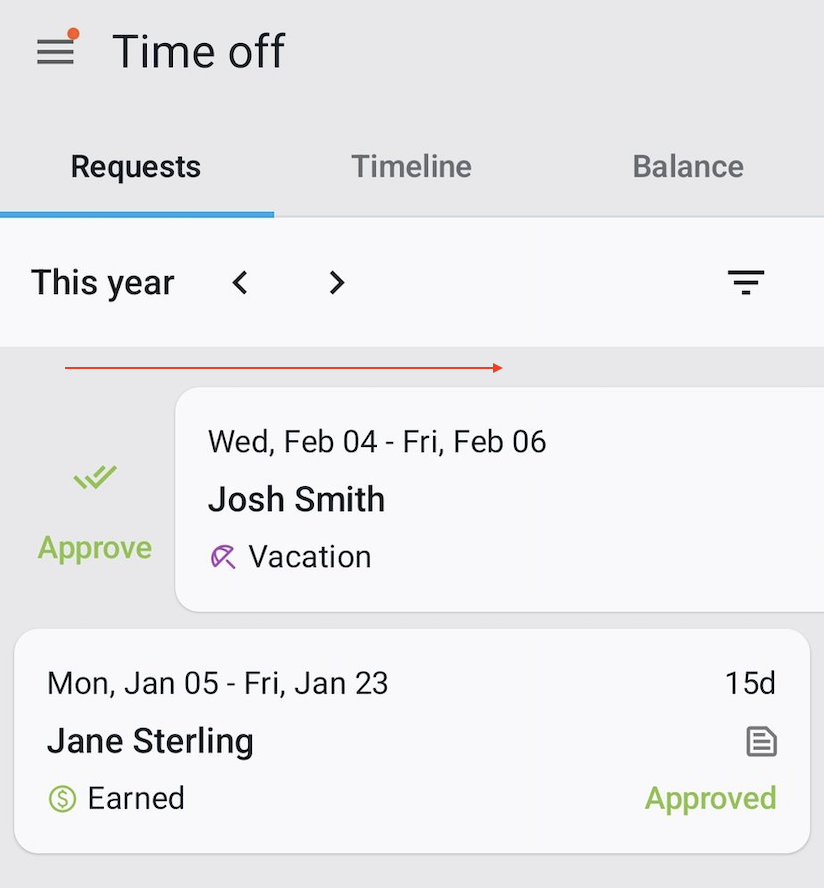
Time off consists of the following tabs:
- Timeline: View an overview of all your requests, their statuses, and holidays
- Balance: Check your accrued, used, and available time off, broken down by policy and specify a period when time off balance will be available in
- Requests: See all submitted requests and their statuses (pending, approved, or rejected). Here, you can approve, withdraw, or reject requests based on your role and permissions.
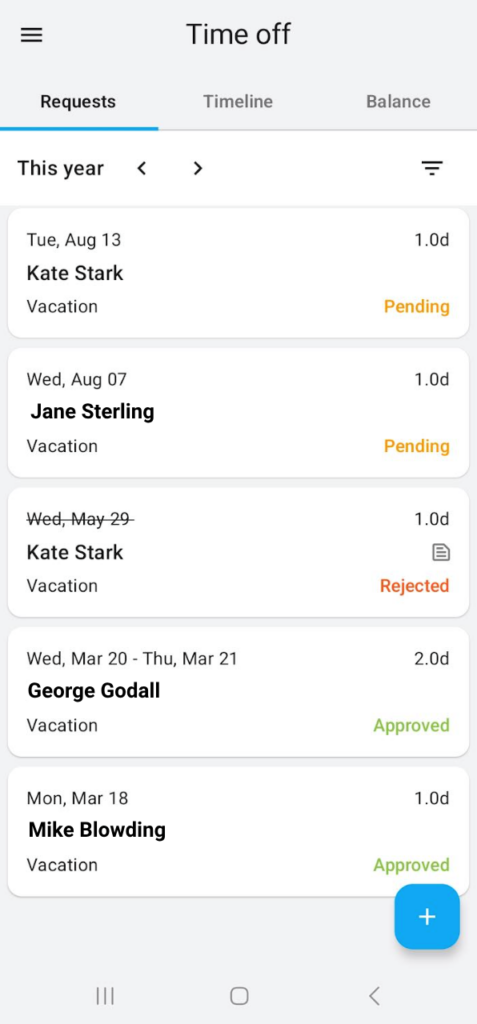
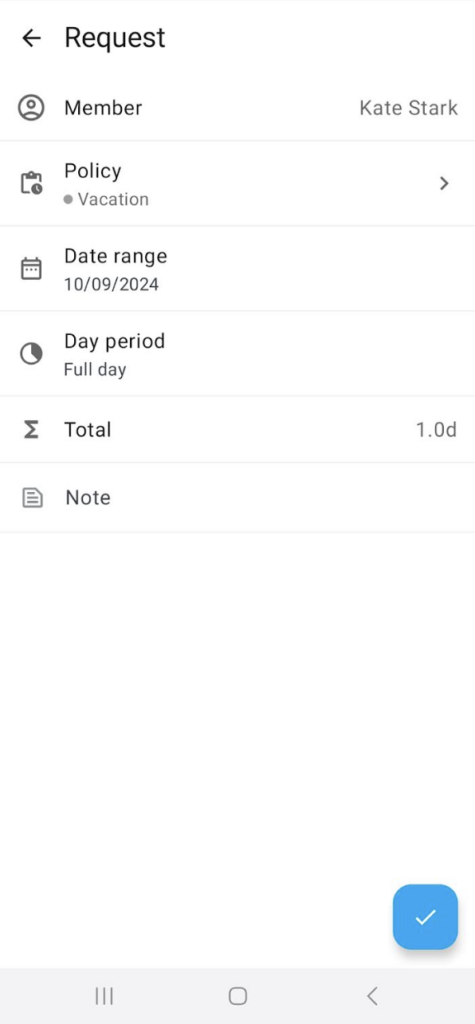
To submit a time off request:
- Open Time off screen from the sidebar
- Tap + to create a new request
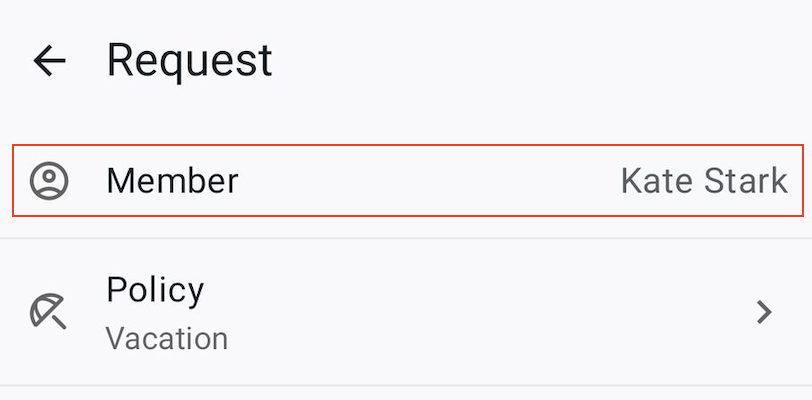
- Select the time off policy (e.g. vacation, sick leave)
- Choose the date range, specific period, and/or time
- Add a note (optional)
- Tap the check mark to submit your request
Once approved, you’ll receive an email notification, and your request status will be updated to Approved.
Approved time off requests cannot be withdrawn.
To manage a request:
- Tap and open the request
- Review the details in the new screen
- Approve, reject, or withdraw the request based on its status
You can also manage requests directly from the list:
- Swipe right to quickly approve
- Swipe left to reject or withdraw
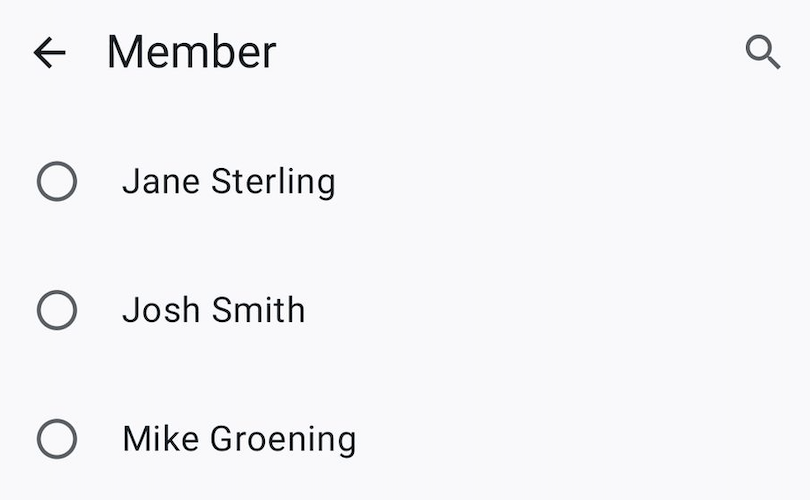
If a member forgets to submit a request, you can easily take care of that using the following steps:
- Open Time off screen from the sidebar
- Tap the + button and open new request
- Choose the member, policy, date range, and optionally add a note
- Tap the check mark to submit the request
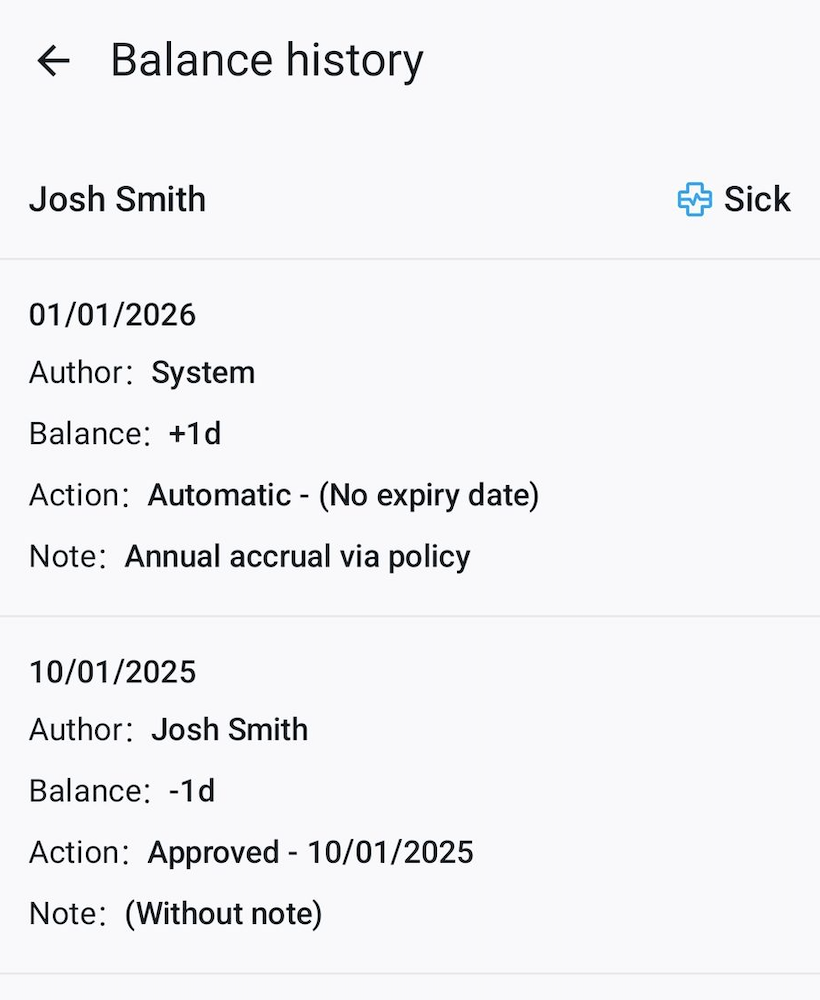
Policy details #
To see balance policy details:
- Go to the Balance tab
- Choose the policy you’d like to see details for
- Tap on three dots and open:
- View details (see validity period details)
- Balance history (see balance history)

Filter requests & balances #
Filter out requests and balances, so that you always have a clear overview of what you need to see. Your filters will be saved for your next visit.
Filter requests #
To filter time off requests:
- Go to the Requests tab
- Tap the filter
- Choose your criteria, such as time period, status, or team
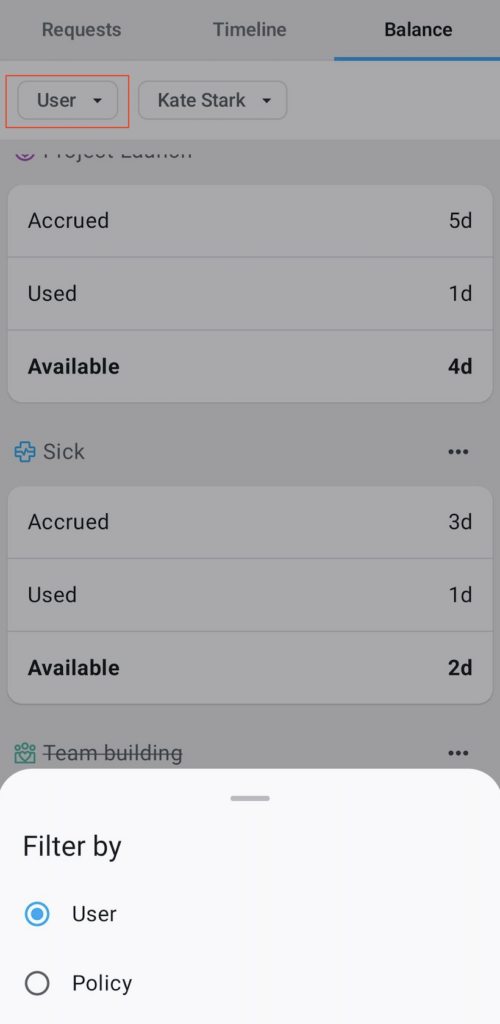
Filter balances #
To filter time off balances:
- Go to the Balance tab
- Tap on the filter
- Choose the display by user or by policy
Record expenses #
- Open Expenses from the sidebar (if you don’t see it, make sure you have Expenses enabled in the workspace settings)
- Tap + to add a new expense
- Select category
- Enter amount
- Select project
- Choose date
- Optional: add a note and/or a receipt (either by attaching an image, taking a photo using your phone’s camera or uploading a PDF file)
Maximum size of uploaded file is 5 MB.
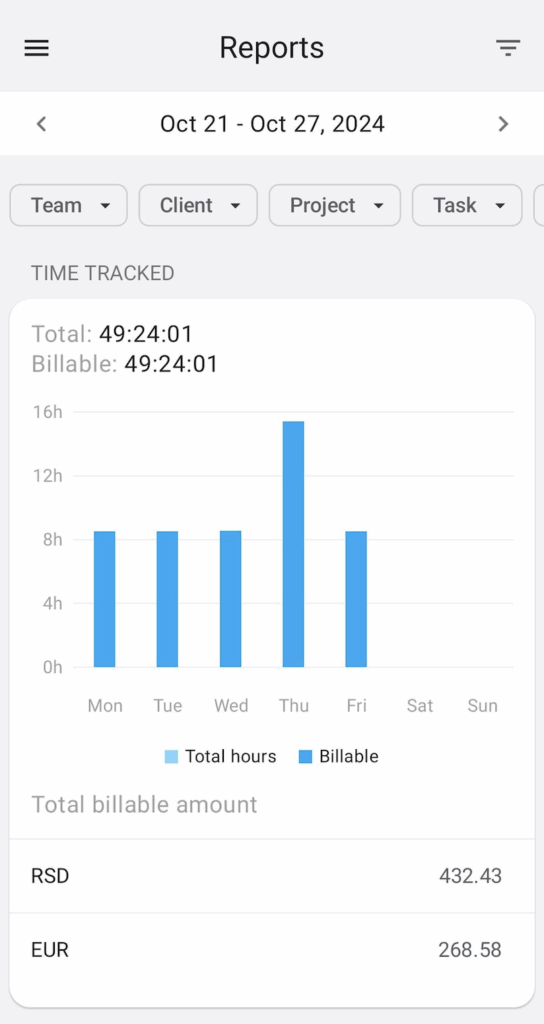
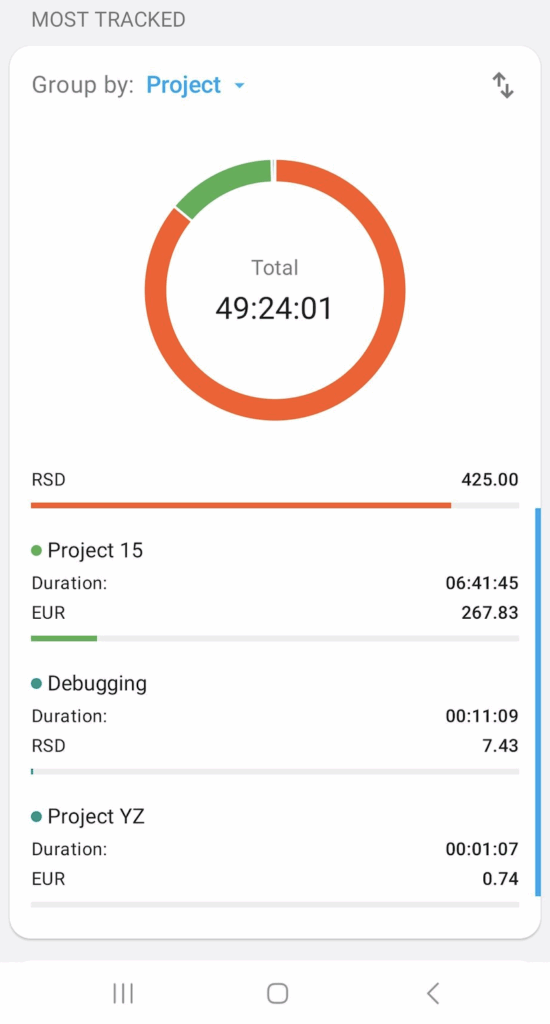
Reports #
You can see breakdown of your and your team’s tracked time directly in the app in the Reports section (available in the side menu).
- Select date by tapping on the active date (e.g. by tapping This week)
- Go to next/previous period by tapping < or >
- Switch between breakdown for Team, Client, Project, Task, Tag, Description by tapping the filter button (next to the < and >)
- See total amount for all projects at the top and currency breakdown next to each project
- Tap on the bar chart to see the total just for that day and currency
- Tap on the pie chart to see the total just for that project and currency
Duration format is set in the Workspace settings on the web app.
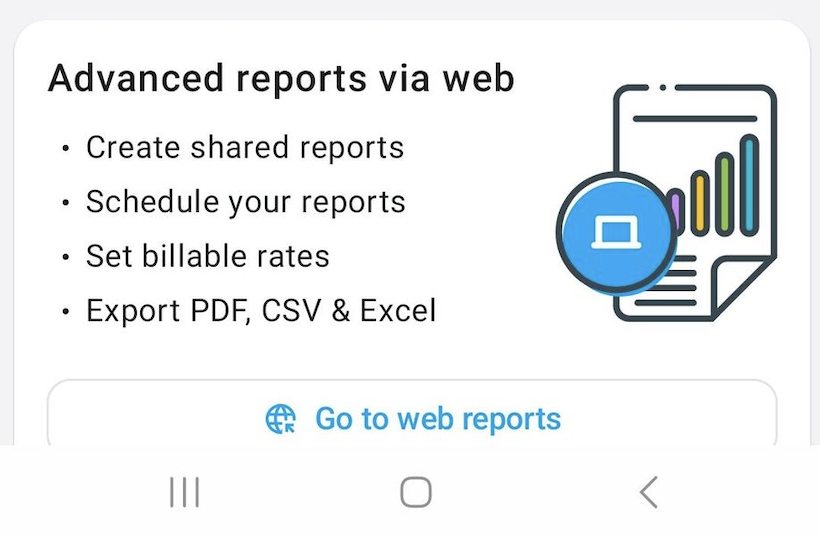
For more control (such as grouping, filtering, sharing, and exporting reports), you can use Reports in the web version. Keep in mind that after you’re redirected to the Reports page on the web app, the same date range and filters you set on your Android device will be applied.
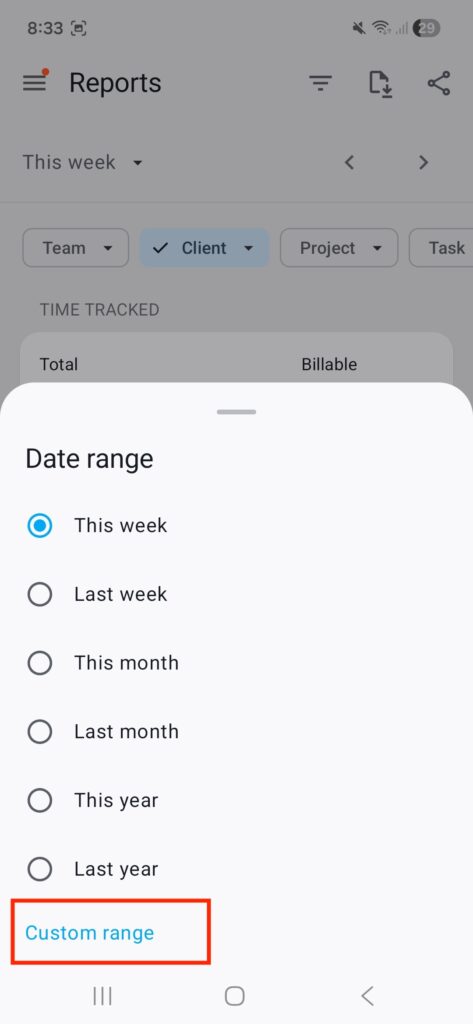
Custom date range #
You can only select a date range of up to 31 days (1 month) on a Free plan.
You can select a custom date range to generate reports:
- Go to Reports
- Tap on the current date range (This week, This month, etc) on the top-left corner of the page
- Select Custom range
4. Tap the start and end dates on the calendar
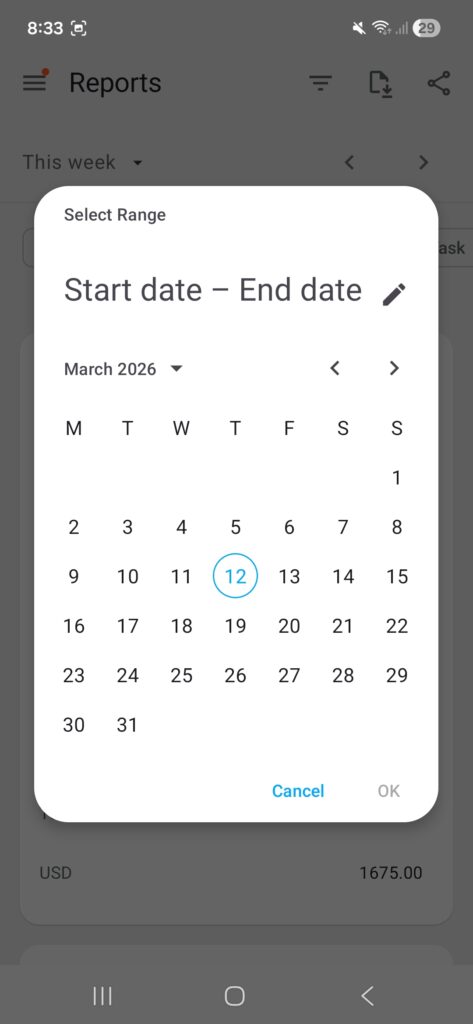
5. Tap OK when done
Export report #
Free plan users can only export reports within a one-month period and download is as PDF (not CSV or Excel format).
To export a report and download it as PDF, CSV, or Excel:
- Go to Reports
- Tap the download icon on the top-right corner
- Select the file format (Save as PDF, Save as CSV, Save as Excel)
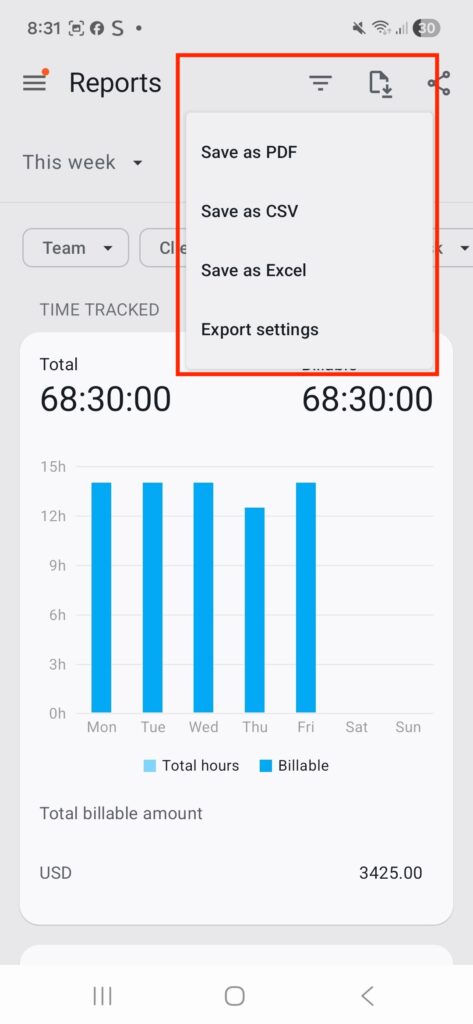
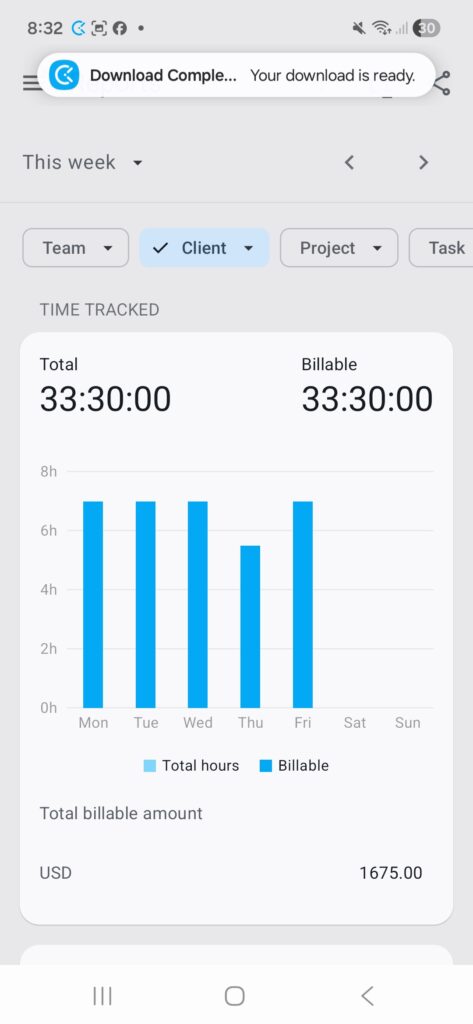
A confirmation pop-up should appear that the download is complete.
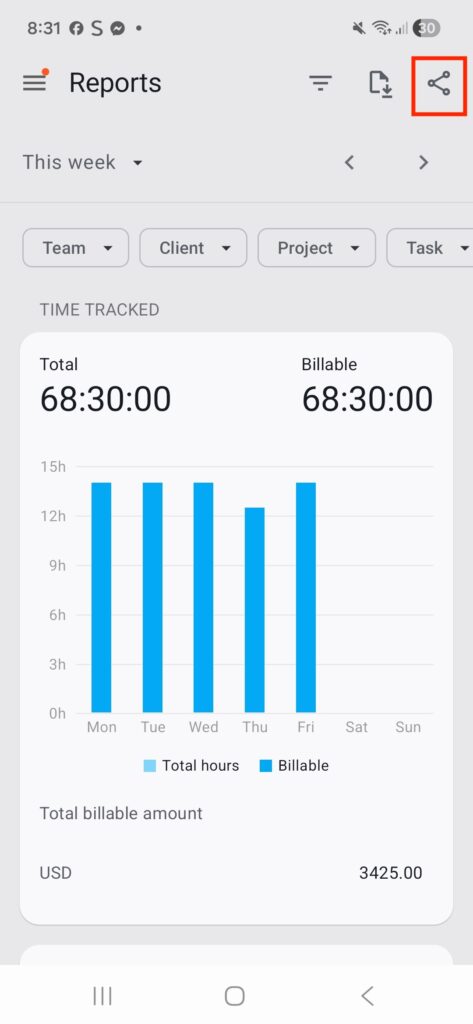
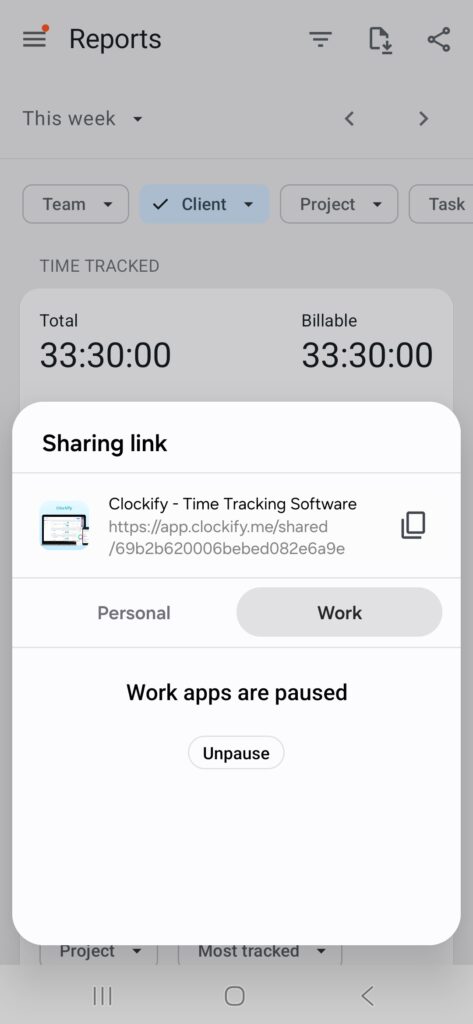
Share report #
You can share a report and send a link even to people outside your workspace.
To share a report:
- Go to Reports
- Tap the share button
3. Enter a name for the report
4. Set the Visibility:
- Public makes the report visible to anyone you share the link to even if they don’t have a Clockify account
- Private makes the report visible only to members of your Clockify workspace
5. Enable Always open this week if you want the generated report to show on the current week
6. Enable Lock dates if you don’t want to show the report in different time ranges
7. Enable Schedule to email to set the report to be sent daily, weekly, or monthly via email to a specified user (This is a paid feature available on the Pro plan and higher)
8. Click Create link
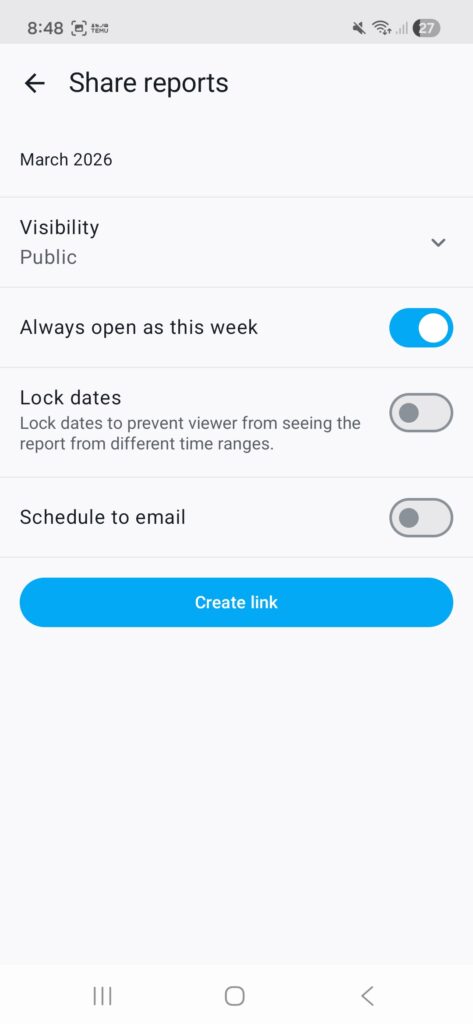
A pop-up window should appear where you can copy the link.
Receive reminders and notifications #
Configure your push notifications to receive alerts to start or stop your timer, and stay informed about important team updates, like time off requests.
Clockify notifies you if your:
- Timer is started
- Time off request is approved/rejected
- Schedule is published
You will be asked for the permission to receive notifications after you initially log into the app.
Notification settings #
You can customize which notifications you receive:
- Open the main menu and go to Workspace tab
- Tap on Notifications
- Here, you can enable the type of notifications you want to receive:
- Time off: alerts for time off requests
- Scheduling: alerts about scheduling changes

Essential notifications (e.g. start/stop reminders, approvals) are turned on by default. You can change these settings at any time. If you are in offline mode, your notification will be disabled.
Timer reminders #
Set up push notifications to remind you to start or stop your timer on specific days and times.
Enable reminders #
To enable and customize reminders:
- Go to the main menu and open App tab
- In the Reminders section, toggle the switch on
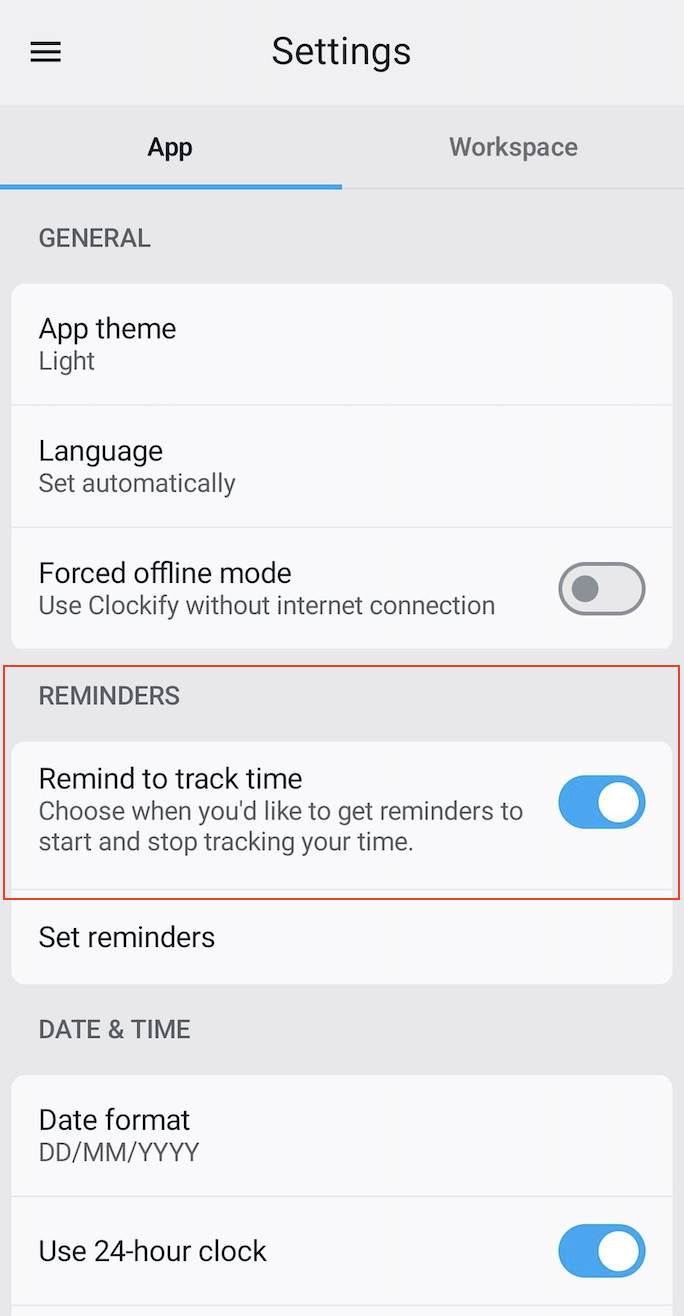
- In the Set reminders window you can:
- Set reminders to start tracking at specific times
- Set reminders to stop tracking at specific times

- Tap Save
As a result, you will receive push notifications at scheduled time, even if the app is closed.
Once a timer notification appears, you can tap it and stop the timer directly, without opening the app.
Disable reminders #
To stop receiving all reminders, go to Settings > Reminders and toggle the switch off.
Time off indicator #
If you’re a Manager/Admin/Owner, a time off indicator helps you quickly see when new requests are pending.
You’ll see a badge icon on the main menu, which alerts you to pending notifications, even when you’re on the home screen.
The indicator disappears as soon as the request is approved, rejected, or withdrawn.
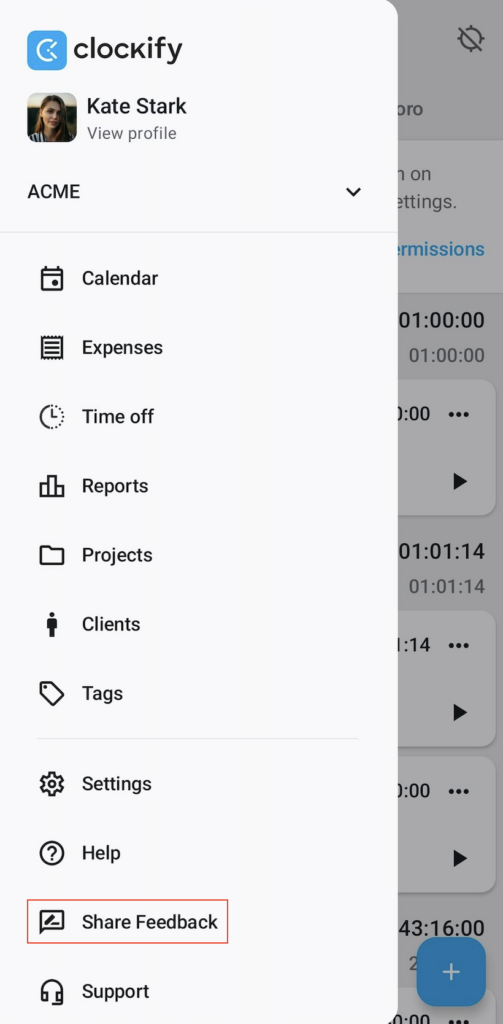
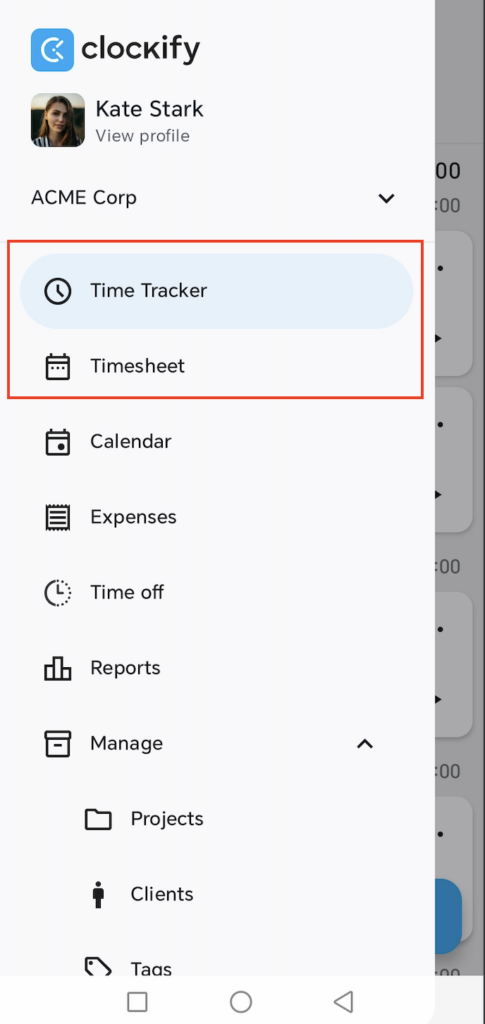
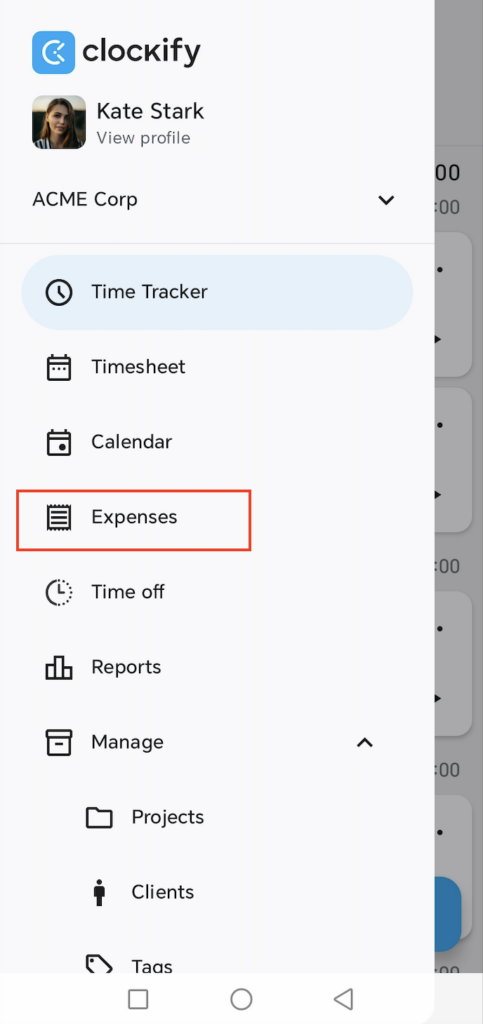
Menu navigation #
To find the app’s menu tap on the three horizontal lines located in the upper left corner. In this menu you can:
- Configure your profile settings
- Switch Workspace
- Go to Timesheet
- Go to Calendar (see your time entries in a Calendar view)
- Check Expenses (see expenses you tracked and submitted for approval)
- Create Time off (submit time off request)
- View Reports (see reports for tracked time/expenses)
- Go to Manage>Projects (add new projects, edit existing projects, create clients, and tags)
- Go to Settings > Apps (enable dark mode, choose language, switch to offline mode, enable reminders, set up date, time and timezones) or Workspace (configure notifications and set default project)
- View reports
- Get help
- Share feedback
- Contact support
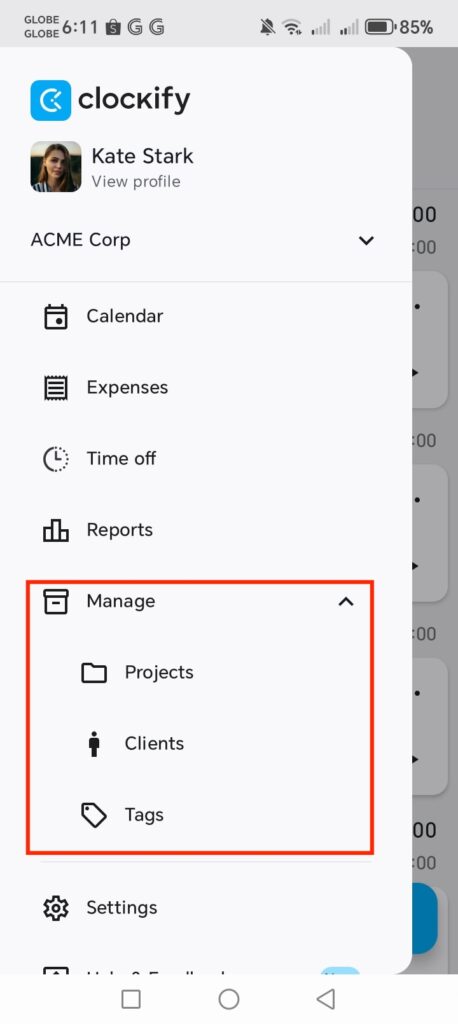
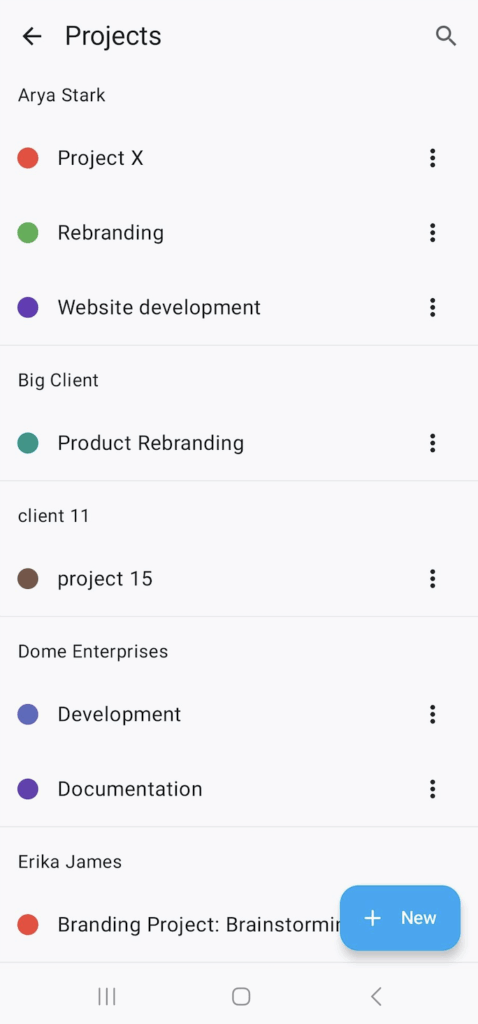
Create projects, clients and tags #
Regular (non-admin) team members are not able to create projects, tasks, and tags if they are not granted these permissions. To give them such permissions, you will need to log in via Web browser and in the Workspace settings set Who can create projects and clients, Who can create tasks and Who can create tags to Everyone.
Add new project #
- Tap on three horizontal lines on the upper left corner to open the sidebar menu
- Tap Manage and select Projects
3. Tap the +New button on the bottom right corner
4. Name the project
5. Set it as billable/non-billable, public/private, select a client, and change the color
6. Tap Save
Add a new client #
To add a client:
- Tap the Manage tab on the sidebar
- Select Clients
- Tap the +New button
- A new page will open, asking you for the following details:
- Client name
- Address
- Client currency (choose from the dropdown of currencies set up in your workspace)
- Note (optional)
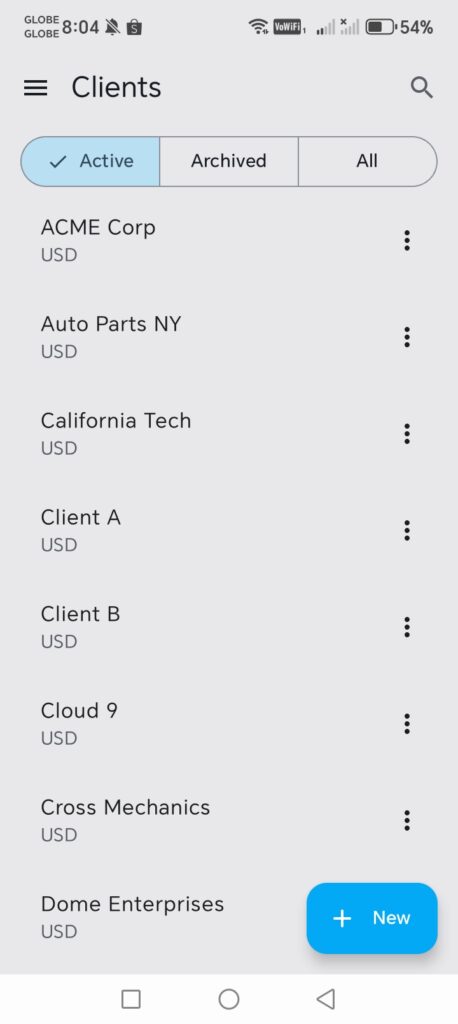
After you tap Save, your new client will appear on the page.
From the Clients page, you can easily edit or archive clients.
Add new tag #
To add tags:
- Tap the Manage tab
- Select Tags
- Tap + New button on the bottom right corner
- Name the tag and tap Add to create a new tag
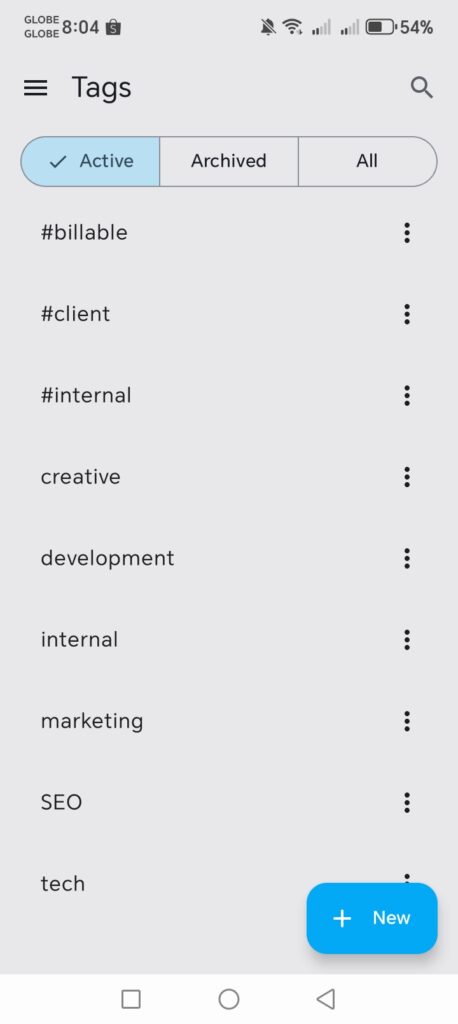
Here you can also rename existing tags by tapping on the three dots next to the tag.
You can simply discard the time entry at this point by tapping the back button on your phone if you just want to add a new tag without creating a time entry.
My Profile screen #
To manage your account and personal preferences, tap your account name in the side menu to open My Profile screen.

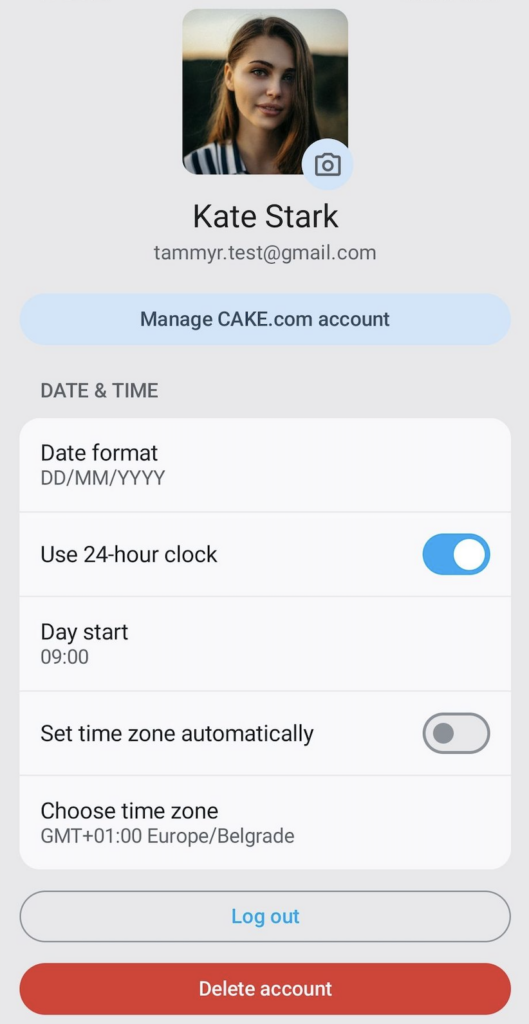
Account management #
- Profile picture: Tap to change your photo
- Manage CAKE.com account: Tap to go to My account and manage your CAKE.com account settings
- Log out: Log out of your current session
- Delete account: Tap to delete your CAKE.com account
Date & time settings #
In the Date & time section, you can customize how your time & dates are displayed:
- Date format: Choose your preferred layout (e.g. DD/MM/YYYY)
- Time format: Enable/disable 24-hour clock
- Day start: Choose which time your workday starts
- Time zone: Enable automatic detection, or choose your time zone manually
Day start #
Apart from customizing start of your week, you can also customize working hours and set up start of your day.
The default day start is set to 09:00h.
To change the default day start:
Go to My Profile screen from the sidebar and tap on the Day start option. Choose your preferred hour by inserting the numbers, or use a time picker option in the lower left corner. The time picker will differ based on the time format you’re set (12-hour or 24-hour).
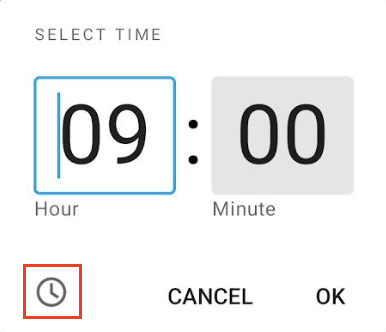
The change you’ve made in the Android app will be automatically applied to all other platforms you use with the same account.
Changing the starting hour of your working day in Clockify will impact these features: Timesheet and Time off.
Week start #
Customize your week start, align it with your routines or cultural practices and improve your efficiency.
Default week start is set up for all Workspace members in the Workspace settings on the Web app. Owners and Admins can change this configuration for individual users on the Clockify Web app, Team page > Profile settings.
Time zone settings #
There are two ways in which you can set your time zone in the Android app:
- Choose time zone manually from the list of available time zones
The change you’ve made in the Android app will be automatically applied to all other platforms you use with the same account.
Also, if you set a time zone that is different from the time zone set on your Android device, in order to track time you’ll need to change time zone in Clockify’s Profile settings > Preferences > General so that it matches your phone’s time zone.
- Set time zone automatically
If you’d like to set your time zone automatically, the app will automatically switch to the time zone set on your Android device. This time zone will be applied to all the platforms you use with the same account.
To ensure consistency and accuracy of the time tracking and the approvals, you won’t be able to change the time zone if you have pending approval request. Once the request is approved/rejected, you’ll be able to modify the time zone.
Delete account #
You can delete your account from the Settings page:
- Tap on your photo in the sidebar to open My Profile screen
- Scroll down to the bottom of the page and tap Delete account

- Confirm the action and you’ll be redirected to the organization’s web page
Settings #
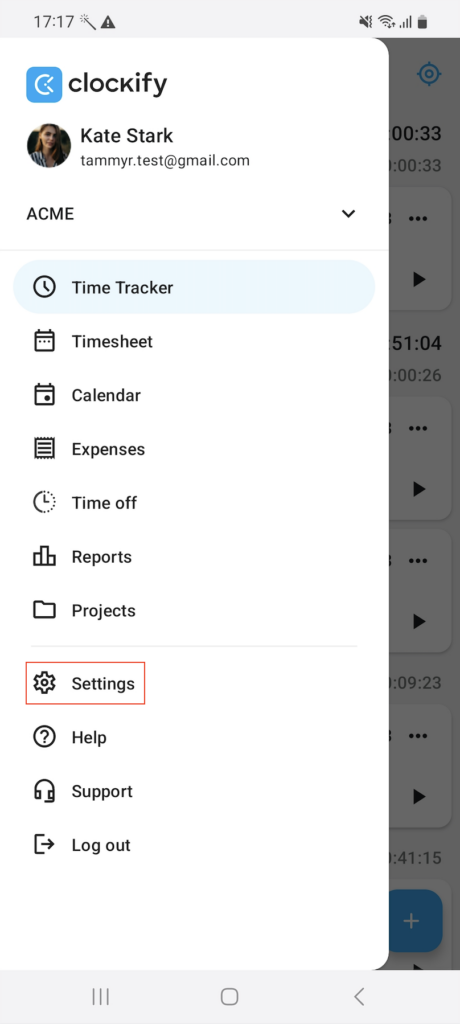
Tap the three horizontal lines located in the upper left-hand corner and select Settings.
In the App tab you can:
- Modify app theme
- Choose language (German, English, Spanish, French, Portuguese)
- Force offline mode
- Enable time tracking reminders
- Sync Clockify with your local calendar
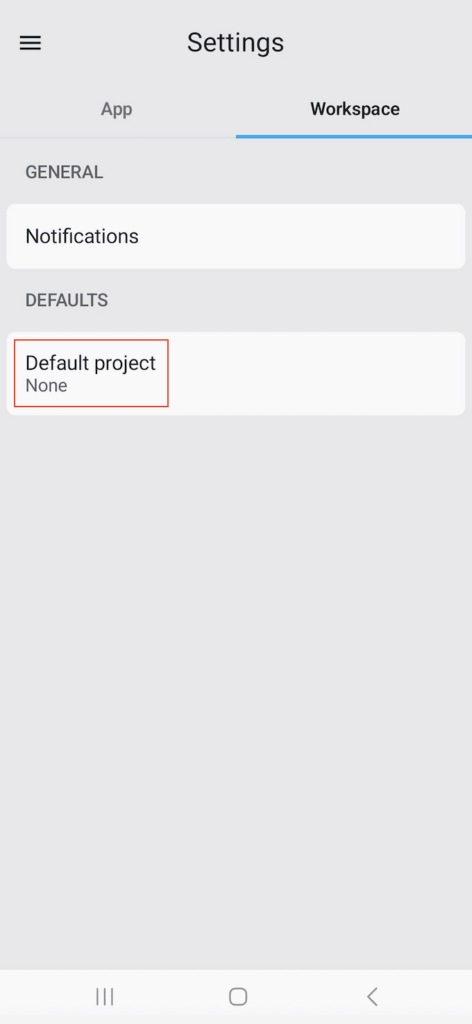
Use Workspace tab to:
Default project #
If you continuously work on the same project, you can set a default project in the app’s Settings > Workspace tab. Then when you start the timer or add a time entry, the project will be selected automatically.
You can select:
- Fixed project, which will be always used when you start a timer for an entry without a project (until you change the default project)
- Last used project, and the timer will pick up the most recently used available project from your list of time entries
If Default project is enabled, you won’t be able to have a time entry without a project assigned. Also, if you edit a previous entry that’s without a project, the app will automatically assign it to a default project.
App theme #
Set an app theme that will follow the app system.
- Go to Settings > App tab
- Choose one of the following:
- Light
- Dark
- System default
Offline mode #
You can track time in Clockify on your Android even if you’re offline.
Create time entries manually or start/stop the timer. Entries made while offline will be saved locally on your phone. Once you get back online, they’ll get synced with your web account automatically.
When you’re offline, you will only be able to see information loaded while you were online (time entries, projects, tasks, tags, etc.). So projects, tasks, and tags are available for selection if they were loaded before you went offline.
Once you’re offline, you can see, open and edit the expense, but the changes will be made once you go back online.
It’s not possible to create new projects, tasks, tags, and clients while offline.
If you notice that the app is very slow, it probably means you have an unstable internet connection. In that case, enable Force offline mode in Settings to improve performance. This will make the app behave as if it’s offline without you having to turn off your internet connection. After your turn off Force offline mode, the app will automatically sync all time entries.
If you are using the app in the offline mode, please make sure you’ve synced your time entries with the cloud prior to logging out. If you fail to do that, all the data that is not synced at the moment of logging out, will be lost.
If your access token expires while offline, you’ll be logged out when you reconnect. Unsynchronized data will automatically sync, and you’ll be notified if you were offline.
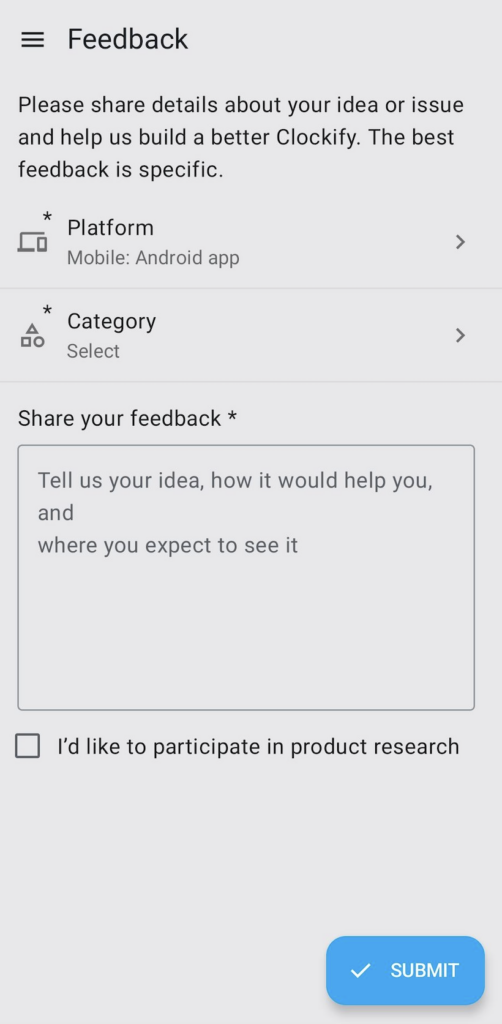
Share feedback #
If you’d like to share your feedback about the Clockify Android app, or any other Clockify app you’re using, go to the main menu and choose the Share feedback option.