Berichte filtern
Das Filtern von Berichten ermöglicht es dir, bestimmte Zeiteinträge mithilfe von Datumsbereichen und benutzerdefinierten Variablen zu isolieren, sodass du genau die Daten siehst, die du benötigst.
Diese Funktion steht allen Personen zur Verfügung. Das Anzeigen von Datumsbereichen von mehr als 31 Tagen ist jedoch nur in den kostenpflichtigen Tarifen (Basic, Standard, Pro und Enterprise) verfügbar.
Datumsbereich festlegen #
- Gehe zu Berichte > Zusammenfassung/Detailliert > Wöchentlich
- Klicke auf die Datumsangaben im Kalender (oben rechts)
- Das Startdatum aus dem linken Kalender und das Enddatum aus dem rechten Kalender wählen
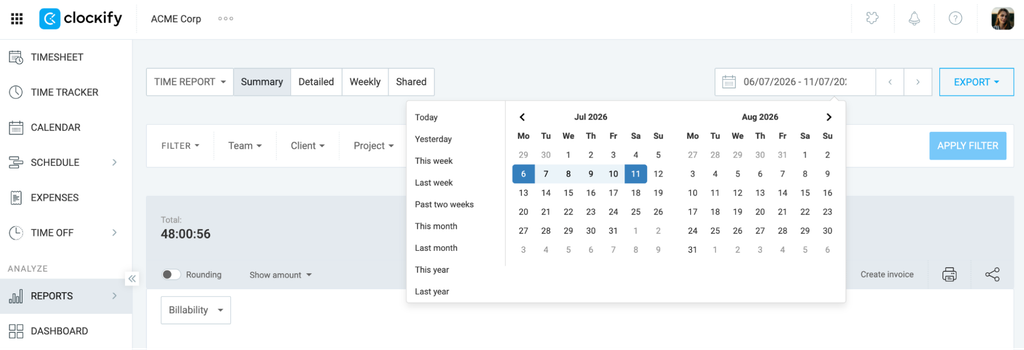
Du kannst vordefinierte Optionen wie Heute, Diese Woche oder Letzten Monat auswählen oder auf die Pfeile klicken, um einfach zwischen vorherigen und kommenden Zeiträumen zu navigieren.
Filter ein- oder ausblenden #
- Klicke oben auf der Seite auf das Dropdown-Menü Filter
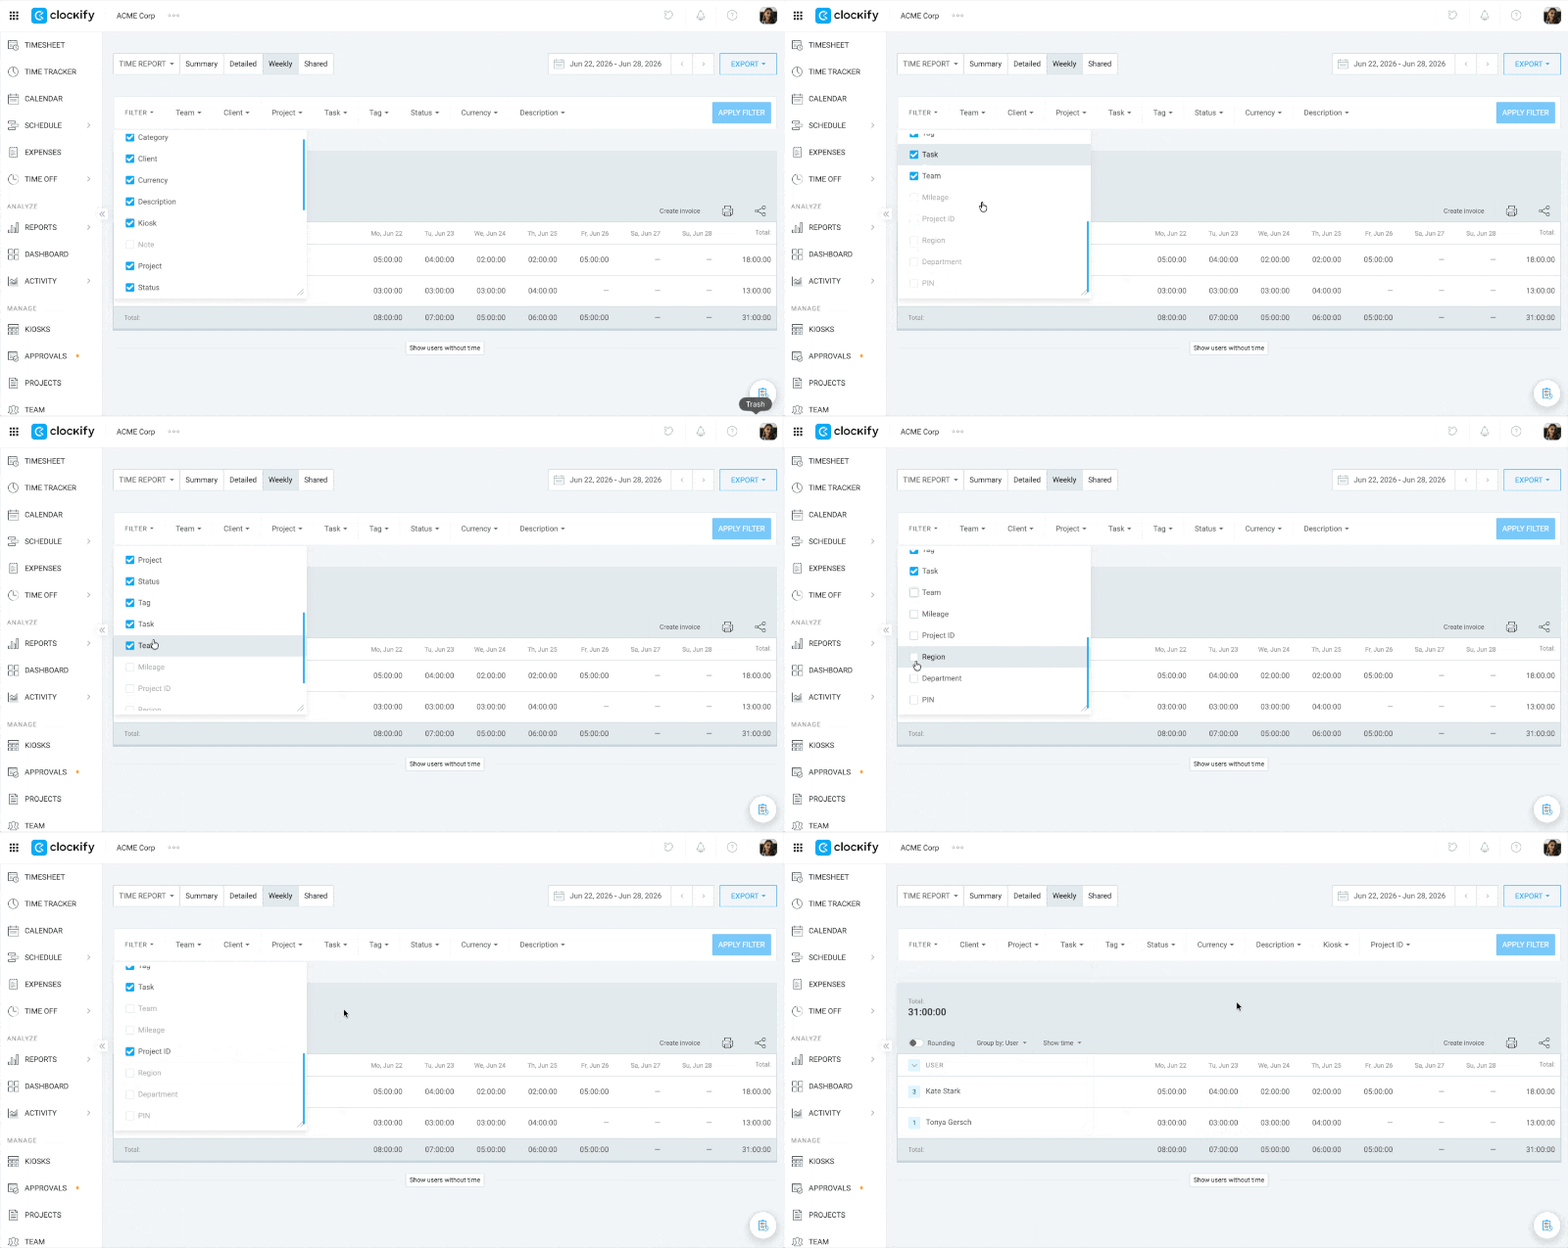
- Aktiviere die Kontrollkästchen für die Elemente, die du in deinem Filtermenü anzeigen möchtest
- Deaktiviere die Kontrollkästchen für die Elemente, die du in deinem Filtermenü ausblenden möchtest
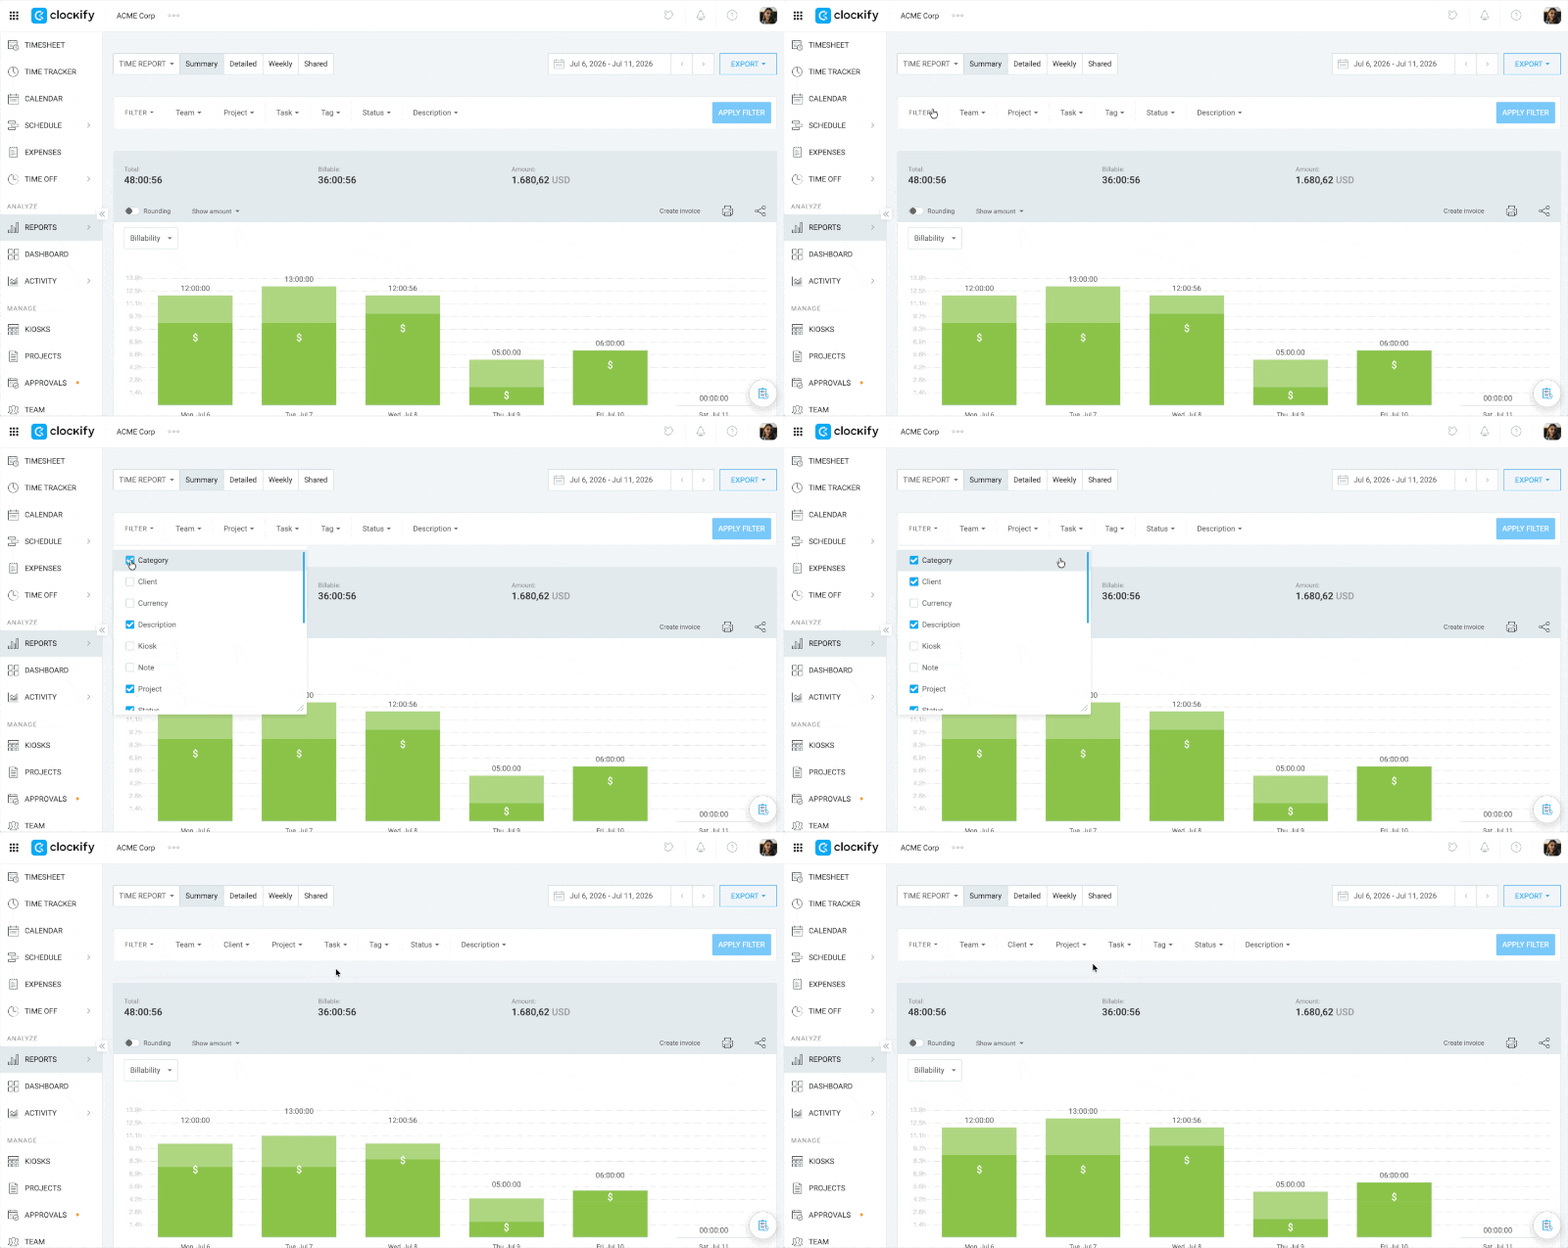
Wenn du Benutzerdefinierte Felder verwendest, musst du diese zuerst aus diesem Dropdown-Menü auswählen, bevor sie als reguläre Filteroptionen angezeigt werden.
Falls das Feld, das du aktivieren möchtest, ausgegraut ist, deaktiviere andere Felder.
Berichtsfilter anwenden #
- Wähle oben auf der Seite einen oder mehrere Filter aus, wie z. B. Kunde, Projekt, Tag oder Beschreibung
- Klicke auf die Schaltfläche Filter anwenden (oben rechts), um einen Bericht zu erstellen, der nur deine gefilterten Einträge enthält
- Klicke auf Filter zurücksetzen, wenn du sie entfernen möchtest
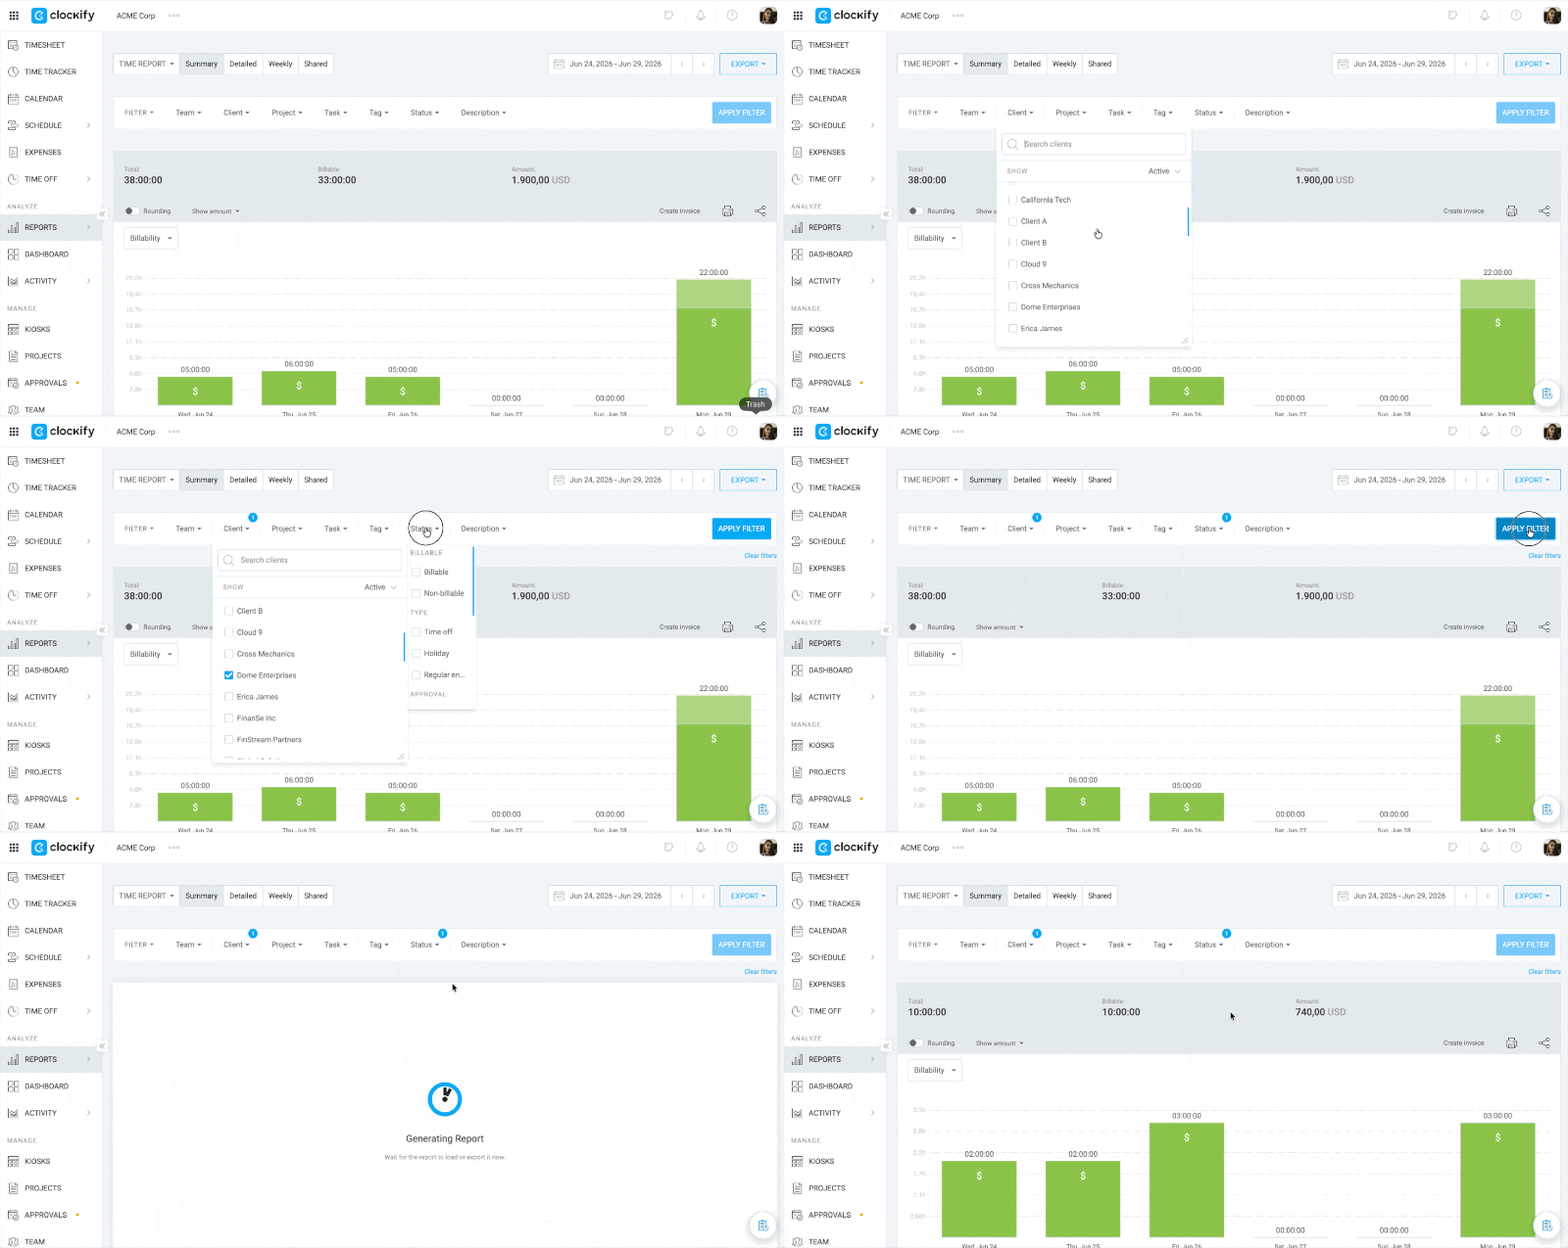
Du kannst fehlende Daten aufspüren, indem du nach Einträgen filterst, denen kein Kunde, Projekt, keine Aufgabe oder kein Tag zugewiesen ist.
Filteroptionen verstehen #
Du kannst eine Vielzahl von Filtern verwenden, um deine Berichtsdaten einzuschränken. Hier ist eine Übersicht der verfügbaren Filteroptionen:
| Filteroption | Beschreibung | Anwendungsfall |
| Kategorie | Gruppiert Zeiteinträge nach spezifischen Klassifizierungen | Überprüfen der für abrechenbare versus nicht abrechenbare Arbeit aufgewendeten Zeit |
| Kunde | Filtert Einträge, die bestimmten Kunden zugeordnet sind | Erstellen eines Zeitberichts für eine spezifische Kundenrechnung |
| Währung | Zeigt Einträge basierend auf der für die Abrechnung verwendeten Währung | Überprüfen der Gesamteinnahmen in einer bestimmten Währung |
| Beschreibung | Sucht nach bestimmten Schlüsselwörtern in der Beschreibung des Zeiteintrags | Finden aller Einträge im Zusammenhang mit „Überstundenberichte aktualisieren“ |
| Kiosk | Filtert Zeit, die über einen bestimmten geteilten Kiosk erfasst wurde | Anzeigen von Anwesenheitsaufzeichnungen für einen bestimmten Bürostandort |
| Projekt | Grenzt Daten auf bestimmte Projekte ein | Analysieren der Gesamtzahl der für ein Website-Redesign aufgewendeten Stunden |
| Status | Filtert nach Genehmigungs- oder Rechnungsstellungsstatus | Finden aller nicht abgerechneten Zeiten zur Erstellung neuer Rechnungen |
| Tag | Isoliert Einträge, die mit bestimmten Tags versehen sind | Nachverfolgen der für „Meetings“ aufgewendeten Zeit über alle Projekte hinweg |
| Aufgabe | Filtert nach bestimmten Aufgaben innerhalb eines Projekts | Überprüfen der für die Aufgabe „Wireframing“ aufgewendeten Zeit |
| Team | Zeigt Zeiteinträge für bestimmte Teammitglieder oder Personengruppen | Überprüfen der wöchentlich vom Design-Team erfassten Stunden |
| Benutzerdefinierte Felder | Filtert mithilfe benutzerdefinierter Datenfelder | Sortieren von Zeiteinträgen nach einem benutzerdefinierten Feld wie „Ticket-ID“ oder „Standort“ |
Filter „Gruppieren nach“ verwenden #
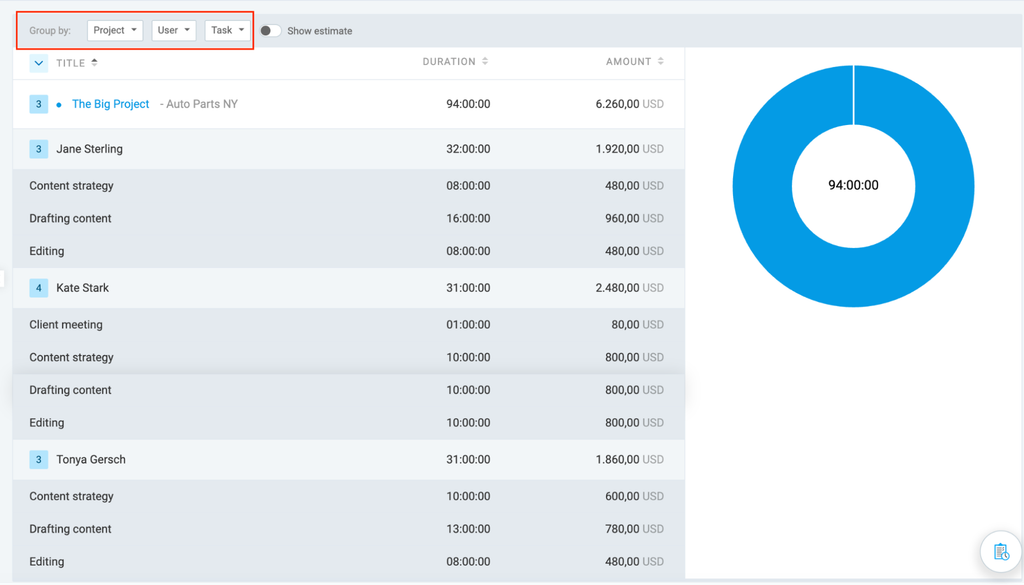
Du kannst den Sortierfilter Gruppieren nach verwenden, um die Darstellungsweise eines Berichts zu ändern.
So verwendest du diesen Filter:
- Gehe zu Berichte > Zusammenfassung/Wöchentlich
- Wende die Hauptfilter auf deinen Bericht an (Projekt, Kunde, Status usw.)
- Scrolle nach unten, um das Dropdown-Menü Gruppieren nach oberhalb der Tabelle zu finden
- Wende die gewünschten Sortieroptionen über eines, zwei oder alle drei Dropdown-Menüs an:
- Projekt
- Kunde
- Benutzer
- Beschreibung
- Gruppe
- Tag
- Monat
- Woche
- Datum
Berichte werden nacheinander basierend auf deinen gewählten Optionen für Gruppieren nach kategorisiert – beginnend mit dem primären Filter und fortlaufend durch jede nachfolgende Auswahl.
Einstellungen für Tag-Filter verwenden #
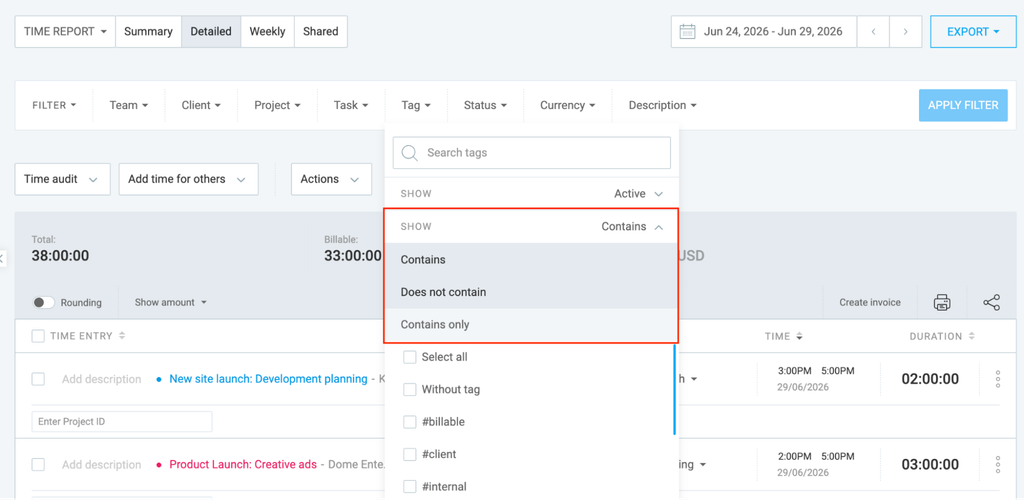
Beim Filtern von Tags kannst du die folgenden Einstellungen verwenden, um die Daten weiter einzuschränken.
So verwendest du diese Optionen:
- Gehe zu Berichte > Zusammenfassung/Detailliert/Wöchentlich
- Klicke auf den Tag-Filter, um die Dropdown-Optionen anzuzeigen
- Wähle aus den folgenden Optionen:
- Enthält: Dein Bericht führt alle Zeiteinträge auf, die das ausgewählte Tag enthalten
- Enthält nicht: Dein Bericht schließt alle Zeiteinträge aus, die das ausgewählte Tag enthalten
- Enthält nur: Dein Bericht führt nur die Zeiteinträge auf, die mit allen ausgewählten Tags übereinstimmen
- Wähle das Tag aus
Häufig gestellte Fragen #
Kann ich meine häufig verwendeten Filtereinstellungen speichern?
Obwohl du eine reine Filterkonfiguration nicht als eigenständige Voreinstellung speichern kannst, lässt sich der gesamte Bericht mit den angewendeten Filtern speichern. Sobald du deine gewünschten Datumsbereiche und Filter konfiguriert hast, klicke oben auf der Seite auf das Symbol Speichern.
Du kannst dem Bericht einen Namen geben und später über deine gespeicherten Berichte darauf zugreifen. Dadurch werden automatisch alle deine bevorzugten Filterkriterien geladen.
Kann ich die Daten exportieren, nachdem ich meine Filter angewendet habe?
Ja. Nachdem du deine Filter angewendet und genau die Daten isoliert hast, die du benötigst, kannst du die Ergebnisse exportieren. Klicke oben rechts auf dem Berichtsbildschirm auf die Schaltfläche Exportieren, um deine gefilterten Daten als PDF-, CSV- oder Excel-Datei herunterzuladen. Die exportierte Datei enthält nur die Daten, die deinen Filterparametern entsprechen.
Kann ich nach dem Filtern meiner Daten verändern, wie diese auf dem Bildschirm organisiert sind?
Ja. Du kannst die Optionen Gruppieren nach und Untergruppe verwenden. Nachdem du beispielsweise nach einem bestimmten Kunden gefiltert hast, kannst du die verbleibenden Zeiteinträge nach „Projekt“ gruppieren und sie nach „Person“ oder „Aufgabe“ untergruppieren, um eine hochstrukturelle Aufschlüsselung der abgeschlossenen Arbeit zu erstellen.