Actualizado: 25 de febrero de 2026
 Esta guía proporciona pasos prácticos sobre cómo fichar entrada y salida en Clockify a través de las aplicaciones móvil y web. También explica cómo los gerentes y el personal de los recursos humanos pueden revisar los datos de fichaje de entrada/salida en Clockify para evaluar el rendimiento y la nómina.

- Al configurar tu cuenta de Clockify, puedes personalizar tu espacio de trabajo. Por ejemplo, puedes añadir el logotipo de tu empresa.
- Para fichar tu entrada y salida en la aplicación web de Clockify, puedes usar el temporizador de Clockify, registrar tu entrada y salida manualmente o mediante planillas de horarios.
- Si tienes trabajadores de campo, también puedes optar por el quiosco de Clockify para fichar la entrada y salida.
- Si quieres gestionar la asistencia de los empleados, existen funciones de nivel administrativo como permisos, planificación y generación de informes de asistencia.
Configurar tu espacio de Clockify
Antes de que los empleados comiencen a seguir su tiempo en Clockify by CAKE.com, necesitarás configurar el espacio de trabajo en la aplicación. Un espacio de trabajo predeterminado se crea automáticamente para ti al registrarte en Clockify. Puedes personalizar tu espacio de trabajo:
- Añadiendo el logotipo de tu empresa,
- Habilitando las funciones como planilla de horarios o tiempo libre,
- Eligiendo un formato de duración de tiempo, y más.
Después de personalizar el espacio de trabajo, puedes invitar a los miembros de tu equipo, asignar roles y permisos, y crear tareas y proyectos en los que los empleados registran su tiempo.
Para invitar a los empleados al espacio de trabajo sigue estos pasos:
- Selecciona Equipo de la barra lateral,
- Haz clic en Añadir nuevo miembro,
- Introduce un correo electrónico del miembro, y
- Haz clic en Enviar invitación.
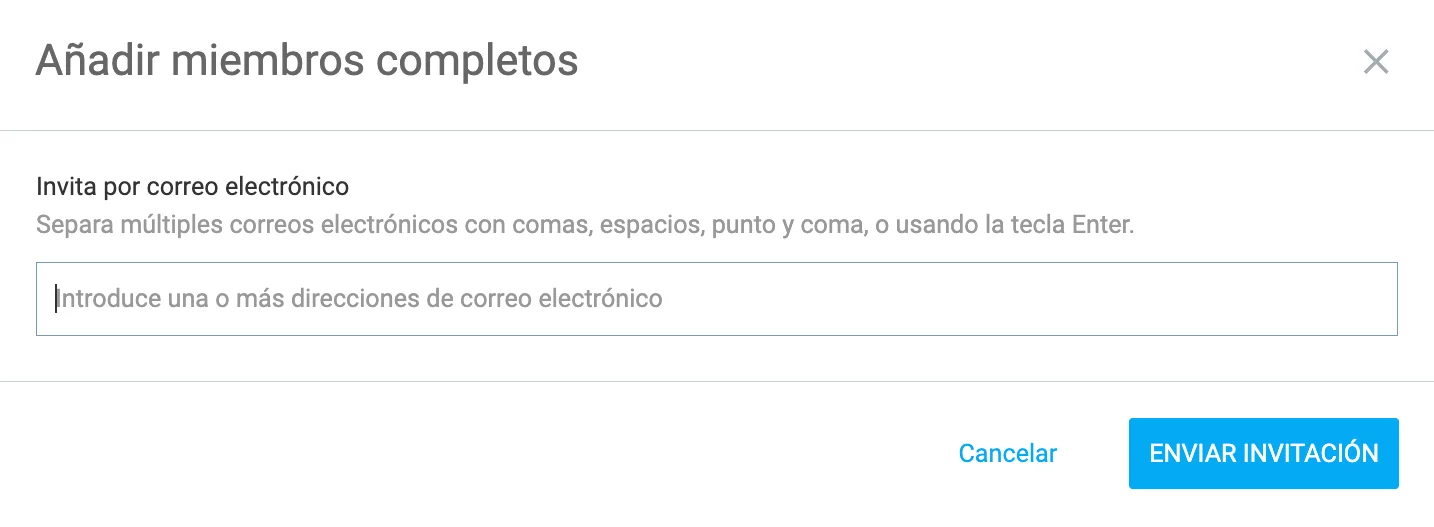
Después de que los empleados hagan clic en la invitación y verifiquen su dirección de correo electrónico, pueden iniciar sesión a su cuenta y empezar a seguir el tiempo.
Obtén Clockify by CAKE.com GRATIS
Consejo para solucionar problemas: Si un miembro del equipo no recibe el código de verificación, asegúrate de haber introducido una dirección de correo electrónico válida y pídele que revise las carpetas de correo no deseado y spam. Además, es posible que tu proveedor de correo electrónico esté poniendo tus mensajes en cola o en cuarentena (en ese caso, ponte en contacto con el administrador de tu dominio de correo electrónico o con tu proveedor). Si utilizas Gmail o un ID de Apple, puedes seleccionar Continuar con Google o Continuar con Apple.
Lee más sobre el problema de no recibir el código de verificación aquí →
Cómo fichar entrada/salida en la aplicación web de Clockify
En la aplicación web de Clockify, los empleados pueden seguir el tiempo dedicado a tareas y proyectos con el temporizador de Clockify. Si se olvidan de iniciar el temporizador, los empleados pueden añadir el tiempo manualmente después de completar la tarea.
Si la función de la planilla de horarios se habilita en la configuración del espacio de trabajo, los usuarios pueden también registrar sus horas enviando las planillas de horarios en Clockify al final del día.

Fichar entrada/salida utilizando el temporizador en la aplicación web de Clockify
Para fichar entrada/salida a través del temporizador de Clockify, los empleados necesitan:
- Seleccionar Temporizador en la barra lateral,
- Introducir en lo que están trabajando,
- Elegir el proyecto, y
- Hacer clic en botón Iniciar para iniciar el seguimiento de tiempo.
Cuando terminan trabajando, hacen clic en el botón Detener para detener el registro de tiempo.
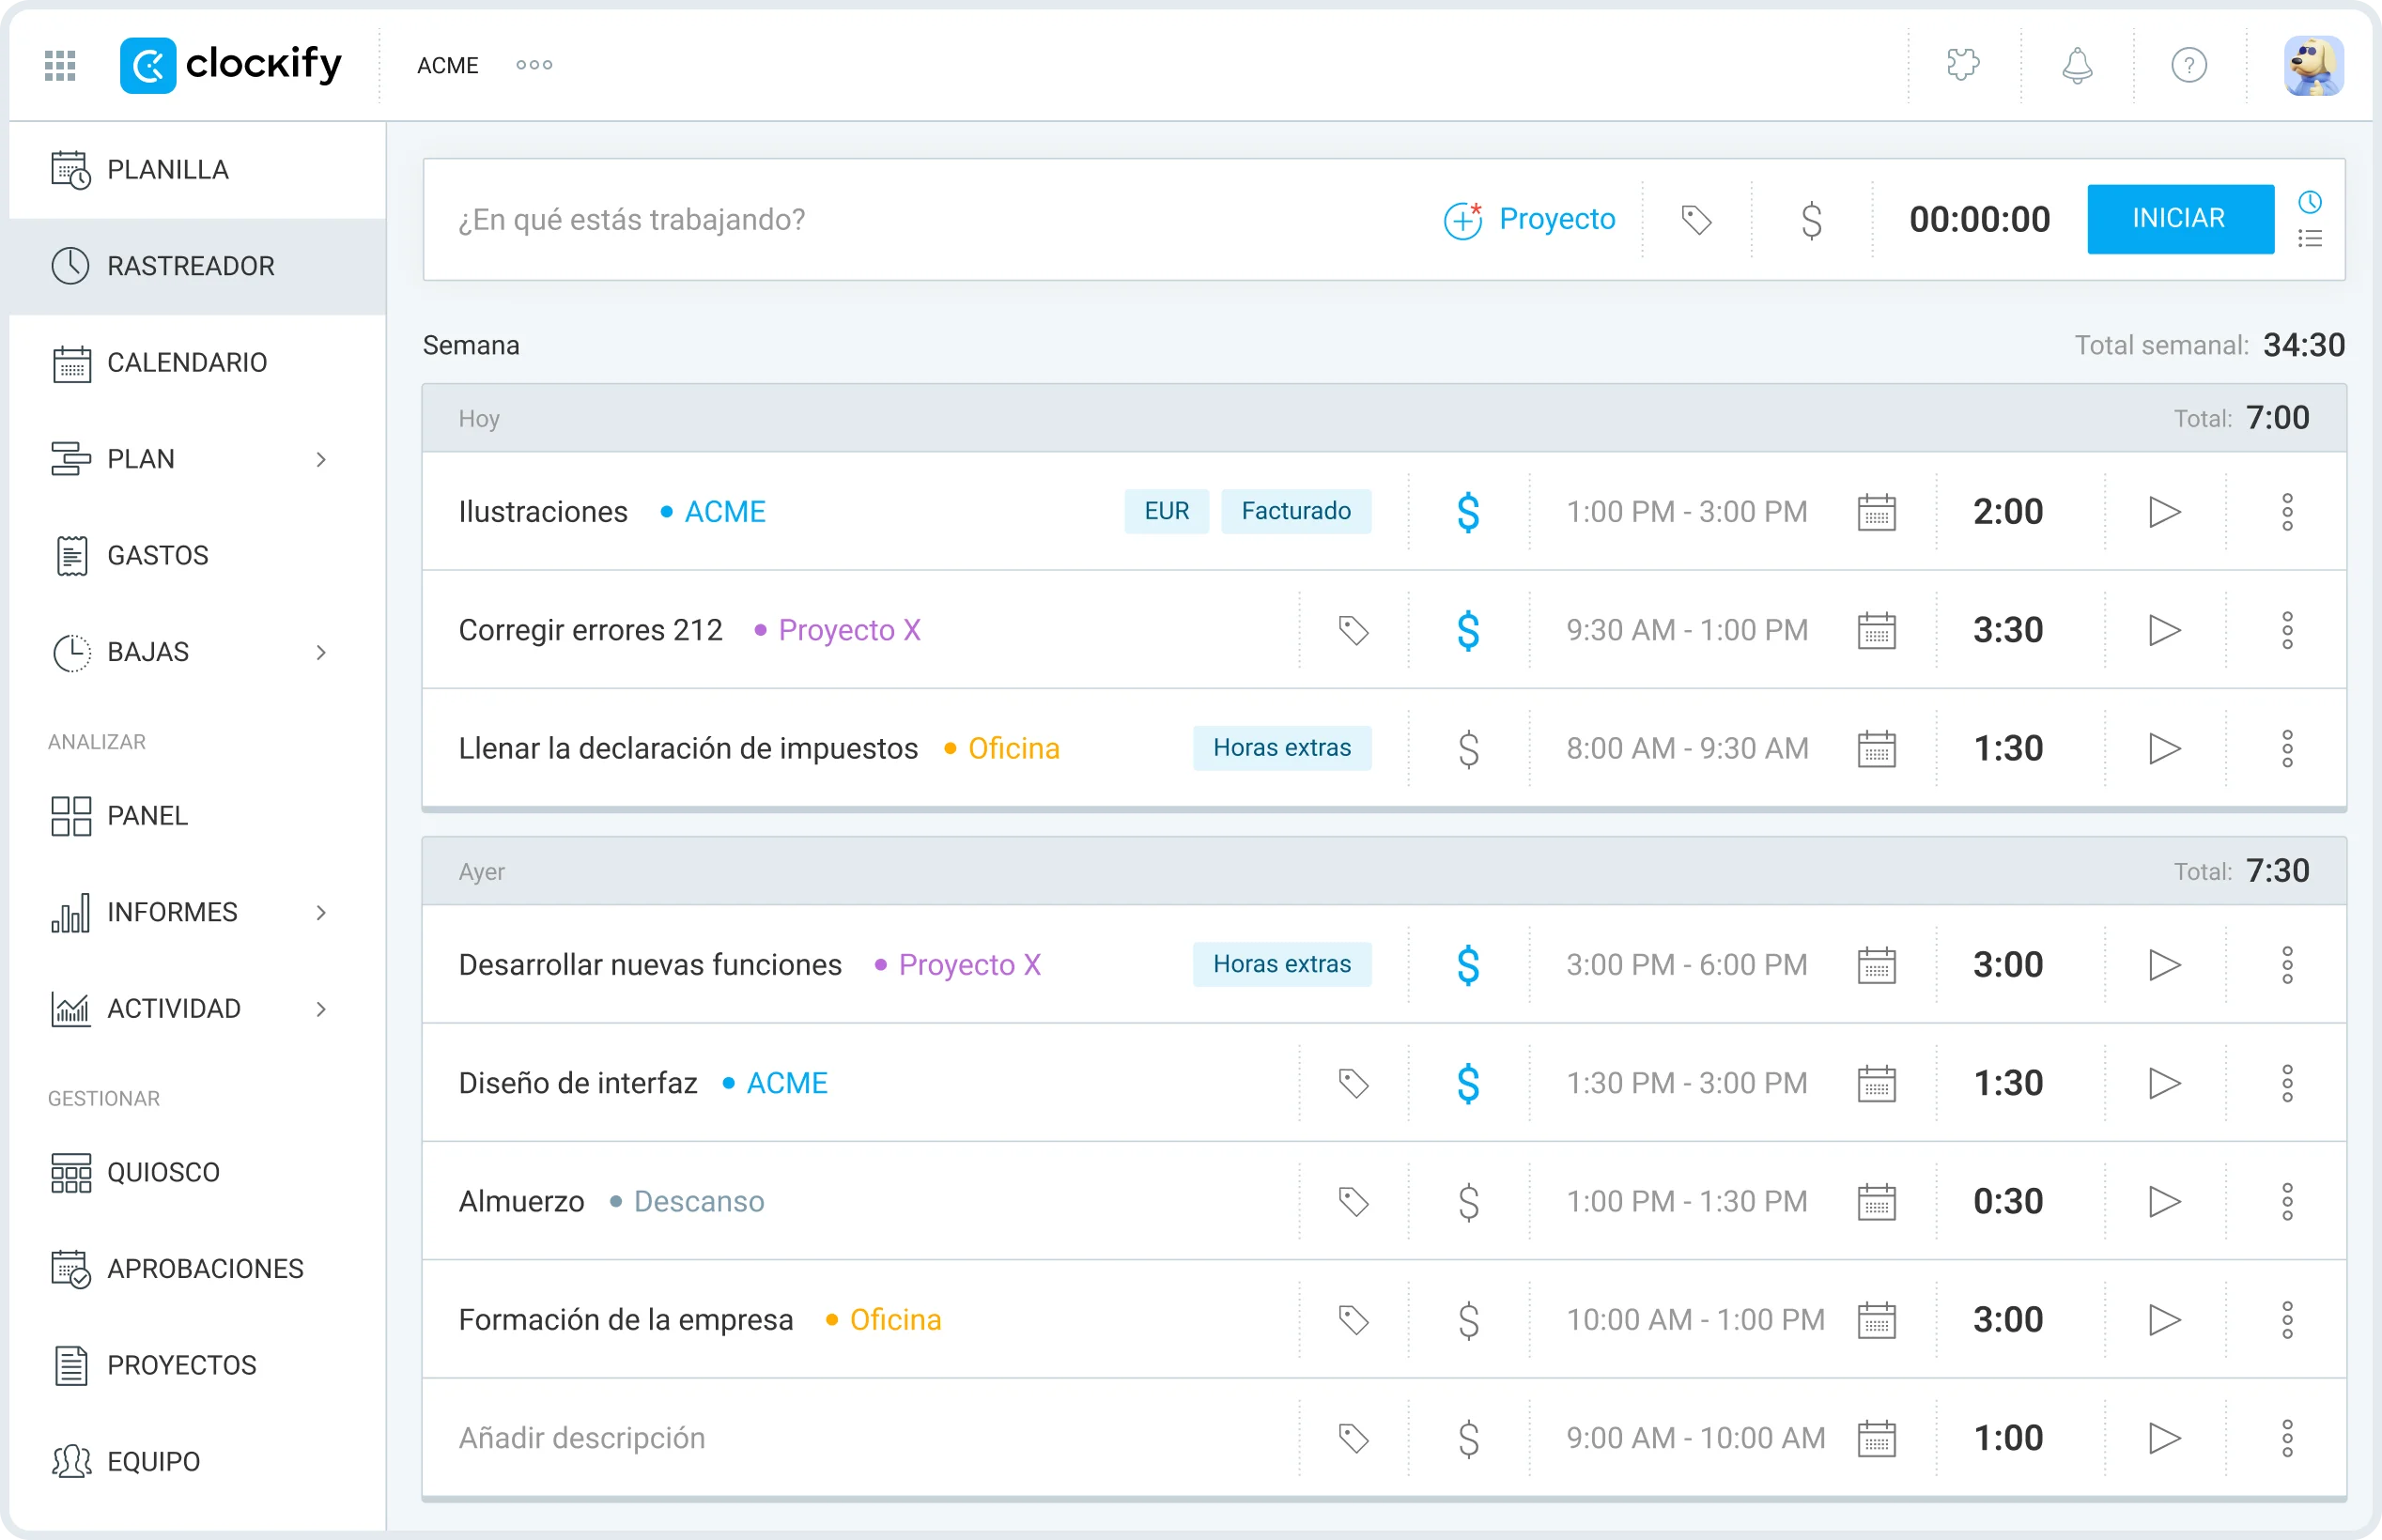
Una vez que un miembro del equipo detenga el temporizador, una nueva entrada de tiempo se añade automáticamente a su lista de entradas de tiempo.
Sigue las horas de trabajo en Clockify
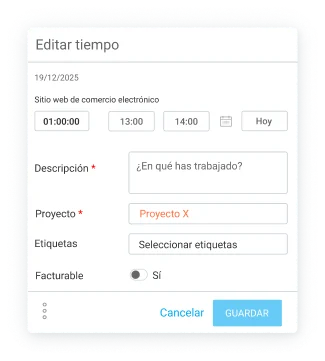
Fichar entrada/salida utilizando el modo manual en la aplicación web de Clockify
Para añadir el tiempo manualmente, los miembros necesitan abrir la página de Rastreador y hacer clic en el ícono en la esquina superior derecha.

Luego, necesitan:
- Introducir en qué han trabajado,
- Elegir el proyecto,
- Introducir la hora de inicio y fin, y
- Hacer clic en el botón Añadir.

Al hacer clic en el botón Añadir, sus entradas de tiempo se guardan en Clockify.
NOTA: Todos los usuarios del espacio de trabajo pueden añadir tiempo manualmente en Clockify cuando el Temporizador forzado está deshabilitado en la configuración del espacio de trabajo. Si está habilitado, solo pueden registrar el tiempo utilizando un temporizador activo.

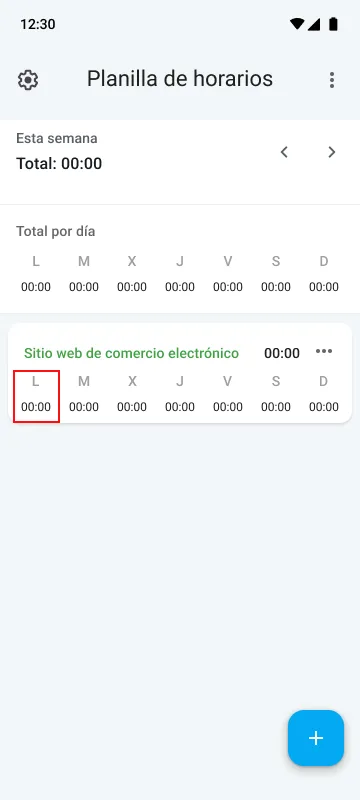
Fichar entrada/salida utilizando planillas de horarios en la aplicación web de Clockify
Para fichar entrada/salida a través las planillas de horarios de Clockify, los miembros del equipo necesitan:
- Seleccionar Planillas en la barra lateral,
- Elegir el proyecto, y
- Introducir sus horas de trabajo en los intervalos de tiempo adecuados.

Además, aquí está cómo los miembros pueden añadir más detalles a sus entradas de tiempo:
- Pasa el cursor sobre una celda específica con el tiempo registrado,
- Haz clic en los 3 puntos,
- Añade las horas de inicio y fin, una descripción, o etiquetas, y
- Haz clic en Guardar.
NOTA: Los usuarios regulares en Clockify pueden solo editar su propio tiempo, mientras que el propietario del espacio de trabajo y los administradores pueden editar tiempo de todos. Los gerentes del equipo en Clockify pueden editar el tiempo de sus miembros del equipo asignados, siempre que el propietario haya habilitado esta opción en la configuración del espacio de trabajo.
Cómo fichar entrada/salida en la aplicación móvil de Clockify
Primero, los miembros del equipo necesitan descargar la aplicación móvil de Clockify de App Store (iOS) o Google Play (Android). Después de instalar la aplicación, pueden iniciar sesión en su cuenta e iniciar el control de tiempo.
En la aplicación móvil de Clockify, los empleados pueden registrar sus horas de trabajo en tiempo real utilizando el temporizador. Si necesitan registrar un evento pasado, pueden introducir el tiempo manualmente. Al final, pueden utilizar las planillas de horarios de Clockify para registrar sus horas al final del día.

Fichar entrada/salida utilizando el temporizador en la aplicación móvil de Clockify
Abrir la aplicación móvil de Clockify trae los empleados directamente a la página Rastreador, donde pueden ver todas las entradas de tiempo.
Para añadir una nueva entrada, necesitan tocar el signo más en la esquina inferior derecha.
Para iniciar el control de tiempo utilizando un temporizador, los miembros del equipo hacen clic en el botón de temporizador.
Cuando terminan el trabajo, hacen clic en el botón al lado del temporizador para detenerlo.
Una vez que lo haces, aparece una nueva ventana donde pueden añadir los detalles de la entrada. También tienen la opción de introducir en que están trabajando y seleccionar las etiquetas. (Elegir un proyecto es obligatorio para evitar tener entradas de tiempo mal asignadas.)
Al hacer clic en el botón de detener en la esquina inferior derecha, el temporizador deja de funcionar y la entrada se guarda.
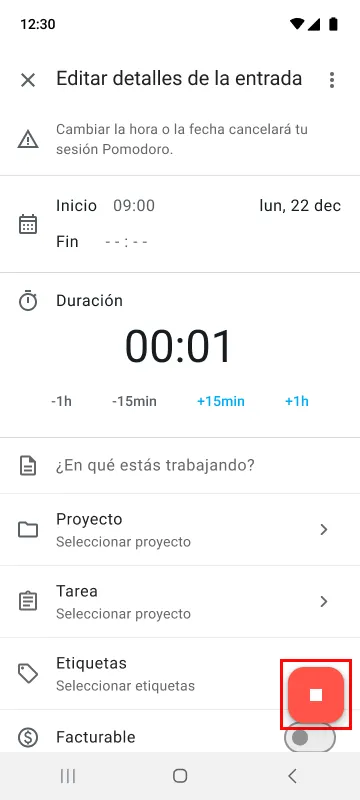
Fichar entrada/salida utilizando modo manual en la aplicación móvil de Clockify
Para añadir el tiempo manualmente, los miembros del equipo necesitan pulsar el signo más en la página Rastreador y elegir Manual.
Luego, introducen sus horas y minutos trabajados en los campos adecuados y hacen click en OK.
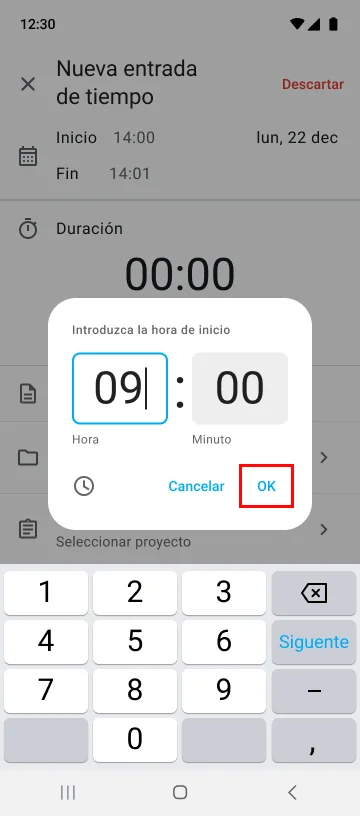
Una vez que hacen clic en OK, los miembros del equipo pueden comenzar a añadir las horas de inicio y fin y otros detalles a su entrada.
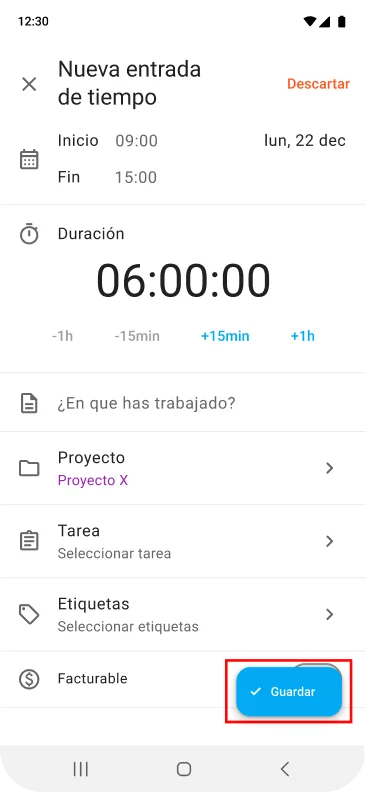
Para cambiar la hora de inicio, toca el campo de inicio y selecciona la hora exacta utilizando el selector de hora.
Alternativamente, pueden hacer clic en el ícono de teclado en el selector de la hora e introducir su hora de inicio. Una vez hecho esto, hagan clic en OK.
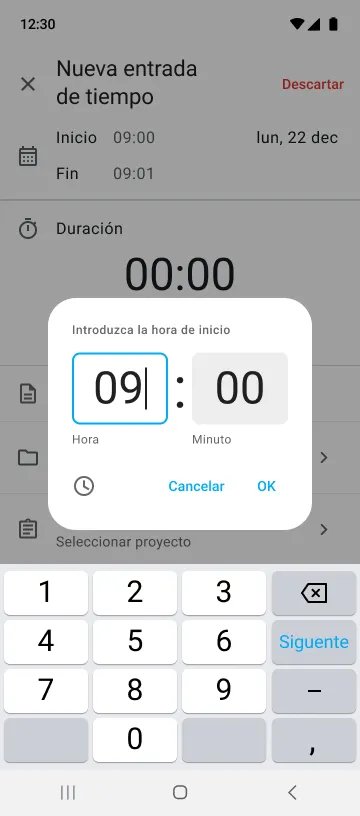
El proceso es el mismo para cambiar la hora de fin, excepto que solo tienen que pulsar el campo de hora de fin.
Después de introducir sus horas de inicio y fin y otros detalles, los empleados deben seleccionar el proyecto (obligatorio) u hacer clic en Guardar para enviar la entrada de tiempo.
Sigue el tiempo con Clockify GRATIS
Fichar entrada/salida utilizando planillas de horarios en la aplicación móvil de Clockify
Para registrar sus horas a través de las planillas de horarios, los miembros del equipo necesitan hacer clic en el ícono de hamburguesa en la esquina superior izquierda de la página de Rastreador. Luego, seleccionan Planilla de horarios en la barra lateral.

Después, necesitan:
- Pulsar el signo más en la esquina inferior derecha,
- Seleccionar un proyecto, y
- Hacer clic en el período de tiempo adecuado.
Luego pueden añadir sus horas de inicio y fin, el título de tarea y cualquier otra información relevante.
Para introducir sus horas de inicio, los miembros necesitan pulsar el campo de hora de inicio y seleccionar la hora exacta que quieren, o introducirla. Después, hacen clic en OK para guardar los cambios.
El proceso es el mismo para añadir el tiempo de finalización, excepto que tendrán que pulsar el campo de hora de fin.
Al final, para guardar la entrada de tiempo, los empleados hacen clic en Guardar.
Adicionalmente: Fichar entrada/salida con el quiosco de Clockify
Otra forma de que los empleados pueden registrar sus horas es con un quiosco de fichar de Clockify. Fichan la entrada y la salida en un dispositivo compartido (tableta, teléfono u ordenador) utilizando un código PIN único o un código QR.
Para obtener más información sobre cómo crear y utilizar el quiosco de Clockify, consulta la página de ayuda de quiosco de Clockify.

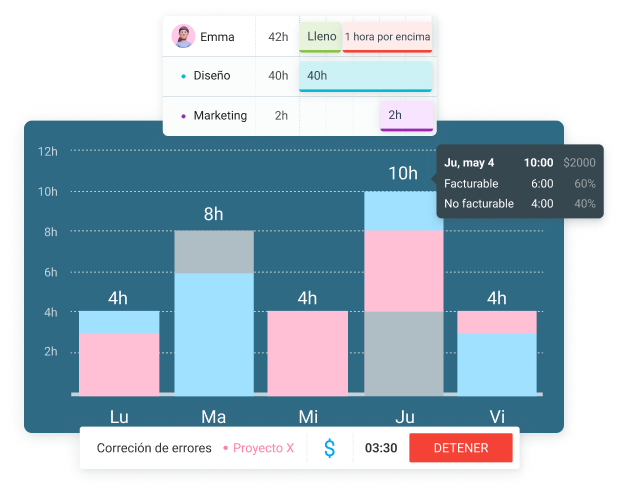
Cómo revisar los datos de fichaje de entrada/salida en Clockify by CAKE.com
Para revisar los datos de tiempo de los empleados, utiliza los informes de Clockify, como resumidos, detallados, semanales y compartidos.
Para abrir un informe detallado de Clockify, pasa el cursor sobre Informes en la barra lateral y haz clic en Detallado.
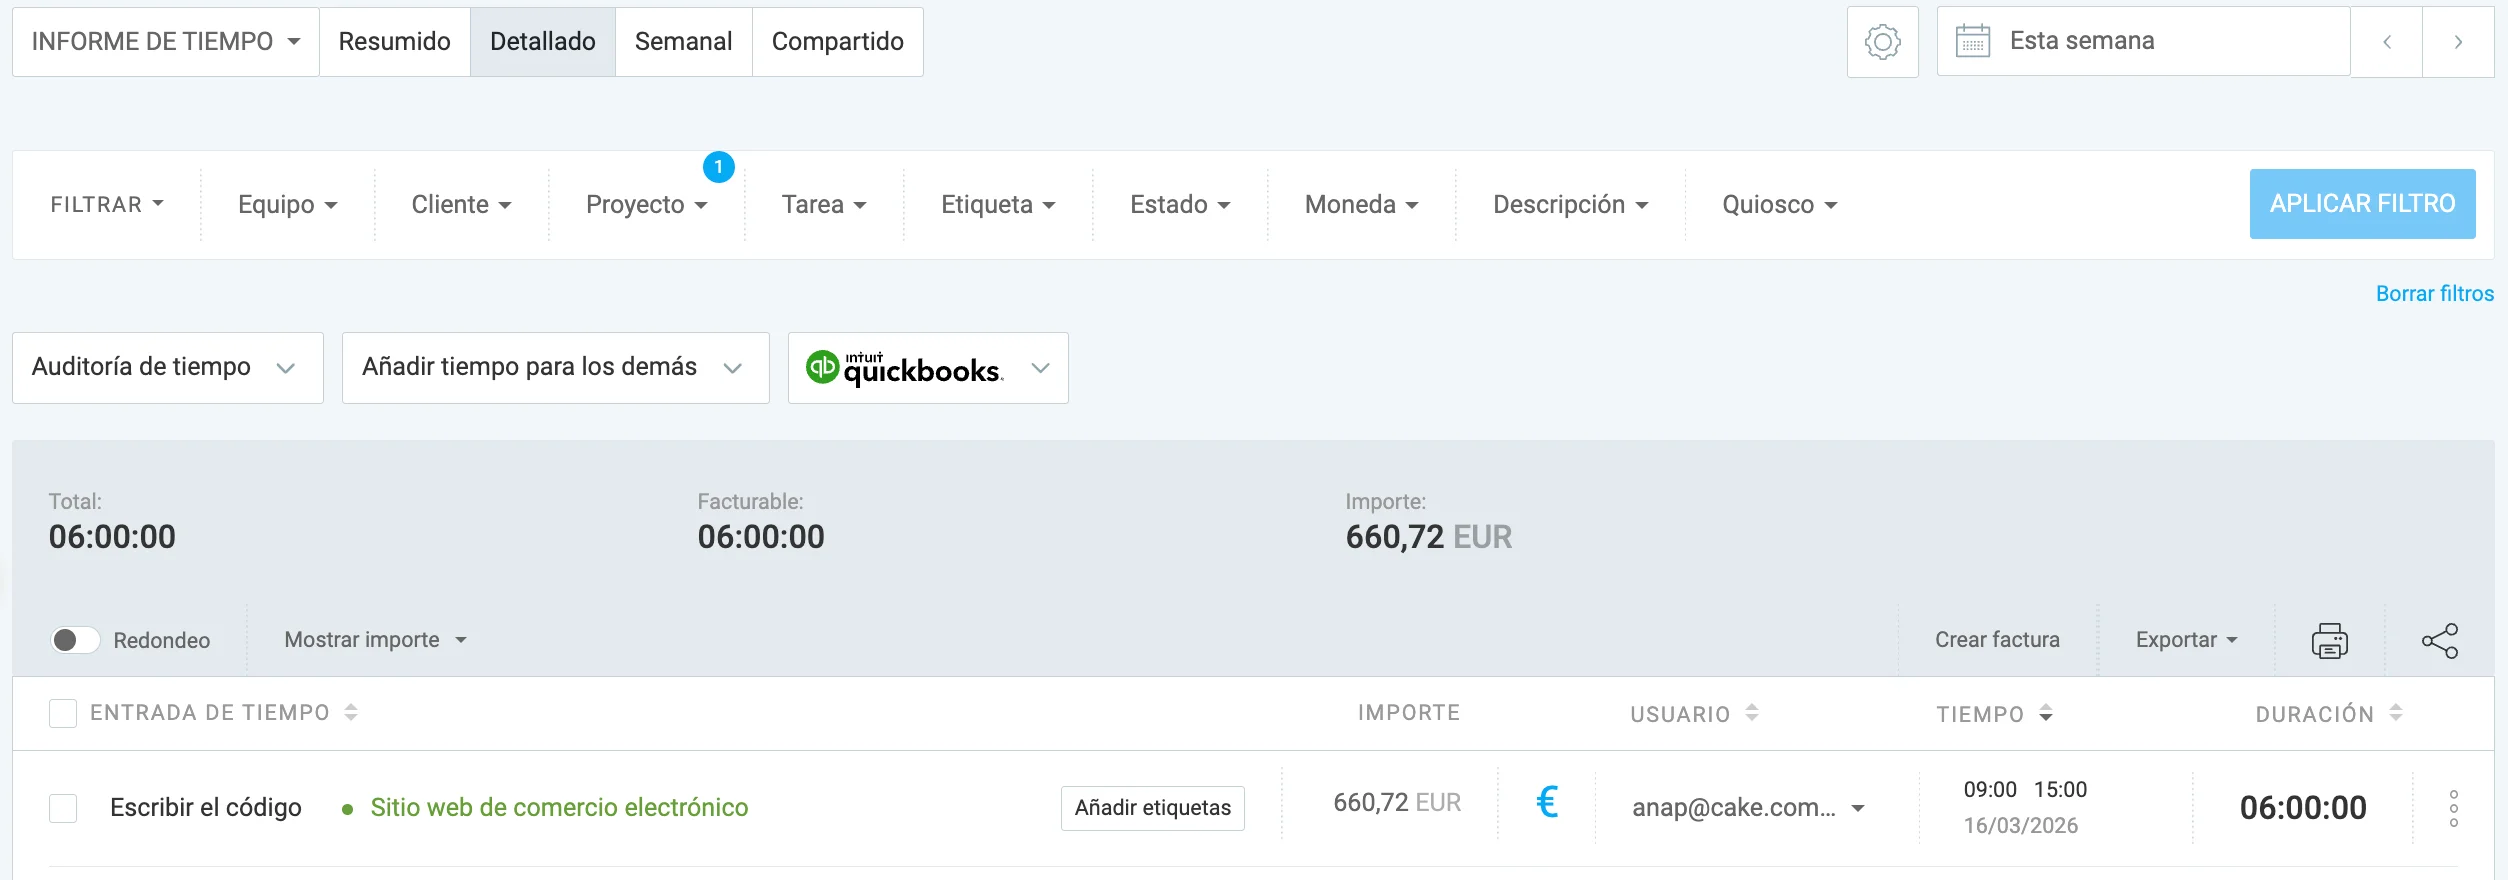
Informe detallado de Clockify proporciona un desglose de cada entrada de tiempo, incluyendo:
- Usuario,
- Tarea y proyecto,
- Hora de inicio y fin,
- Fecha cuando el tiempo se registró,
- Duración total, y
- Importe facturable (si los usuarios registraron el tiempo facturable).
Con esta información, los gerentes pueden:
- Evaluar la productividad del equipo,
- Detectar y eliminar ineficiencias,
- Equilibrar los cargos de trabajo, y
- Saber qué tareas o proyectos son verdaderamente rentables.
Los informes de tiempo de Clockify también se pueden exportar a PDF, CSV o Excel para un análisis adicional o el procesamiento de la nómina. También se pueden compartir con partes relevantes a través de un enlace privado o público.
Otra forma de revisar los datos de fichaje de entrada/salida de los empleados es utilizar el informe de asistencia de Clockify. Aquí, los gerentes y el personal de los recursos humanos pueden ver las especificaciones de asistencia diaria de los empleados, incluyendo:
- Horas de inicio y fin,
- Hora de descanso,
- Tiempo de trabajo,
- Capacidad,
- Horas extra (la diferencia entre el trabajo actual y la capacidad), y
- Tiempo libre.

Esto les ayuda a monitorear los patrones de asistencia, evitar brechas de personal y prevenir el agotamiento de los empleados.
Analiza los datos de tiempo en Clockify
Problemas comunes con el fichaje de entrada/salida en Clockify (+ resoluciones)
Aquí están algunos problemas con el fichaje de entrada/salida en Clockify y cómo arreglarlos.
Problema 1: Olvidé de fichar entrada/salida
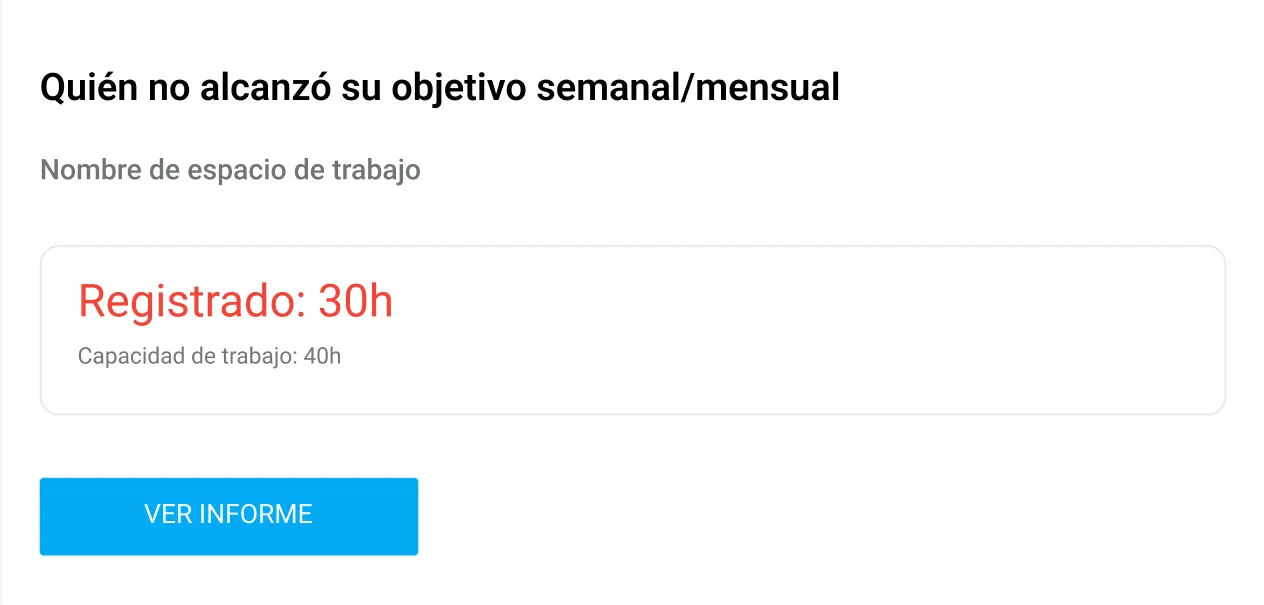
Los usuarios a menudo se olvidan de iniciar/detener el temporizador cuando comienzan/terminan su trabajo, lo que lleva a datos faltantes o erróneos. Para prevenir los registros de tiempo erróneos, establece los recordatorios de control de tiempo para los miembros de tu equipo en Clockify.
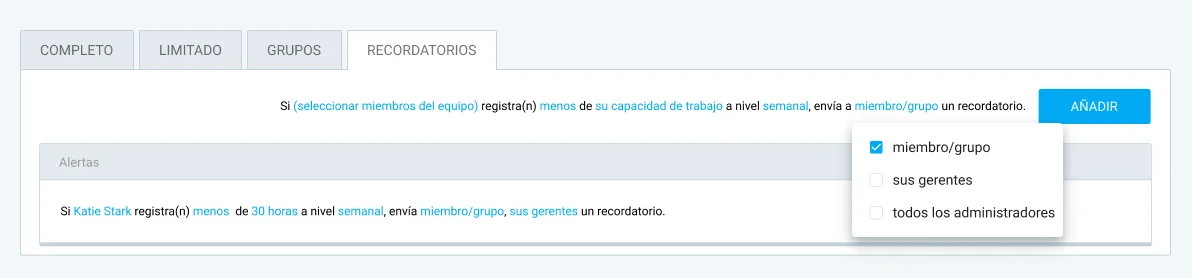
Si un miembro del equipo no cumple sus objetivos diarios, semanales o mensuales o registra más tiempo de lo necesario, recibirán un recordatorio por correo electrónico:

Los administradores y gerentes de equipo también pueden recibir notificaciones por correo electrónico cuando un miembro no cumple su objetivo de horas.
Establece los recordatorios de control de tiempo
Problema 2: No puedo detener el temporizador
Si los usuarios no pueden detener el temporizador, es probable que algo falta o está restringido en Clockify.
Si los campos obligatorios (proyecto, tarea, etiqueta o descripción) se establecen en el espacio de trabajo, los miembros del equipo no podrán detener el temporizador hasta que introduzcan esta información.
Para detener el temporizador, los empleados deben:
- Abrir la página de Rastreador,
- Buscar cualquier campo obligatorio (marcado con el asterisco rojo),
- Introducir la información necesaria, y
- Hacer clic en el botón Guardar.

Adicionalmente, si el temporizador de un empleado ha estado en marcha por demasiado tiempo y la función de bloquear las planillas de horarios está habilitada en la configuración del espacio de trabajo, es posible que no puedan detener el temporizador.
En este caso, pueden descartar el temporizador o pedir al administrador que desbloquee la planilla de horarios para que puedan ajustar su tiempo. Para descartar el temporizador, los empleados necesitan:
- Hacer clic en los tres puntos al lado del botón Detener, y
- Seleccionar Descartar.

Finalmente, haz clic en el botón Descartar para confirmar la acción.
Problema 3: Discrepancias en las planillas de horarios
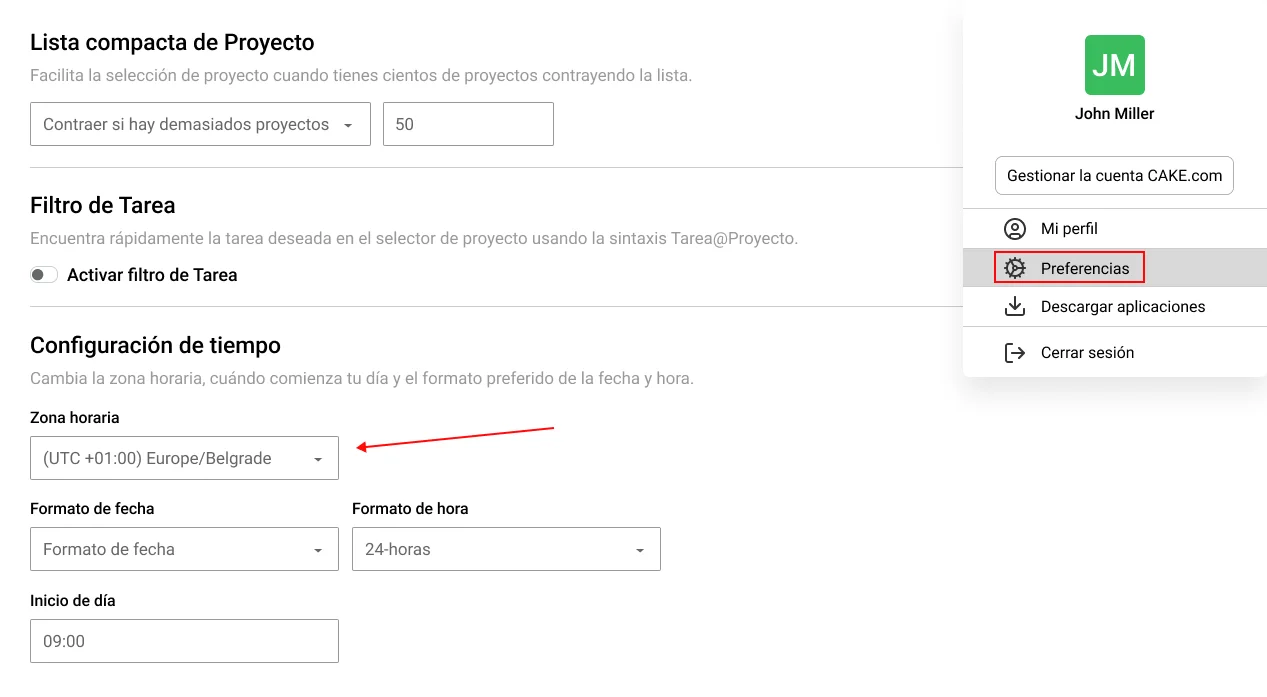
Las entradas de tiempo de los miembros de tu equipo pueden aparecer en un día diferente o en diferentes horas cuando se ven en tu cuenta. Es probable que esto se deba a una discrepancia entre las zonas horarias en los perfiles de usuarios individuales.
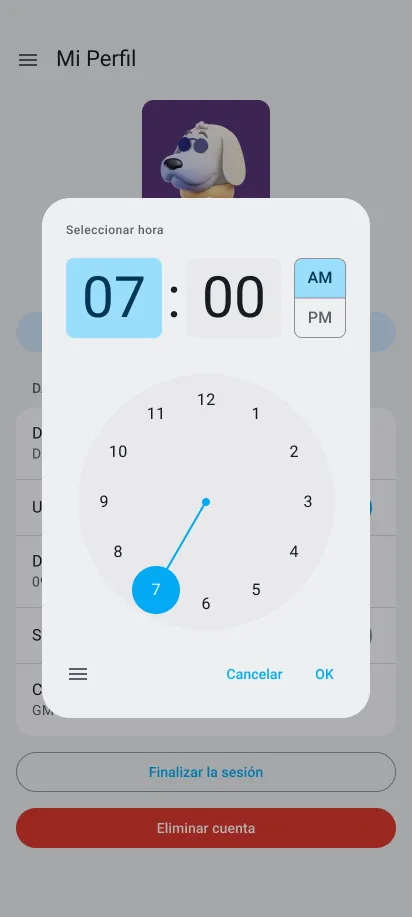
Para alinear sus zonas horarias en Clockify, los empleados necesitan:
- Hacer clic en su ícono de perfil en la esquina superior derecha,
- Abrir la configuración de Preferencias,
- Desplazarse hasta la sección de Configuración de tiempo, y
- Cambiar su zona horaria para que coincida con la tuya.
🎓 Cómo zona horaria afecta tu productividad
Para aprender más sobre los problemas de Clockify y sus soluciones, consulta nuestra página de solución de problemas.
Preguntas frecuentes sobre el fichaje de entrada y salida
En esta sección, proporcionamos respuestas a preguntas frecuentes sobre el fichaje de entrada y salida en Clockify.
¿Cómo introducir el tiempo en Clockify?
Para introducir el tiempo en Clockify, utiliza:
- Modo de temporizador para registrar el tiempo dedicado en tareas y proyectos en tiempo real,
- Modo manual para añadir horas manualmente, y
- Modo de planilla de horarios para registrar las horas llenando planillas de horarios diarios o semanales.
Los trabajadores en situ pueden usar el quiosco de Clockify para fichar entrada y salida de un dispositivo compartido utilizando su PIN personal o código QR. Esto elimina los problemas de fichar por un compañero (el buddy-punching).
¿Qué es el modo de planilla de horarios en Clockify?
La vista de planilla de horarios de Clockify permite a los empleados registrar sus horas contra tareas y proyectos específicos utilizando un diseño similar a las hojas de cálculo.
El modo de planilla de horarios de Clockify es perfecto para los empleados que prefieren enviar planillas de horarios diariamente o semanalmente en vez de usar un temporizador en marcha para seguir el tiempo.
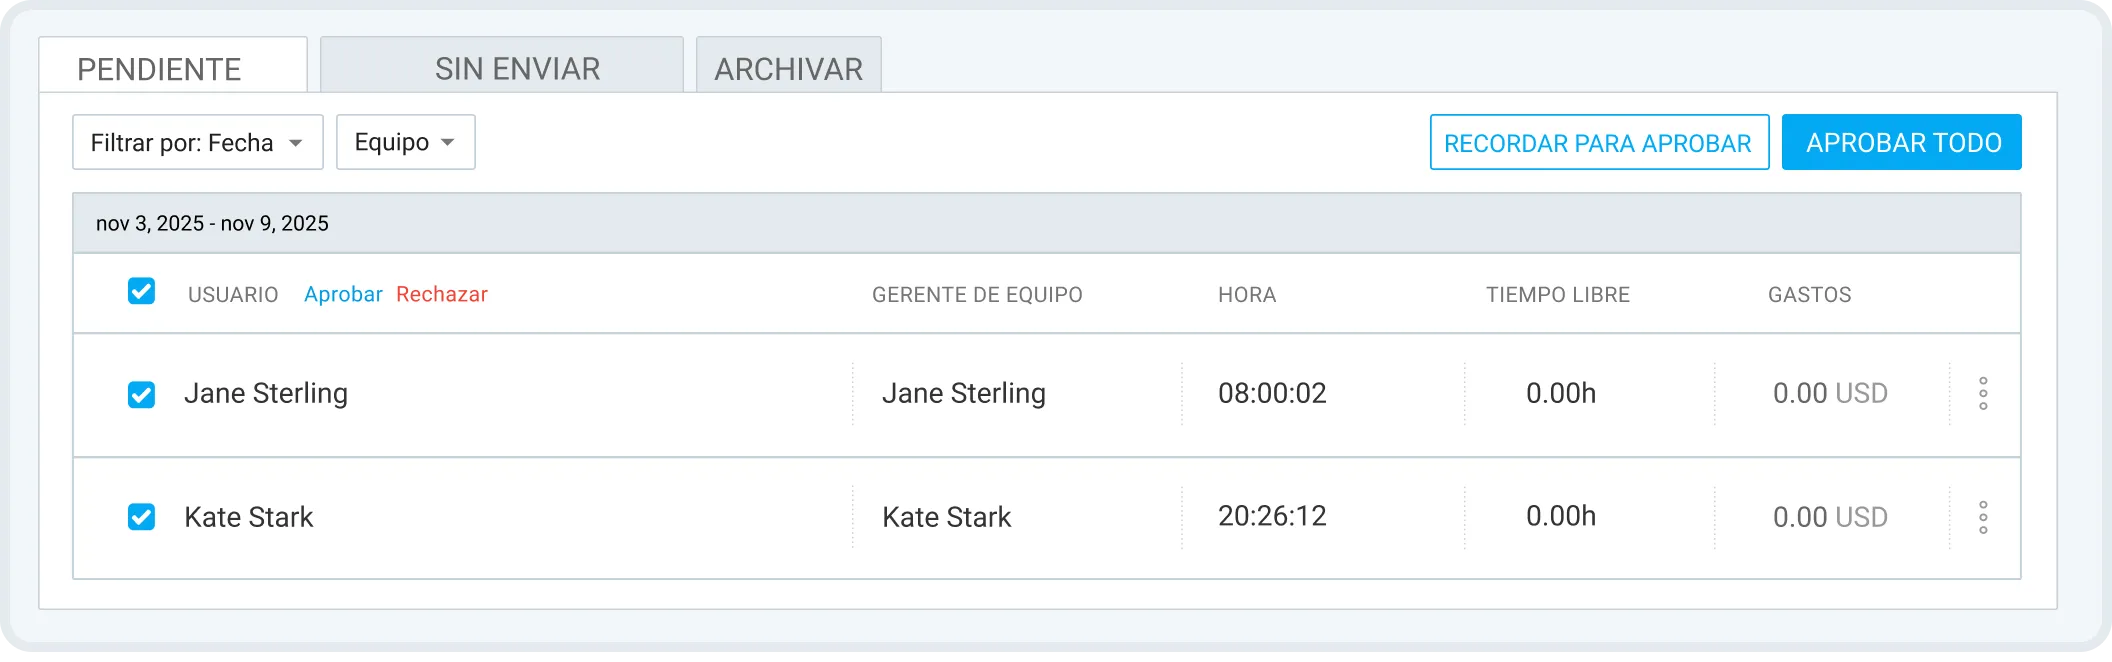
Adicionalmente, los empleados pueden enviar sus planillas de horarios para aprobación en Clockify, permitiendo un proceso de aprobación perfecto. Los gerentes pueden también utilizar la función de enviar en masa las planillas de horarios para los miembros del equipo y aprobar o rechazar múltiples planillas de horarios a la vez.
Prueba las planillas de horarios de Clockify GRATIS
¿Qué es la regla de 7 minutos para fichar entrada y salida?
La regla de 7 minutos (o regla de 7/8 minutos) es una guía de control de tiempo bajo la FLSA que permite a los empleadores redondear los registros de tiempo de los empleados al cuarto de hora más cercano (15 minutos).
Según la Ley de Salarios y Horas de Carolina del Norte, los empleadores pueden redondear los registros de entrada y salida de los empleados “siempre que el redondeo es consistente ‘tanto hacia arriba como hacia abajo’.”
EJEMPLO: Si un día laboral de un empleado comienza a las 9:00, y un día ficha la entrada a las 9:05, el empleador redondeará su hora de inicio “hacia abajo” a las 9:00. Sin embargo, si el mismo empleado otro día ficha la entrada a las 9:09, entonces el empleador redondeará su hora de inicio “hacia arriba” a las 9:15.
¿Cuáles son las funciones de administradores de Clockify para gestionar la asistencia?
Clockify ofrece un rango de funciones a nivel de administrador para gestionar el tiempo y la asistencia de los empleados, incluyendo:
- Tiempo libre,
- Aprobación de tiempo,
- Planificación,
- Informe de asistencia,
- Objetivos y recordatorios de control de tiempo,
- Seguimiento GPS, y
- Capacidades de ajuste manual de tiempo de los empleados.
Con el seguimiento de asistencia de Clockify, los gerentes pueden monitorear las horas de trabajo de los empleados, seguir sus descansos y tiempo extra, generar informes de tiempo detallados para la nómina, y mucho más.
🎓 Seguimiento de asistencia: Cómo seguir y comprobar la asistencia
¿Cómo seguir los fichajes de entrada y salida de mis empleados?
Para seguir el tiempo del equipo con precisión, necesitas un sistema dedicado de control de tiempo de empleados que es tanto fácil de usar como confiable: igual que Clockify by CAKE.com.
Con Clockify, es posible no solo seguir los fichajes de entrada y salida de los empleados sino sus ubicaciones, lo que permite:
- Una productividad aumentada, y
- Una eficiencia mejorada.
Para aprender más sobre la importancia de utilizar un sistema confiable para seguir el tiempo de los empleados, lee sobre los beneficios de un sistema de fichaje.
Ficha entrada y salida con Clockify
Cómo revisamos esta publicación: Nuestros escritores y editores monitorean las publicaciones y las actualizan cuando hay nueva información disponible, para mantenerlas frescas y relevantes.