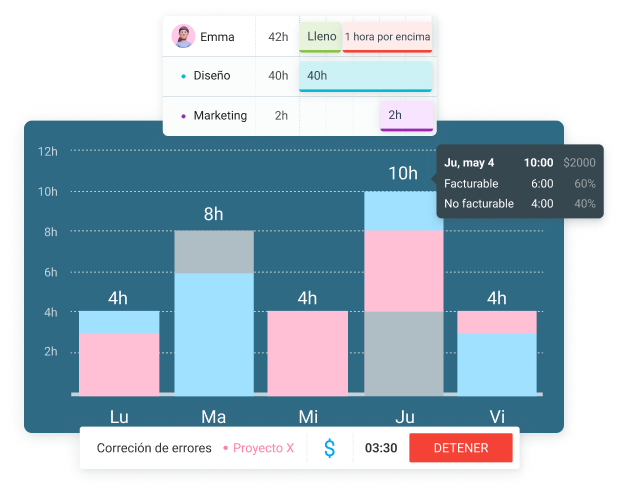
Noticia de última hora: Puede que solo estés usando el 20% del potencial de Clockify.
Las funciones clave de Clockify, como el temporizador y las planillas de horarios, son aún más potentes si conoces algunos trucos y consejos.
Sigue leyendo para descubrir las 10 funciones de Clockify que probablemente desconocías, además de algunas menciones de honor.
- Clockify puede detectar el tiempo de inactividad mediante la extensión del navegador.
- Los administradores del espacio de trabajo de Clockify pueden controlar quién ve el tiempo y los gastos registrados.
- Los usuarios pueden sincronizar Clockify con un calendario externo para convertir rápidamente eventos en entradas de tiempo.
- Los administradores pueden detener el temporizador para otros usuarios en Clockify.
- Los usuarios de Clockify pueden duplicar una entrada de tiempo con un solo clic.
1. Detección de tiempo de inactividad (Plan Gratis)
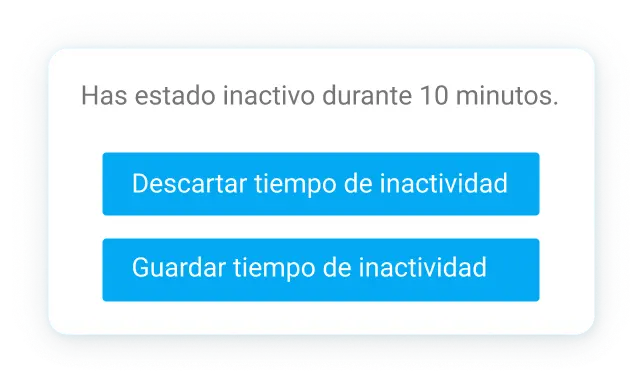
La detección de inactividad mide la inactividad de los usuarios mientras el temporizador está en funcionamiento. Cuando Clockify detecta falta de actividad, permite al usuario elegir entre estas opciones:
- Descartar el tiempo de inactividad para detener el temporizador inmediatamente y eliminarlo del total de horas registradas.
- Descartar y continuar para detener el temporizador actual, eliminar el tiempo de inactividad e iniciar uno nuevo.
- Conservar el tiempo de inactividad para que se contabilice en el total de horas registradas y mantener el temporizador actual en funcionamiento.
- Añadir el tiempo de inactividad como una nueva entrada para registrarlo en una entrada de tiempo independiente.
Para activar la detección de tiempo de inactividad, instala la extensión de Clockify para tu navegador. La extensión es gratuita y está disponible para dos navegadores populares: Chrome y Firefox.
Luego, abre Configuración y activa la Detección de inactividad. La extensión también te permite editar la cantidad de minutos que se calculan como tiempo de inactividad (el valor predeterminado es de 15 minutos).
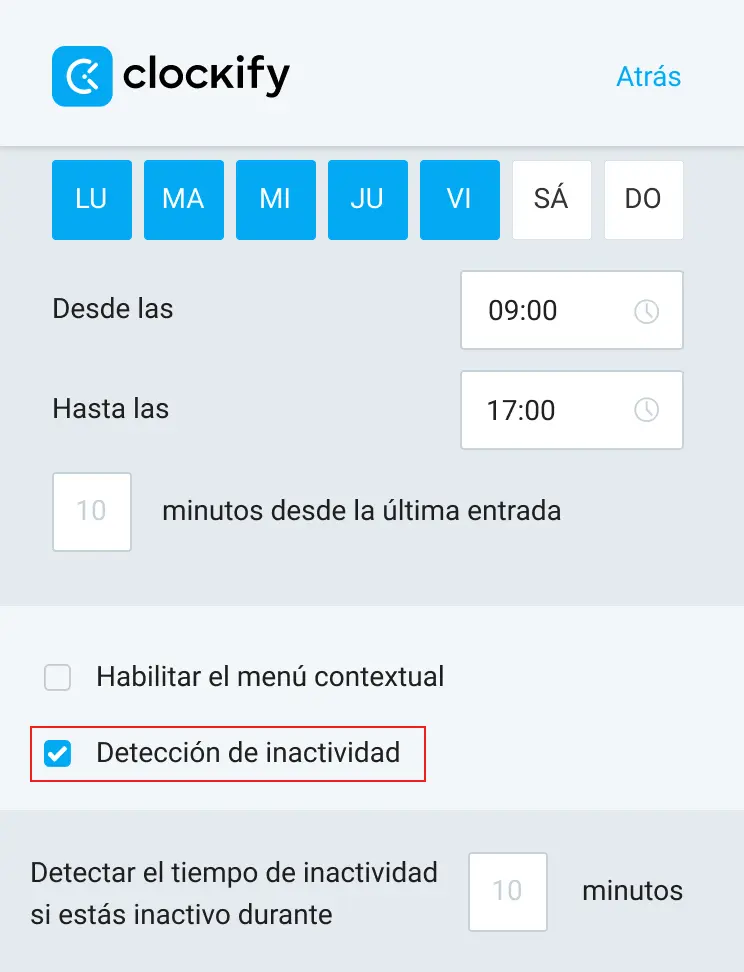
Una vez que el usuario activa la detección de inactividad, cada vez que no utilice el teclado o el ratón durante al menos 15 minutos (o un tiempo personalizado), verá una ventana emergente que le preguntará si quiere descartar o conservar el tiempo de inactividad.
La función de detección de tiempo inactivo es ideal para garantizar que las horas registradas reflejen las horas reales trabajadas. De esta forma, podrás facturar a tus clientes con precisión el tiempo dedicado al proyecto. El total de horas facturables no se verá inflado si el temporizador se deja funcionando accidentalmente.
2. Iniciar/detener el temporizador automáticamente (Plan Gratis)
Tu equipo podrá registrar el tiempo con precisión sin depender de la memoria activando la opción de inicio o detención automáticos del temporizador. Para que esta función funcione, los miembros del equipo deben instalar la aplicación de escritorio o la extensión para navegador: Clockify para Mac o Clockify para Windows.
Luego, activa esta función en Preferencias, en la sección Temporizador. La aplicación de escritorio Clockify inicia automáticamente el temporizador cuando activas al menos una de estas opciones:
- Iniciar temporizador al encender el ordenador
- Iniciar temporizador al desbloquear el ordenador
- Iniciar temporizador al iniciar la aplicación
Las opciones para detener automáticamente el temporizador incluyen:
- Detener temporizador si la pantalla se bloquea
- Detener temporizador si el ordenador entra en modo de suspensión
- Detener temporizador si el ordenador se apaga
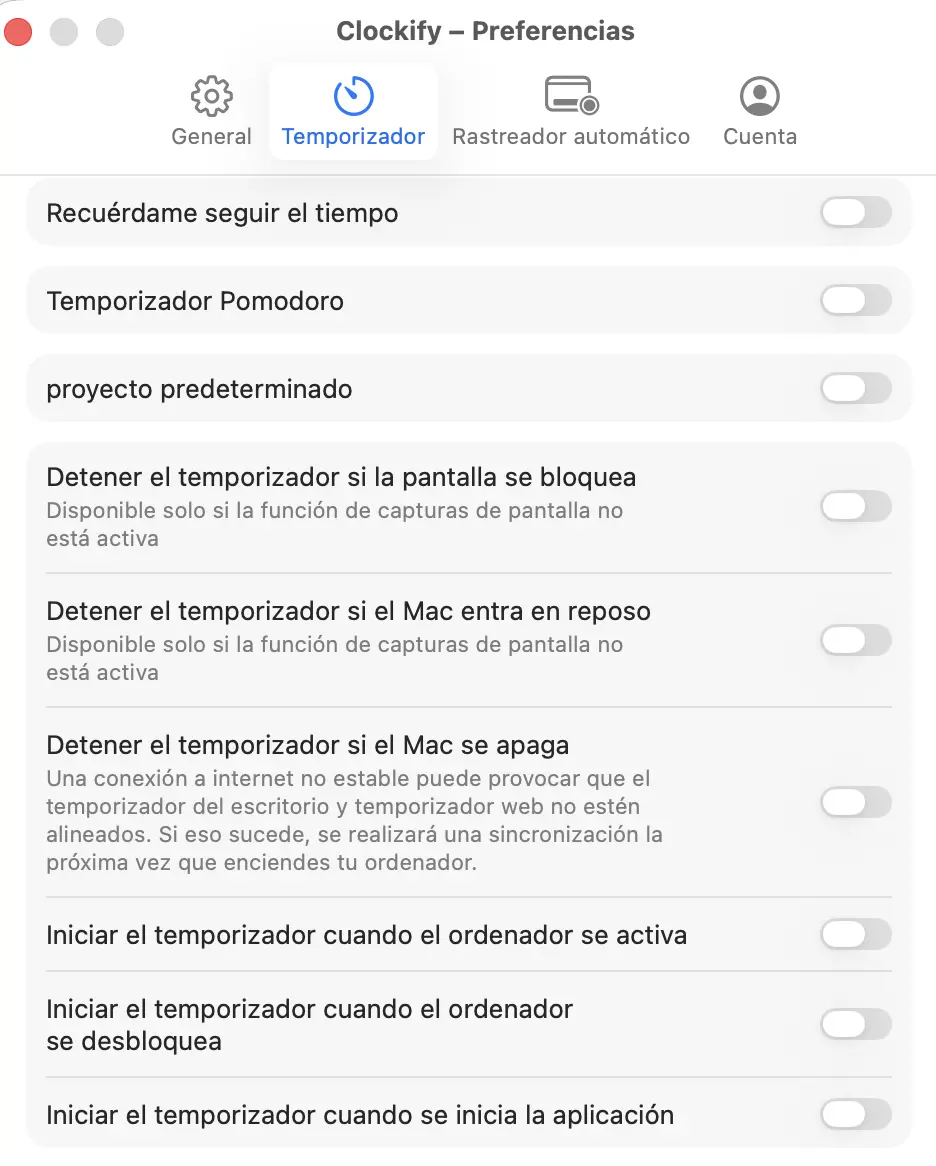
Una vez activadas las opciones que quieras, podrás empezar a trabajar sin preocuparte por el temporizador.
Por ejemplo, supongamos que siempre empiezas a trabajar en cuanto enciendes tu ordenador. Luego, durante la pausa para comer, tu ordenador entra en modo de reposo por inactividad. Al regresar, desactivas el modo de reposo y retomas el trabajo. Al final de la jornada, apagas el ordenador.
En ese caso, las opciones que debes activar son:
- Detener temporizador si el ordenador entra en modo de suspensión
- Detener temporizador si el ordenador se apaga
- Iniciar temporizador al encender el ordenador
Si no empiezas a trabajar en cuanto enciendes el ordenador, puedes elegir la opción Iniciar el temporizador al iniciar la app. Simplemente abre la aplicación y el temporizador se iniciará.
También puedes usar la opción Iniciar/detener el temporizador automáticamente en la extensión del navegador, sin necesidad de instalar la app de escritorio.
Puedes activar la opción para que el temporizador se inicie al abrir el navegador y se detenga al cerrarlo. Incluso puedes establecer una hora específica para que se detenga.
Esta función es especialmente útil para equipos remotos que se ausentan de su ordenador con frecuencia. Para una mayor automatización, los equipos remotos pueden usar el Rastreador automático de Clockify, que registra el uso de las aplicaciones y el tiempo de inactividad cuando está activado, sin necesidad de intervención del usuario.
💡 CONSEJO PRO DE CLOCKIFY
Si necesitas extensiones de Chrome para aumentar tu productividad, consulta este artículo:
3. Ocultar tiempo y gastos registrados (Plan Basic)
Puedes controlar quién ve el tiempo y los gastos registrados en Clockify. No es necesario que todos los datos sean visibles para todos los usuarios; en su lugar, puedes elegir si quieres que los usuarios regulares vean:
- Solo su propio tiempo y gastos
- Solo el tiempo y los gastos de proyectos públicos
- El tiempo y los gastos registrados de todos

Esta regla se aplica a los usuarios regulares de Clockify. Los gerentes de proyectos y equipos podrán ver el tiempo y los gastos registrados, pero solo para los proyectos/equipos que gestionan.
Por lo tanto, si quieres garantizar que el tiempo y los gastos permanezcan privados y solo sean visibles para el administrador del espacio de trabajo y los gerentes, selecciona la opción Solo su propio tiempo y gastos . Esta función te permite proteger datos financieros confidenciales, incluidos los gastos totales facturables a los clientes.
Además, el hecho de que los empleados no puedan ver el tiempo registrado de sus compañeros reduce las comparaciones y la competencia innecesarias entre ellos, lo que previene un posible ambiente de trabajo hostil.
4. Atajos de teclado para el control del tiempo (Plan Gratis)
Aquí tienes una lista de atajos de teclado predeterminados para un seguimiento del tiempo más rápido en Clockify:
| Función | Atajo en la app web | Atajo en la app para Mac |
|---|---|---|
| Iniciar el temporizador | N | Cmd+S |
| Detener el temporizador | S | Cmd+T |
| Continuar registrando el tiempo en la última entrada | C | Sin atajo predeterminado |
| Cambiar a modo manual | M | Cmd+N |
| Guardar la entrada de tiempo al editar | Sin atajo predeterminado | Shift + Cmd + S |
| Descartar el temporizador | Sin atajo predeterminado | Cmd+D |
La aplicación de escritorio te permite personalizar los atajos de teclado para las funciones de seguimiento del tiempo de Clockify.
Los atajos de teclado ayudan a los equipos a minimizar el tiempo dedicado a crear entradas de tiempo, permitiéndoles centrarse en tareas productivas.
5. Conversión de eventos del calendario en entradas de tiempo (Plan Gratis)
Puedes sincronizar Google Calendar u Outlook con Clockify para convertir rápidamente eventos (como reuniones) en registros de tiempo. Por ejemplo, si utilizas Google Calendar para programar eventos, conéctalo a Clockify y esos eventos aparecerán en el Calendario de Clockify. Luego, puedes elegir iniciar el temporizador desde el evento o convertirlo manualmente en un registro de tiempo.
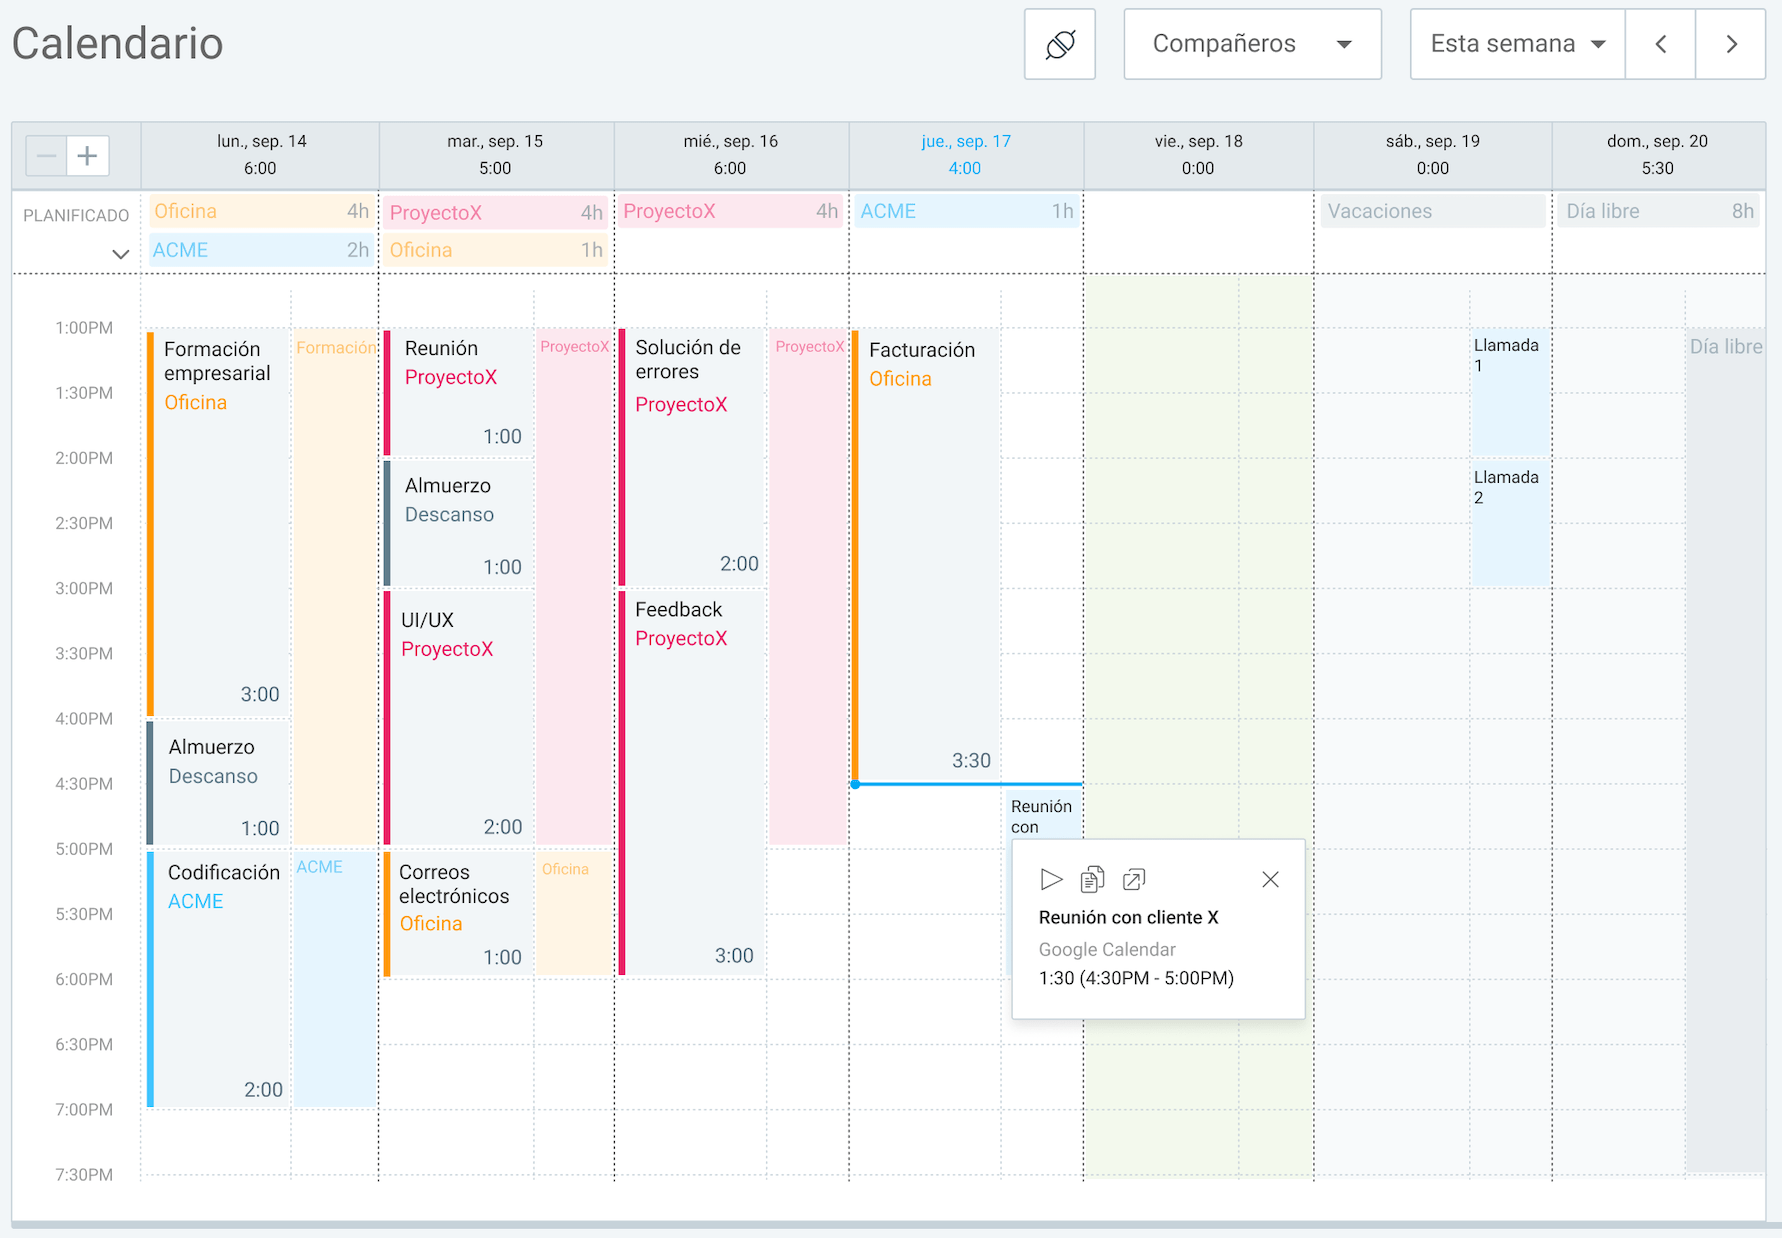
Convertir eventos del calendario en entradas de tiempo es ideal para equipos remotos e híbridos que participan en muchas reuniones virtuales programadas a través de Google Calendar o Outlook. De esta forma, no tienen que memorizar ni añadir cada evento por separado: aparecerán automáticamente.
Los eventos en Clockify son privados hasta que crees entradas de tiempo para ellos.
6. Detener el temporizador de un miembro del equipo (Plan Enterprise)
Los administradores del espacio de trabajo pueden detener el temporizador de otros usuarios si olvidan hacerlo ellos mismos.
Para usar esta función, ve a la pestaña Cuentas y selecciona Iniciar sesión como, que se encuentra junto al nombre del usuario. Luego, simplemente haz clic en el botón rojo Detener junto al temporizador.
Después de completar todas las tareas necesarias para ese usuario, haz clic en Cerrar sesión para volver a tu cuenta.
De esta forma, evitarás pagarle al empleado por tiempo no trabajado o cobrarle al cliente por horas registradas por error.
💡 CONSEJO PRO DE CLOCKIFY
Si quieres saber cuál es la forma más sencilla para que tu equipo fiche su entrada y salida en Clockify, consulta esta guía:
7. Dividir el tiempo (Plan Basic)
Usa la opción Dividir el tiempo para evitar iniciar y detener el temporizador cada vez que cambies de proyecto, especialmente si trabajas en varios proyectos diferentes a lo largo del día.
Puedes dejar el temporizador en marcha mientras trabajas en tus tareas. Luego, simplemente divide la entrada de tiempo en tantas entradas como necesites.
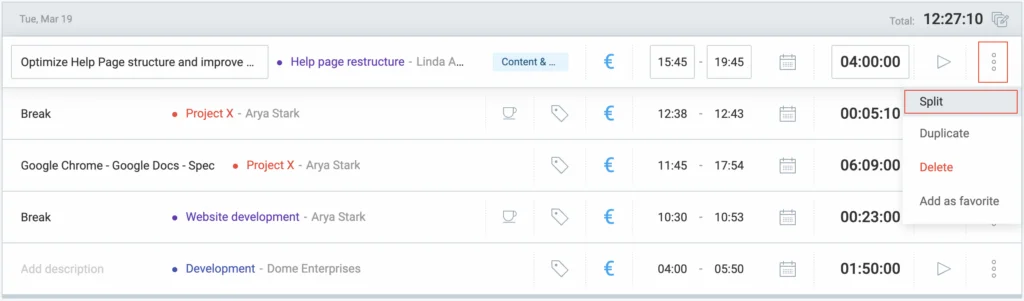
Una vez que hagas clic en Dividir, aparecerá una ventana que te pedirá que elijas la hora en la que quieres dividir tu entrada.
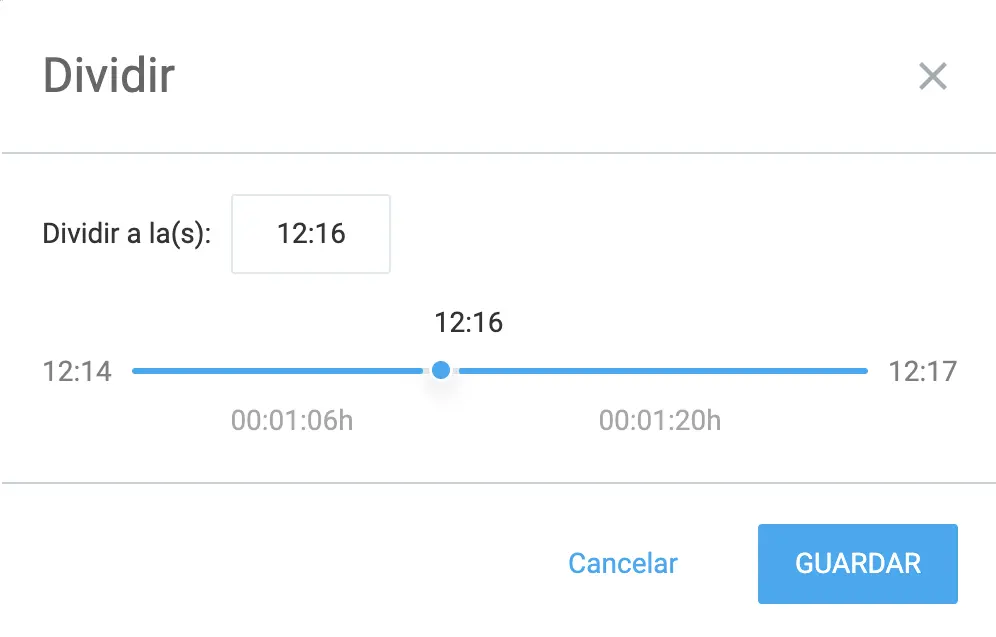
Después, haz clic en Guardar y tendrás dos entradas de tiempo separadas para el mismo proyecto. Podrás editar cualquier parte de tus entradas, incluyendo el proyecto, la tarea, la descripción y la hora. Editar una entrada dividida no afectará a la otra.
Así, si un empleado cambia de proyecto para un cliente diferente, pero mantiene el temporizador en marcha, puede dividir fácilmente la entrada de tiempo y cambiar el proyecto. De esta forma, el equipo se asegura de que los clientes reciban la factura correcta por los proyectos correspondientes.
8. Recordatorios de horas extras para gerentes (Plan Standard)
Clockify te permite establecer objetivos y recordatorios, lo que significa que recibirás una notificación cada vez que un miembro del equipo registre horas extras.
Para establecer el objetivo, ve a la Configuración del espacio de trabajo y desplázate hacia abajo hasta Capacidad de trabajo diaria. La capacidad predeterminada es de 8 horas al día, pero puedes modificarla.

Para configurar recordatorios, selecciona a los miembros del equipo a quienes se aplica esta regla. Luego, elige Más o Menos que Su capacidad de trabajo (o Tiempo personalizado).
Finalmente, elige quién recibirá el recordatorio:
- Solo miembros del equipo (marca la opción Ellos)
- Miembros del equipo y sus gerentes (marca las opciones Ellos y sus gerentes)
- Miembros del equipo y todos los administradores (marca también la opción Todos los administradores)
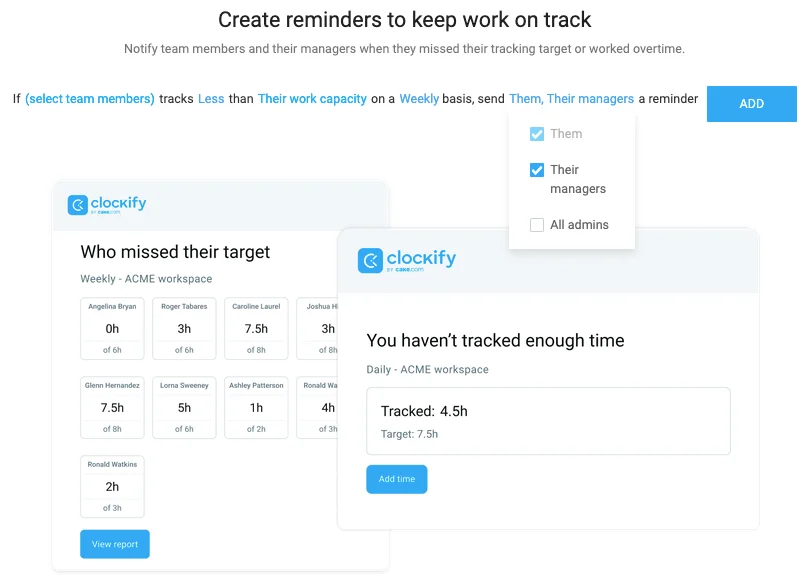
También puedes elegir si quieres que la capacidad se contabilice diaria, semanal o mensualmente.
Supongamos que tu objetivo diario es de 8 horas y quieres que los gerentes de equipo reciban una notificación cuando algún miembro del equipo trabaje horas extras. Así es como configurarías el recordatorio:
Si Todos registran Más de Su capacidad de trabajo durante Día, envíales un recordatorio a Ellos y a Sus gerentes.

Una vez configurado todo, cuando un miembro del equipo registre más de 8 horas, el gerente recibirá una notificación. Esto garantiza que los gerentes estén al tanto de que sus miembros del equipo trabajan horas extras, para que puedan recibir la compensación correspondiente o un recordatorio para no trabajar horas extras si la política de la empresa no lo permite.
9. Guardar la planilla de horarios como plantilla (Plan Gratis)
Guardar la planilla de horarios como plantilla es una opción práctica para los miembros del equipo cuyas semanas son prácticamente iguales. Pueden completar la planilla de una semana y guardarla como plantilla siguiendo estos pasos:
- Haz clic en Guardar como plantilla
- Nombra la plantilla
- Marca la opción Guardar también el tiempo (si necesitan que se copien también las horas trabajadas)
Por supuesto, al aplicar la plantilla, los usuarios pueden modificarla si no coincide completamente con la semana actual, lo que garantiza que envíen planillas precisas para la nómina.
10. Edición masiva (Plan Basic)
La opción de Edición masiva es útil cuando necesitas editar varias entradas de tiempo y hacerlo una por una lleva demasiado tiempo.
Supongamos que quieres cambiar 10 entradas de tiempo a un proyecto diferente. Simplemente selecciona todas las entradas que quieres editar, haz clic en Edición masiva y selecciona otro proyecto.
Una vez que hagas clic en Guardar, todas las entradas de tiempo seleccionados se editarán automáticamente, lo que garantiza que el proyecto correcto se facture al cliente correspondiente.
💡 CONSEJO PRO DE CLOCKIFY
Si quieres obtener más información sobre las funciones de pago de Clockify, lee este artículo:
Funciones ocultas de Clockify: Menciones de honor
Si quieres más consejos y trucos de Clockify, aquí tiene algunas menciones honoríficas (funciones ocultas de Clockify que no aparecen en nuestra lista principal).
1. Cambiar la hora de inicio de un temporizador en ejecución (Plan Gratis)
Al empezar una tarea urgente, es posible que no inicies el temporizador de inmediato. En lugar de añadir tiempo manualmente, puedes iniciar el temporizador cuando puedas y luego editar la hora de inicio.

Una vez que el usuario corrija la hora de inicio, sus registros reflejarán las horas trabajadas reales, lo que garantiza informes de asistencia precisos.
2. Descubre quién no ha registrado su tiempo (Plan Standard)
Para saber qué miembros del equipo no han registrado su tiempo, abre el Informe de Asistencia. En la sección Trabajo, verás un guión con los miembros que no registraron horas.
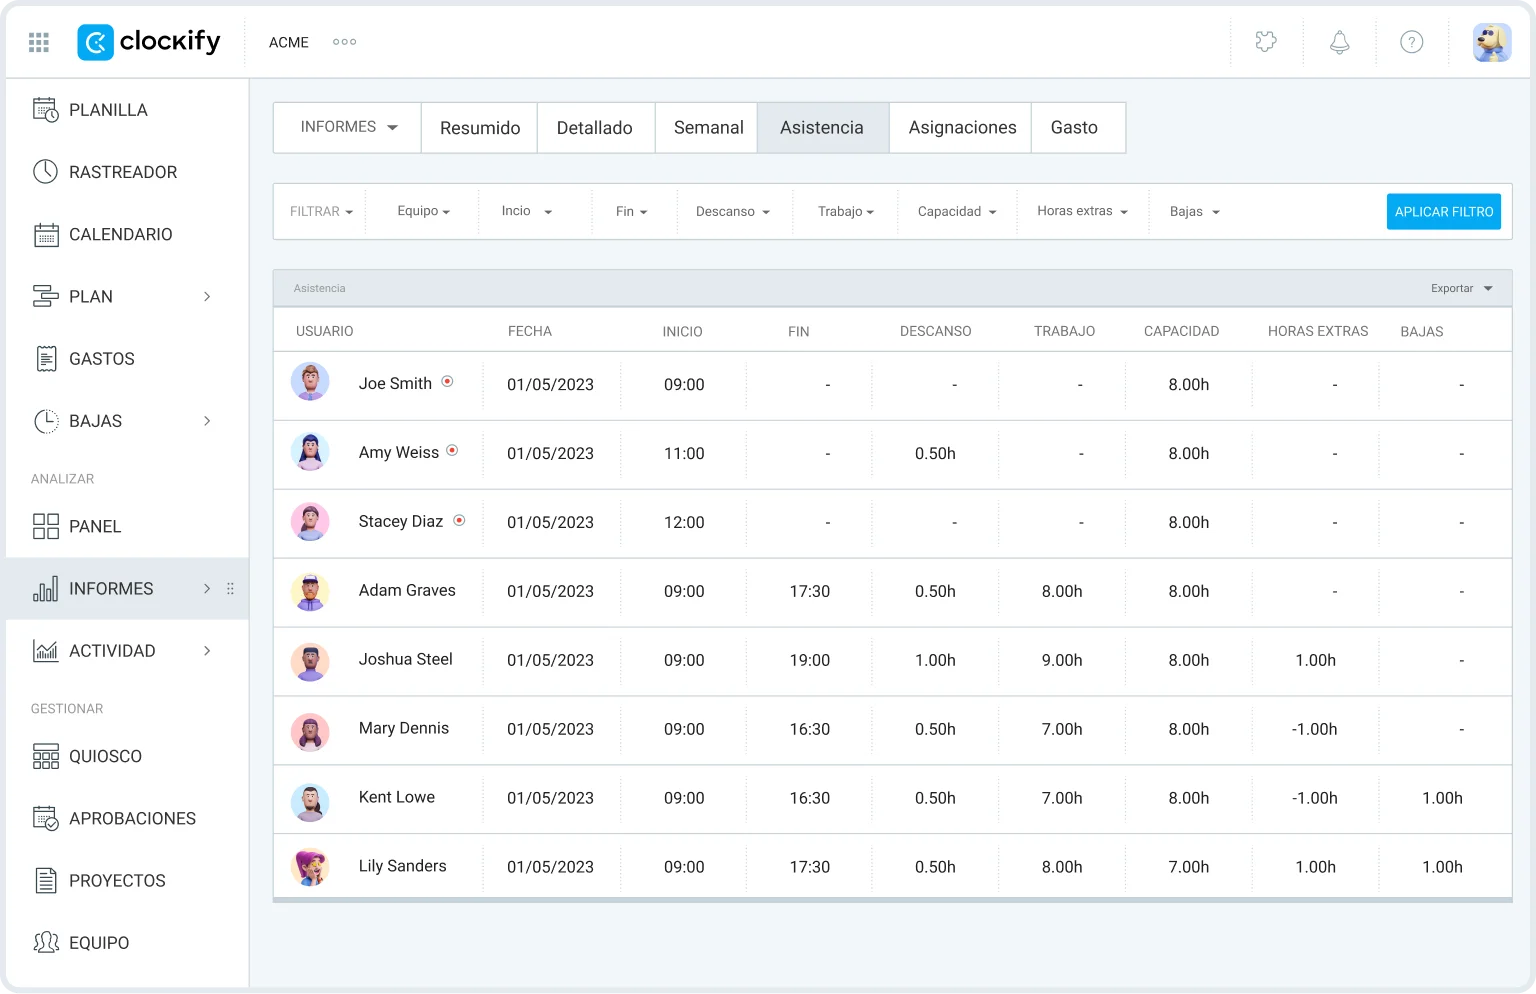
Una vez que identifiques a los empleados que no registraron su tiempo, podrás averiguar el motivo y si alguno faltó al trabajo sin una razón justificada. De esta forma, también te asegurarás de que no se hayan cometido errores en el registro de asistencia antes de procesar la nómina.
3. Temporizador Pomodoro (Plan Gratis)
Puedes convertir Clockify en una herramienta de productividad activando el temporizador Pomodoro en la extensión de tu navegador o en la aplicación de escritorio.
El método Pomodoro es una técnica de productividad que generalmente consiste en intervalos de trabajo de 25 minutos. Cada intervalo de trabajo va seguido de un descanso de 5 minutos, y un descanso más largo después de 3 mini descansos. En Clockify, los tiempos de trabajo y descanso se pueden personalizar para que se adapten a tu estilo de trabajo.
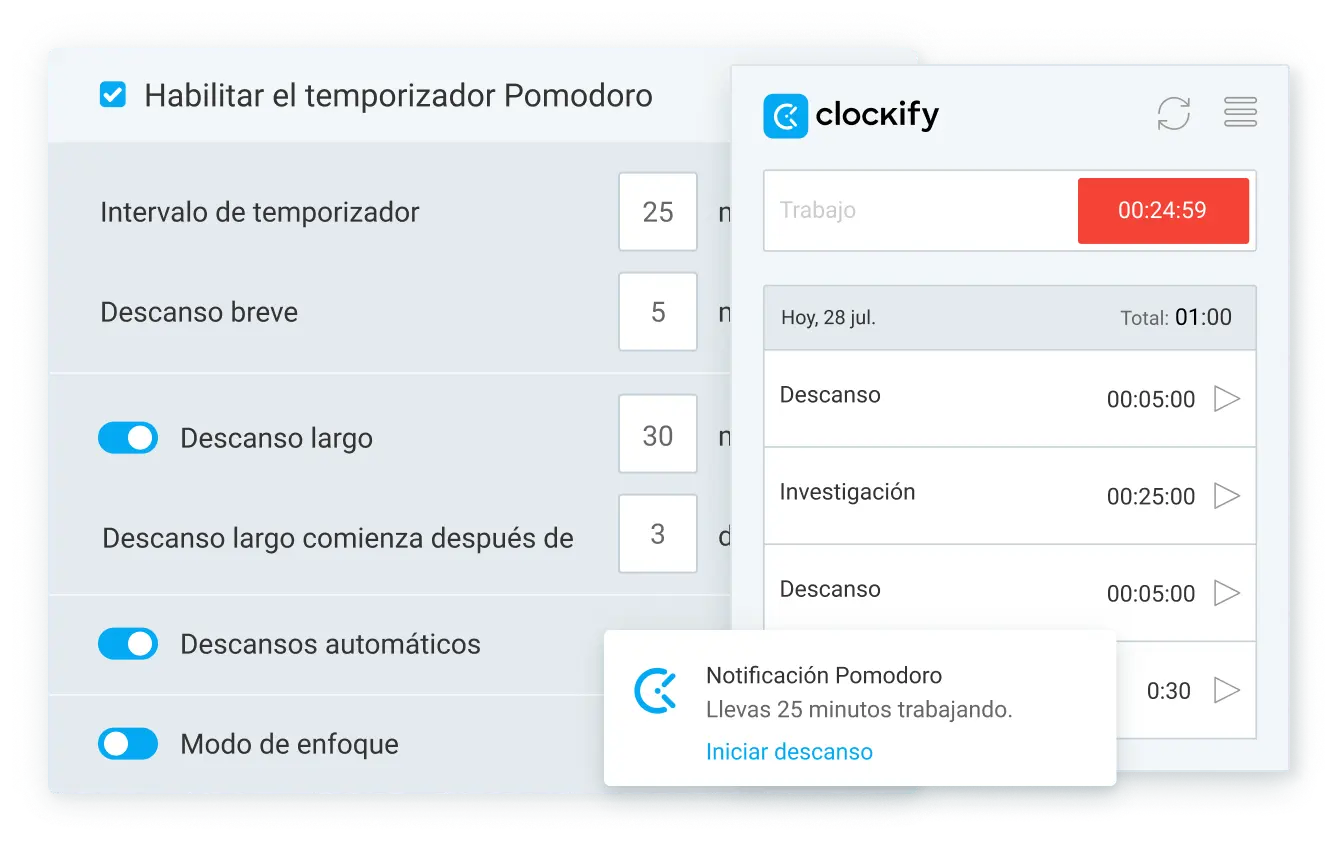
Si activas el Modo de enfoque, verás una cuenta regresiva desde el número de minutos que configuraste para el tiempo de trabajo. Lo mismo ocurre con tus descansos.
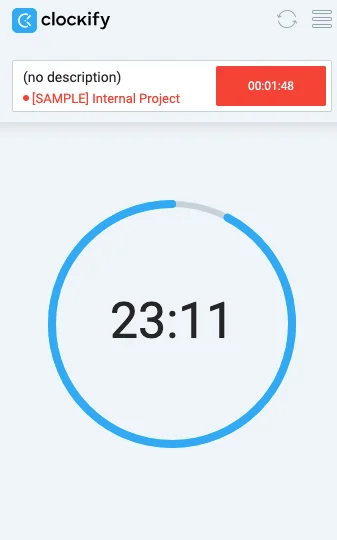
Recibirás una notificación cada vez que comience tu descanso o intervalo de trabajo. Incluso puedes activar las notificaciones sonoras para asegurarte de no perderte el inicio de tu descanso o intervalo de trabajo.
💡 CONSEJO PRO DE CLOCKIFY
¿Quieres aprender más sobre la técnica Pomodoro? Lee todo al respecto aquí:
4. Personaliza las exportaciones de informes (Plan Basic)
Una gran ventaja de los informes de Clockify es que se pueden personalizar. Quizás ya sepas que puedes filtrar los informes en la aplicación web, pero también puedes elegir qué aparece en tus exportaciones.
Si siempre haces clic en Guardar como PDF/CSV/Excell inmediatamente, seguro que te perdiste esta opción.
Para personalizar tu exportación, haz clic en Exportar en el informe que quieras y luego en Personalización.
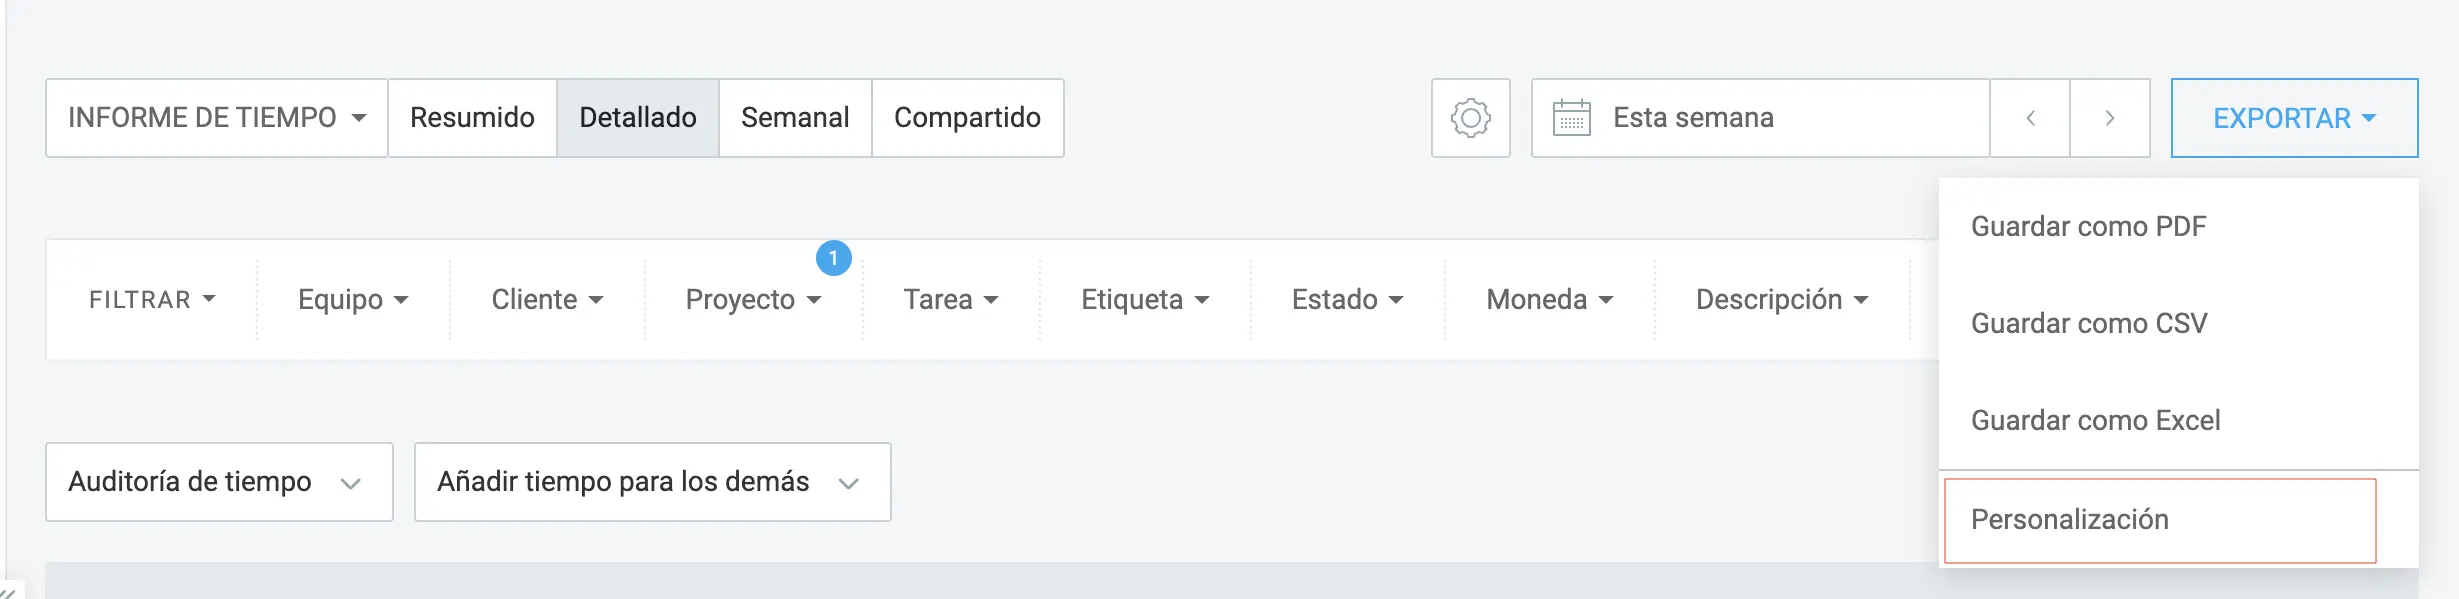
Según el tipo de informe que exportes, encontrarás elementos que puedes activar o desactivar. Por ejemplo, si seleccionas el Informe Detallado, podrás incluir o excluir:
- Proyecto
- Tarea
- Descripción
- Usuario
- Cliente
- Otras opciones relacionadas
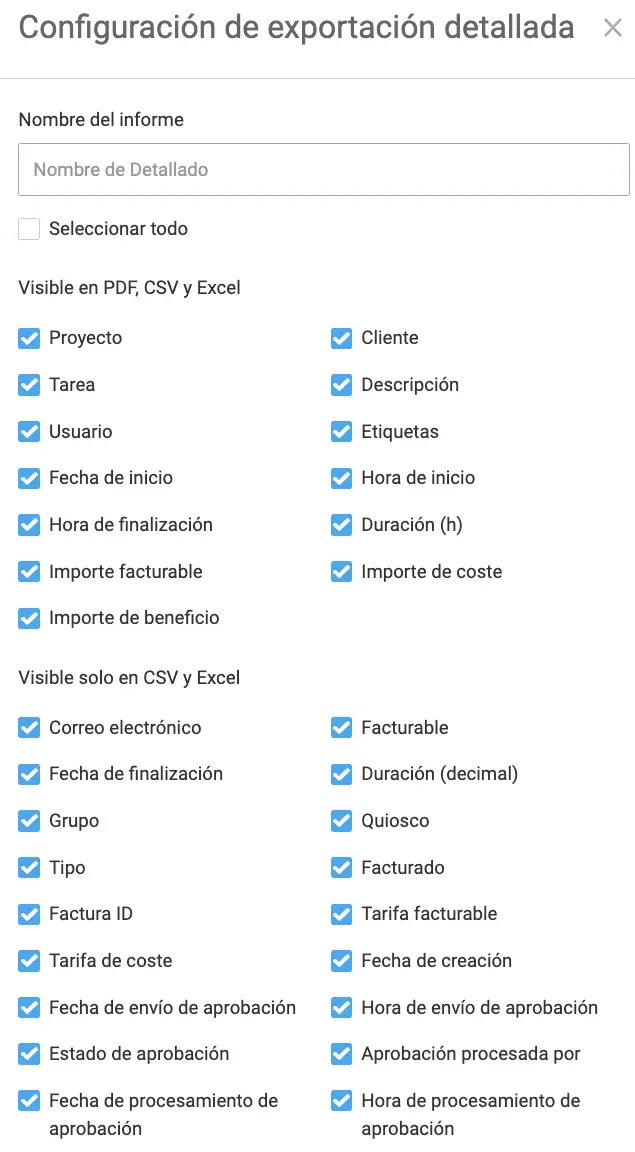
Si activas la opción Notas, puedes añadir texto personalizado a tus exportaciones en PDF. Esto resulta útil cuando necesitas enviar el informe a un cliente y añadir una nota adicional. Además, como puedes elegir qué información aparece en el informe, puedes ocultar toda la información confidencial, como el importe de las ganancias.
5. Duplica entrada de tiempo (Plan Gratis)
Si necesitas una entrada de tiempo con los mismos detalles, no tienes que crearla desde cero. Simplemente duplica tu entrada de tiempo con un clic.
Como la entrada clonada tendrá la misma fecha y hora, puedes moverla a una franja horaria diferente.
La forma más sencilla de hacerlo es abrir la vista de Calendario y arrastrar y soltar la entrada duplicada en otra casilla.
Aprovecha al máximo Clockify by CAKE.com para nóminas, facturación e informes detallados
Es posible que encuentres aún más funciones útiles en Clockify. Para explorar Clockify en profundidad, consulta:
- Página de recursos
- Canal de YouTube
- Tutoriales para control de tiempo
- Tutoriales para sectores específicos
- Página de precios de las funciones de Clockify
Además, si cumples los requisitos, recibirás consultas personalizadas de un asesor de éxito. Los criterios para acceder a los servicios de asistencia personalizada incluyen:
- 120 usuarios para el plan Basic
- 90 usuarios para el plan Standard
- 60 usuarios para el plan Pro
- 40 usuarios para el plan Enterprise
- 30 usuarios para el plan Bundle
Clockify también ofrece soporte humano las 24 horas, los 7 días de la semana, disponible para todos los usuarios en todos los planes.