Updated: febrero 25, 2026
 This guide provides practical steps on how to clock in and clock out in Clockify via mobile and web app. It also explains how managers and HR staff can review clock-in/out data in Clockify for performance evaluation and payroll.

Set up your Clockify workspace
Before employees start tracking time in Clockify by CAKE.com, you need to set up the workspace in the app. A default workspace is automatically created for you when you sign up for Clockify. You can customize your workspace by:
- Adding the company logo,
- Enabling features like timesheet or time off,
- Choosing a time duration format, and more.
After you customize the workspace, you can invite team members, assign roles and permissions, and create tasks and projects that employees will track time on.
Inviting employees to the workspace takes a few simple steps:
- Select Team in the sidebar,
- Click on Add new member,
- Enter a member’s email, and
- Click Send invite.
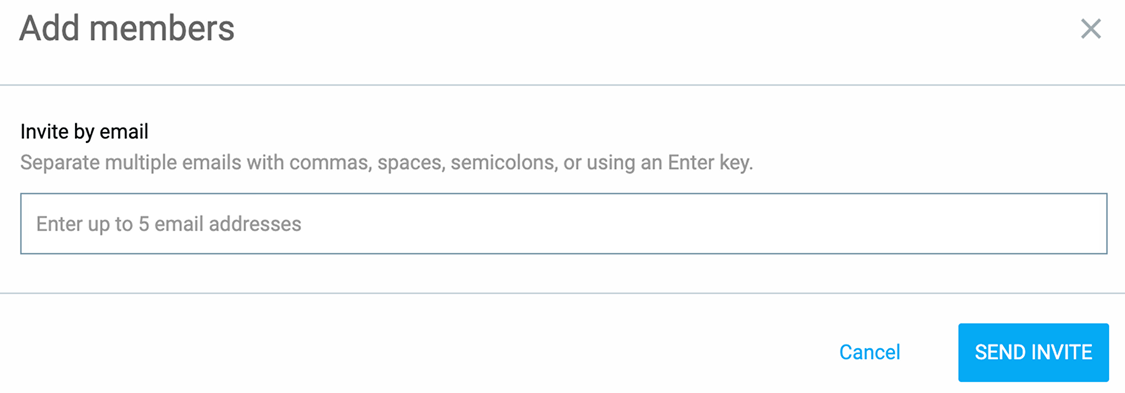
After employees click the link in the invitation email and verify their email address, they can log in to their account and start tracking time.
How to clock in/out in the Clockify web app
In Clockify’s web app, employees can track time spent on tasks and projects with the Clockify timer. If they forget to start the timer, employees can manually add time after completing the task.
If the timesheet feature is enabled in workspace settings, users can also log their hours by submitting timesheets in Clockify at the end of the day.

Clocking in/out via timer in Clockify’s web app
To clock in and out via the Clockify timer, employees need to:
- Select Time tracker in the sidebar,
- Enter what they’re working on,
- Choose the project, and
- Click the Start button to start tracking time.
When they finish working, they click the Stop button to stop recording time.
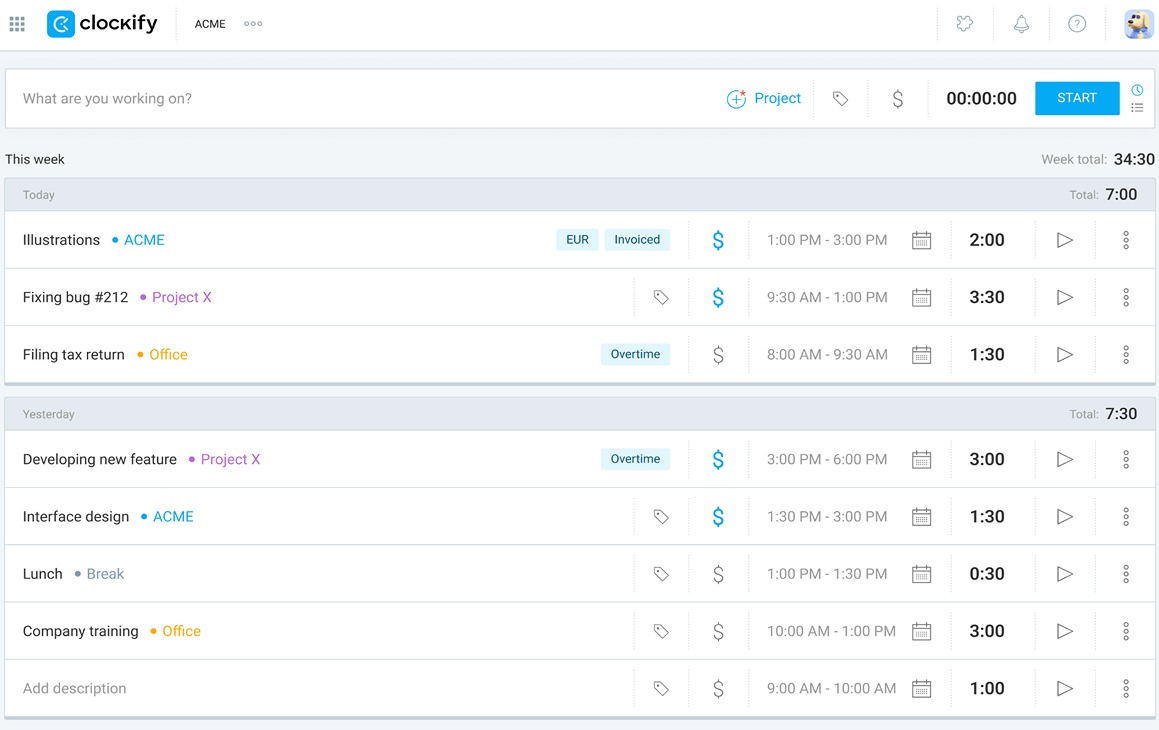
Once a team member stops the timer, a new time entry is automatically added to their list of time entries.
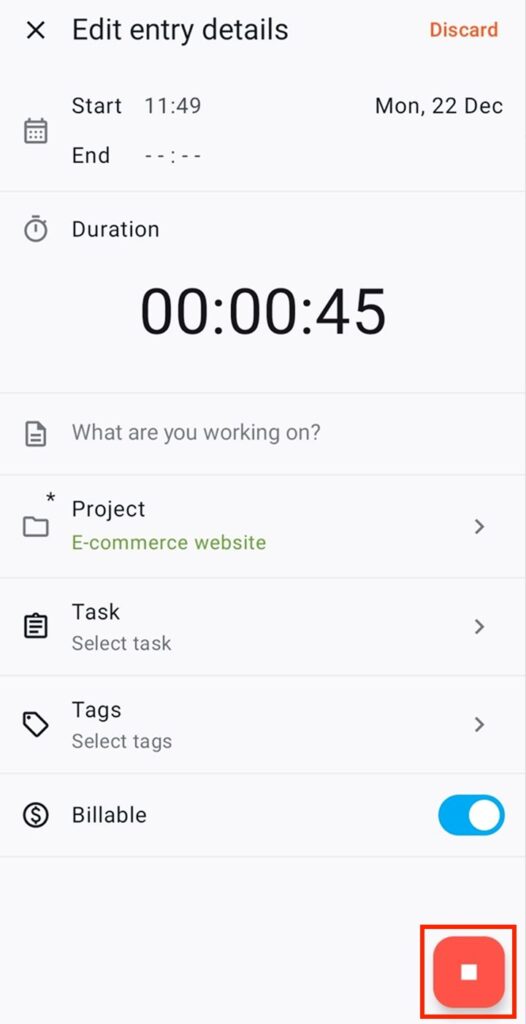
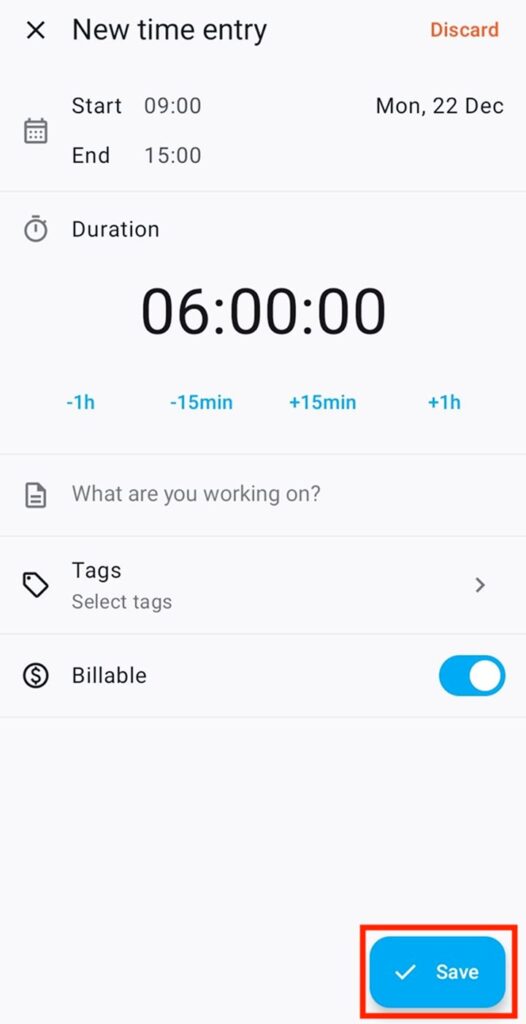
Clocking in/out via manual mode in Clockify’s web app
To manually add time, members need to open the Time tracker page and click the list icon in the upper-right corner.

Then, they need to:
- Enter what they’ve worked on,
- Choose the project,
- Enter their start and end times, and
- Click the Add button.

Once they click the Add button, their time entry is saved in Clockify.
NOTE: All workspace users can manually add time in Clockify when the Force timer is disabled in workspace settings. If it’s enabled, they can only record time using an active timer.

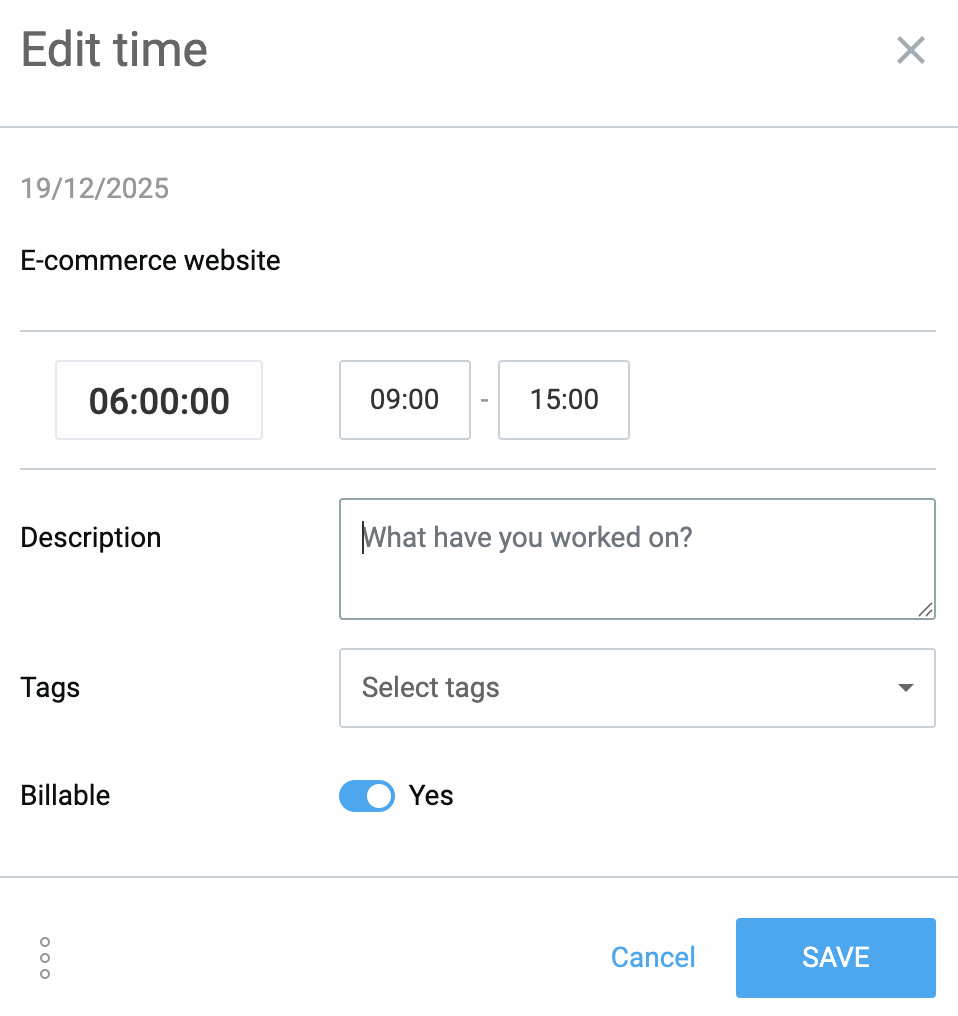
Clocking in/out via timesheets in Clockify’s web app
To clock in and out via Clockify timesheets, team members need to:
- Select Timesheet in the sidebar,
- Choose the project, and
- Enter their work hours in the appropriate time slot.
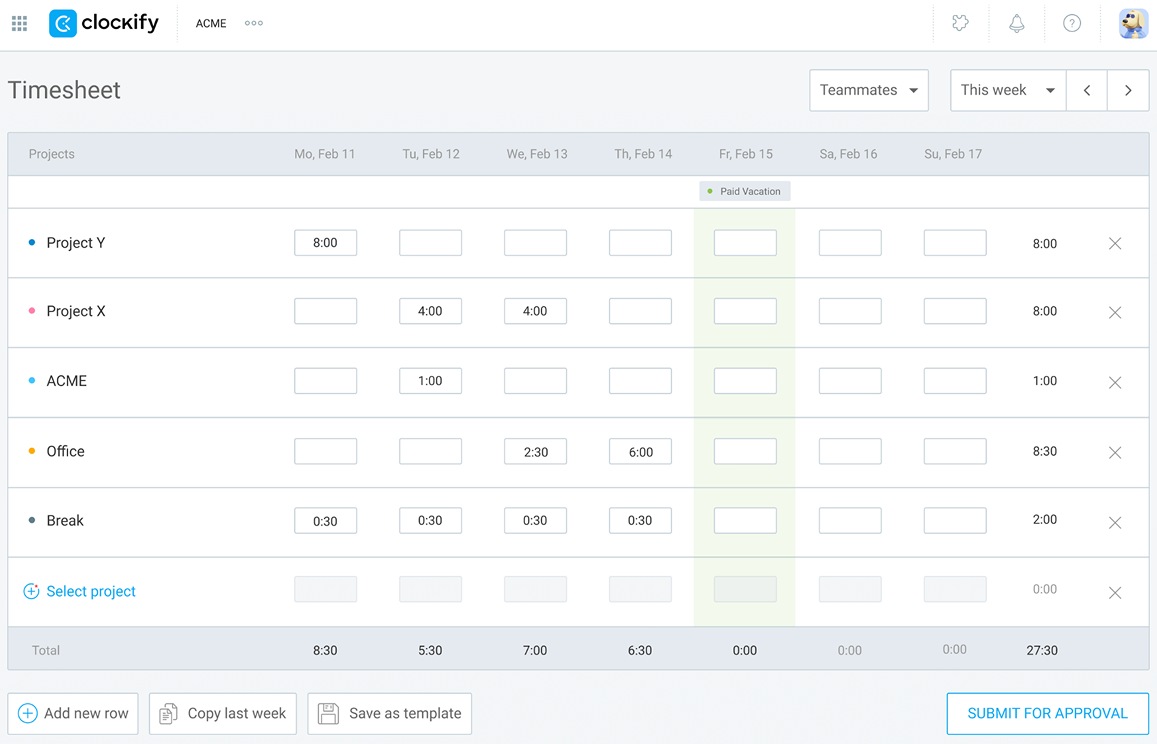
Also, here’s how members can add more details to their time entries:
- Hover over a certain cell with tracked time,
- Click the 3 dots,
- Add start and end times, a description, or tags, and
- Click Save.
NOTE: Regular users in Clockify can only edit their own time, while the workspace owner and admins can edit anyone’s time. Team managers in Clockify can edit the time of their assigned team members, provided the owner has enabled this in workspace settings.
How to clock in/out in the Clockify mobile app
First, team members need to download the Clockify mobile app from the App Store (iOS) or Google Play (Android). After installing the app, they can log in to their account and start tracking time.
In Clockify’s mobile app, employees can track their work hours in real time via the timer. If they need to log a past event, they can manually enter the time in manual mode. Finally, they can use Clockify timesheets to log their hours at the end of the day.

Clocking in/out via timer in Clockify’s mobile app
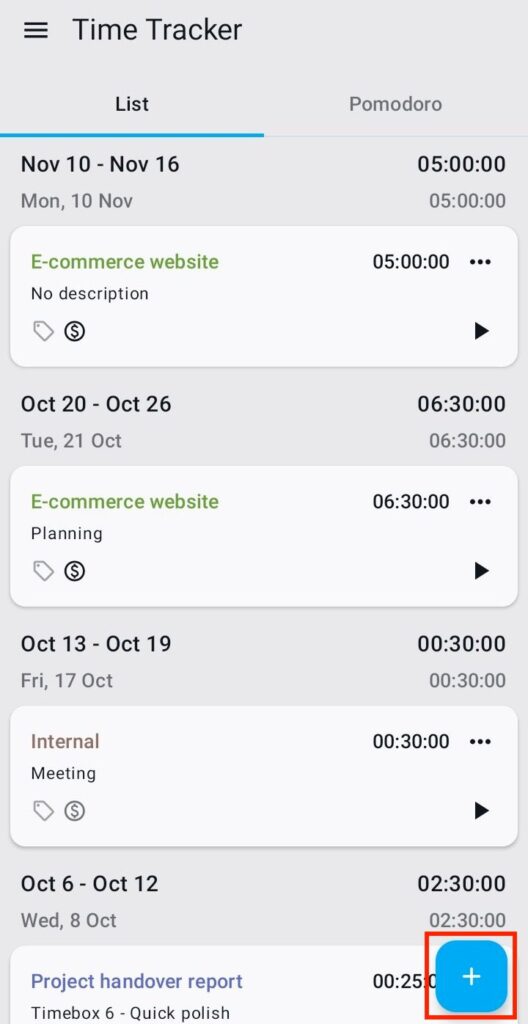
Opening the Clockify mobile app brings employees straight to the Time tracker page, where they can view all their time entries.
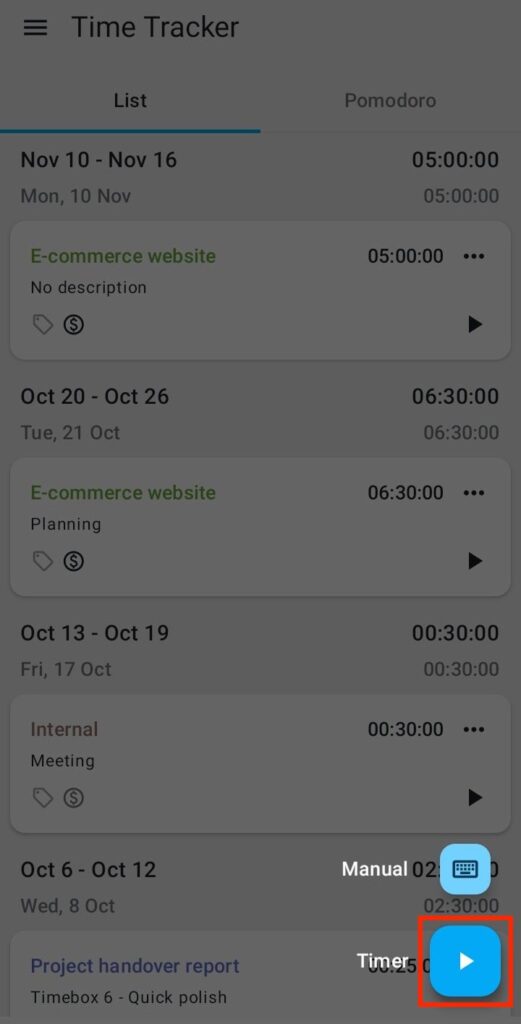
To add a new entry, they need to tap the plus sign in the bottom-right corner.
To start tracking time via the timer, team members click the Start button.
When they finish working, they click the stop button beside the running timer.
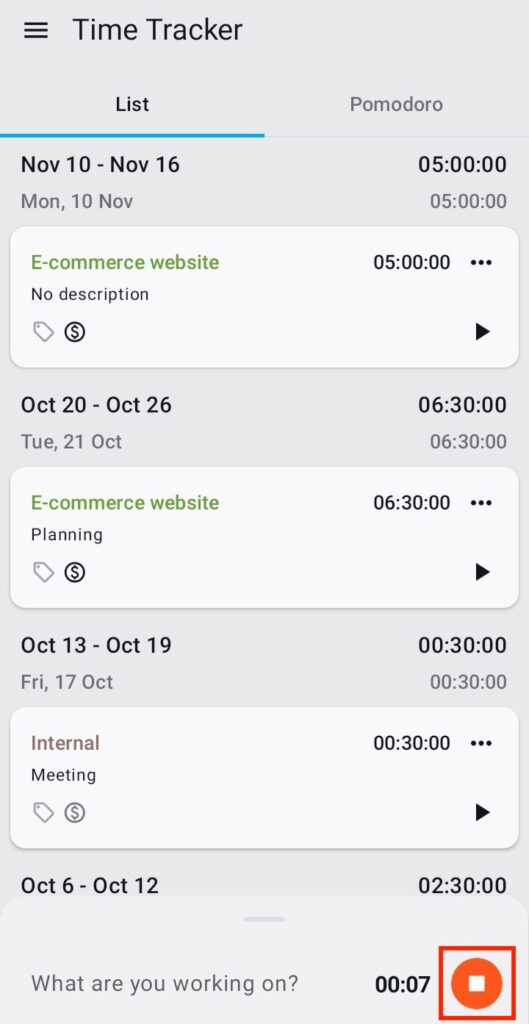
Once they do that, a new window appears, where they can add their entry’s details. They also have the option to enter what they’re working on and select tags. (Choosing a project is mandatory to avoid having misassigned time entries.)
When they click the stop button in the bottom-right corner, the timer stops running, and their entry is saved.
Clocking in/out via manual mode in Clockify’s mobile app
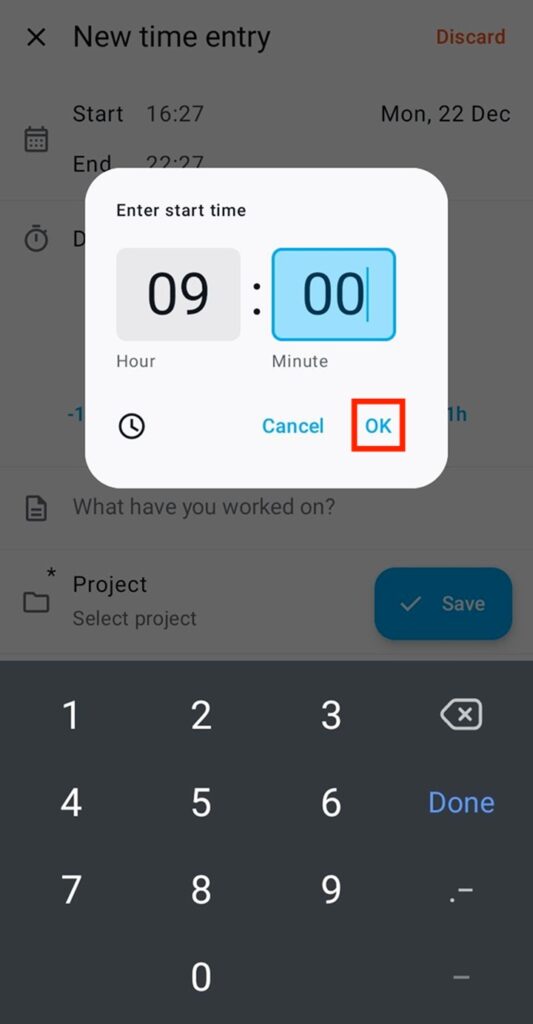
To add time manually, team members need to tap the plus sign on the Time tracker page and choose Manual.

Then, they enter their hours and minutes worked in the appropriate fields and click OK.
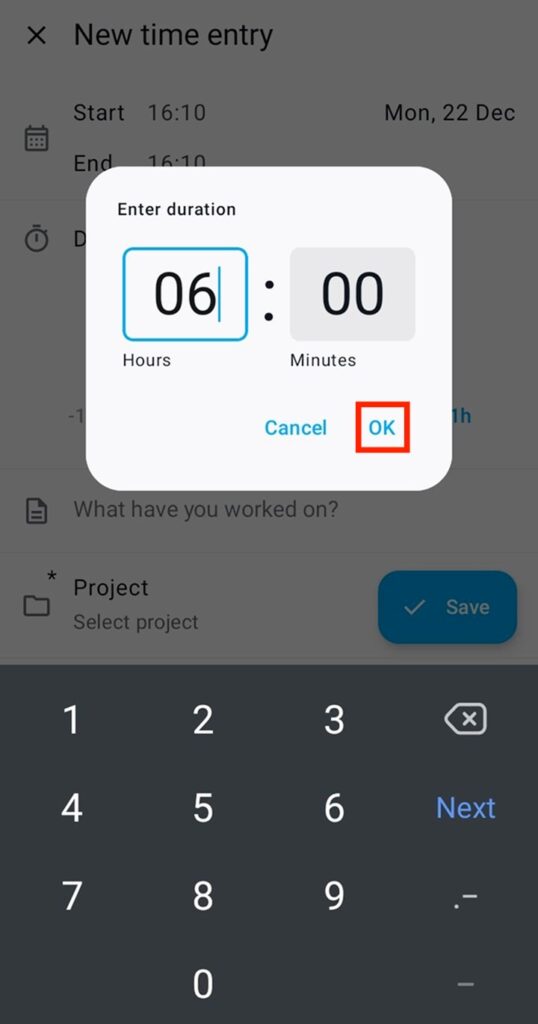
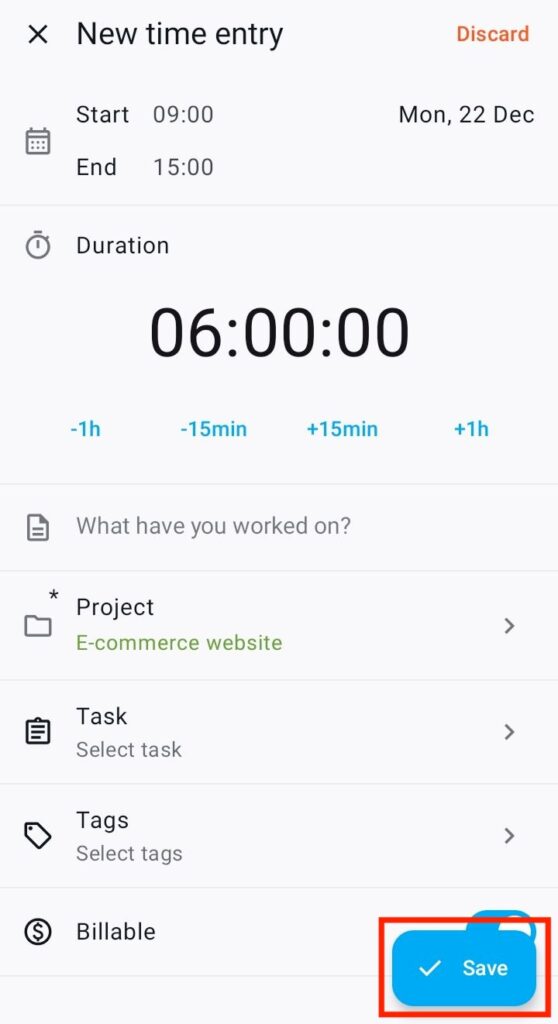
Once they click OK, team members can add start and end times and other details to their entry.
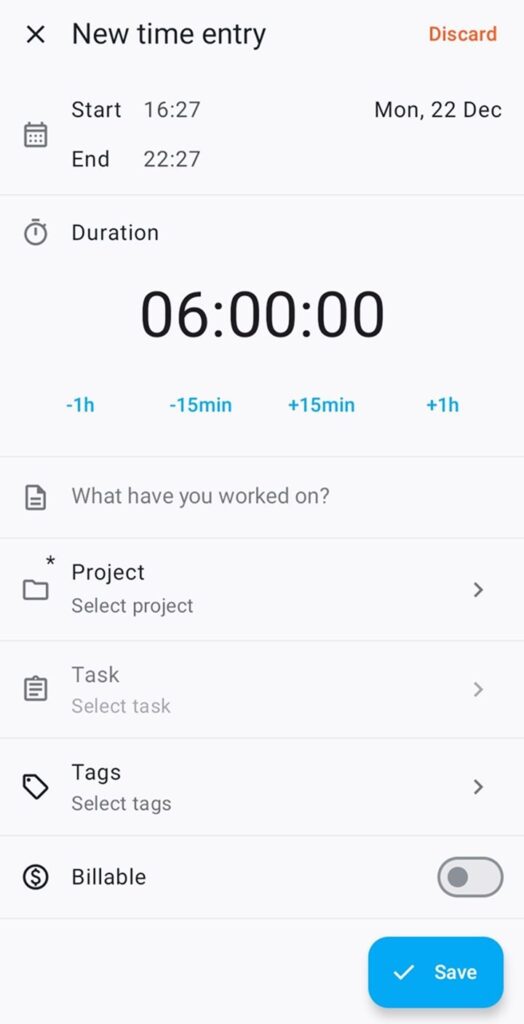
To change the start time, tap the start field and select the exact time using the time picker.
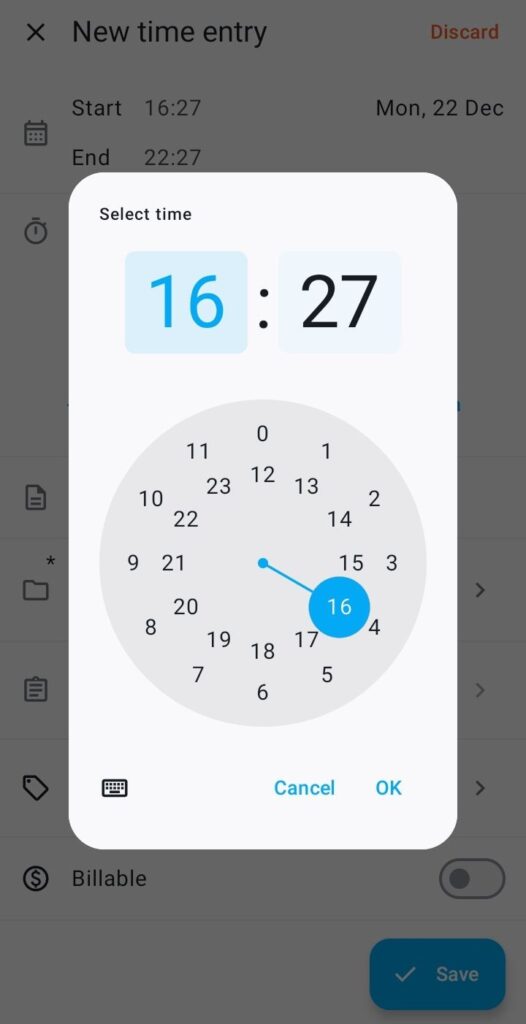
Alternatively, they can click the keyboard icon in the time picker and type in their start time. Once they’ve done that, they click OK.
The process is the same for changing the end time — except they’ll tap the end field.
After entering their start and end times and other details, employees must select the project (mandatory) and click Save to submit the time entry.
Track time with Clockify for FREE
Clocking in/out via timesheets in Clockify’s mobile app
To log their hours via timesheets, team members need to click the hamburger icon in the top-left corner of the Time tracker page. Then, they select Timesheet in the sidebar.
After that, they need to:
- Tap the plus sign in the bottom-right corner,
- Select a project, and
- Click on the appropriate time slot.
Then they can add their start and end times, the task name, and any other relevant information.
To enter their start time, members need to tap the start field and select the exact time they want, or type it in. Afterward, they click OK to save the changes.
The process is the same for adding an end time — except they’ll tap the end field.
Finally, to save the time entry, employees click Save.
Bonus: Clocking in/out with the Clockify kiosk
Another way employees can track time is with the Clockify punch clock kiosk. They clock in and out on a shared device (tablet, phone, or computer) using a unique PIN or QR code.
For more information on how to create and use the Clockify kiosk, refer to Clockify’s kiosk help page.

How to review clock-in/out data in Clockify by CAKE.com
To review employee time data, use Clockify reports, like summary, detailed, weekly, and shared.
To open Clockify’s detailed report, hover over Reports in the sidebar and click Detailed.
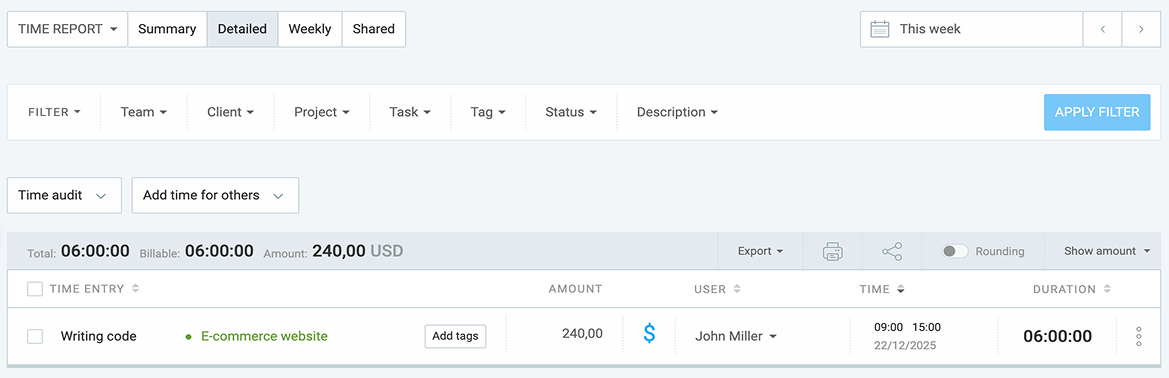
Clockify’s detailed report provides a breakdown of each time entry, including:
- User,
- Task and project,
- Start and end time,
- Date the time was tracked,
- Total duration, and
- Billable amount (if users tracked billable time).
With these insights, managers can:
- Assess team productivity,
- Spot and eliminate inefficiencies,
- Balance workloads, and
- Know which tasks or projects are truly profitable.
Clockify time reports can also be exported to PDF, CSV, or Excel for further analysis or payroll processing. They can also be shared with relevant parties via a private or public link.
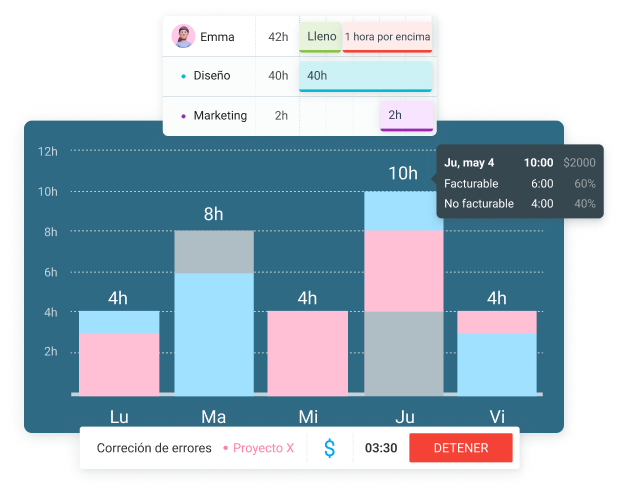
Another way to review employee clock-in/out data is to use Clockify’s attendance report. Here, managers and HR staff can see the daily attendance specifics, including each employee’s:
- Start and end times,
- Break time,
- Tiempo de trabajo,
- Capacidad,
- Overtime (the difference between actual work and capacity), and
- Tiempo libre.
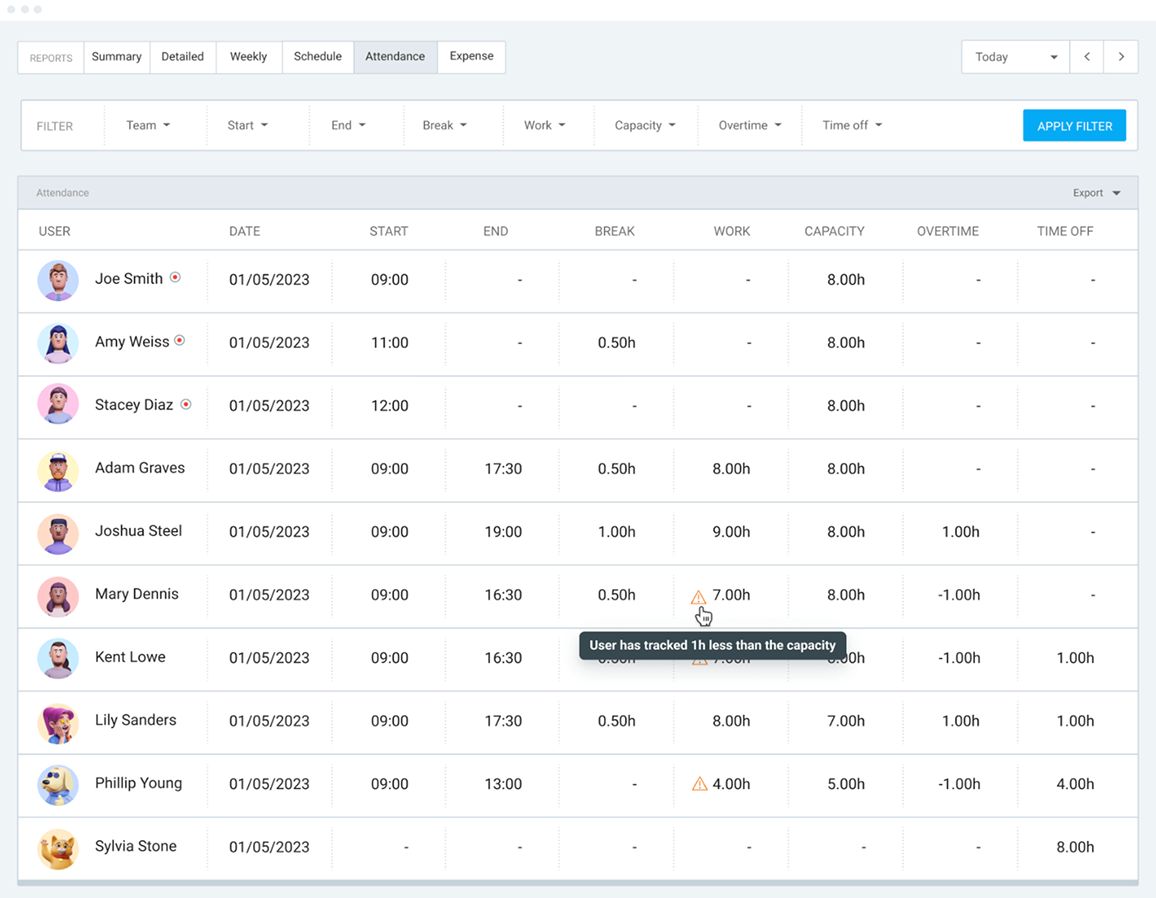
This helps them monitor attendance patterns, avoid staffing gaps, and prevent employee burnout.
Common clock-in/out issues in Clockify (+ fixes)
Here are some clock-in/out issues in Clockify and how to fix them.
Issue #1: I forgot to clock in/out
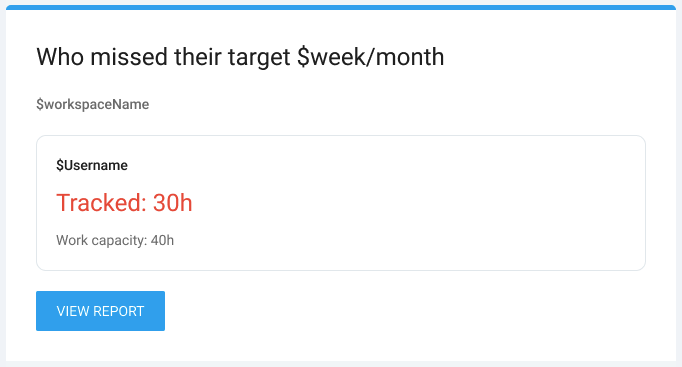
Users often forget to start/stop the timer when beginning/finishing work, which leads to missing or inaccurate time data. To prevent incorrect time records, set time-tracking reminders for your team members in Clockify.
If a team member doesn’t meet their daily, weekly, or monthly target or logs more time than needed, they’ll receive an email reminder:
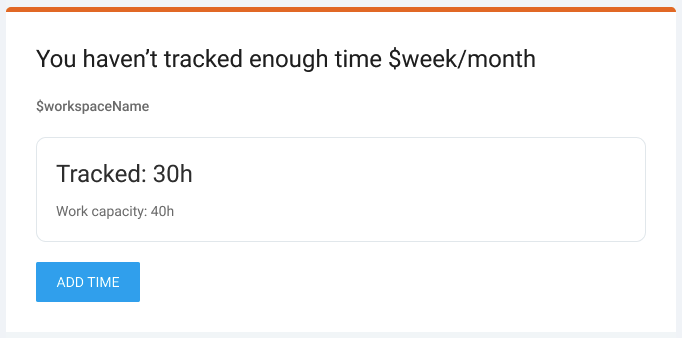
Admins and team managers can also be notified via email when a member misses their target hours.
Issue #2: I can’t stop the timer
If users can’t stop the timer, it’s usually because something is missing or restricted in Clockify.
If required fields (project, task, tag, or description) are set in the workspace, team members won’t be able to stop the timer until they enter that information.
To stop the timer, employees have to:
- Open the Time tracker page,
- Look for any required fields (marked with a red asterisk),
- Enter the necessary information, and
- Click on the Stop button.

Additionally, if an employee’s timer has been running for a long time and lock timesheets is enabled in workspace settings, they may be unable to stop the timer.
In this case, they’ll either discard the timer or ask the admin to unlock the timesheet so they can adjust their time. To discard the timer, employees need to:
- Click on the 3 dots beside the Stop button, and
- Select Discard.

Finally, click the Discard button to confirm the action.
Issue #3: Timesheet discrepancy
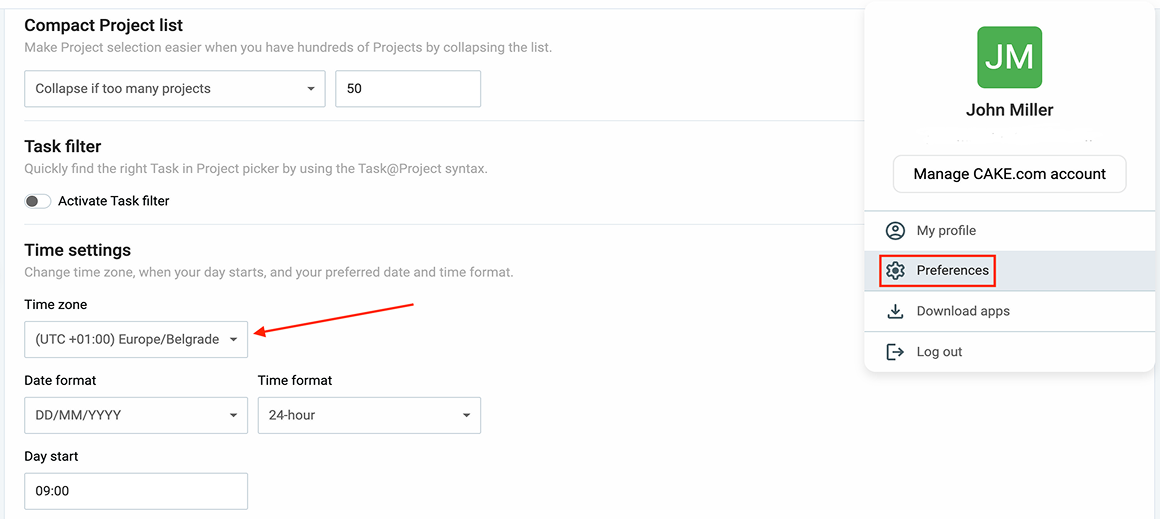
Your team members’ time entries may appear on a different day or at different hours when viewed in your account. This is likely due to a time zone mismatch across individual user profiles.
To align their time zone with yours in Clockify, employees need to:
- Click on their profile icon in the upper-right corner,
- Open the Preferences settings,
- Scroll down to the Time settings section, and
- Change their time zone to match yours.
🎓 How Time Zone Affects Your Productivity
To learn more about Clockify issues and their fixes, check out our troubleshooting page.
FAQs about clocking in and out
In this section, we provide answers to frequently asked questions about checking in and out in Clockify.
How to enter time in Clockify?
To enter time in Clockify, use:
- Timer mode to record time spent on tasks and projects in real time,
- Manual mode to manually add hours, and
- Timesheet mode to log hours by filling out daily or weekly timesheets.
On-site workers can use Clockify’s kiosk to clock in and out from a shared device using their personal PIN or QR code. This eliminates buddy-punching issues.
What is timesheet mode in Clockify?
The Clockify timesheet view allows employees to log their hours against specific tasks and projects using a spreadsheet-like layout.
Clockify’s timesheet mode is ideal for employees who prefer to submit daily or weekly timesheets rather than use a running timer to track time.
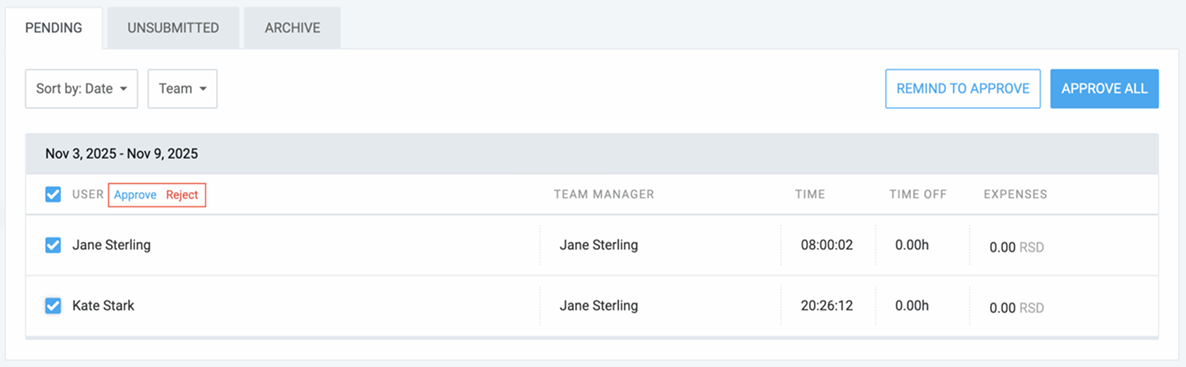
Furthermore, employees can submit their timesheets for approval in Clockify, enabling a flawless approval process. Managers can also bulk-submit timesheets for their team members and approve or reject multiple timesheets at once.
Try Clockify timesheets for FREE
What is the 7-minute rule for clocking in and out?
The 7-minute rule (or 7/8-minute rule) is a timekeeping guideline under the FLSA that allows employers to round employees’ time punches to the nearest quarter hour (15 minutes).
According to the North Carolina Wage and Hour Act, employers can round employee clock-ins and outs “as long as the rounding is consistent ‘up and down’.”
EXAMPLE: If an employee’s workday starts at 9:00 a.m., and they clock in one day at 9:05 a.m., the employer will round their start time “down” to 9:00 a.m. But if the same employee clocks in another day at 9:09 a.m., then the employer will round their start time “up” to 9:15 a.m.
What are Clockify’s admin features for managing attendance?
Clockify offers a range of admin-level features for managing employee time and attendance, including:
- Time off,
- Time approval,
- Scheduling,
- Attendance report,
- Time-tracking targets and reminders,
- GPS tracking, and
- Manual employee time adjustment capabilities.
With Clockify attendance tracking, managers can monitor employee work hours, track employee breaks and overtime, generate detailed time reports for payroll, and much more.
🎓 Attendance Tracking — How to Track and Check Attendance
How do I track my employees’ clock-ins and outs?
To accurately track team time, you need a dedicated employee clock-in system that’s both easy to use and reliable — like Clockify by CAKE.com.
With Clockify, not only can you track employees’ clock-ins and outs, but also their locations, which allows for:
- Increased productivity, and
- Enhanced efficiency.
To learn more about the importance of using a reliable system for tracking employee time, read about the benefits of a clock-in system.
Clock in and out with Clockify
Cómo revisamos esta publicación: Nuestros escritores y editores monitorean las publicaciones y las actualizan cuando hay nueva información disponible, para mantenerlas frescas y relevantes.