Attendance report
Attendance report allows users to track their team’s daily attendance, including their presence, absence, overtime work and more.
By using Attendance report you can see when team members started and finished working, how much they worked each day, breakdown of cost and billable amounts for their scheduled and tracked time, who took time off or didn’t log hours and who worked overtime or below their working capacity.
Attendance report is a paid feature, which you can enable by upgrading your workspace to Standard, Pro or Enterprise plan and is available for users with an admin, or team manager role.
Admins can see all users, while team managers can only see the users they manage.
For an overall guidance on how to use attendance report, watch the video and follow the instructions below.
To access Attendance report:
- Hover over the Reports section in the left sidebar
- Choose Attendance in the Teams section
When you click on it, you’ll see your team’s attendance report.
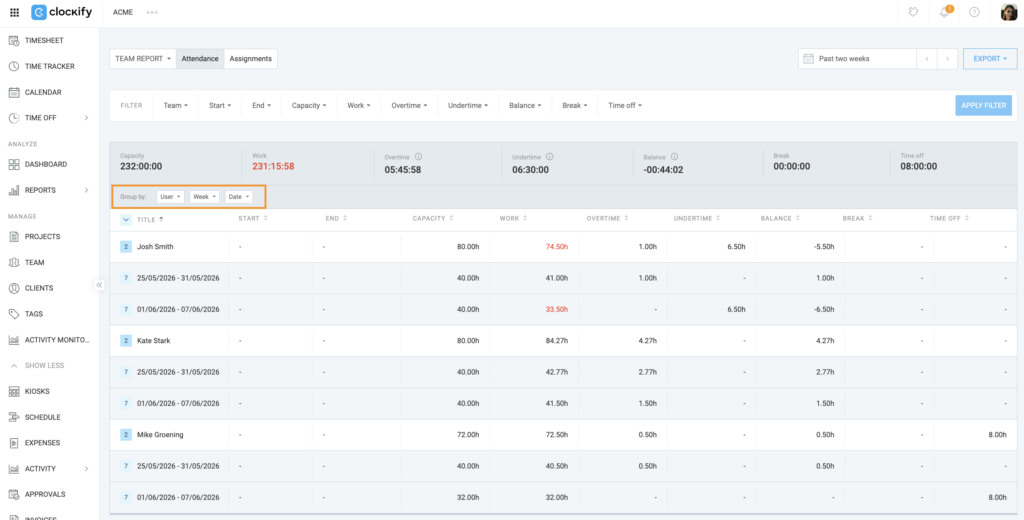
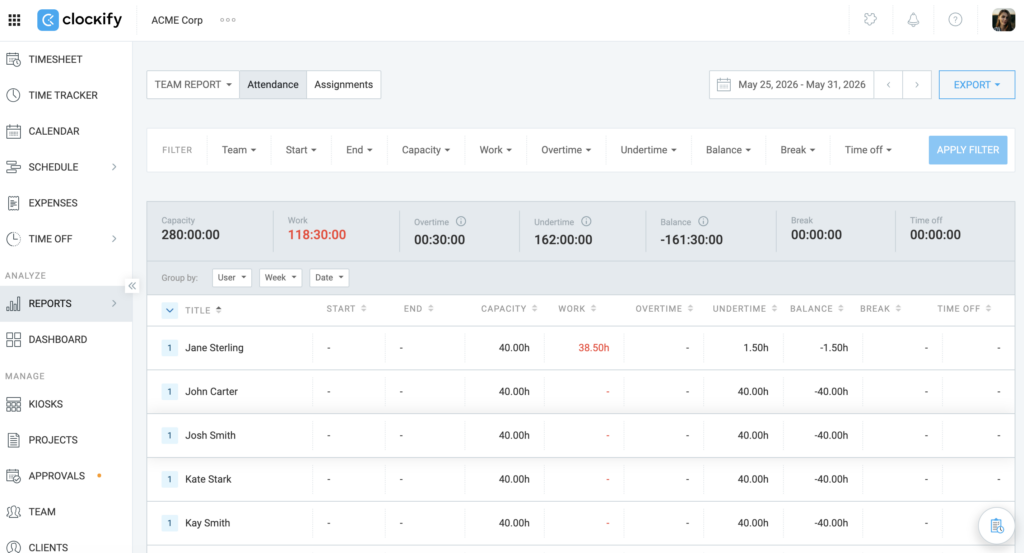
Attendance report page #
The Attendance report features columns for user, date, start time, end time, break (if enabled), work time, capacity and time off (if enabled) and overtime.
- User column presents both full and limited users and indicates running timers
- Date column exhibits the date in the user’s profile settings format
- Start and end times are displayed in the same format
- Capacity column discloses the daily work capacity of the user, including time off hours
- Work column contains the total work time for the day
- Overtime shows the difference between work and capacity, indicating how much time the user worked over their capacity (excluding breaks)
- Undertime shows the difference between capacity and work, indicating how much time the user worked under their capacity (excluding breaks)
- Break column presents the total duration of break entries for the day
- Time off shows how many hours user is off for a particular day

Set working capacity #
Admins can set or change the working capacity (in hours per day) for all users in the Workspace settings.
To do this:
- Click on the three dots icon next to your workspace name
- Select Workspace settings
- Locate Daily work capacity and click Change
- Enter the number of hours you want to set as the working capacity
- Select between two options:
- New and existing users currently using the default
- All users
- Click Set
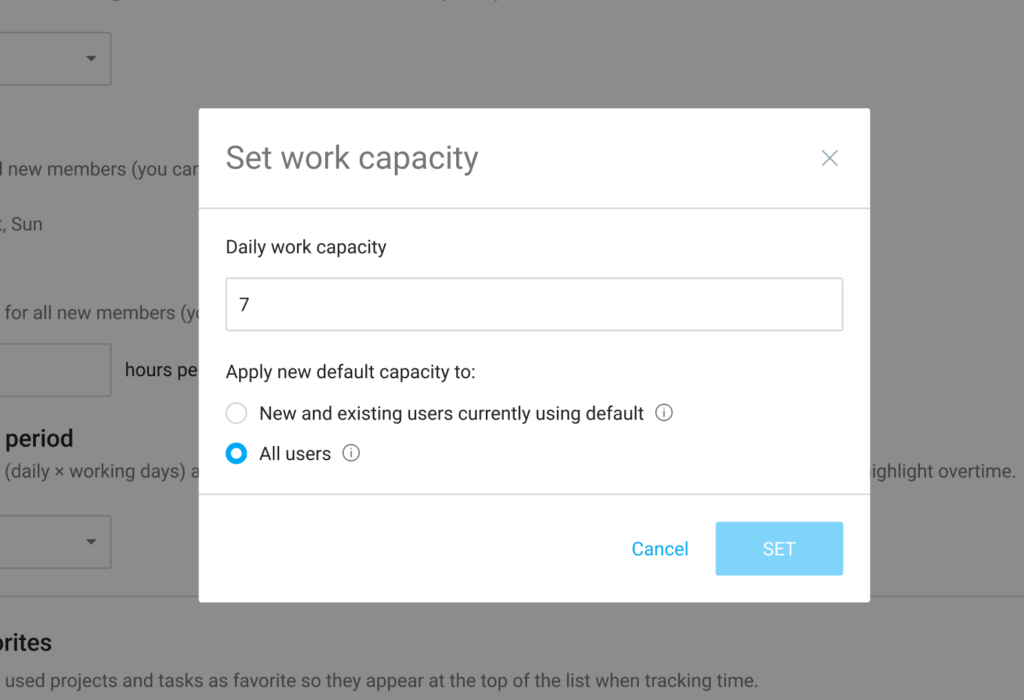
The first option (New and existing users currently using the default) will not apply to users with a custom capacity setting that they’ve set for their profile.
Set overtime calculation #
To ensure your get the correct overtime calculation:
1. Click on the three dots icon next to your workspace name
2. Select Workspace settings
3. Locate Overtime calculation
4. Select Daily, Weekly, or Monthly
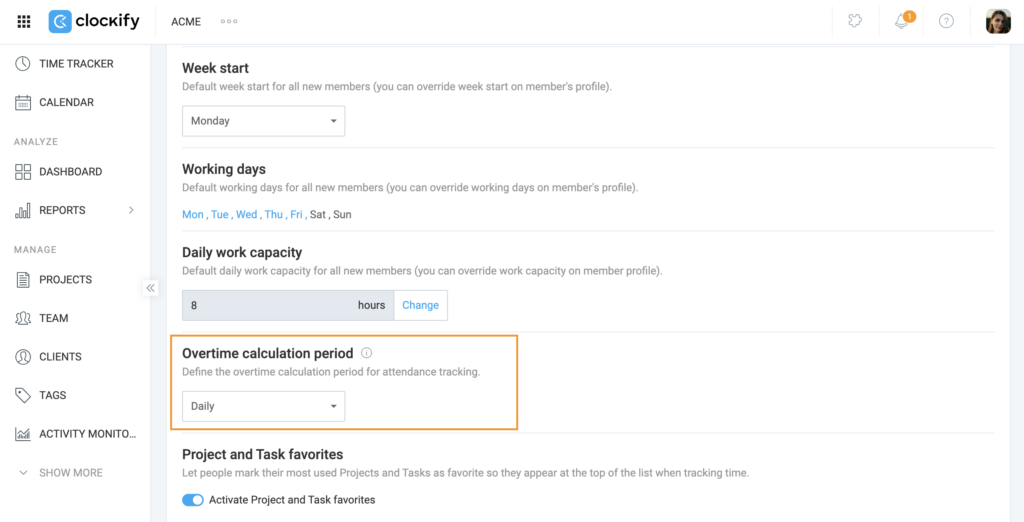
This setting determines how overtime and undertime are calculated:
- Daily overtime period: The system uses daily capacities. Any work above or under the daily capacity is considered over/undertime.
- Weekly overtime period: Daily capacity is multiplied by the working days in a week to establish the total hours that should be worked. Any work over or under this total is considered over/undertime.
- Monthly overtime period: Daily capacity is multiplied by the number of days in a month, and any work over or under this total is considered over/undertime.
View attendance report #
To view the attendance report:
- Go to the Attendance Report page
- Select your preferred time period
- Review your totals and the full breakdown of hours, which includes your capacity, worked hours, overtime, undertime, OT deviation, breaks, and time off
Undertime is highlighted in red, so you can easily spot any teammates who are not working according to an agreed contract. Overtime won’t be highlighted but it can be reviewed in the Overtime column.
Group attendance data #
- Go to the grouping options on the Attendance Report
- Select your preferred grouping levels based on your workspace’s overtime rule
| Overtime rule | Grouping levels |
| Daily OT | Date <>User<>None |
| Week OT | Week <> User <> Date <> None |
| Month OT | Month <> User <> Date <> None |
All users can group attendance reports according to the rules set by workspace admin to maintain a transparent overview of their working timeline.
Overtime, undertime, and balance #
Overtime, undertime, and balance filters will be applied to your data depending on the overtime calculation (Daily, Weekly, or Monthly) selected in Workspace settings.
Export Attendance report #
To export the attendance report:
- Click the three dots to open the report options menu
- Select either CSV or Excel to export your data
- Click Export to download the file
A file will be generated and downloaded containing all available data. This report will be sorted in the same way it is grouped on the screen.