Team chat (Pumble integration)
Send one-on-one and group messages to teammates directly inside Clockify using Pumble, our very own business messaging platform.
Enable chat #
- Navigate to the workspace name
- Open the menu
- Choose Workspace settings > Integrations tab
- Expand Pumble integration
- Click Connect to Pumble
- Allow access to Pumble
Once the connection is established between Clockify and Pumble, you can open the chat widget and send message to anyone in your workspace.
If you already have a Pumble account, make sure you use the same email in both Clockify and Pumble. Then, when you click Connect, you’ll be asked if you wish to connect your existing Pumble workspace or create a new one.
Only admins in Clockify can enable chat. Only admins in Pumble can connect their Pumble workspace to Clockify.
A Pumble workspace can only be connected to one Clockify workspace (and vice versa).
To disconnect, expand Pumble in the Integrations tab and click Disconnect. You can always reconnect later, or connect your Clockify workspace to some other Pumble workspace (as long as you are admin in both).
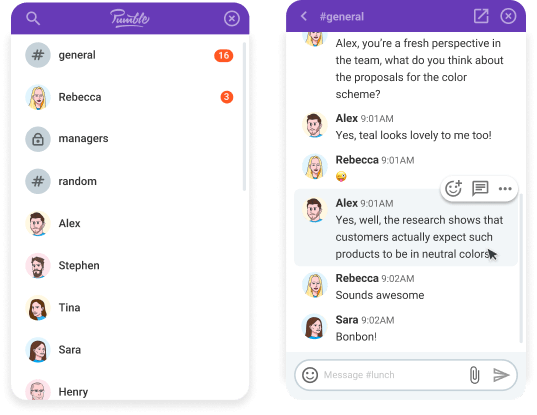
Send messages #
To send someone a direct message:
- Click on the chat widget in the corner
- Click on the person to whom you wish to send a direct message (or filter the list by clicking on the search icon)
- Type the message at the bottom (or attach a file)
- Click on send icon to send the message
To start a thread, hover over some message, click the comment icon, and type a reply.
You can react to messages by hovering over a message and clicking emoji sign. You can also click on an existing message’s emoji to add your vote too.
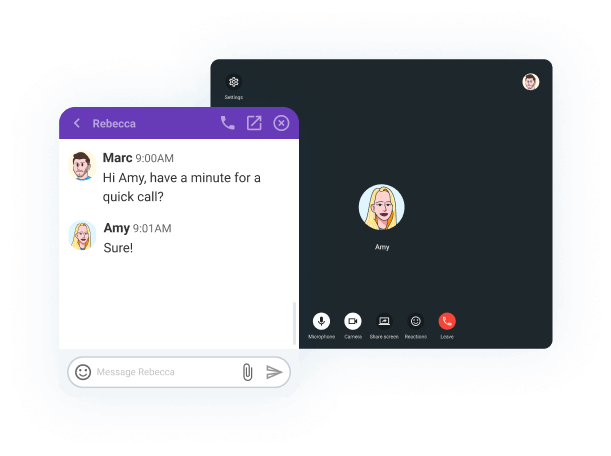
Audio and video calls #
In addition to messaging, you can also directly call your teammates:
- Open the widget and
- Click on the person you wish to call
- Click on the phone icon
- Wait until the other person accepts the call
- Share your screen during the call (optional)
Send group messages #
In addition to direct messages, you can also post messages to channels and send group messages.
- Click on the chat widget in the corner
- Click on a channel (channels have hashtag # in their name)
- Type a message and send
- Channels members can see and respond directly to it
To create new channel, click on Pumble logo to open Pumble web app and click + next to Channels in the sidebar
To join channels, click on Pumble logo to open Pumble web app and click on Channel Browser in the sidebar, choose a channel, and click Join Channel.
You can add other users to a channel by going to some channel and clicking on the Add People icon in the upper right corner.
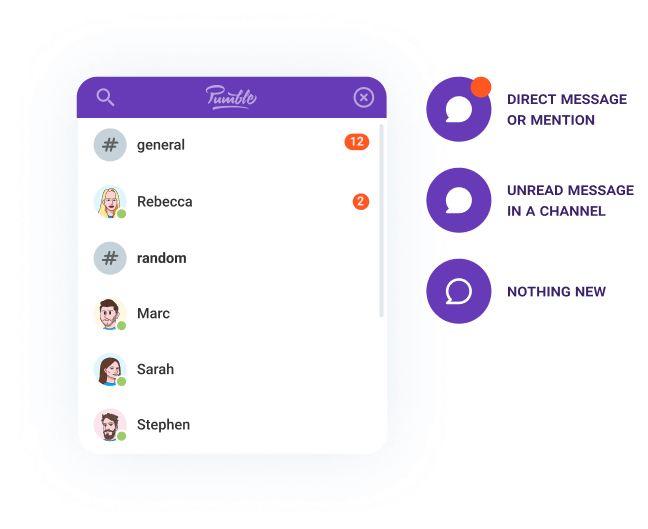
Notifications and status #
When someone mentions you in some channel or sends you a direct message, the chat widget will have a red badge, indicating you have an unread notification. If there’s an unread message on some channel you follow, the widget’s icon will be white.
Each user has status indicator next to them:
- If it’s a green circle, it means they’re online (i.e. they have either Pumble app or Clockify open at the moment)
- If it’s an empty circle, it means they’re offline (i.e. they have neither Pumble nor Clockify open at the moment)
Pumble app #
You can expand any message or channel by clicking on the link icon in the top right corner next to close button, which will take you to the web app.
You can also install Pumble on your phone (iOS, Android) and computer (Windows, Mac).
If you haven’t set a password in Pumble, be sure to set it (via forgot password) so that you can access Pumble outside of Clockify.
In the web version, you can also create and join channels, invite guests, manage users, update profile settings, search messages and files, set status, receive push notifications, set up integrations, and more.
For more information, check Pumble Help Center.
User sync #
- When you’re creating a new workspace in Pumble via Clockify, all active Clockify users will be migrated to Pumble too (name, email, photo)
- While connected to Pumble, Clockify will create a user in your Pumble workspace whenever a new user joins your Clockify workspace
- If you activate a deactivated user in Clockify, Pumble will check if they exist and create an account. If the user already exists in Pumble but they’re inactive, they’ll reman inactive in Pumble
- If you deactivate or delete a user in Clockify, their status won’t change in Pumble (you’ll need to manually deactivate them in Pumble)
- If a user changes their email in Clockify, their email will be changed in Pumble too
- If a user changes their email in Pumble, they’ll need to change it in Clockify, too (or they won’t be able to use chat)
- If you add or deactivate user in Pumble, it won’t affect Clockify (e.g. you’ll need to add or deactivate the user manually in Clockify)