Track breaks on kiosk
Breaks on kiosk allow employees to specify when they’re on a break via a kiosk. They can start or end their breaks using your kiosk terminal. Later, in reports, admins and managers can see when each employee was on a break and for how long.
Breaks can be enabled by admins in the Workspace settings.
Start break #
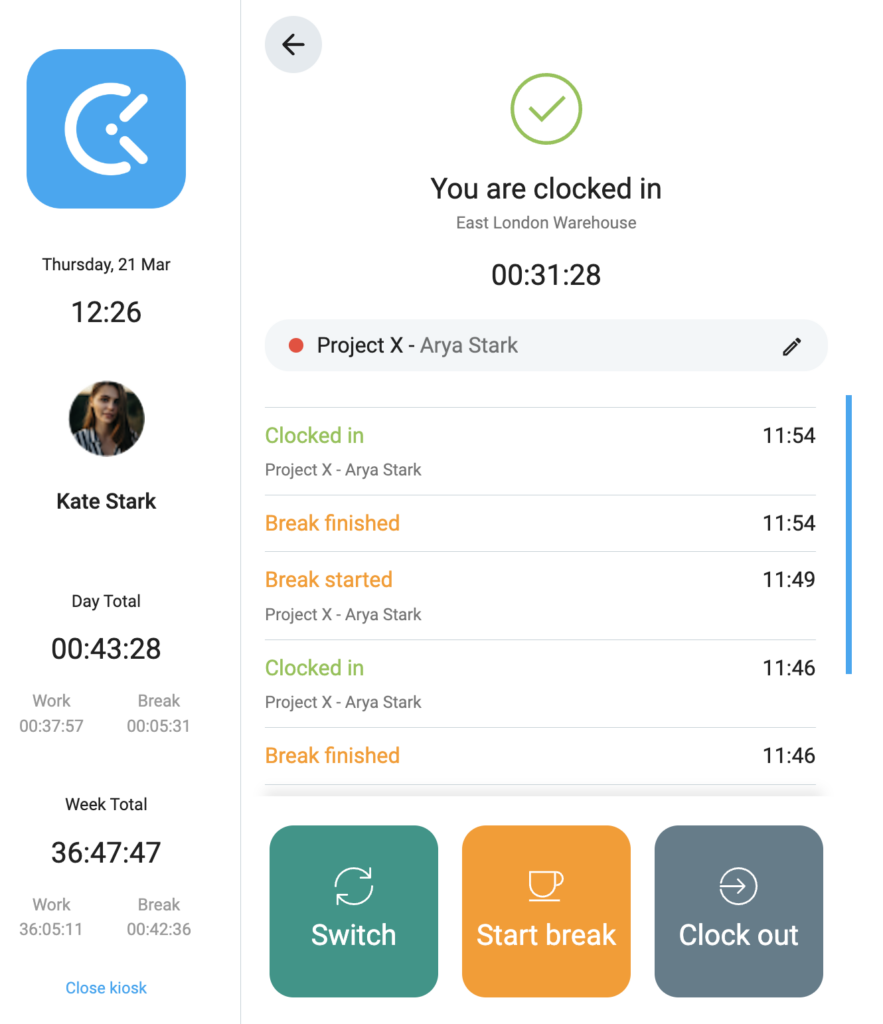
To start a break:
- Go to kiosk
- Select your profile
- Enter your PIN (if required) or scan QR code
- Choose Start break
If you’re clocked-in and start a break, you’ll be automatically clocked-out and a timer for break entry will start immediately.
People who are on a break will have an orange dot next to them on the kiosk list.
Team Dashboard also shows who’s currently clocked-in and who’s on a break in the web app.
Finish break #
To finish a break:
- Go to kiosk
- Select your profile
- Enter your PIN (if required) or scan QR code
- Choose Finish break
When you finish a break, you’ll be automatically clocked-in again. A break timer will end and a new clock-in timer will start.

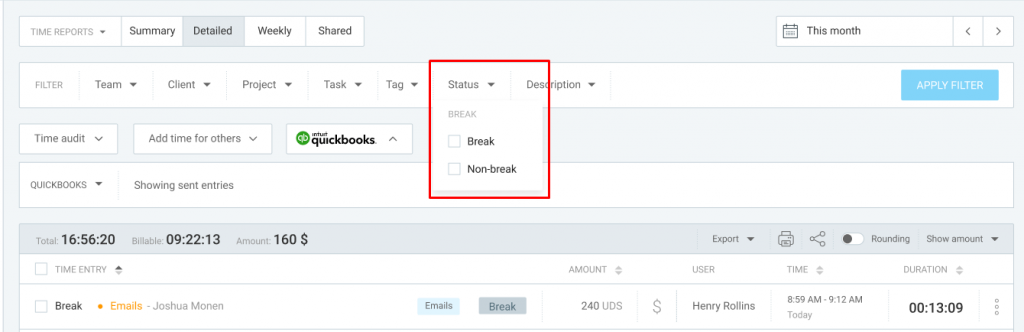
Reports for breaks #
You can distinguish break entries from regular work entries:
- On the Timer Tracker, Detailed report, and Approval, a break entry will have a gray “Break” tag
- In the Calendar, a break entry will have a coffee cup icon on it
- In the Timesheet, a new line shows all breaks summarized
You can define to which project/task break time will be tracked in the kiosk settings:
- Go to Kiosk page
- Click three dots next to some kiosk
- Choose a default project/task for break
- Save kiosk and all break time will be tracked to the selected project/task
Please note that you can change the default project/task break for one or multiple kiosks, if you’re a member of multiple kiosks. If you click a continue icon on a break entry (via Time Tracker or Calendar), a timer for a new break entry will start running.
You can create multiple kiosks if you are subscribed to a paid plan.
On the Timesheet, you can edit breaks, or copy them from previous week or via template.
In the Detailed report and Time Tracker, break entries can be edited in the same way as other time entries. You can also include them in invoices if they’re billable.
You can filter reports by break and non-break status in the Status filter.
You can see break status of each entry in the Detailed report export (Excel, CSV).
It’s not possible to remove the break tag from an entry.
If you need to manually create a break entry, duplicate an existing one and modify its information (e.g. start/end time, user, etc.). If you duplicate it while the Break feature is disabled, a regular entry will be created instead.
If you’re no longer on a paid plan, Break feature will be disabled, but time entries for break made by that point will remain visible, but not editable.