Invoice tracked time & expenses
Invoice tracked time and associated expenses to your clients, allowing them to compensate you for the rendered services. The invoicing process involves handling both tracked time and project-related expenses.
Invoicing is a paid feature, which you can use if you upgrade your workspace to Standard, Pro, or Enterprise plan.
Import time and expenses #
- Open the invoice in your workspace
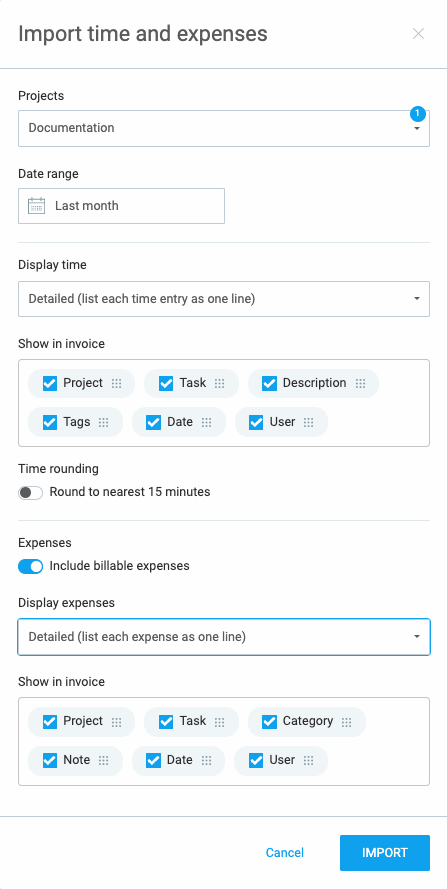
- Click on Import time and expenses
- Choose client projects you intend to invoice
- Specify date range and projects for which you want to import time and expenses
- For expenses, activate the Include billable expenses option
- Choose the grouping preference for items on the invoice:
- Single Item: Merge all hours/expenses into one line item
- Detailed: List each time entry/expense as an individual line item
- Grouped: Group hours by project, user, or date/category with further subgrouping options
Specify if you want to round imported time and click Import to finalize the process.

As a result, all time entries/expenses matching the selected date range and project/task will be imported.
Configure imported time and expenses #
Setting time rounding #
You can configure the time rounding option in the Workspace settings. Note that when rounding time, each individual time entry is rounded, not just the final total.
Line items #
Editing line items from the imported items (e.g. changing description, amount, or cost) won’t affect the actual time entries. If you delete a line item, all time entries from that item will lose their invoiced status.
Each imported expense will be marked as invoiced so you don’t accidentally invoice the same expense twice. If you remove a line item that contains imported expenses (or delete the whole invoice), those expenses will be marked as uninvoiced.
Configure invoices manually #
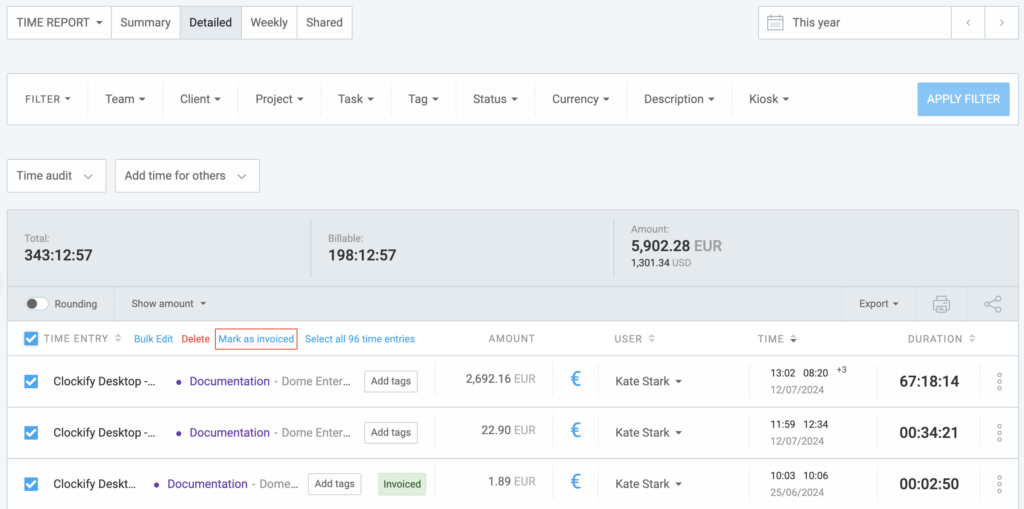
If you’d like to manually configure invoices, you can mark an expense as invoiced or uninvoiced in the Detailed expense report by selecting them through bulk edit.

Important considerations #
- Only uninvoiced and billable time entries and expenses can be imported
- You can import time and expense into an invoice multiple times, provided it is for the same client
- If entry is approved, after import:
- Invoice items are automatically populated
- Relevant entries are automatically marked as invoiced
- Deleting the entire invoice marks all entries as uninvoiced
- Expenses with a unit:
- The unit column in the invoice takes the unit information from the expense
- The price column in the invoice takes the price information from the category
- Expenses without a unit are displayed as a single unit in the invoice
- Item type in invoice:
- Imported time categorized as Service
- Imported expense categorized as Product
You can customize the names of Service and Product item types in the invoice settings. Additionally, you have the option to hide the item type column from the PDF.
Item type section appears only if the tracking expenses option is enabled in the Workspace settings.
You can always mark an expense as invoiced or uninvoiced manually in the Detailed Expense Report by selecting them via bulk edit.