Peppol e-invoicing add-on
The Peppol e-invoicing add-on allows you to send digital invoices over the Peppol network, so that your billing in compliant with local legislations and international standards (Peppol BIS 3.0)
To use this add-on, both you and your client must register on Peppol and have valid Peppol IDs.
Both versions of the Peppol e-invoicing add-on are paid. The Peppol e-invoicing Starter lets you send up to 20 invoices per month, and Peppol e-invoicing Growth lets you send up to 100 invoices per month.
Install Peppol add-on #
- Go to https://marketplace.cake.com/
- Log in with your Clockify credentials
- Search for Peppol e-invoicing in the search bar
- Select your preferred add-on plan:
- Peppol e-invoicing Starter (send up to 20 invoices per month)
- Peppol e-invoicing Growth (send up to 100 invoices per month)
5. Click Install on the add-on page
6. Select the workspace where you want to install the add-on
General settings #
After the add-on is installed, you’ll need to activate it in your Add-on settings.
- Click on the three dots next to your workspace name
- Select Workspace settings
- Click the Add-on tab
- Click the three dots next to Peppol e-invoicing add-on
- Select Settings
- Go to the General tab in the add-on settings
- Fill in the Sender (Bill from) information:
– Company name
– Address
– Tax ID
– Peppol ID - Click Connect e-invoice
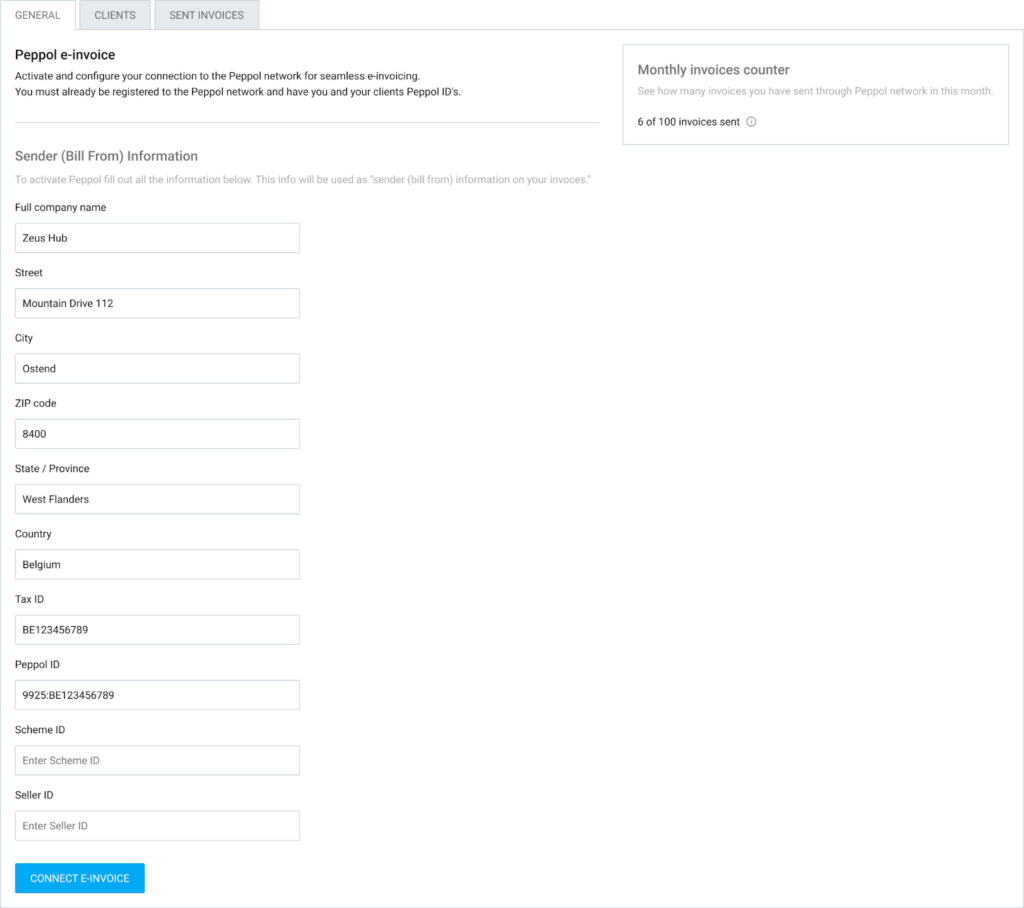
You can track your usage via the Monthly invoices counter. It shows how many invoices you’ve sent versus your monthly limit.
Manage clients #
Before you can send an e-invoice, your clients must be set up and verified in the add-on.
To manage your clients:
- Go to the Clients tab
- You’ll see a list of clients imported from your Clockify workspace
- Click the Set up button next to the client
- Enter the client’s company details and their Peppol ID
- Click Set up client
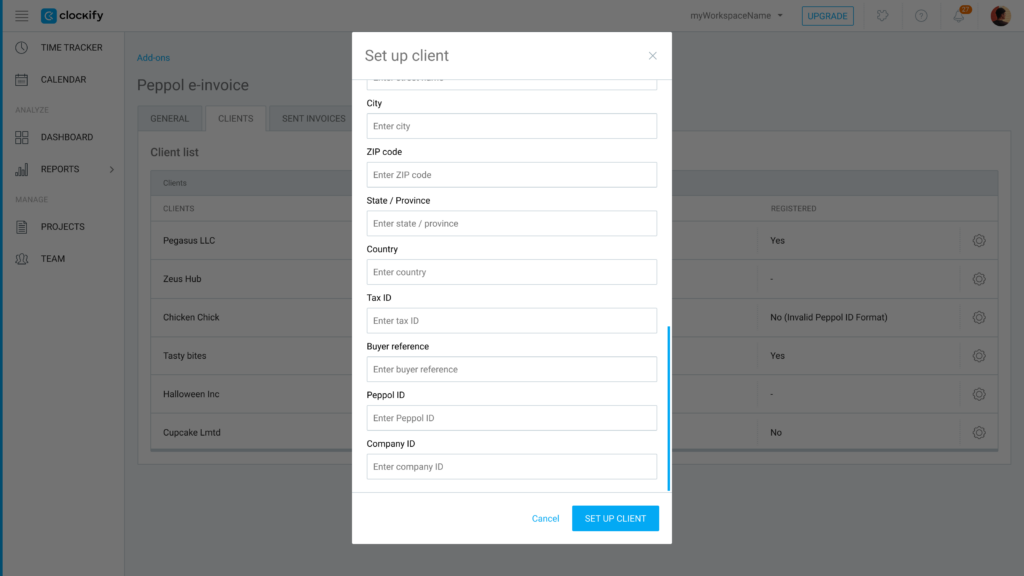
The system will automatically check if the client is registered in the Peppol network.
If it is not registered, it displays an error message explaining why the check failed.
Send invoices #
Once your company and clients are configured, sending an e-invoice is simple:
- Go to your Invoices page
- Open the invoice you wish to send
- Click on the Add-on actions dropdown menu
- Choose Send via Peppol

The invoice will be sent in the legally compliant Peppol BIS 3.0 format.
If you click Send to Peppol on the main invoice screen, all invoices shown on the page will be sent.
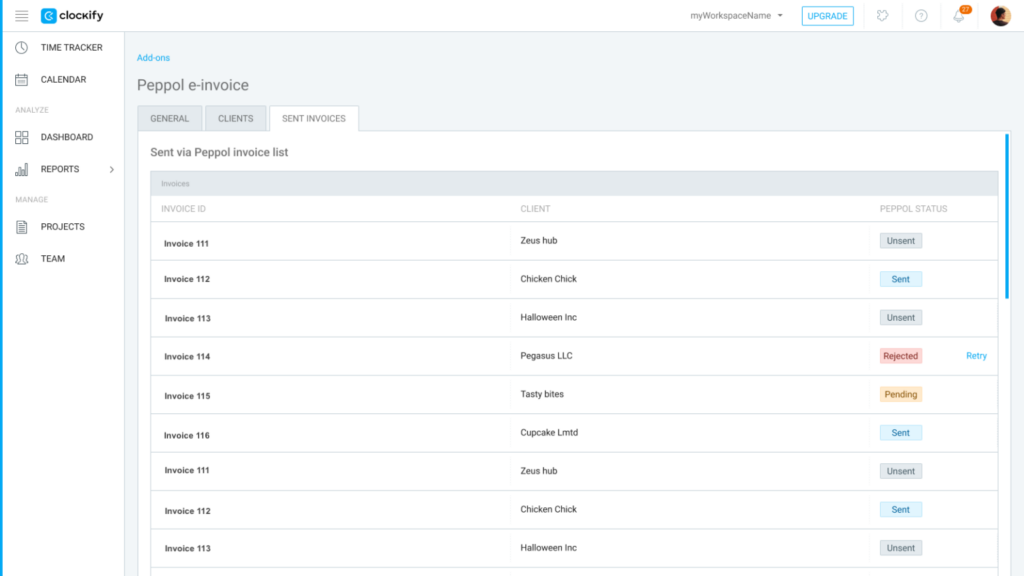
Track your e-invoices #
Use the Sent invoices tab in the add-on settings to monitor the status of your outgoing e-invoices.
See the following information:
- View history: See a list of all sent invoices, including the Invoice ID, Client, and specific Peppol status
- Failed invoices: If an invoice fails, the system will provide a reason (e.g., Client missing information)
- Retry: You can click Retry for any unsuccessfully sent invoice once you corrected the missing information
FAQ #
Who is eligible to use the Peppol e-invoicing add-on?
The add-on is available to workspaces on a Standard subscription plan or higher. Additionally, both you and your clients must be registered on the Peppol network and have your respective Peppol IDs ready to use the service.
How do I know if my client can receive e-invoices?
When you enter a client’s details and Peppol ID in the Clients tab, the system automatically verifies their registration in the Peppol network. If they are not registered, Clockify will display an error message explaining why the verification failed.
What happens if an invoice fails to send?
You can monitor the status of all outgoing documents in the Sent invoices tab. If an invoice fails, the system will provide a specific reason for the failure (such as missing client information). Once you have corrected the errors, you can simply click Retry to send it again.
Is there a limit to how many e-invoices I can send?
Yes, your usage is subject to a monthly limit based on your specific add-on tier. You can monitor your current usage through the Monthly invoices counter located in the add-on’s general settings.