Audit log
The Audit Log helps admins check user and system activities within the workspace. Its purpose is to provide information on who performed an action, what was changed, and when it happened.
The Audit Log is a paid feature available on the Enterprise plan.
Enable audit log #
By default, the Audit Log is not active. You must enable it and specify which categories of data you wish to track.
To enable audit log:
- Click the three-dot icon next to your workspace name in the top sidebar
- Select Workspace settings
- Navigate to the Audit Log tab
- Activate the Audit Log
- Check the boxes for the changes you wish to record:
- Time Entries
- Projects
- Tasks
- Clients
- Tags
- Expenses
Important note on linked changes #
Linked changes are secondary actions triggered automatically by the system when a primary item is modified or removed.
Because many items in Clockify are interconnected (such as time entries being linked to specific projects), a single change to one can have a “ripple effect” across others to ensure data consistency.
Example:
If you delete a project, the system also updates all associated time entries to reflect that they no longer belong to that project.
If you are tracking both Projects and Time Entries, you will see two logs in the Audit Log page linked to changes such as Project deleted and Time entry updated.
Run an audit report #
Once the feature is enabled, you can generate reports to review workspace activity.
To run a report:
- Click Run Report
- Go to Workspace Settings > Audit Log
- Apply filters as needed:
- Filter by Date — Select a date range (maximum range is 30 days per report).
- Filter by Author — Choose specific users, or select “System” to see automated activities logged by the app itself.
- Filter by Action — Select specific actions (e.g., “Deleted time,” “Created project”).
You can then proceed to:
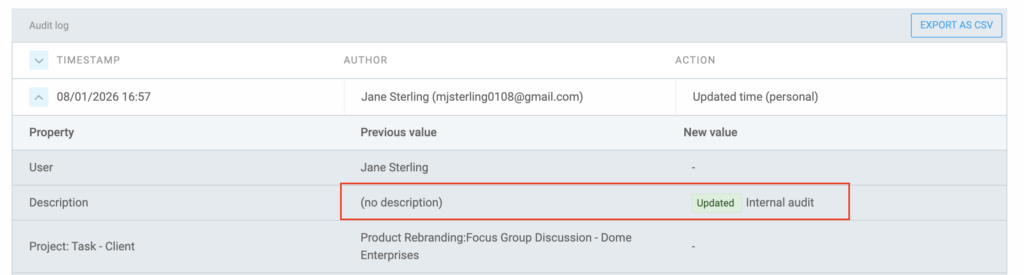
- Expand details — Click on any event in the table to see the following details:
- User
- Description
- Project
- Task
- Client
- Kiosk
- Type
- Start/end date
- Start/end time
- Duration
- Billable (Yes/No)
- Billable rate
- Cost rate
- Approved (Yes/No)
- Invoiced (Yes/No)
- Export data — Click Export as CSV to download a CSV file for external analysis in Excel or Google Sheets.
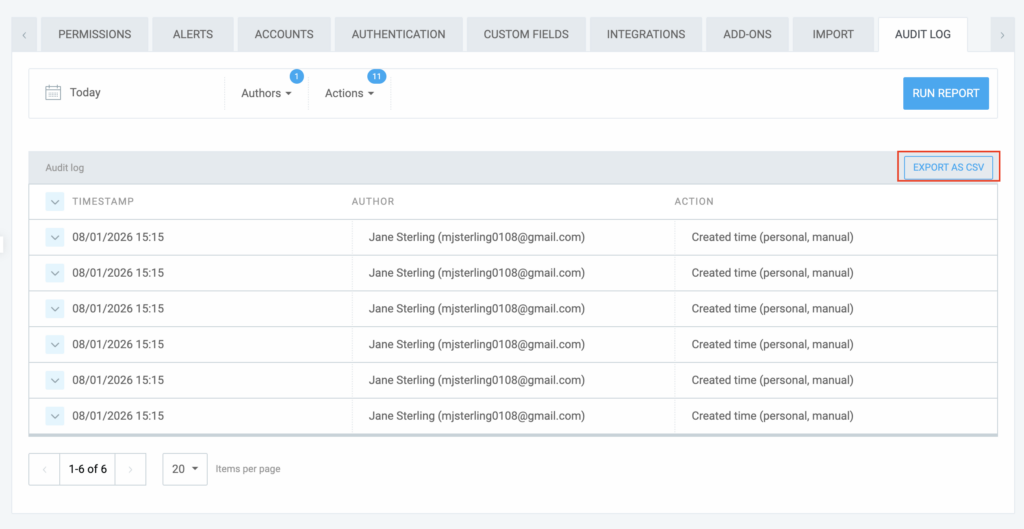
Large files may take time to generate. You can wait on the page or choose to have the file emailed to you.
Update events #
Update events provide a side-by-side comparison of changes made to any item in your workspace. Instead of just telling you that a change happened, these events capture the specific before and after state of the data.
Whenever a user modifies a setting, name, or value, the audit log records the change. The system categorizes these into two clear fields:
- Previous value: The state of the item before the edit.
- New value: The state of the item after the edit.
We recommend enabling the Audit Log as soon as you start using Clockify, because changes are logged only after it’s enabled.
- If the Audit Log is off when an entry is created, and you turn it on later to update that entry, Clockify may not have the “Previous Value” stored.
- Once an entry is updated for the first time while the log is active, all subsequent changes will show full comparison data.
Audit log data is stored for 1 year.
Tracked actions by category #
The following activities are recorded in the audit log:
| Category | Available Actions |
| Time entries | Created (Timer/Manual/Kiosk/Import), Updated, Deleted, Restored |
| Projects | Created (Manual/Import/QuickBooks), Updated, Deleted |
| Tasks | Created, Updated, Deleted |
| Clients | Created (Manual/Import/QuickBooks), Updated, Deleted |
| Tags | Created, Updated, Deleted |
| Expenses | Created, Updated, Deleted, Restored |
| Users | Logins, Profile Updates, Role Changes |