Single Sign-On (SSO) is an authentication method that lets your team log in to Clockify using existing company credentials (e.g., Okta, Azure, Google). This eliminates the need for separate passwords and centralizes access control.
Note
This is a paid feature, which you can enable by upgrading your workspace to Enterprise plan.
What happens when SSO is activated?
Once SSO is enabled and configured for your workspace:
Users will no longer use a Clockify-specific password. Instead, they will be authenticated through your organization’s Identity Provider (IdP).
If enabled, new users who log in via SSO for the first time will have a Clockify account automatically created and added to your workspace.
Your team will access Clockify through your custom subdomain (e.g., yourcompany.clockify.me).
Note
When accessing your custom subdomain for the first time, you must verify your identity via one-time-password (OTP) to meet our updated safety standards. This extra layer of security is only required during your initial login.
Activating SSO changes how your team accesses their accounts:
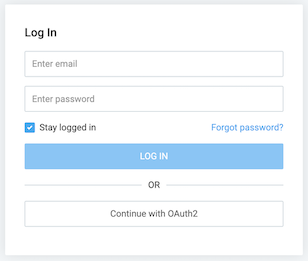
1. Users go to your workspace’s custom subdomain, such as acmecorp.clockify.me. 2. Clicking on Log in with SSO redirects to your company’s sign-in page (like Okta or Microsoft). 3. After entering their company credentials, they are instantly redirected back to Clockify, fully logged in.
Warning
If you disable Log in with email, users will be required to use SSO, preventing any logins via standard email/password combinations for maximum security.
Setting up custom subdomain
Note
To use SSO, you first need to move your workspace to subdomain. Once you do that, you can configure SSO settings and disable other login methods.
Moving to subdomain
Before you can configure and start using SSO for authorization, you need to move your Clockify app domain to a custom subdomain.
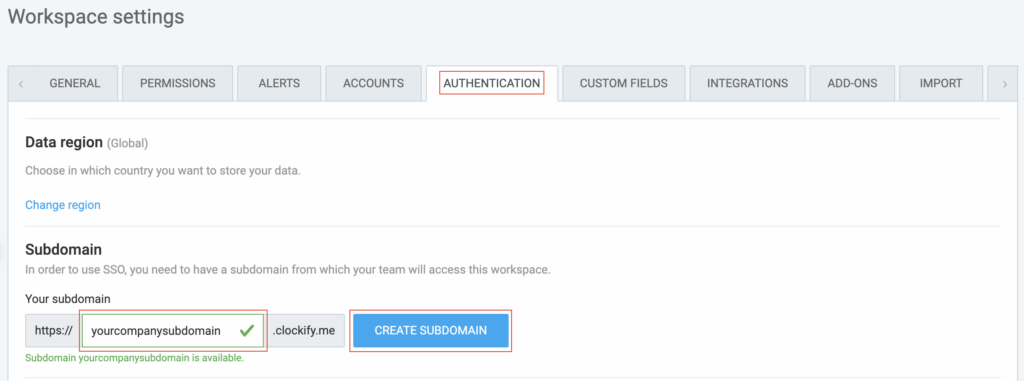
When you upgrade your Clockify subscription to Enterprise plan, you will get Authentication tab in the Workspacesettings. There, you can enter the subdomain you’d like to use and move your workspace there.
Click Create subdomain and Create to confirm the action
After you created your subdomain and moved your workspace there, Google login will no longer work for you and your users.
If you’d, however, like to use Google login, you need to set it up manually by configuring OAuth 2.0 (OIDC) for SSO.
Accessing Clockify from subdomain
After you create your subdomain, you’ll automatically be logged out of any apps you were logged in with your Clockify account. You’ll have access to them only through the subdomain you created (e.g. https://yourcompanysubdomain.clockify.me/login).
Workspaces on subdomain
To access multiple workspaces, log in to the main Clockify domain. Use the Workspace switcher (nine-dot icon) to access another workspace.
Changing subdomain
Info
Once you change your URL, your users will be logged out and will have to use the workspace through the new URL.
You can change subdomain URL at any time.
If you cancel the subscription to the Enterprise plan:
you’ll move back to the main domain when the subscription expires
your subdomain will become available for others to use
your users will have to log in with their email
API keys on subdomain
For security reasons, each user on subdomain gets a separate API key that works only for that workspace – meaning, no one can access your data on your subdomain unless they have the right authorization.
If, for example, there is a user with two separate Enterprise workspaces, workspace owners can’t see, or access data from each others accounts.
Inviting new users
Once you’re in the subdomain workspace, you can invite users one by one using email (like before), or let anyone join without you having to manually invite them.
To let anyone join, check the Users can join without an invite checkbox.
If you use SSO and someone without an account tries to log in, the account will be automatically created for them and they’ll log in.
If you allow Log in with email, people will be able to create an account and automatically join your workspace.
Configuring SSO
If you’d like to use SSO via your mobile devices (android or iOS) all the SSO configurations supported by Clockify should contain [yourcompany subdomain].clockify.me links. For example, in the Redirect URL section add https://yourcompanysubdomain.clockify.me/login/android/oauth2 or https://yourcompanysubdomain.clockify.me/login/ios/oauth2 link.
Clockify supports all major SSO identity providers:
Only workspace owner can see Authorization tab, manage subdomain, configure SSO, and turn SSO on/off.
If you wish to force everyone to log in with SSO, simply turn off the Log in with email option. Once this change has been saved, your workspace members accounts will be required to use SSO to log in.
Data in the SSO configuration can always be edited or deleted. If deleted, your users will have to switch back to logging in by using email.
Owner can always log in using the original credentials at https://mysubdomain.clockify.me/login-owner
To add Default Relay State, use the parameters below.
Note
Make sure to use curly brackets and straight quotes instead of the curly ones, otherwise it won’t work.
In General Settings form, enter the following information and click Next
App name: e.g. Clockify
Logo: e.g. upload Clockify logo
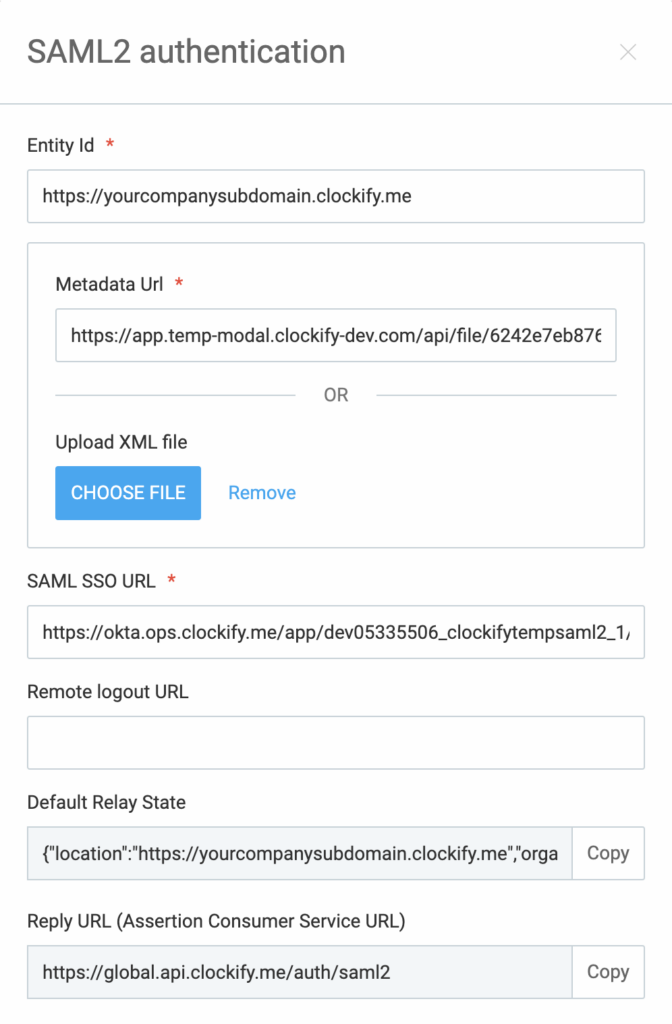
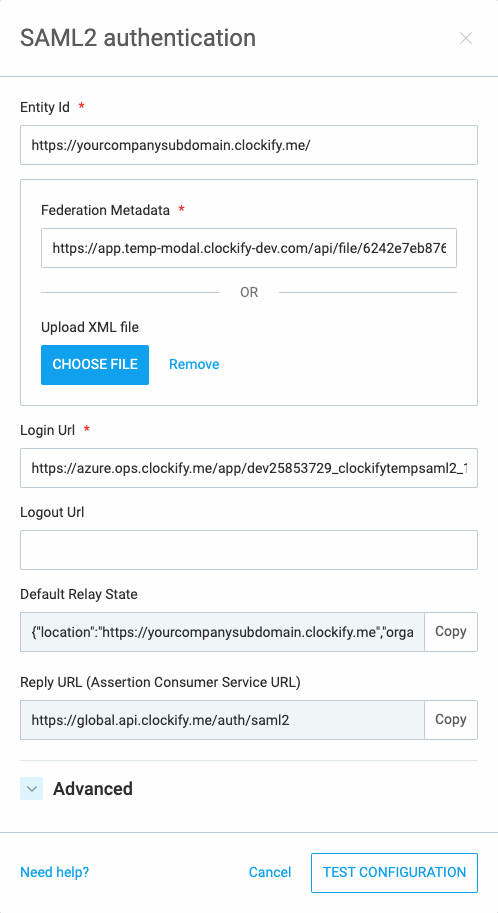
In Configure SAML form, enter the following information:
Single sign on URL (or ACS): Specific URL that SAML assertions from Okta should be sent to (e.g. https://global.api.clockify.me/auth/saml2)
Audience URI (Entity ID in your app): Unique identifier of your custom application; same as Entity Id in SAML authentication field (e.g. https://yourcompanysubdomain.clockify.me)
Default Relay State: IdP-initiated authentication so that users can log in to Clockify straight from the Okta dashboard
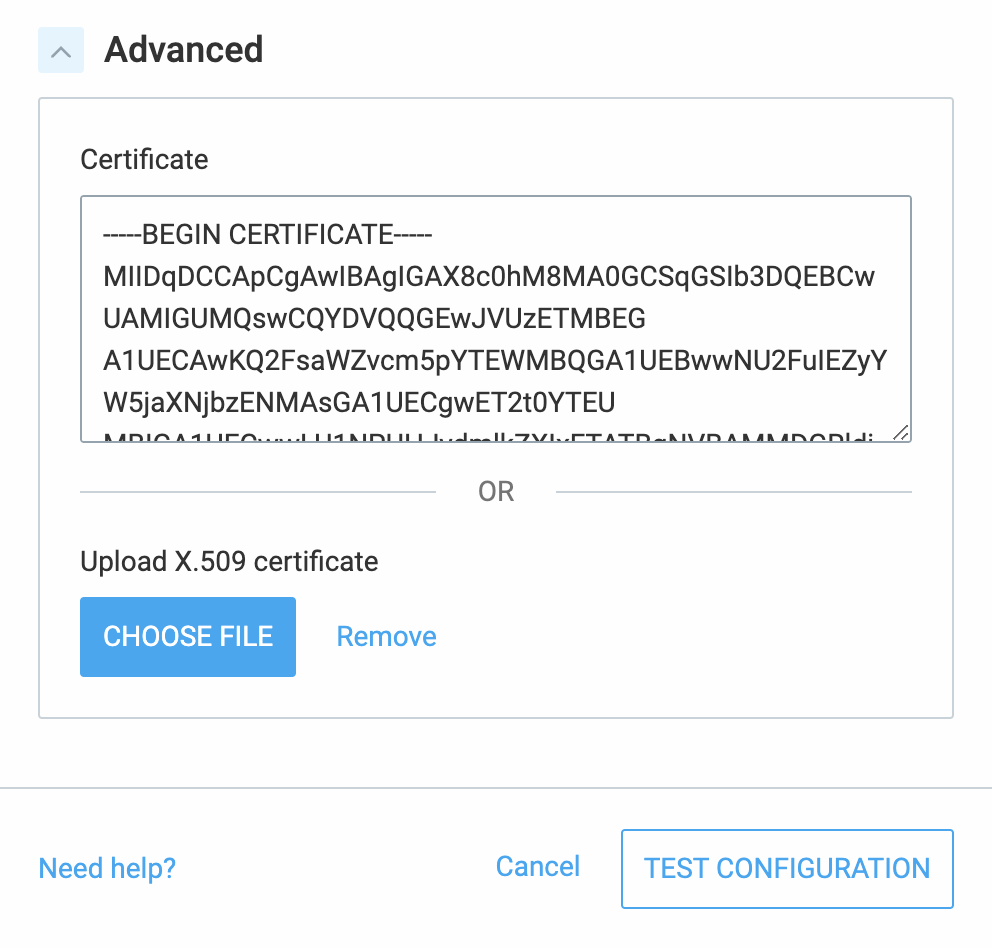
Finally, your screen in Clockify should look something like this:
and
After entering all required data, you can choose to verify your configuration by clicking the Test configuration button. This action ensures the accuracy of the provided information. If everything is correct, the Test configuration button will be replaced with a Finish configuration button.
Click Finish configuration to complete the process and enable Log in with SAML2. Optionally, disable Log in with email and password.
Step 4: Assign application in Okta
In Okta:
Navigate to Applications
Choose Clockify
In Assignments tab click Assign
Choose Assign to People/Groups depending on who from your Okta account you’d like to be able to access Clockify
And that’s it! Now you, and your workspace users are able to log in to your workspace with SAML2.
Choose OneLogin as IdP Template and fill out the following fields
Audience (Entity Id): Clockify
Metadata Url: Go to OneLogin > SSO and copy Issuer URL then paste it in Metadata Url in Clockify
Login Url: Copy/paste SAML 2.0 Endpoint (HTTP) from SSO section in OneLogin
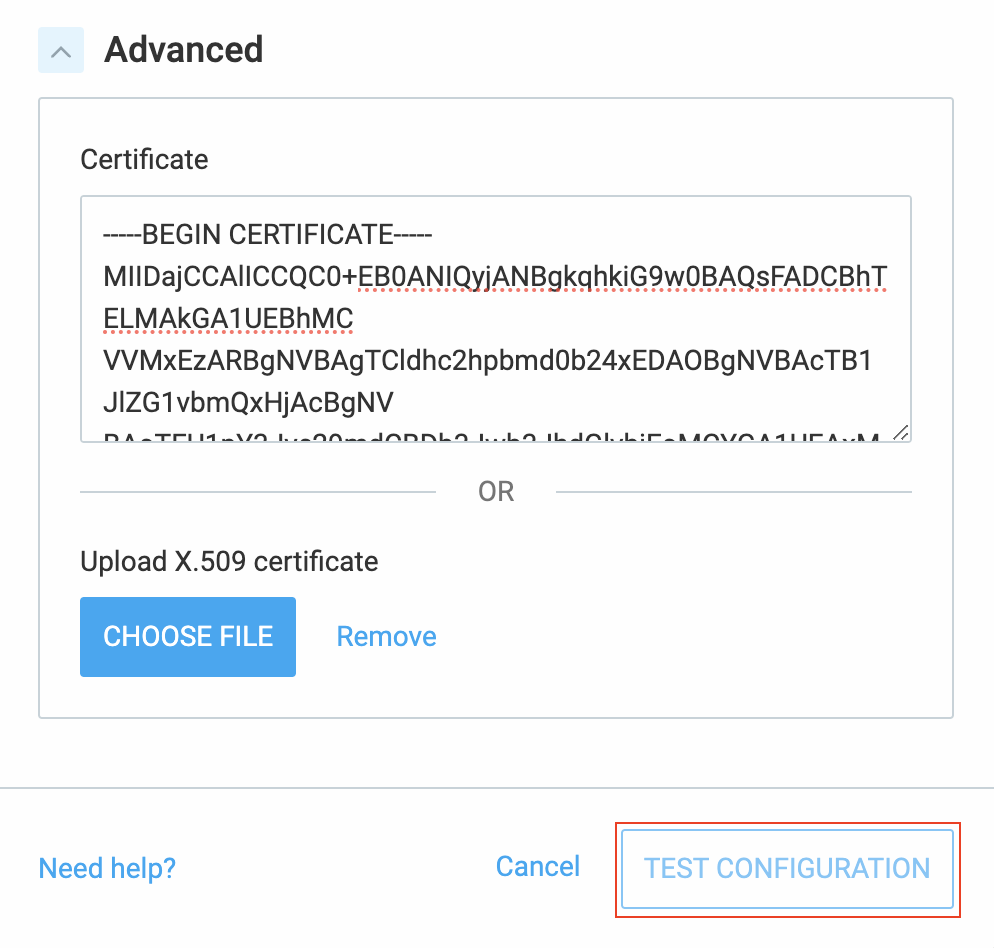
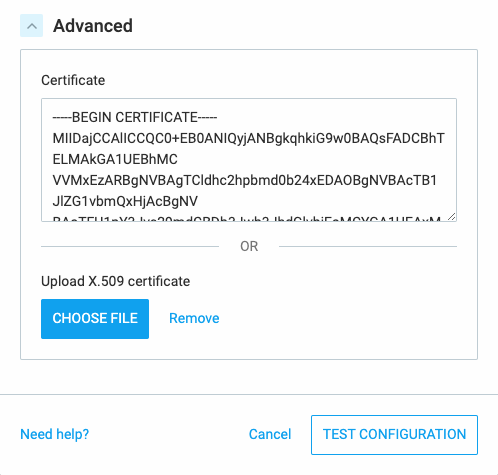
In Advanced section, enter:
Certificate: Copy/paste the X.509 Certificate from View Details, SSO in OneLogin
Step 4: Assign application in OneLogin
In OneLogin:
Navigate to Users (this is where you choose which users from your OneLogin account will be able to access Clockify)
Click on the specific User
In Applications, click the + sign to add an app
Choose Clockify
Click Continue and Save
In Clockify, after entering all required data, you can choose to verify your configuration by clicking the Test configuration button. This action ensures the accuracy of the provided information. If everything is correct, the Test configuration button will be replaced with a Finish configuration button.
Click Finish configuration to complete the process and enable Log in with SAML 2.0. Optionally, you can disable Log in with email and password.
And that’s it! Now you, and your workspace users are able to log in to your workspace with SAML 2.0.
You’ll proceed to the Google Identity Provider details screen Google side:
Download IdP metadata URL and upload it to Clockify/IdP Metadata URL field
Copy SSO URL and paste it to Login URL field in Clockify Clockify side:
Click Continue Google side:
You’ll proceed to Service provider details
Insert the following: – ACS URL: Copy/paste Reply URL from Clockify, e.g. https://global.api.clockify.me/auth/saml2 – Entity ID: Unique identifier of your custom application, e.g. Clockify – Start URL: Copy/paste Default Relay State from Clockify, e.g.
After entering all required data, on the Clockify side, you can choose to verify your configuration by clicking the Test configuration button. This action ensures the accuracy of the provided information. If everything is correct, the Test configuration button will be replaced with a Finish configuration button.
Now that you’ve completed all the steps and created the app, open the app’s settings and in Service status enable the app for everyone.
The app you created will appear in the Google workspace for all the users of that workspace.
Give app a descriptive name, select category and upload a logo
Check Single Sign-on (SAML)
Click Continue
Confirm that you are Application admin
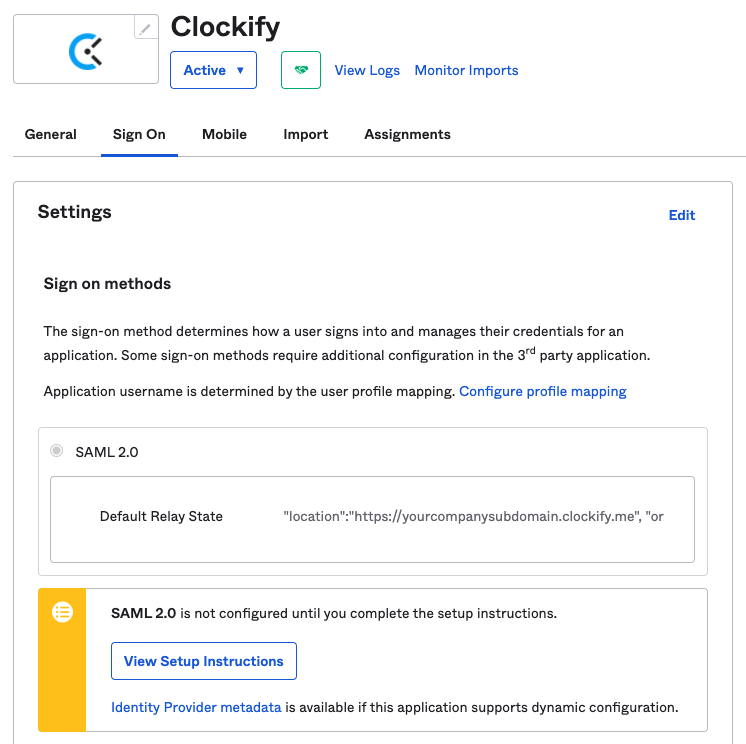
New page with SSO instructions opens and you can proceed with the next step. The page contains SSO Setup instructions which include the IdP Metadata XML file.
Download IdP Metadata from Rippling.
Step 3: Add SSO configuration in Clockify
In the Authentication tab in which you created your subdomain:
Click Add SSO Configuration
Choose SAML2 as authentication type and click Next
Choose Rippling as IdP Template
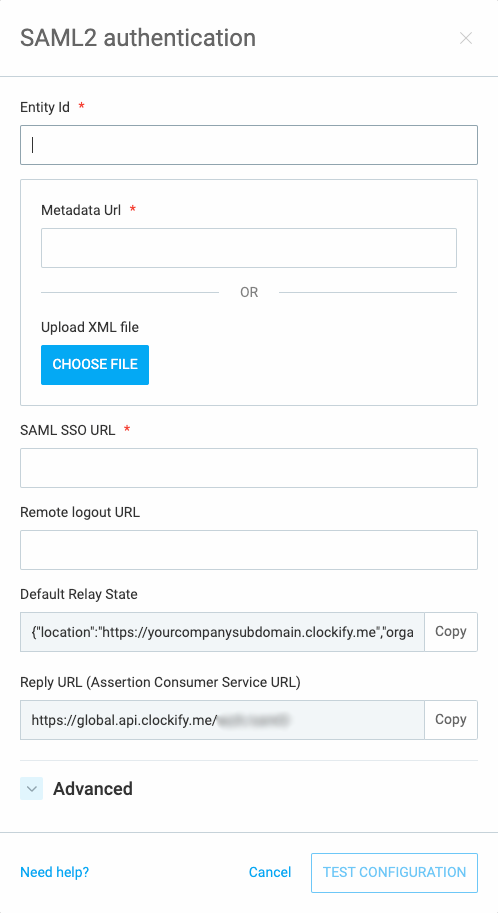
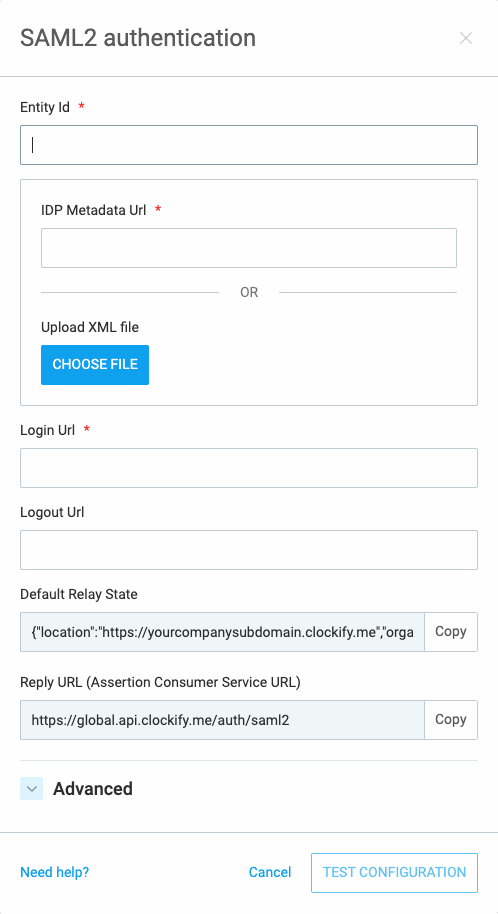
In SAML2 authentication form that appears, enter the following information:
Upload IdP Metadata XML file you downloaded in Step 2 or
Copy/paste IdP Metadata URL from Rippling
Login Url: Copy/paste Single Sign-on URL/Target URL from Rippling
After entering all required data, you can choose to verify your configuration by clicking the Test configuration button. This way you can be certain of the accuracy of the provided information. If everything is correct, the Test configuration button will be replaced with the Finish configuration button.
Click Finish configuration to complete the process and enable Log in with SAML2. Optionally, disable Log in with email and password.
Step 4: Assign application in Rippling
Navigate back to Rippling.
On SSO Instructions page scroll down and enter the following:
ACS URL: Copy/paste Reply URL from Clockify
Service Provider Entity ID: Copy/paste Entity ID from Clockify
Click Move toNext Step
Choose Access Rules you want
Choose Provision Time you want
Configure SSO for Admins if necessary
Configure Group Attributes if necessary
Click Connect via Rippling if you’d like to check the connection between apps or simply Continue
And that’s it! You’ve successfully installed your application in Rippling and you and your users are now able to log in to your workspace with SAML2.0.
In the Authentication tab in which you created your subdomain:
Click Add SSO Configuration
Choose SAML2 as authentication type and click Next
Choose JumpCloud as IdP Template
Step 3: Create application in JumpCloud
Navigate to SSO in the sidebar on the left
Click + to add new app
Choose Custom SAML App
In Application Information enter the following:
Display Label: Application name e.g. Clockify
Logo: e.g. upload Clockify logo
In SSO tab you can proceed with the next step. The page contains SSO Setup instructions which include the IdP Metadata XML file. Download IDP Metadata from JumpCloud and save it for later.
In User attribute mapping add attributes mapping Service Provider Attribute Name to JumpCloud Attribute Name
Click Activate
Open the application you created
Click on IDP Certificate Valid on the left and download the certificate
Click Save
You’ve successfully created your application in JumpCloud. Now you can decide which users from your JumpCloud account will be able to access Clockify and finish the configuration in Clockify.
Step 4: Finish SSO configuration in Clockify
Navigate back to Clockify
In SAML2 authentication form enter the following information:
Metadata Url: Upload IdP Metadata XML file you downloaded in Step 3
IdP Url: Copy/paste IDP URL from JumpCloud
Advanced: Copy/paste IDP Certificate from JumpCloud
After entering all required data, you can choose to verify your configuration by clicking the Test configuration button. This action ensures the accuracy of the provided information. If everything is correct, the Test configuration button will be replaced with a Finish configuration button.
Click Finish configuration to complete the process and enable Log in with SAML2. Optionally, disable Log in with email and password.
Once you move to subdomain, the default Google login will stop working and you’ll have to configure it manually to continue using it.
Setting up Google login is quick and easy.
You need to have a G Suite or Cloud Identity account in order to do this.
You need to Set up OAuth 2.0 in your Google account, create a project and get OAuth 2.0 client ID for a web application.
In Google Cloud Platform navigate to API & Services and choose Credentials. Open the project/application you’ve created and paste https://yourclockifysubdomain.clockify.me/login under the Authorized redirect URIs.
You should also add then following URIs in order for the OAuth login to work on Clockify mobile apps:
If you’re using one of the regional servers for hosting, please note that the URIs for workspaces that are on subdomain won’t contain the indicator of the region in question, although they are hosted on a regional server.
In Clockify, go to Authentication tab
Click Add SSO Configuration
Choose OAuth2 authentication type
Choose Google in IdP Templates modal
Click Next
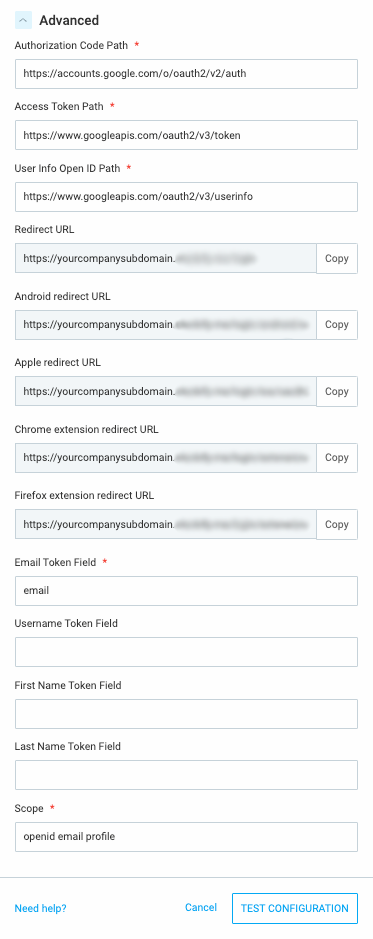
Copy/paste Client ID and Client Secret from your Google app as seen in the example below (fields in the Advanced section will be pre-populated)
Your screen in Clockify should look something like this:
and
After entering all required data, you can choose to verify your configuration by clicking the Test configuration button. This action ensures the accuracy of the provided information. If everything is correct, the Test configuration button will be replaced with a Finish configuration button.
Click Finish configuration to complete the process. Check theLog in with OAuth checkbox to start using Google login. Optionally, you can force everyone to use your company’s Google identity for logging in by disabling Log in with email and password.
Supported account types: Choose what you prefer; in our case it’s Accounts in this organizational directory only (Default Directory only – Single tenant)
Redirect URI: Paste Redirect URL you copied from Step 2; https://yourcompanysubdomain.clockify.me/login (it can also be: https://yourcompanysubdomain.clockify.me/login/ios/oauth2 or https://yourcompanysubdomain.clockify.me/login/android/oauth2) and click Register to continue
Or, if you’re using one of the regional servers, you should add one of the regional URLs.
Step 4: Configure (Clockify & Azure)
Configure AzureAD:
Certificates & Secrets:
Choose New client secret
Description: Clockify
Expires: Never
Click Add
Client Secret: Copy/paste the value of this client secret
API permissions:
Add a permission
Microsoft Graph
Check openid in Delegated permissions
Add permissions (you can also check other permissions such as email and profile)
Refresh the page
Go back to Overview
Configure Clockify:
OAuth2 authentication:
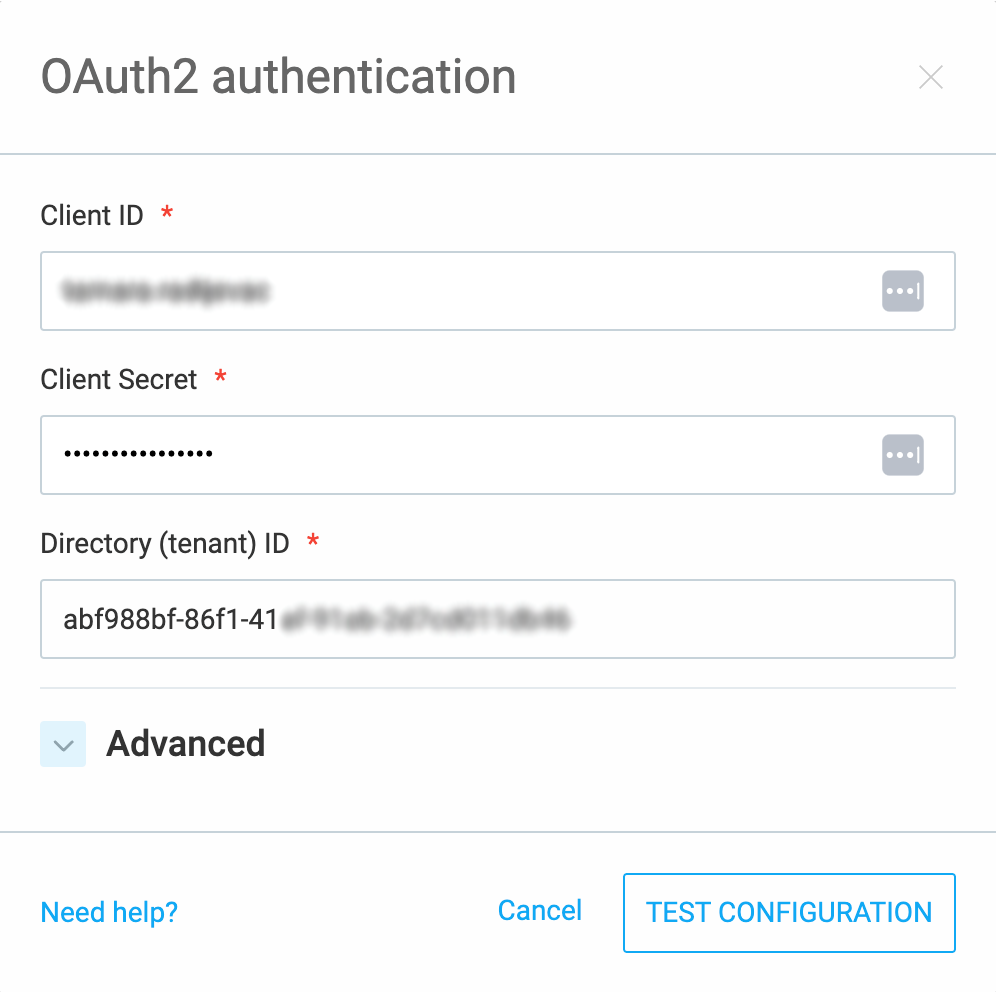
Client Id: Go to Azure — Overview — Application (client) ID: copy the value and paste it back in Clockify
Client Secret: this should already be pasted from previous steps (Certificates & Secrets)
Directory (tenant) ID: Go to Azure — Overview — Directory (tenant) ID copy the value and paste it back in Clockify
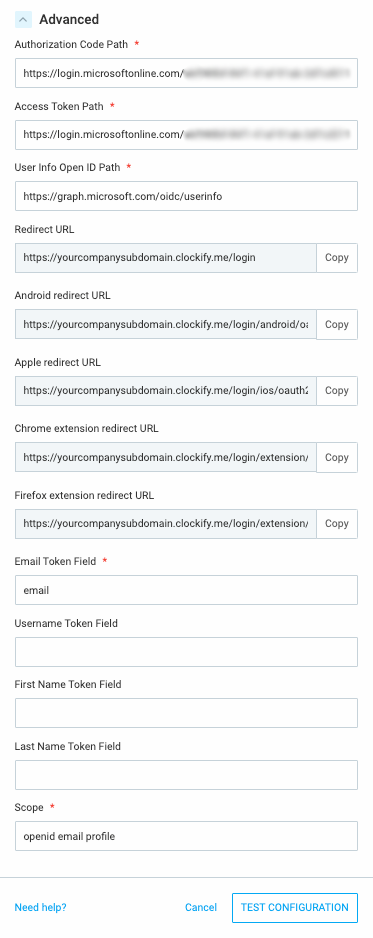
Fields in the Advanced section will be pre-populated.
Your screen in Clockify should look something like this:
and
After entering all required data, you can choose to verify your configuration by clicking the Test configuration button. This action ensures the accuracy of the provided information. If everything is correct, the Test configuration button will be replaced with a Finish configuration button.
Click Finish configuration to complete the process. Check the Log in with OAuth checkbox (and optionally disable Log in with email and password).
New application (then make sure you’re on the new gallery view)
Choose Create your own application
Enter the following:
Name: Clockify
Integrate any other application you don’t find in the gallery
Click Create and navigate to Properties and fill out the fields:
Logo: e.g. upload Clockify logo
Optionally change User assignment required and Visible to users if necessary
Click Save to complete the process.
Step 3: Clockify
Click Add SSO Configuration
Choose SAML2 as authentication type
Click Next
Once you get the SAML2 authentication template, go back to Azure.
Step 4: Azure SSO configuration
Navigate to Single sign-on in the sidebar
Choose SAML
Basic SAML Configuration (click the pencil to edit):
Identifier (Entity ID): This is where you put your subdomain address, e.g. https://yourcompanysubdomain.clockify.me/
Reply URL (Assertion Consumer Service URL): go back to Clockify and copy pre-generated Reply URL, e.g. https://global.api.clockify.me/auth/saml2
Click Save and continue with SAML Certificate: (click the pencil to edit):
New certificate
Save the changes and click the 3 dots on the Inactive certificate, choose Make certificate active and click Yes.
Now, reload the page to see the changes.
Step 5: Clockify
Entity Id: (this is where you put your subdomain address, in our case it’s https://yourcompanysubdomain.clockify.me/)
Federation Metadata: Navigate to Azure, under SAML Certificates copy/paste App Federation Metadata Url in Clockify
Login Url: Navigate to Azure, under Set up Clockify find Login URL and copy/paste it in Clockify
Your screen should look like this:
and like this:
After entering all required data, you can choose to verify your configuration by clicking the Test configuration button. This action ensures the accuracy of the provided information. If everything is correct, the Test configuration button will be replaced with a Finish configuration button.
Click Finish configuration and enable Log in with SAML2 (and optionally disable Log in with email and password).
Step 6: Assign application in Azure
Navigate to Users and Groups in the sidebar (where you choose which users from your Azure account will be able to access Clockify)
or, if you’re using one of the regional servers, you should add one of the regional URLs.
Then, scroll down and in the Assignments section check Allow everyone in your organization to access option. Click Save to complete the action.
You should get the screen that looks like this:
Step 3: Add SSO configuration in Clockify
Now, in Clockify, in Authentication screen where you created your subdomain:
Click Add SSO Configuration at the bottom of the screen
Choose OAuth2 as authentication type
Choose Okta as IdP Template
Click Next
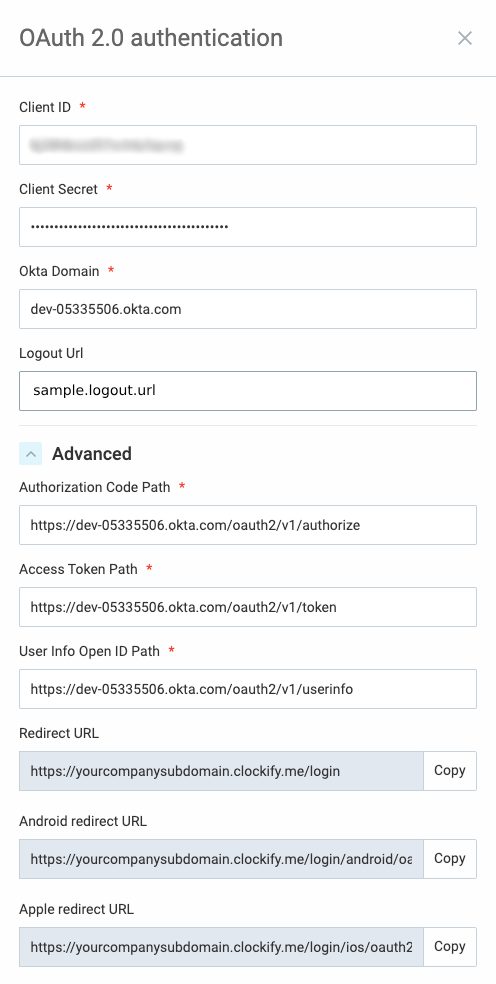
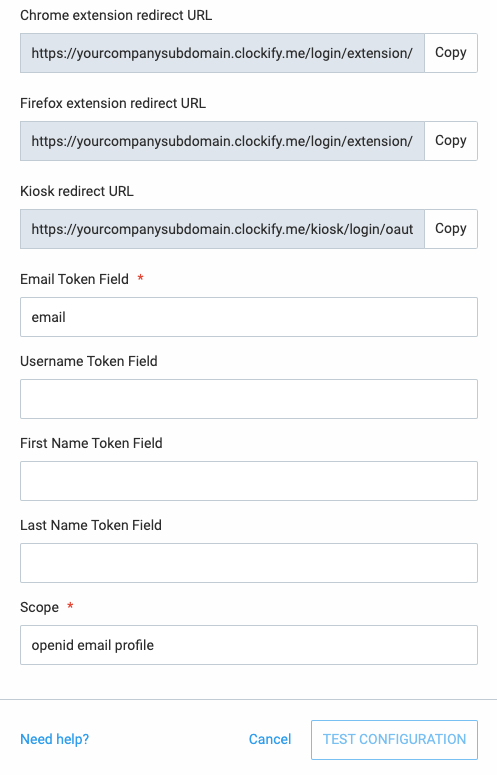
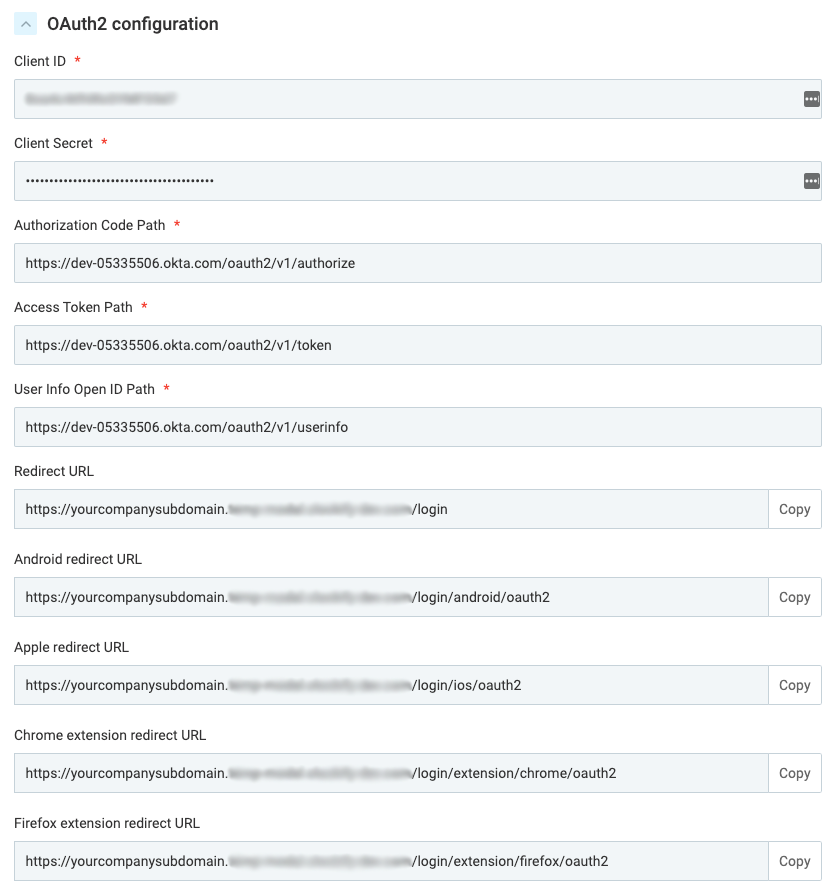
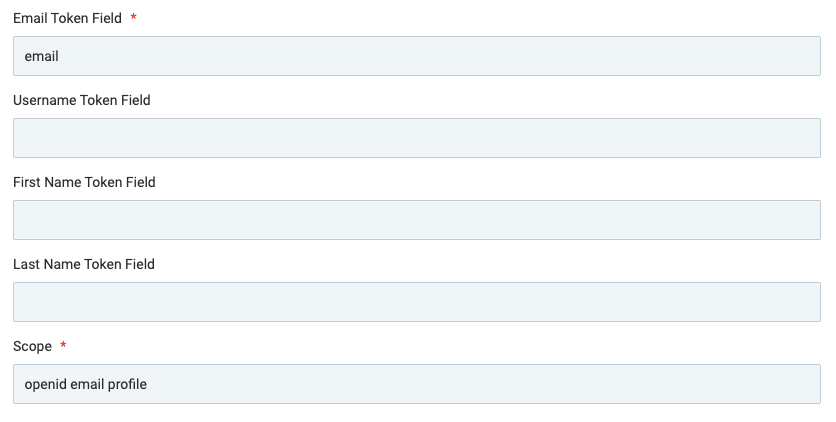
In OAuth 2.0 (OIDC) authentication form enter the following information:
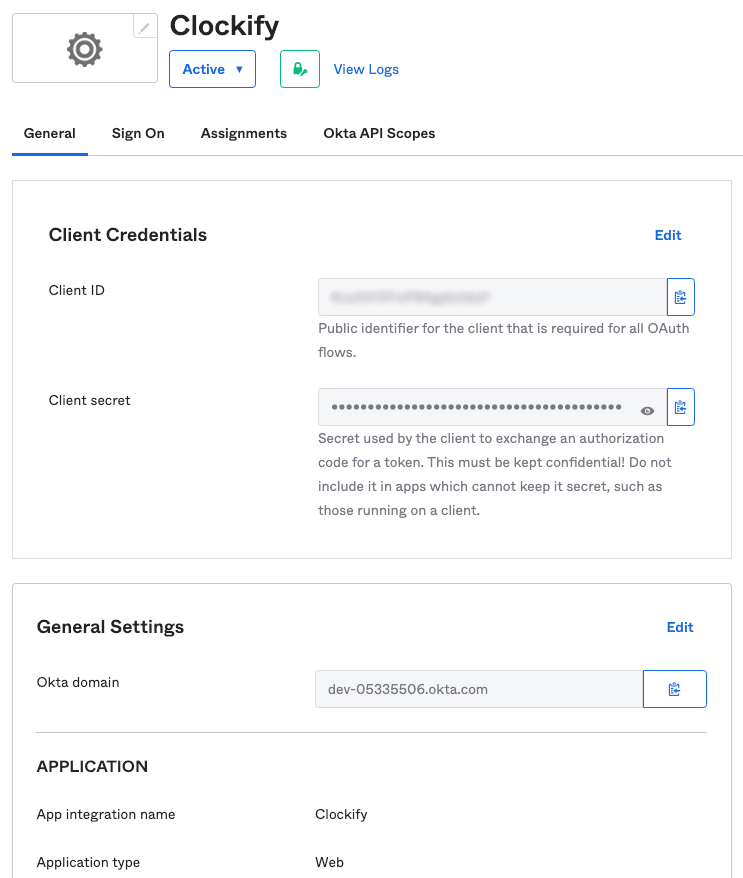
Client ID: Generated in Okta in the previous step; copy it from the Client Credentials section
Client Secret: Same as Client ID; copy it from the Client Credentials section
Okta Domain: Copy it from Okta, General Settings, Okta domain field (Note: Okta Domain requires a domain name only, for example: doamin_name.okta.com instead of: https://domain_name.okta.com)
Logout Url: Optionally add a logout URL to set up redirection after logging out
Advanced section is pre-populated (automatically generated)
The screen should look something like this:
and
Step 4: Assign application in Okta
In Okta:
Navigate to Applications
Choose Clockify
In Assignments tab click Assign
Choose Assign to People/Groups depending on who from your Okta account you’d like to be able to access Clockify
After entering all required data, on the Clockify side, you can choose to verify your configuration by clicking the Test configuration button. This action ensures the accuracy of the provided information. If everything is correct, the Test configuration button will be replaced with a Finish configuration button.
Click Finish configuration to complete the process and enable Log in with OAuth. Optionally, you can disable Log in with email and password.
Finally, your screen in Clockify should look something like this:
And that’s it! Now you, and your workspace users are able to log in to your workspace with OAuth 2.0 (OIDC).