Extras

Custom fields

Add additional fields to time entries and track anything!

With custom fields, you can manually track: expenses, mileage, breaks, overtime, invoice status, number of units, custom dropdowns, quantity, codes, location, equipment, estimate, deal number, link to ticket, receipts, images, all sorts of IDs (invoice, task, user, project)… and more!

In addition to user data, you can also track project metadata – perfect when you need to analyze data in pivot tables, or when you need to integrate Clockify with external systems via API.

If you wish to add custom fields to users (like Employee ID), you can use user fields.

Custom fields are an extra feature, which you can enable by upgrading your workspace to Pro or Enterprise plan.

Users can enter data into custom fields via: web, browser extension, iOS, Android, and Mac (support for Windows coming soon).

User interface displayed in this video may not correspond to the latest version of the app.

Creating fields #

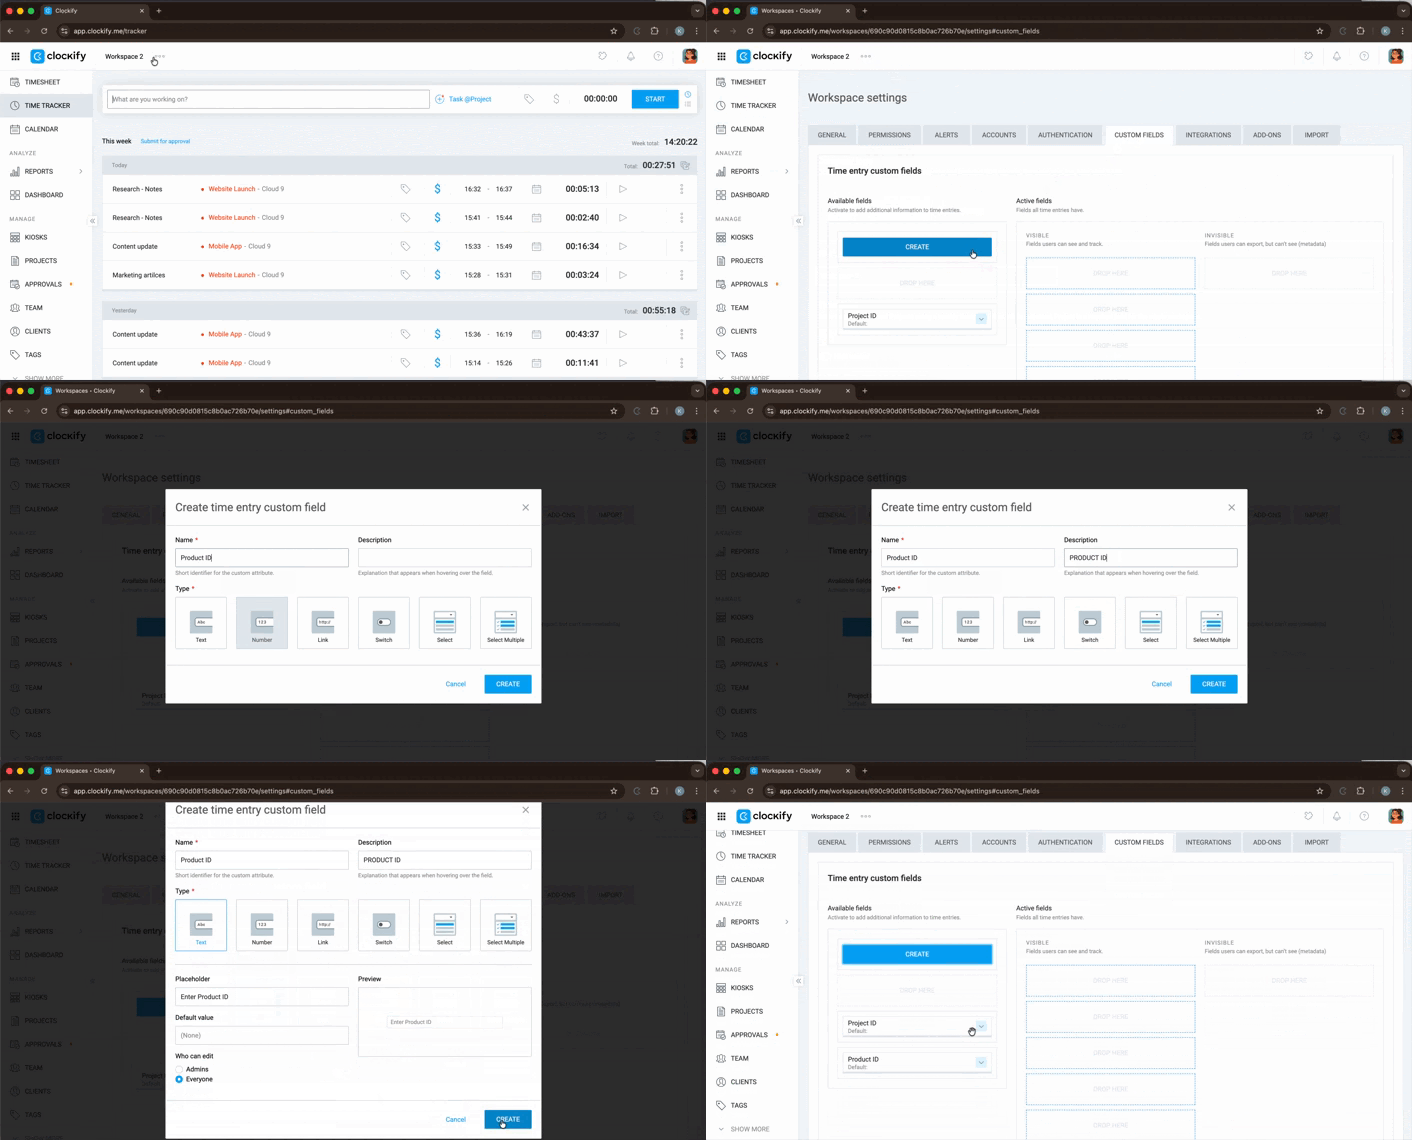
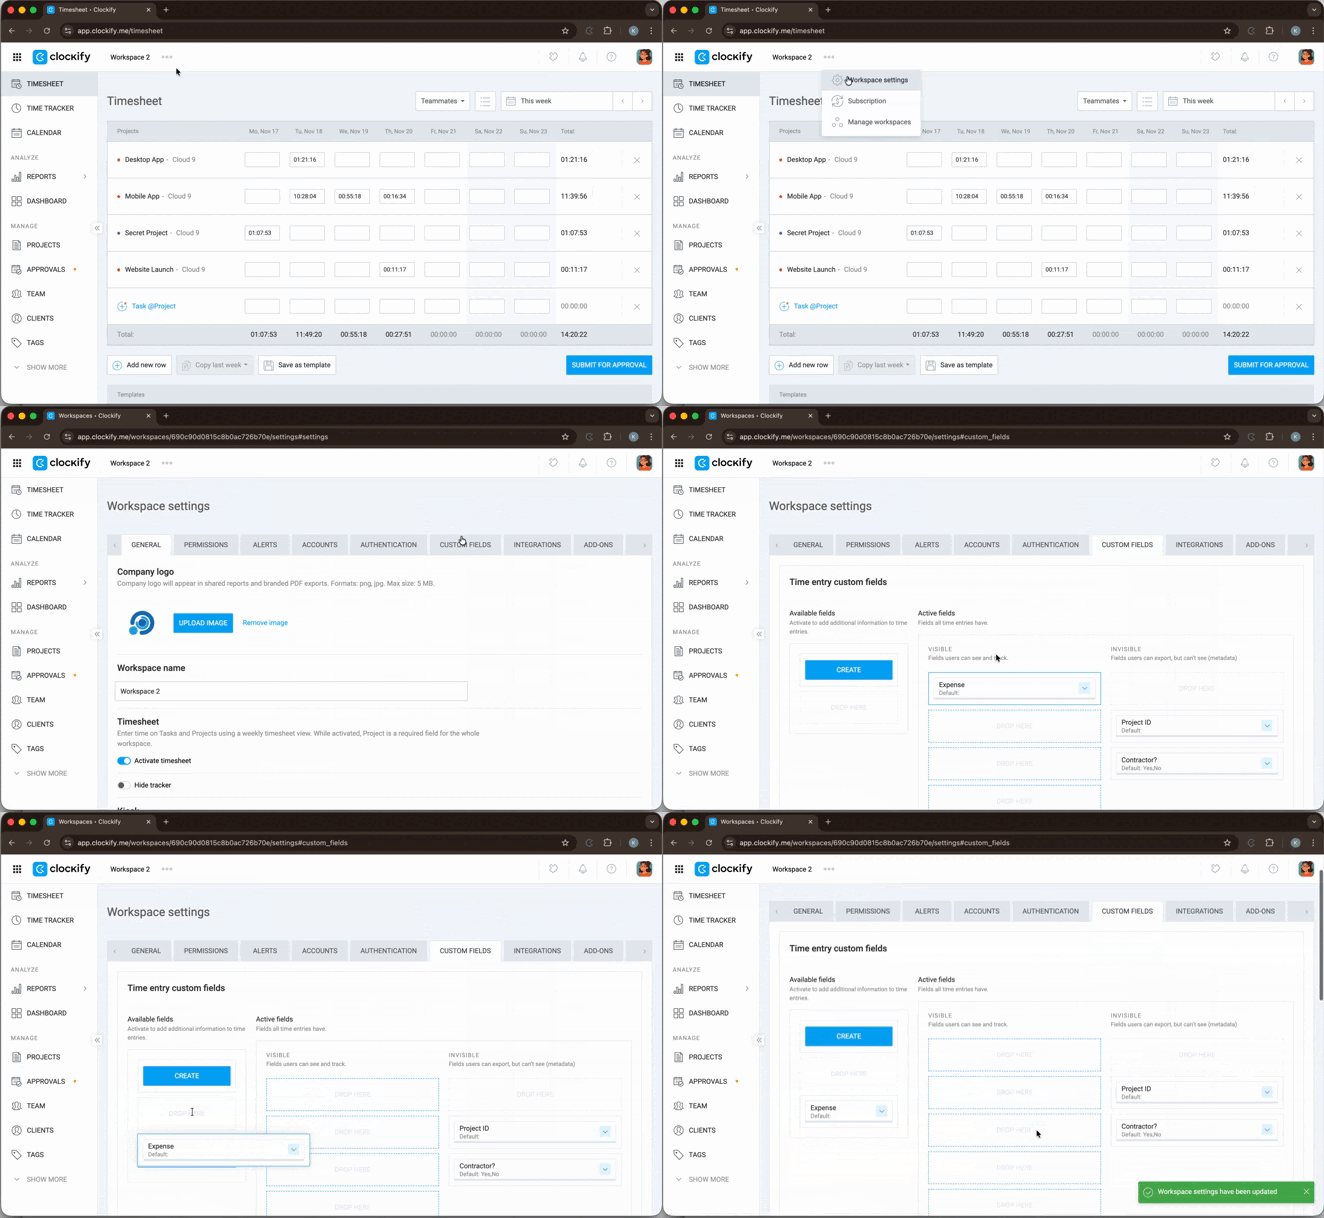
You can create custom fields in Workspace Settings > Custom Fields tab. You can have up to 50 fields in a workspace.

When creating a field, you need to specify field type:

  • Text – input field where you can type anything you wish (project ID, additional notes, coordinates)
  • Number – input field that accepts only numerical values (mileage, expenses, number of units)
  • Link– input field that accepts URL to websites or files (receipts, screenshots, documents, task reference)
  • Switch – a simple yes/no switch (invoiced, paid, urgent)
  • Select – input field that lets users select a single option from a pre-determined list (location, status, category)
  • Select multiple – input field that lets users select any number of values from a pre-determined list (equipment used, custom tag list for a project)

You can also prevent regular users from entering or changing data by settings Who can edit: Admins (for example, you can have Unpaid/Paid status which users can see but only admins can change).

Using fields #

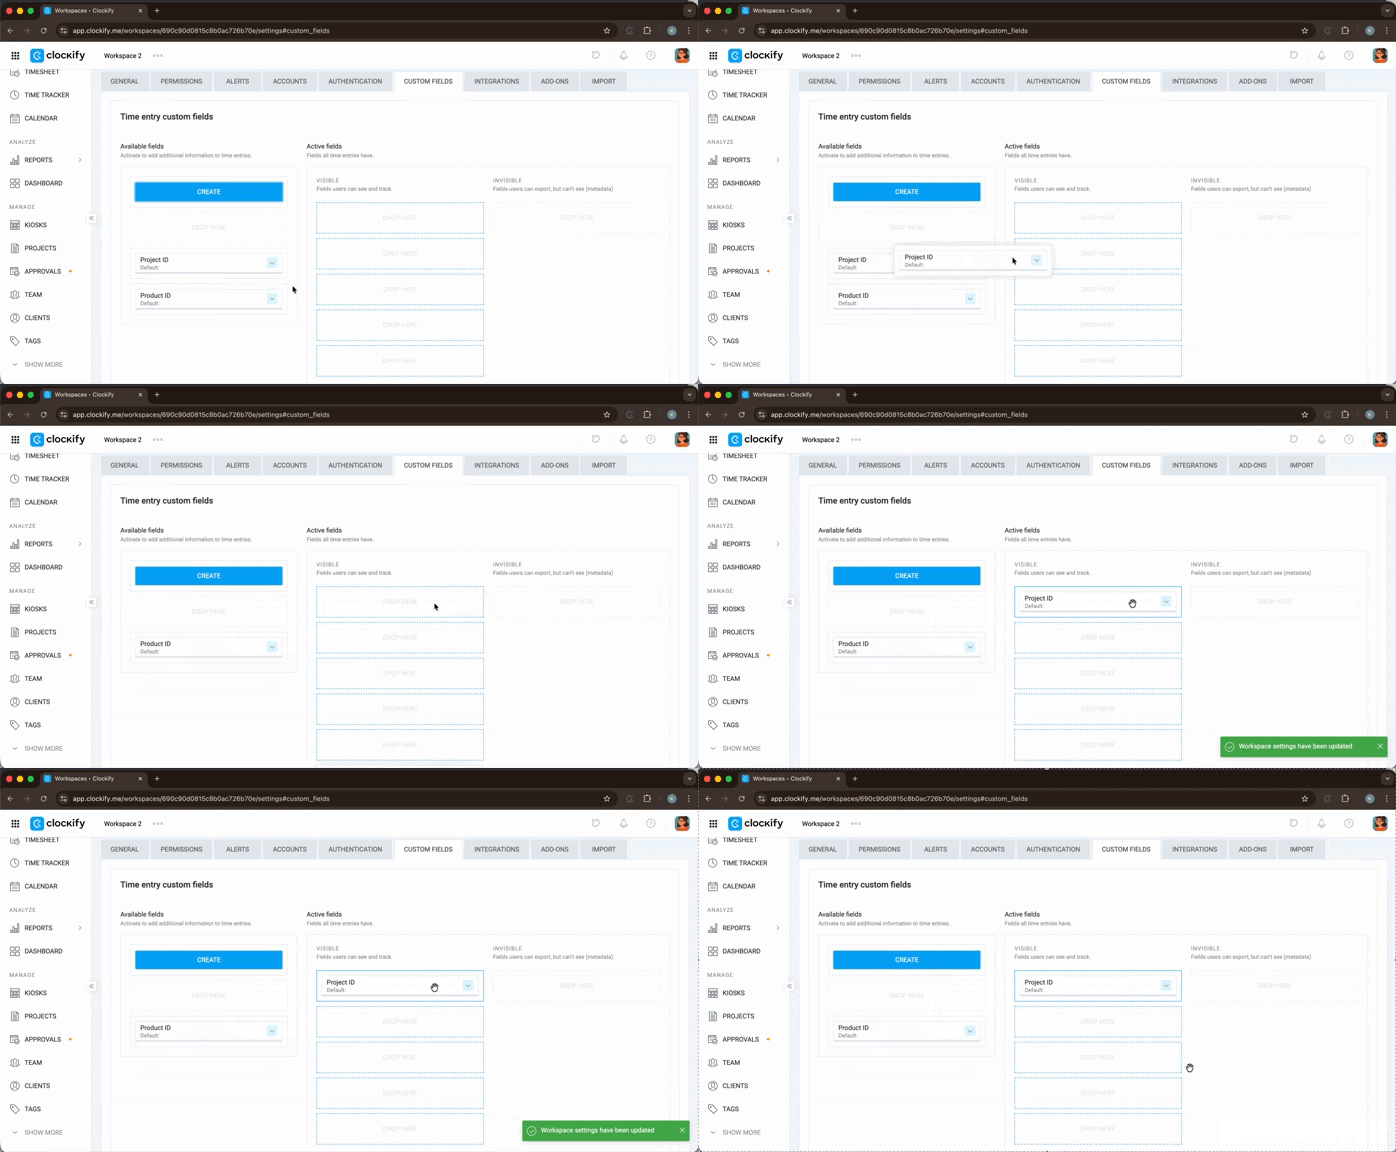
In order for your users to see and use the fields you’ve created, drag-and-drop the field to the Visible slot in Active column. Then, the fields will show up in Time Tracker and Timesheet for everyone in the workspace.

In Timesheet, you can enter data for additional fields when you hover over a cell with time and click on the three dots.

You can have up to 5 visible fields for the whole workspace, plus 5 more on projects.

Fields function like regular inputs, depending on the field type you’ve specified. Users can enter text, number, check a checkbox, or select from a list of predetermined values.

When to use invisible fields

Invisible fields are useful when you need to integrate Clockify with external systems via API, or you need entries to inherit additional metadata from projects (like project ID or project type) and you don’t want to overburden your users with irrelevant data.

If you activate a field and make it invisible, users won’t see the field anywhere, but all created entries will have them. Entries can inherit value for invisible fields via project, or you can update them via API or some integration.

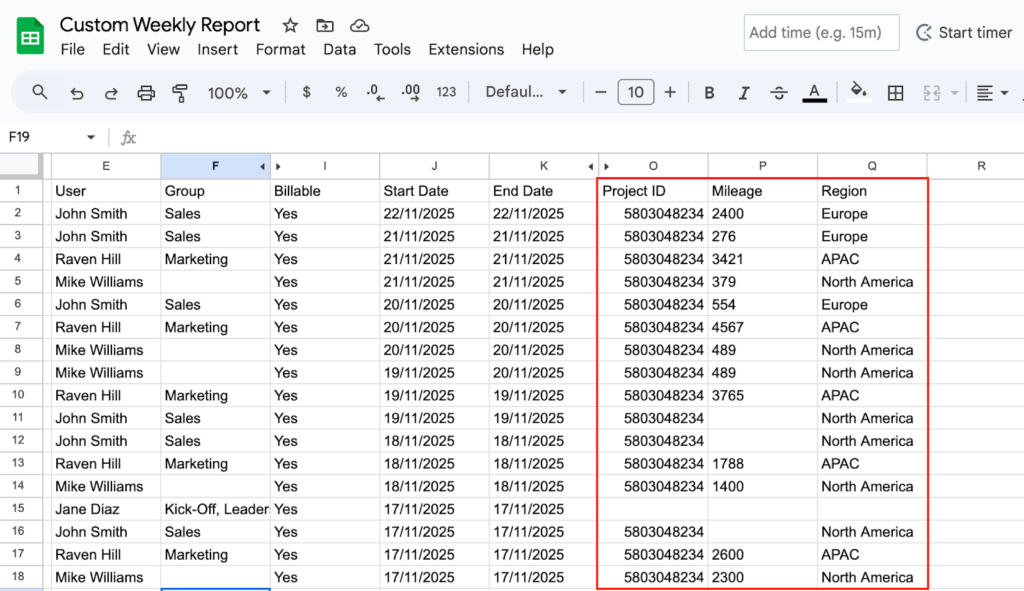
Invisible fields and their data show up in Excel and CSV export of Detailed report.

Setting fields on projects #

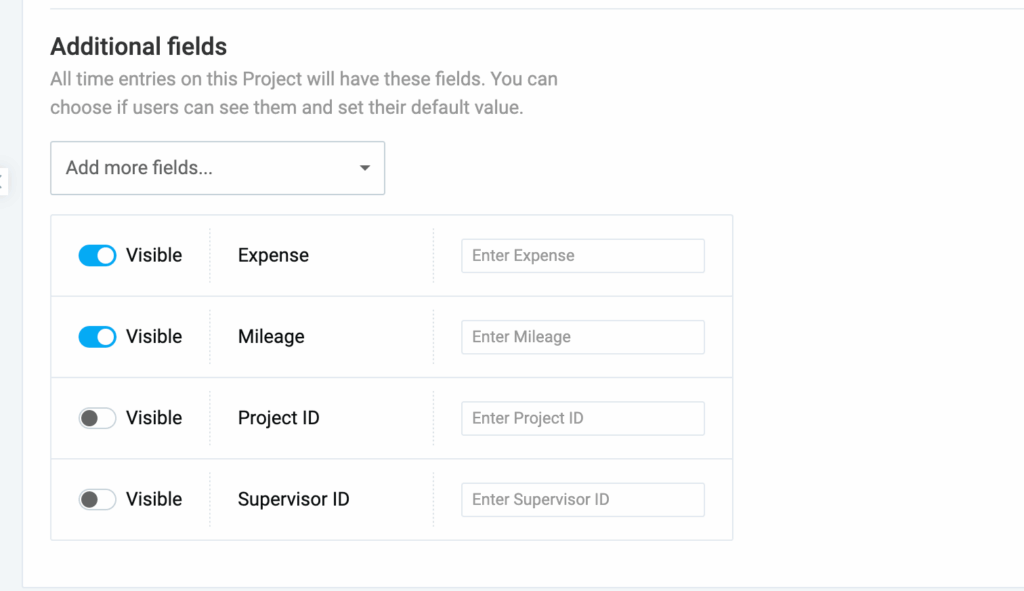
In addition to activating custom fields for the whole workspace, you can also activate them by project instead, as well as override visibility and default value in project settings.

All invisible fields automatically show up in projects. You can set their default value for that project, plus make them visible (or invisible) when a user selects that project.

You can have up to 10 visible fields on a project.

In addition to managing active fields, you can also add a field from a list of available fields, so only entries on that particular project have that field.

If you wish fields to have some default value when a user selects a project. For example, if a user selects ProjectX, a field Location can be set to USA, which the user can later override if it’s not USA.

Be careful with default values as they always override existing values. For example, if a time entry has My Value and then you change a project with a Default Value, it will overwrite My Value (you can re-enter My Value, but if you change a time entry’s project again, My Value will be lost).

A project manager can override a field’s visibility and set a default value for their projects.

Advanced usage #

You can achieve any workflow you need by using these four mechanisms:

  • Editing permission – You can let users edit data in a field for their time entries, or limit editing to admins only
  • Visibility – Affects whether users can see a field in Time Tracker and Timesheet
  • Default value – Fields on time entries start out as empty unless you prefill them with some default value
  • Project overrides – You can override a field’s visibility and default value by project

For example, you can set a field as non-editable by regular users and visible only on certain projects. Or, you can make some field invisible and set a default value on projects so each time entry has its project metadata.

EDITVISIBILITYDEFAULTUSE CASE
EveryoneVisibleEmptyFor user input
A user sees an input field and enters a value (e.g. mileage, expenses, receipts)
Everyone VisibleInheritsFor users to override if necessary
A user sees an input field with a prefilled value, which they can change if necessary (e.g. select a different value)
Everyone Invisible Empty For user integrations
Entries have that field with an empty value, which can be updated only via API
Everyone Invisible Inherits For project metadata
All entries inherit metadata from a workspace or project (e.g. workspace name, project ID)
Admins Visible Empty For users to track status
Admins edit time entries of others so users can later see the status of their entries (e.g. admin indicate time was paid out)
Admins Visible Inherits For user reference
Entries show to users project information for reference purpose
Admins Invisible Empty For admin integrations
Entries have field with an empty value, which can be updated only by admins via API
Admins Invisible Inherits For admin project metadata
Workspace or project metadata, which only admins can override via API (e.g. workspace name, project ID)

Required custom field #

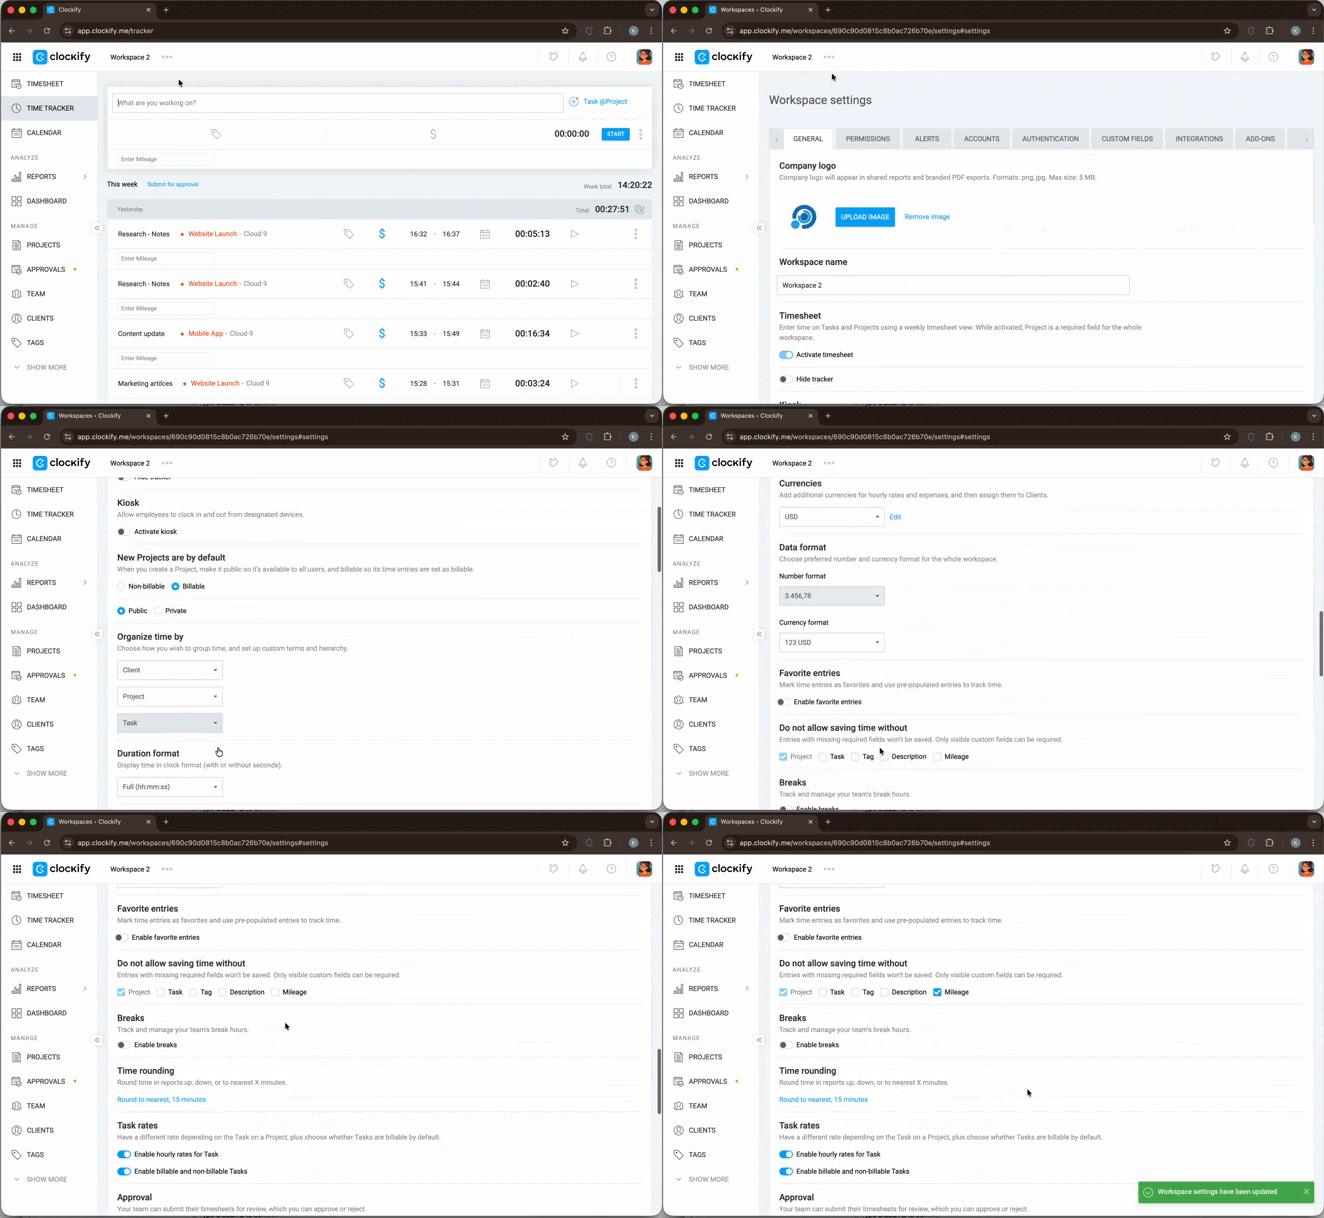
You can also set a time entry custom field to be required for every time entry on a workspace level.
To do that, a time entry custom field needs to be set as Visible with a default value, or edited by Everyone. If configured properly, this custom field will appear in the workspace settings, under the Do not allow saving time without section, in the General tab. After selected in a checkbox, field will appear in a Time Tracker and Timesheet as a required field.

So, next time a user would like to enter a time entry, they would need to insert the data in this required field.

Editing and deleting fields #

Activating a field doesn’t impact older entries. Only new time entries going forward will have custom fields and default values. To retroactively add fields to time entries, you’ll have to manually update the time entries.

If you move a field from Active to Available, new entries will stop having that field, but existing entries will retain their data and show up in exports.

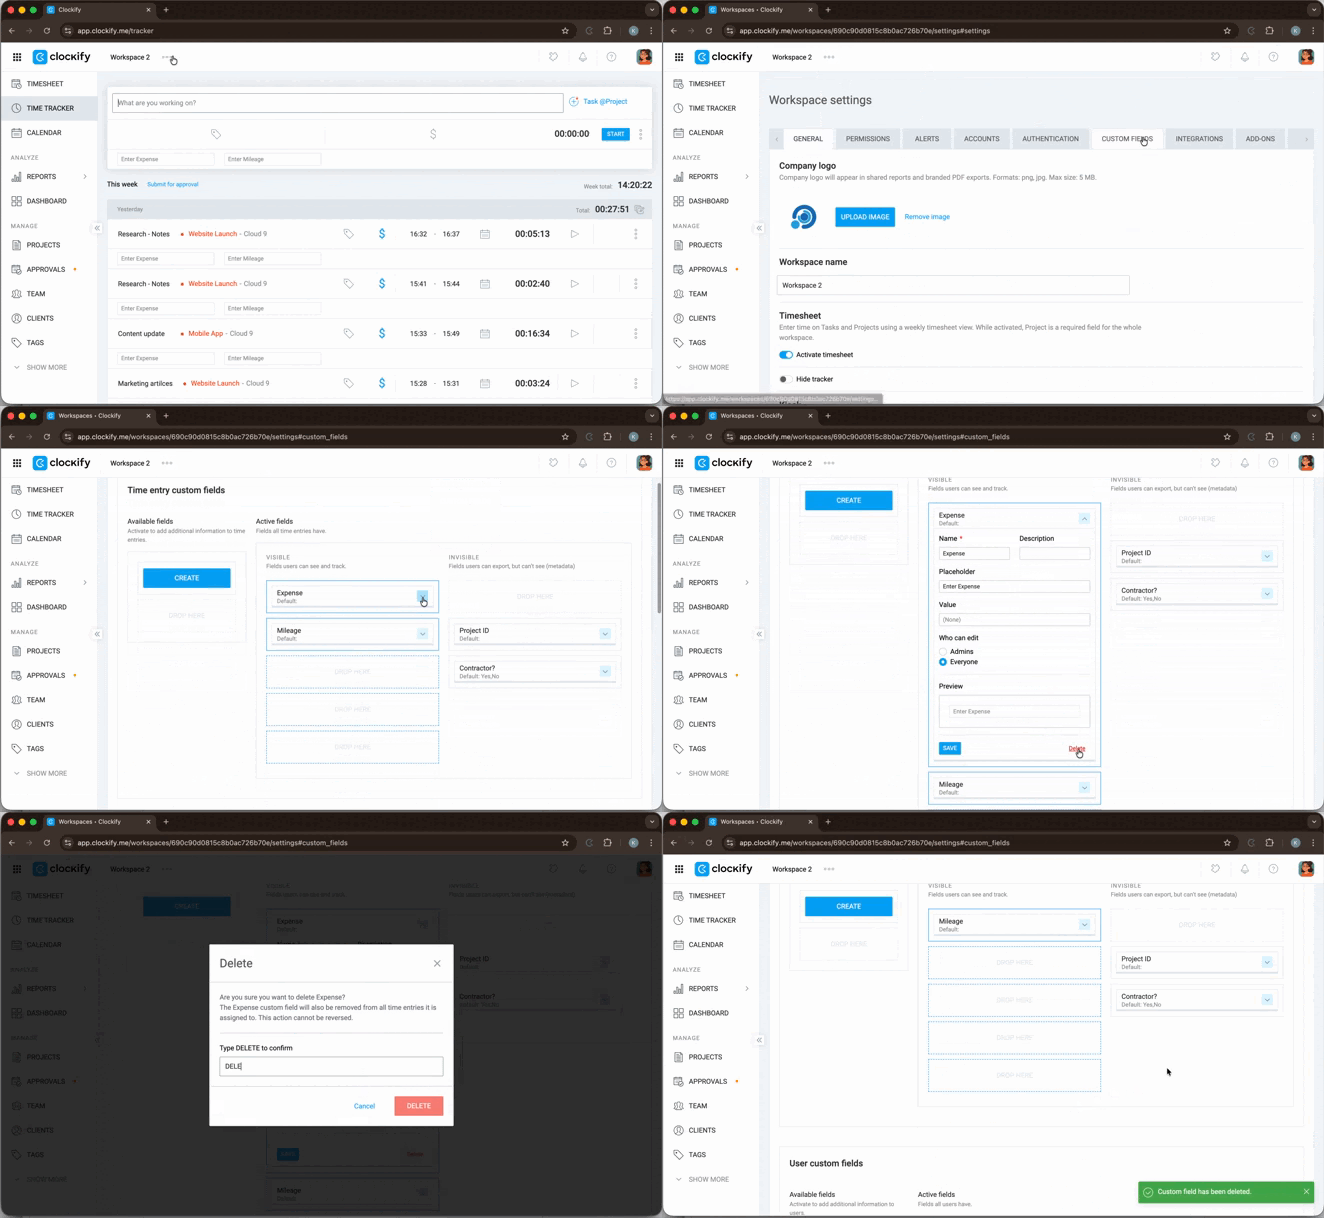
Deleting a custom field deletes that field and all its data from all time entries, across the whole workspace. Once you delete a field, it’s like it never existed. There is no undo. To retain data, it’s best to deactivate it by moving the field to Available column.

If you edit the options of a Select type field, existing time entries will retain the original values. Unless:

  • You manually change the value of Select type custom field on the time entry to a different value
  • You change the project of the time entry to a project which has a default value set for this Select type field. In this case, the entry will get the default value for the Select type custom field of the project you selected.

Editing example #

Let’s say you have a Select type custom field named Location with 3 select options: Los Angeles, New York, and Boston.

You create a time entry and select Los Angeles as your location. Then you go to Workspace settings and rename Los Angeles option to San Francisco.

The created entry will retain the value Los Angeles.

If you edit the created entry and change its project to a project that has a default value for the Location field (e.g. New York) the entry will now have New York set as Location. In other words, default value will overwrite the original value any time you update an entry.

Another example: let’s say you create a field called Updated, set default value 2020, and make it invisible. Your old entries won’t have that field, but each entry moving forward will have it.

If someone changes the project on their old entry, that entry will pick up the 2020 value even though it never had it, thus allowing you to see if some entry has been tampered with.

Custom fields in reports #

You can retrieve time entries with all their fields and data in Detailed Report via Excel and CSV export. Then, you can create all sorts of custom reports in pivot tables.

You can see and edit the data for visible fields directly in the Detailed report. Additionally, admins can edit custom fields data other users have entered (regular members can only edit and delete time entries that belong to them).

You can also use Bulk Edit to update Custom fields on multiple time entries with one click.

Excel and CSV export list all active fields. If some entry has some value in some custom field that is no longer active in neither workspace nor some project, that field won’t show up.

Download sample report (Excel)

The Reports also allows you to filter the report by custom fields. You can easily enable or disable what custom fields you’d like to see as filters and use them when filtering the time entries.

These filters are user-specific. When you add some custom fields to filters, this doesn’t affect other users. Each user can have their own set of filters.

Was this article helpful?

Thank you! If you’d like a member of our support team to respond to you, please drop us a note at support@clockify.me