 Updated: June 24, 2026
 So, you want to switch from Toggl Track to Clockify. But you need to fully understand why it’s a better fit before you commit.
Make your choice with our honest guide to Toggl vs. Clockify, including comparisons and migration tips.
- Toggl Track is a time tracker that offers native integrations at a premium but lacks scheduling, time clocks, and location tracking.
- Clockify and Toggl Track differ in pricing, time tracking methods, integration depth, free plans, and monitoring and scheduling capabilities.
- While Toggl Track unlocks advanced features at lower plans, they’re twice as expensive as Clockify’s plans, making Clockify the more cost-effective option.
- Toggl Track suits teams that thrive on personal autonomy, while Clockify draws those in need of team productivity and accountability.
- On a monthly basis, Toggl Track costs between $9 and $20, and Clockify is priced between $3.99 and $ 15.99.
Why move from Toggl Track to Clockify by CAKE.com
You should switch from Toggl Track to Clockify if you want scalable pricing plans, ethical monitoring features, and more versatile timekeeping. Toggl Track remains a safe choice for teams that enjoy clean UI and user-friendly time tracking.
Now, let’s explore the top 6 switching triggers in our Clockify vs. Toggl Track comparison.
#1: Steep pricing
Off the bat, you’ll notice a big difference in affordability and pricing model. If you prefer simple time tracking over growth, Toggl Track’s 3-plan structure may suit you — though it’s costly. Clockify wins this round, offering 6 plans with reasonable per-user pricing for agencies and small teams with growing needs.
Track time in Clockify — it’s FREE
#2: Limited timekeeping options
While praised for its sharp UI, Toggl Track provides fewer time tracking solutions than Clockify. For example, Toggl Track doesn’t include location sharing or time clocks, which remote and field teams use to maintain trust and data accuracy. Clockify covers those needs with features like Location and Kiosk.
💡 CLOCKIFY PRO TIP
Track your off-site team with the right remote work app + management tips. Read more below:
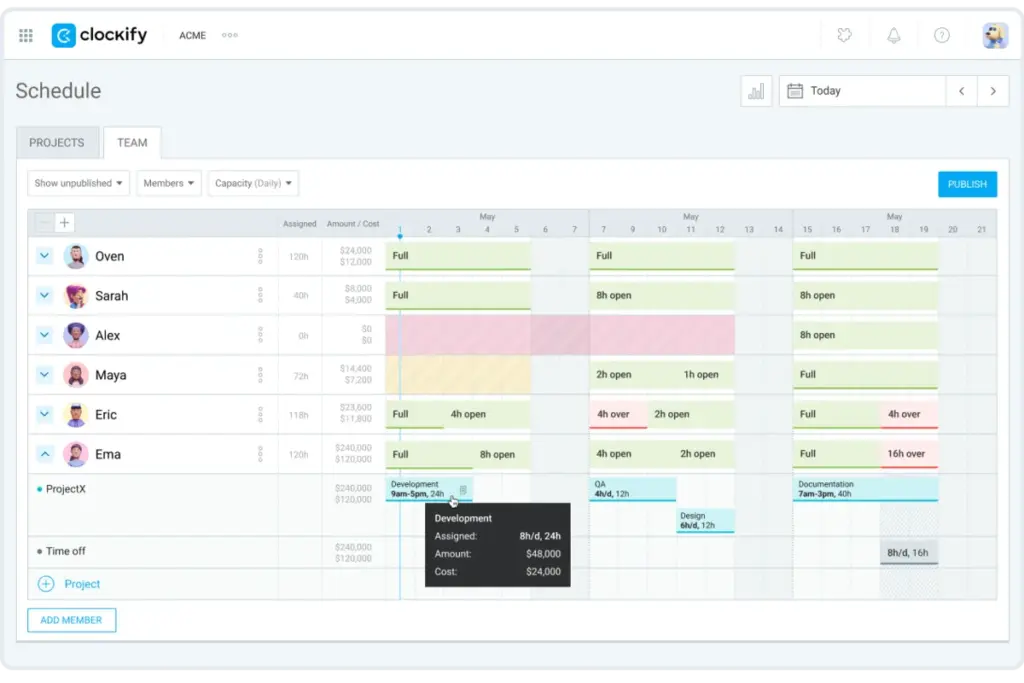
#3: Absent scheduling
Team scheduling isn’t available in Toggl Track. For both agencies and small businesses, scheduling is a safety net for preventing:
- Under- and overbooking
- Project bottlenecks and delays
- Poor resource delegation
Clockify takes the win, as it addresses the pain points above with a fully adaptable Scheduling feature.
#4: No screenshot monitoring
Toggl Track doesn’t capture screenshots because it has a rigid employee privacy posture. But relying on user input alone could lead to time theft. Without tangible evidence, you can’t take disciplinary action and build accountability.
If you’re in the market for non-invasive monitoring, Clockify captures blurred screenshots to protect user privacy and provide visual proof of work.
Learn how Clockify handles your data ➜
#5: More direct integrations
Toggl Track has a wide range of native integrations. By offering 2-way syncing with Salesforce, Jira, and Asana, it takes the prize here. On the other hand, Clockify provides 2-way sync with Jira and 1-way tracking for other apps via web extensions — installing them adds a Clockify timer button to those apps.
#6: Free plan limitations
Clockify and Toggl Track have similar free plans with a few glaring differences.
Concerning data ownership, Toggl Track deletes free accounts with no tracked time after 6 months. In contrast, Clockify stores your time entries indefinitely across all plans unless you delete the workspace or your account.
Also, Toggle Track offers a weekly, admin-only overview of team time. Meanwhile, Clockify’s Team Dashboard shows a visual breakdown of recent employee activity. It’s date-adjustable and open to everyone, but you can change who sees what.
Clear, real-time summaries help small businesses crack down on bottlenecks. Additionally, agency owners with seasonal work want their accounts available even after a 6-month dry spell. So, Clockify secures the win here.

Toggl Track vs. Clockify: Feature comparison
To help you make the right decision for your team, we’ll break down the features of Toggl Track compared to Clockify.
| Switching considerations | Clockify | Toggl Track |
|---|---|---|
Free plan user limits | Flexible time tracking and reporting – Indefinite data retention, unless you delete it – Unlimited tracking of projects, clients, and tags – Up to 5 users – Summary, Detailed, and Weekly reports – Report export as PDF – Team Dashboard with quick visual insights – 30 API requests per hour – 3 webhooks per workspace – 24/7 human support via chat, email, and phone | Straightforward time tracking – Account deletion after 6 months of inactivity – Up to 5 users – Summary, Detailed, Workload reports – Report export as PDF – Admin Overview showing team hours – 30 API requests per hour – 1 webhook – Low-priority chat support |
| Monitoring features | Compliant monitoring – Pin- and QR-based kiosk – GPS locations during work – Blurred screenshots – Recording opened sites, apps, and files | Limited observation – Tracking visited URLs and apps |
| Pricing per user at scale | Budget-friendly pricing – 1 forever-free plan – Paid plans start at $3.99 per user/month (if billed annually) – A team of 30 costs from $119.70/month (if billed annually) – Low cost per user, even for larger teams | Premium pricing – 1 forever-free plan – Paid plans start at $9 per user/month (if billed annually) – A team of 30 costs from $270/month (if billed annually) – Big price jump per user for advanced features |
Integration depth | Versatile integrations – Calendars: Google Calendar (free) Outlook Calendar (free) – Communication: Pumble (free) Slack (free) – Project planning: Plaky (free) Jira (free) Asana (free) – CRM: Salesforce (free) – Invoicing: QuickBooks (paid) – Add your tool, a custom integration builder (free) – 100+ free browser extensions – CAKE.com Marketplace with 100+ add-ons | Stronger, native integrations – Calendars: iCalendar (paid) Google Calendar (free) Outlook Calendar (free) – Communication: Slack (free) – Project planning: Toggl Plan (free) Jira (paid) Asana (free) – CRM: Salesforce (paid) – Invoicing: QuickBooks (paid) – Toggl Track API, a custom integration builder (free) – 100+ free browser extensions |
| Invoicing | All-in-one billing – Importing tracked billable time – Editing imported entries – Adding expenses, discounts, and taxes – Export as PDF, CSV, and Excel – Invoice status tracking – Recurring invoices – Time rounding | Minimal customization – Generating invoices through reports – Created invoices can’t be edited – Adding custom charges and taxes – Export as PDF – Time rounding |
| Scheduling | Built-in scheduling – Timeline display – Capacity planning – Overtime indicators – Tracking milestones – Drag-and-drop editing – Time off visibility | Separate tool – Toggl is currently transforming Toggl Plan (a scheduling tool) into a new tool called Toggl 2.0 to merge scheduling, project planning, and leave management |
| Best for | SMBs and agencies looking for affordable growth, flexible management solutions, and compliant monitoring | Small agencies and freelancers that prioritize simple time tracking, employee data privacy, and personal productivity |
Clockify vs. Toggl Track: Pricing
Next, let’s break down Toggl Track vs. Clockify’s Free plan, along with their latest annual and monthly billing per seat/month.
| Clockify vs. Toggl Track plan tiers and pricing | |||
|---|---|---|---|
| Plan tier | Clockify | Toggl Track | Value verdict |
| Free tier | $0 (max 5 users) Unlimited tracking, essential time tracking features, basic time reporting, and free integrations | $0 (max 5 users) Unlimited tracking for active accounts, basic timekeeping features, simple time insights, and free integrations | The 2 apps are tied for the best free plan. Toggl Track offers access to native integrations, like Jira, Asana, and Salesforce. However, account deletion after 6 months of inactivity is a risk you can avoid with Clockify. |
| Paid tier 1 | Basic $3.99/user (if billed annually) $4.99/user (if billed monthly) All Free features, plus custom time reporting, project tracking (bulk edits, time estimates), Kiosk, historical billable rates, and concierge services | Starter $9/user (if billed annually) $10/user (if billed monthly) All Free features, plus team-based time analysis and task tracking (team goals, time estimates, and project tasks), and billing | Clockify brings more to the table at half the price, with stronger team control and personalized onboarding and assistance. While Toggl Track introduces invoicing early on, its high pricing is best suited to individuals and small teams. |
| Paid tier 2 | Standard $5.49/user (if billed annually) $6.99/user (if billed monthly) All Basic features, plus time off management, advanced invoicing, and employee attendance tracking | Premium $18/user (if billed annually) $20/user (if billed monthly) All Starter features, plus historical data, fully customizable reports, project forecasts, and Single sign-on (SSO) | Clockify wins on price. Though Toggl Track unlocks full-time and reporting capabilities, it comes at a premium. For instance, Clockify’s Basic plan offers historical billable data while its Pro plan includes complete reports and forecasts. And both plans are cheaper. |
| Paid tier 3 | Pro $7.99/user (if billed annually) $9.99 (if billed monthly) All Standard features, plus interactive scheduling, project forecasts, profitability reports, and more timekeeping options (Force timer and GPS tracking) | Enterprise Hidden pricing Negotiated during a free demo All Premium features, plus a dedicated customer success manager, custom onboarding, and priority support via chat and email | Clockify leads with transparent pricing and equal customer support for all. Your Toggl Track plan determines how fast you receive help. And only Enterprise members get personalized guidance, which is a perk for all paid Clockify members. |
| Paid tier 4 | Enterprise $11.99/user (if billed annually) $14.99 (if billed monthly) All Pro features, plus Single sign-on (SSO), SCIM provisioning, and audit logs | – | Clockify offers advanced security and automation options, unlike Toggl Track. For instance, small agencies use audit logs to justify their pricing while bigger teams use SCIM provisioning to manage employee profiles automatically. |
| Paid tier 5 | CAKE.com Bundle $12.99/user (if billed annually) $15.99/user (if billed monthly) 3 sibling tools with enterprise-level access Clockify for time tracking Pumble for communication Plaky for project management | – | CAKE.com combines its 3 sister apps to offer the key business essentials for every team. Although Clockify, Pumble, and Plaky are available on every plan, this one gives you enterprise-level access to all 3 apps. On the other hand, Toggl (Toggl Track’s parent company) has 2 other tools, Toggl 2.0 and TogglWork, which are priced separately. |
Clockify’s key advantages over Toggl Track
Let’s go over the 6 stand-out features that keep Clockify ahead of Toggl Track.
#1: Streamlined invoicing
Unlike Toggl Track, Clockify has a built-in Invoicing feature. Simply import and customize project-related time and costs, then send the invoice to the client.

Clockify ensures accurate billing for agency work and time-bound projects by:
- Creating itemized invoices
- Tracking the invoice status (sent, paid, partially paid, or void)
- Sending email reminders for outstanding payments
Simplify billing with Clockify
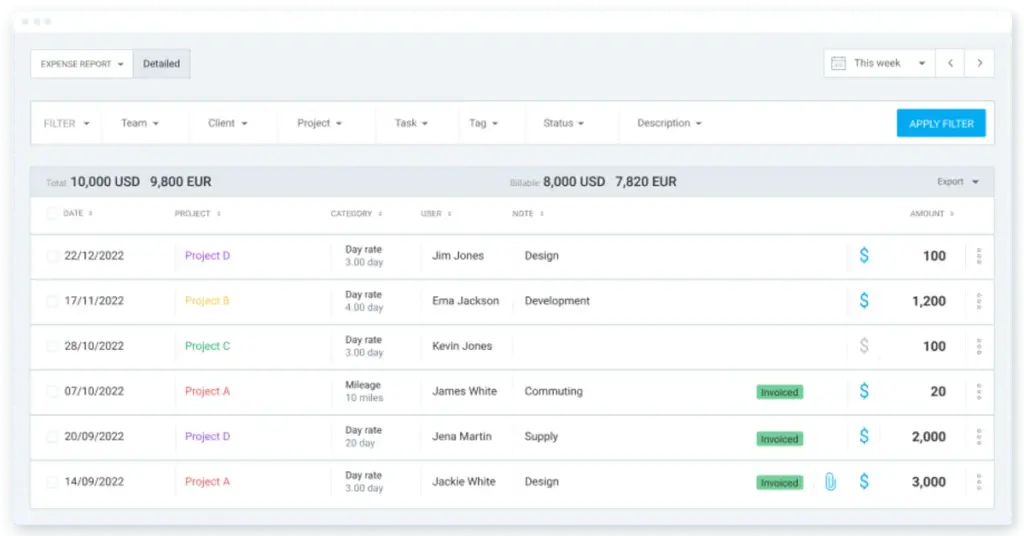
#2: Expense tracking
Clockify records expenses tied to projects or internal operations — a feature that Toggl Track lacks. You can invoice project expenses alongside billable hours for client transparency and calculate exact payroll based on internal costs.
#3: Integrated scheduling
Use Scheduling in Clockify to balance workloads around projects instead of depending on Toggl Track’s integrations. Here’s a glimpse into how it works:
- Assign resources directly on the project’s timeline
- Organize everyone’s schedules in one place
- See who’s booked, underused, or absent
- Track project deadlines and milestones
#4: Attendance keeping with the Kiosk
While Toggl Track doesn’t track attendance, Clockify offers a non-invasive solution with the Kiosk — a clock-in/clock-out feature available on any shared or personal device. So, you can monitor team time and activity without compromising anyone’s private info.
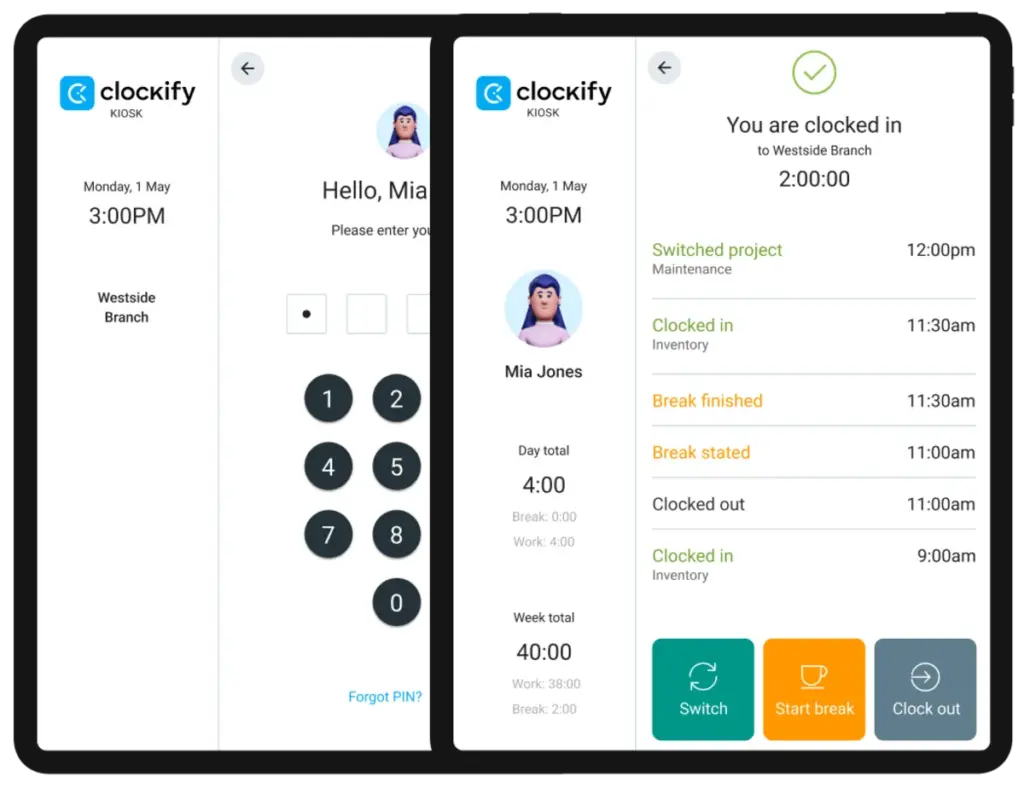
💡 CLOCKIFY PRO TIP
Set up Clockify’s Kiosk to easily check on seasonal workers during your collaboration:
#5: Robust time-off management
Leverage Time off in Clockify to manage absences without disrupting daily work. This feature offers pre-set, adaptable time-off policies to jump-start your leave tracking and resource planning.
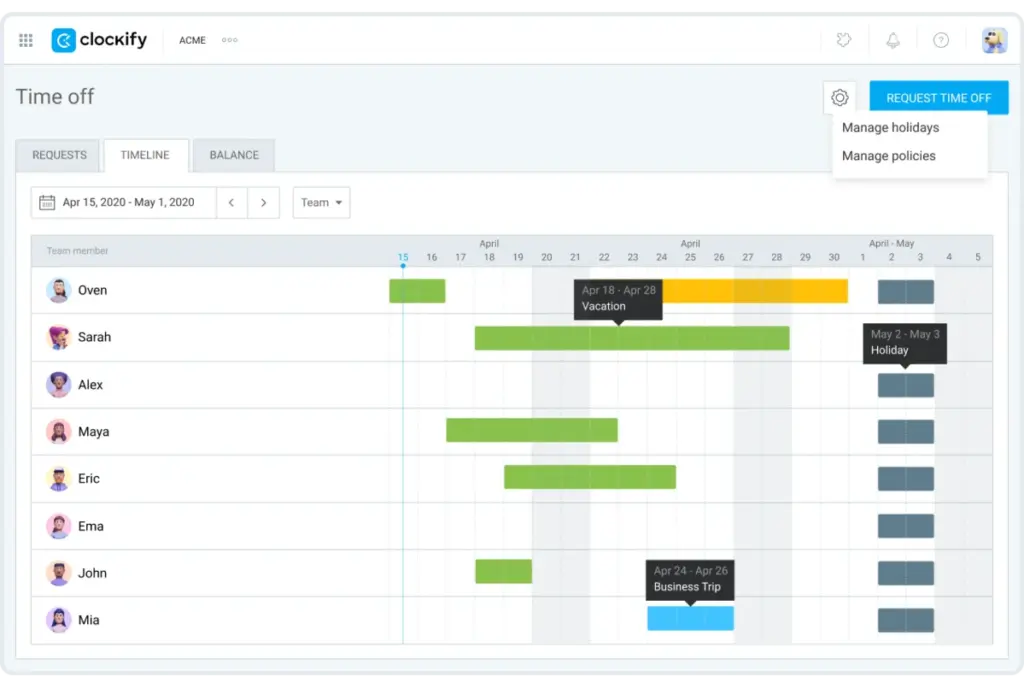
In contrast, you have to ask Toggl Track’s team to activate time off — which is now uncertain with the Toggl 2.0 launch.
#6: Precise reporting with Custom fields
Set up Custom fields for your time entries or employee profiles, like a job title or a link. This lets you capture specific data and get personalized reporting that Toggl Track can’t match. For example, a link field lets you add a link to your Jira or Plaky task under an active time entry.
💡 CLOCKIFY PRO TIP
Excel at project management with Clockify’s budgeting, scheduling, reporting, and more:
When Toggl Track is the better choice
Toggl Track takes the lead when customers look for more relaxed time tracking and key integrations. In particular, the tool suits:
- Freelancers and independent contractors who want a simple interface without monitoring features
- Teams with strong employee privacy standards, like no GPS tracking or screenshots
- Users who need native integrations, like Asana or Salesforce
While Toggl Track is great for clean, focused time tracking, teams experiencing growth may find it restrictive and costly. So they’ll turn to Clockify for more comprehensive features, such as billing and scheduling. At the same time, Clockify’s budget-friendly plans help teams avoid cost overruns and boost revenue.
For a deeper look at how Toggl Track performs in practice, see our full Toggl Track review.
💡CLOCKIFY PRO TIP
Minimize the risk of cost or budget overruns using expert tips:
Who should use each tool?
Independent users will find both Clockify and Toggl Track useful. Each tool has productivity-boosting goodies, like the Pomodoro timer, calendars, time tracking reminders, and idle time detection.
Company use is where things get muddy. Toggl Track is designed for those who promote individual autonomy. Meanwhile, Clockify supports low-key monitoring and accountability, making it ideal for service agencies with remote and field workers.
How to switch from Toggl Track to Clockify
Take 3 simple steps to import your data from Toggl Track to Clockify and ensure a seamless transition.
#1: Download your report from Toggl Track
Once you log in to Toggl, go to Detailed reports and select the desired date range to pull up your data. You can filter your export to include only the projects you want to track time for in Clockify.
Then, export the report as a CSV file.
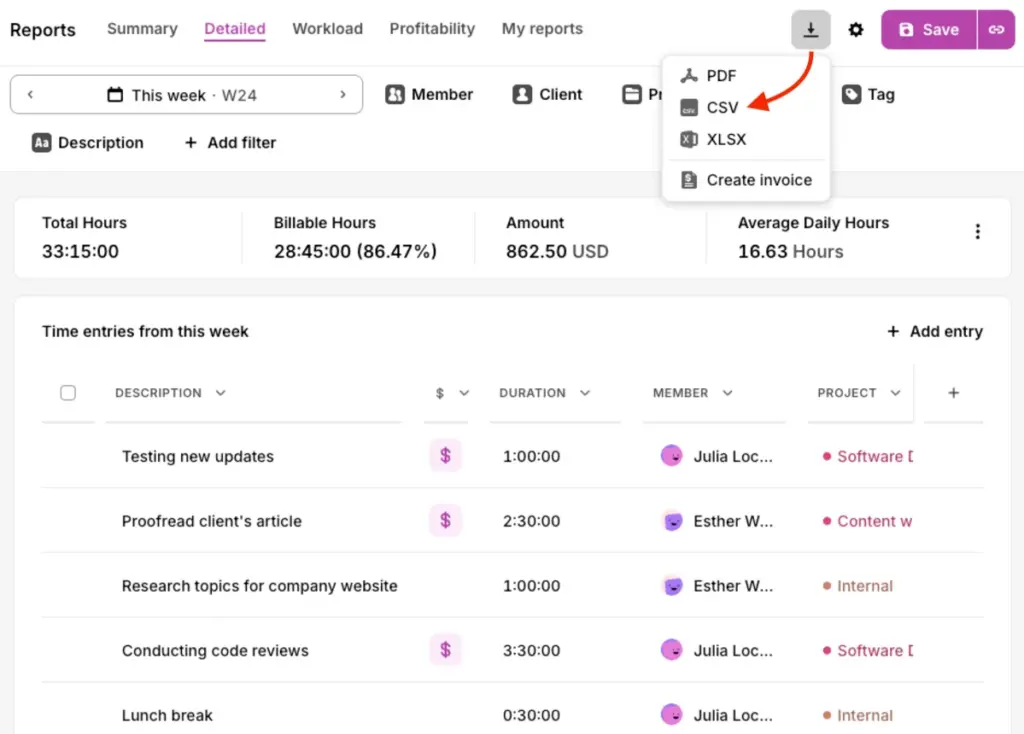
Note: Toggl Track’s free plan lacks CSV export, so you’ll only have this option on the paid plans.
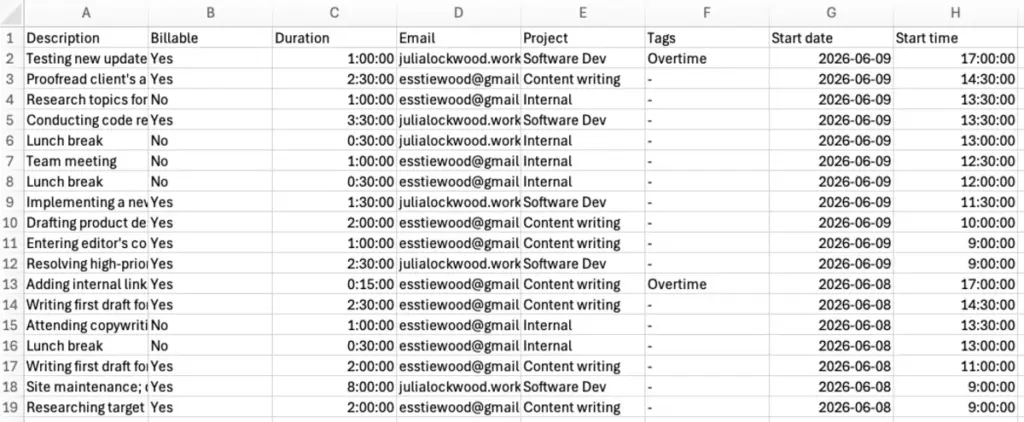
#2: Edit your file before import
When prepping the CSV file, make sure your column names match any of the following field names in Clockify:
- Project
- Client
- Task
- Tags
- Start date
- Start time
- Duration
- Billable
- Description
Additionally, check if your date format aligns with any of Clockify’s formatting options.
Before migrating any data, you need to set up your users first. To do that, upload a separate file and choose the import type Full users or invite employees into your Clockify workspace. Once they’ve joined, start importing your data, and the app will automatically link it to the right people.
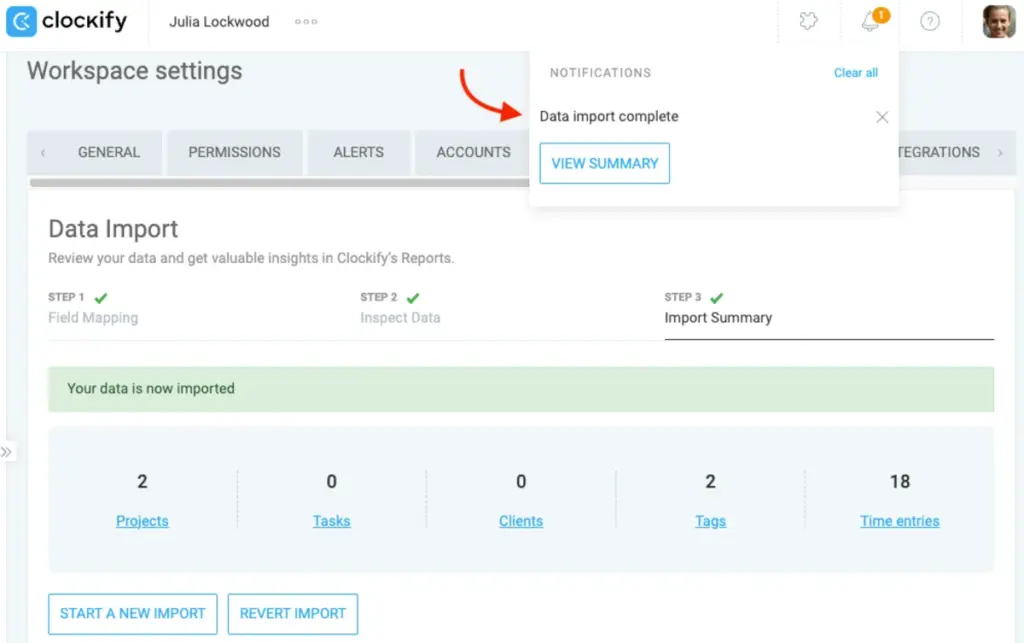
#3: Import your file into Clockify
When your file is ready, go to Clockify’s web app and find the Import tab in the Workspace settings. Drop your file into the Data import window, and the app will analyze what projects, clients, tasks, or tags it needs to create.
The next step shows a breakdown of your time entries organized by field names for a final checkup. After clicking Import, you’ll get notified that your Data import is complete.
Meanwhile, feel free to contact our live support team, and they’ll happily guide you through any hiccups.

Formatting rules to follow
If your CSV file doesn’t match Clockify’s formatting, the app will instruct you to format the data correctly before importing it again.
Edit your file in any text editor or Excel for a more comprehensive overview. If you’re using Excel, your info should be separated into columns, with the category in the first row and the values in the rows below.
In the text editor, your info should be divided by commas. Specifically, the first row should list your data categories. Every other row should contain the specific info that aligns with those categories.
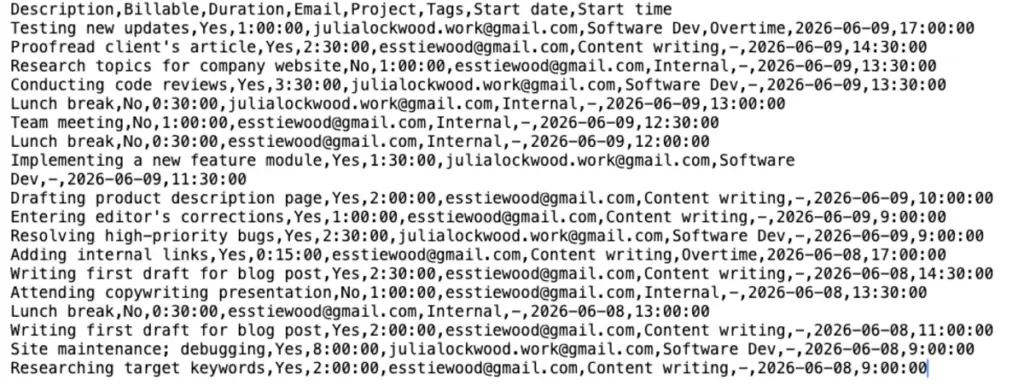
To avoid date or time format errors, ensure that the formatting in your Profile settings matches the one in the file. You can also change the format in the file, but that takes more work.

Summary of formatting rules
Here’s a quick formatting overview:
- You can import an unlimited number of CSV files, provided each one is under 10 MB.
- Only Admins can import data.
- Tasks can’t be uploaded without the Project they’re tied to.
- The order of the columns isn’t important.
- User emails in Clockify must match those in the file.
- If you’ve turned on Required fields in your Clockify workspace, your file needs to contain columns that match those fields.
- The Duration column in the file must align with the selected Duration format in workspace settings, e.g., Full (hh:mm:ss) or Decimal (1.15).
- Values under the Start time and Start date columns must match the time and date formats in your profile settings.
- The end date and end time are calculated automatically based on the start time and duration.
- Mark Projects as billable or not by adding values Yes/No under the Billable column.
- When prepping a user’s file, you can include their Name, Email, Role, Group, Billable rate, Cost rate, and Daily work capacity (expressed in hours).
After importing your data, you’re free to explore other Clockify features and customize it to your liking.
FAQs about Clockify vs. Toggl Track
Still torn between the 2 options? Here are the most common questions comparing Toggl Track and Clockify. Continue on to our complete answers.
Is Toggl Track or Clockify better?
Clockify is better for:
- Precise budget/cost tracking for time-bound projects
- Direct billing and customizable invoices
- Intuitive scheduling and availability insights
- Easy, compliant time off and attendance monitoring
- Free, robust time tracking and affordable upgrades
Toggl Track is better for:
- User-friendly timekeeping with a simple design
- 2-way project management integrations
- Personal productivity analytics
- Unmonitored time tracking for trust-based teams
- Quick time management solution for individuals
💡CLOCKIFY PRO TIP
Want to make the right call? Read our Toggl vs. Clockify vs. Harvest comparison to pick the best option:
Is Clockify cheaper than Toggl Track?
Yes, Clockify is more affordable than Toggl Track, with lower annual and monthly rates. In fact, the price difference between similar tiers is around 50%. More importantly, Clockify provides more value for your buck with feature-rich plans at pocket-friendly prices.
Does Clockify have a free plan?
Yes, Clockify offers a forever-free plan for up to 5 users (1 admin + 4 users), just like Toggl Track. But Clockify stands out for its quick and free 24/7 human customer service and phone support. This is where Toggl Track falls short.
How much does Clockify cost per month?
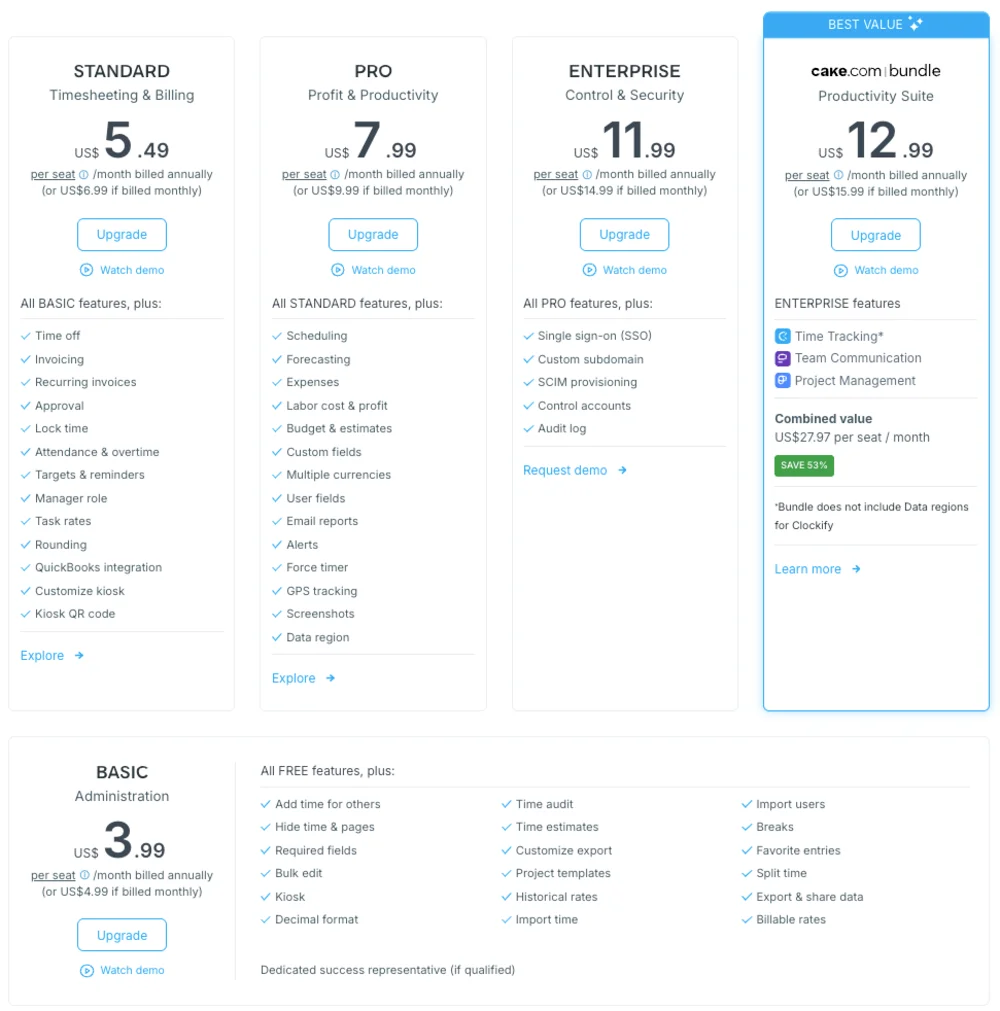
Clockify’s paid plans cost between $3.99 and $15.99 a month. If billed annually, your monthly costs per plan/seat are:
- $3.99 (Basic)
- $5.49 (Standard)
- $7.99 (Pro)
- $11.99 (Enterprise)
- $12.99 (CAKE.com Bundle)
When billed monthly, your monthly expenses per plan/seat are:
- $4.99 (Basic)
- $6.99 (Standard)
- $9.99 (Pro)
- $14.99 (Enterprise)
- $15.99 (CAKE.com Bundle)
Don’t have an account? Sign up FREE
How much does Toggl Track cost?
Toggl Track costs between $9 and $20 for the first 2 paid plans. This estimate excludes the most comprehensive plan (Enterprise), which doesn’t disclose its pricing.
If billed annually, your monthly costs per plan/seat are $9 (Starter) or $18 (Premium). Under a monthly billing cycle, your per-plan/seat cost is $10 (Starter) or $20 (Premium).
What are the disadvantages of Clockify?
Clockify has some disadvantages despite its well-rounded offer. First, its advanced surveillance features can feel nosy if not managed properly.
Next, unlocking multiple features can make the dashboard feel busy. But you can declutter and highlight important data with customization options, like hiding pages and pinning favorite projects.
Certain users also think the integrations aren’t as synchronized or automated. So, Clockify’s team actively works on introducing new integrations, plugins, and add-ons.

Can you export data from Toggl Track to Clockify?
You can export your data by downloading a CSV file in Toggl Track’s Report section and importing it into Clockify via Workspace Settings.
While Clockify’s Free plan supports CSV import, you can only use it to add:
- Projects
- Clients
- Tasks
- Tags