

Are you outgrowing or overpaying Harvest? Regardless, you’re testing Harvest vs. Clockify to stop bleeding cash and unlock versatile features.
Read our honest decision guide on Clockify vs. Harvest to learn exactly what you gain with Clockify and how the migration works.
- Harvest is a time tracker that pairs simple timekeeping with invoicing, a restricted free plan, and steep, unstable pricing.
- Clockify and Harvest differ in free plan limits, pricing models, time tracking flexibility, project forecasting, and billing.
- Harvest applies usage-based pricing and charges extra for its 2 plans, while Clockify delivers 5 paid plans at fixed, discounted rates.
- Harvest provides in-app payment collection but lacks scheduling, time clocks, and time-off options (which Clockify offers).
- On a monthly basis, Harvest costs between $9 and $17.50 before usage fees, while Clockify is priced between $3.99 and $15.99.
Why move from Harvest to Clockify by CAKE.com?
Drop Harvest for Clockify if you need diverse time tracking features, built-in budget forecasting, a free plan for small teams, and fixed pricing.
Unlike Harvest’s rigid free plan and 2025 price jump, Clockify supports growth with affordable paid tiers and unlimited projects on its free plan. Clockify’s timekeeping, invoicing, and budget control beat Harvest’s basic time tracking and heavy focus on accounting.

Here’s a list of switching triggers that show why moving from Harvest to Clockify is worthwhile.
#1: Fixed, multi-level pricing
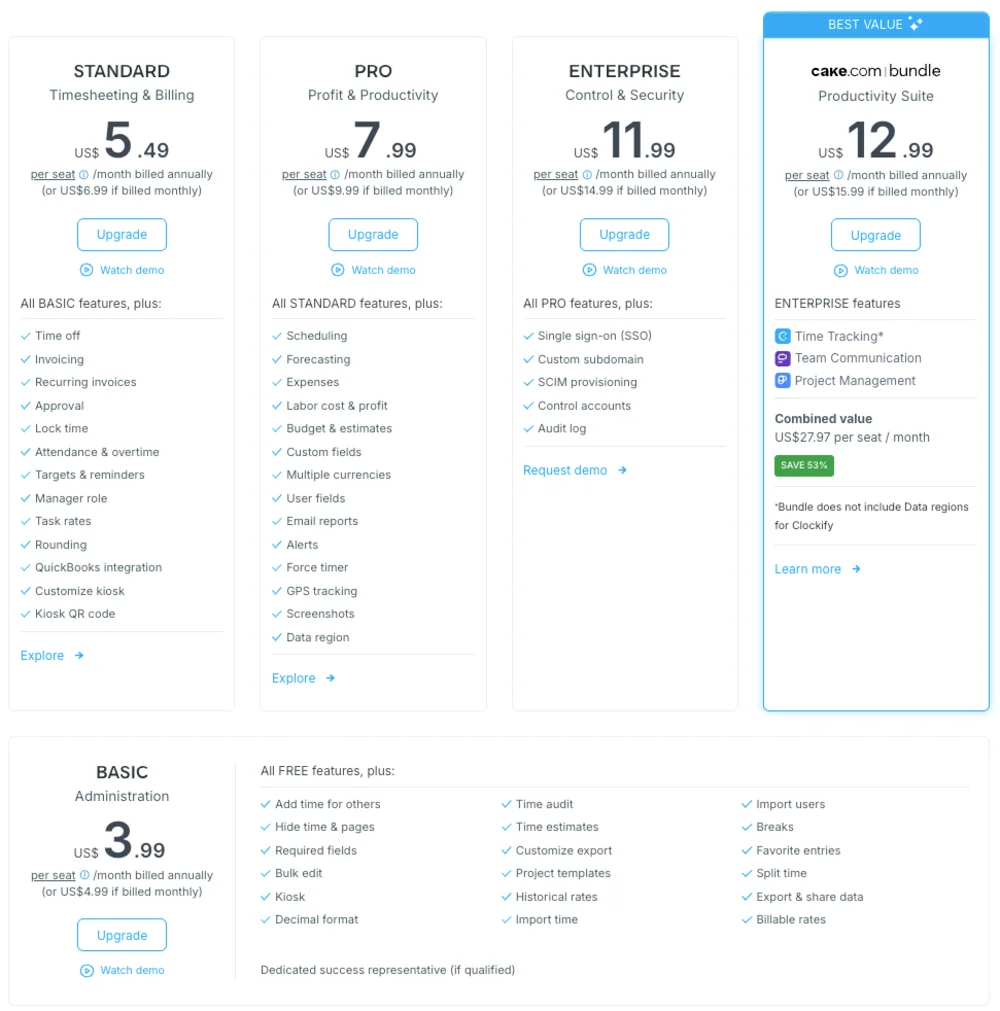
While Harvest includes just 2 (expensive) paid tiers, Clockify offers 5 flat-rate plans at a lower cost. This makes Clockify a more flexible option for teams of different sizes and budgets.
#2: Abundant time tracking options
Harvest lets you track time using a timer, timesheet, and calendar. Beyond those essentials, Clockify delivers the Auto tracker, Kiosk, and Pomodoro timer. Unlike Harvest, Clockify suits any company setup — whether you rely on physical time clocks or manage virtual teams.
#3: Free plan with unlimited tracking
You’ll find Harvest’s free plan generously stocked with features — if you’re a solo freelancer with only 2 projects. But most teams have a higher staff and project count. And they’ll prefer Clockify’s Free plan with unlimited tracking for:
- Projects
- Tasks
- Clients
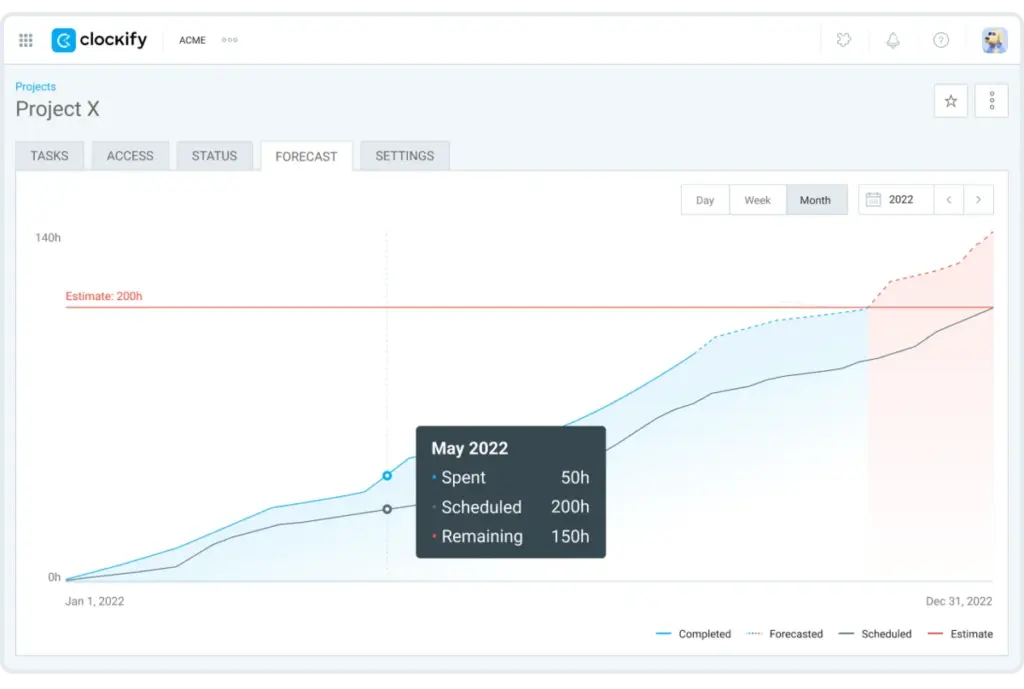
#4: Forecasting project results
While Harvest shows project progress against a set budget or time, it doesn’t predict real outcomes. For that, you need to install their Forecast integration. Clockify delivers both benefits with:
- Project status for real-time monitoring
- Project forecasting for comparing tracked vs. estimated time and budget
To facilitate your move, we’ll go over the differences between Clockify and Harvest integrations.
Key integrations after moving from Harvest to Clockify
| Integration | Is it available? | What works differently? |
|---|---|---|
| Asana | Yes | Harvest’s extension in Asana opens a separate window to log time for each task. Clockify removes this step, letting you track time directly within its extension and view a list of time entries. |
| Slack | No/Replaced | Harvest offers a straight connection to Slack, allowing you to track time from there. Clockify only connects to Slack via third-party apps like Zapier or Make, so the integration is limited. But Clockify syncs directly with Pumble to send you time tracking reminders and notifications inside the chat app. |
| QuickBooks Online | Yes | While Harvest submits finalized invoices to QuickBooks, Clockify sends selected time entries to the platform. This allows you to create highly professional invoices and run payroll right in QuickBooks. |
| Stripe | No/Replaced | Unlike Harvest, which syncs directly with Stripe, Clockify uses third-party apps like Zapier or Make to set up a limited integration. However, Clockify easily links up with Xero or QuickBooks to automate accounting processes. |
NOTE: Unlike Harvest, Clockify maintains an accurate library of all integrations. To see the full list, simply select Integrations from the web browser’s menu.
Clockify vs. Harvest: Feature comparison
Decide on the right fit for your team using our Clockify vs. Harvest comparison table.
| Switching considerations | Clockify | Harvest |
|---|---|---|
| Free plan user limits | Unlimited project tracking for small teams – Up to 5 users (1 admin + 4 users) – Unlimited projects, clients, and tasks – Summary, Detailed, and Weekly reports – Team Dashboard with clear infographics – Importing projects, clients, tasks, and tags – Report export as PDF – Invoicing not supported – 3 project management integrations: Jira (2-way), Trello (1-way), Asana (1-way) – 2 task management integrations: TickTick (1-way), Todoist (1-way) – 3 communication & support integrations: Freshdesk (1-way), Slack (1-way), Zendesk (1-way) – 2 CRM integrations: Pipedrive (1-way), Salesforce (1-way) – 24/7 human support via chat, email, and phone | Essential time tracking for personal use – 1 user (admin) – 2 projects – Time and project reports – No data import – No data export as PDF – No file attachments for invoices – Invoice distribution not available – Sending invoices only via Stripe – Accounting integrations QuickBooks Online and Xero are excluded – Can’t import people or projects from Asana – Free access to all 60+ integrations – Harvest’s user limit makes team-level integrations like Slack or Jira irrelevant – No phone support |
| Price per seat | Affordable pricing for teams and individuals – 1 forever-free plan – Paid plans start at $3.99 per user/month (if billed annually) – Fixed prices with no hidden costs | Unpredictable pricing (base rate + usage fees) – 1 forever-free plan – Paid plans start at $9 per user/month (if billed annually) – Extra usage-based fees apply |
| Time tracking methods | Adaptable time tracking – Timer with break mode – Timesheet with templates – Manual time entry – Calendar – Pin- and QR-based kiosk – Pomodoro timer – Auto tracker | Basic timekeeping options – Timer – Timesheet – Manual time entry – Calendar |
| Invoicing | Intuitive invoicing – Adding project-specific time and expenses – Editable items – Taxes and discounts – Automated statuses (manually adjustable) – Time rounding – Recurring invoices – Export as PDF – Default customization – Translations – Accepting payments not supported | End-to-end billing – Importing client-related time and expenses – Editable items – Taxes and discounts – Automated status tracking – Time rounding – Recurring invoices – Export as PDF and UBL – Invoice design with color-coding and image upload – Translations – Native payment collection – Selecting payment methods |
| Project planning | Streamlined project organization – Independent and client-bound projects – Task tracking – Billable and cost rates – Time and budget estimates – Built-in project status and forecasting – Time and spending alerts – Adjustable required fields for time entries – Time entry descriptions | Project planning dependent on integrations – Projects tied to clients – Task tracking – Billable and cost rates – Estimates that serve as client quotes – Project budget and progress – Integrates with sister tool Forecast to predict budget spend – Projects and tasks are mandatory time entry fields |
| Reporting depth | Highly customizable reporting – Weekly, Summary, and Detailed reports – Team overview with live visual analytics – Attendance and expense reports – Dedicated columns for earnings, time off, and overtime – Granular filtering – Report sharing, both internally and via external links – Export as Excel, CSV, and PDF | Financial-focused reporting – Time, Detailed, Expense, and Profitability reports – Separate report for contractor work – No overtime or time-off insights – Essential filtering – Report sharing within Harvest – Export as Excel, CSV, and PDF |
| Scheduling | Full team planning – Calendar view – Team capacity – Overtime warnings – Individual assignments – Milestone tracking – Drag-and-drop editing – Time-off visibility | Separate tool – Harvest offers another tool called Forecast for team scheduling and capacity planning |
| Time-off management | Advanced absence tracking – Team availability timeline – Time-off allocation – Managing requests – Employee accruals and balances – Creating policies for different leave types – Premade time-off policies – Request status tracking (pending, approved, or rejected) – Filtering requests by user and status – Access via web and mobile app | No built-in time off – Customers use non-billable projects to track PTO or the sister tool Forecast to schedule it |
| GPS tracking | Employee-friendly monitoring – Tracking GPS locations on a map – Logging user routes every 500 m – Active only during work hours – Everyone’s GPS data is visible only to admins – Access to personal location history – Automatic data deletion after 7 days | Unmonitored time tracking – No GPS tracking or other monitoring abilities |
| Idle detection | Cross-platform availability – Active after X minutes of no mouse or keyboard activity – Available on the web extension and Mac/Windows desktop app | Limited access – Monitors mouse movements and keyboard strokes – Available only on the Mac/Windows desktop app |
| Integration count | Extensive integrations for all business setups – 9 native integrations: Jira, Plaky, Pumble, Zapier, Xero, Quickbooks, Peppol e-invoicing, Google Calendar, Outlook – 100+ integrations – 3 browser extensions: Google Chrome, Mozilla Firefox, and Edge – CAKE.com Marketplace with 100+ add-ons – Add your tool, a custom integration builder (free) | Broad workflow and accounting integrations – 8 native integrations: Asana, Jira, Slack, Trello, Xero, Stripe, Github, Google Calendar – 60+ integrations – 3 browser extensions: Google Chrome, Mozilla Firefox, and Edge – Harvest API, a custom integration builder (free) |
💡 CLOCKIFY PRO TIP
Overcome your decision paralysis with our latest guide on the best time tracking apps:
Clockify vs. Harvest: Pricing
To guide your decision further, we’ll compare Clockify vs. Harvest free plans and paid subscriptions.
In 2025, Harvest’s time tracking pricing jumped drastically after Bending Spoons took over the platform. They ditched fixed prices for a usage-based model — it charges the base rate plus fees for additional invoices, projects, clients, and tasks. After this, customers were shocked by their bills, with some tripling in cost.
Now, growing teams and those on tight budgets are looking for cost-effective alternatives. So, let’s see which tool gives you the best value for your buck in the table below.
Clockify vs. Harvest plan tiers and pricing
| Plans | Clockify | Harvest |
|---|---|---|
| Free tier | $0 (max 5 users) – Unlimited projects, all time tracking essentials, basic time reporting, team activity, free integrations, and 24/7 human support via chat, email, and phone | $0 (1 user) – 2 projects, all timekeeping features, time and project reports, expense tracking, invoicing, free integrations, and chatbot and email support |
| Paid tier 1 | Basic – $3.99/user (if billed annually) – $4.99/user (if billed monthly) – All Free features, plus custom time reporting, project tracking (bulk edits, time estimates), Kiosk, billable rates, breaks, a dedicated success representative, and personalized onboarding | Teams – $9/month before usage fees (if billed annually) – $11/month before usage fees (if billed annually) – All Free features, plus team capacity tracking, billable and cost rates, accounting and payment integrations, and scheduled phone support |
| Paid tier 2 | Standard – $5.49/user (if billed annually) – $6.99/user (if billed monthly) – All Basic features, plus time-off management, invoicing, QuickBooks integration, task rates, timesheet approval, and attendance and overtime tracking | Enterprise – $14/month before usage fees (if billed annually) – $17.50/month before usage fees (if billed annually) – All Teams features, plus profitability reports, timesheet approval, activity logs, security measures (SAML-based SSO), and tailored onboarding for 50+ teams |
| Paid tier 3 | Pro – $7.99/user (if billed annually) – $9.99 (if billed monthly) – All Standard features, plus scheduling, cost rates, budget estimates, expenses, forecasting, profitability reports, and more timekeeping options (Force timer and GPS tracking) | – |
| Paid tier 4 | Enterprise – $11.99/user (if billed annually) – $14.99 (if billed monthly) – All Pro features, plus added security with Single sign-on (SSO) and audit logs, and SCIM provisioning | – |
| Paid tier 5 | CAKE.com Bundle – $12.99/user (if billed annually) – $15.99/user (if billed monthly) – 3 in-house apps with enterprise-grade features: 1. Clockify for time tracking 2. Pumble for communication 3. Plaky for project management | – |
| 10-seat costs per plan | Basic – $39.9/month (if billed annually) – $49.9/month (if billed monthly) Standard – $54.9/month (if billed annually) – $69.9/month (if billed monthly) Pro – $79.9/month (if billed annually) – $99.9/month (if billed monthly) Enterprise – $119.9/month (if billed annually) – $149.9/month (if billed monthly) CAKE.com Bundle – $129.9/month (if billed annually) – $159.9/month (if billed monthly) | Teams – $90/month before usage fees (if billed annually) – $110/month before usage fees (if billed monthly) Enterprise – $140/month before usage fees (if billed annually) – $175/month before usage fees (if billed monthly) |
| 25-seat costs per plan | Basic – $99.75/month (if billed annually) – $124.75/month (if billed monthly) Standard – $137.25/month (if billed annually) – $174.75/month (if billed monthly) Pro – $199.75/month (if billed annually) – $249.75/month (if billed monthly) Enterprise – $299.75/month (if billed annually) – $374.75/month (if billed monthly) CAKE.com Bundle – $324.75/month (if billed annually) – $399.75/month (if billed monthly) | Teams – $225/month before usage fees (if billed annually) – $275/month before usage fees (if billed monthly) Enterprise – $350/month before usage fees (if billed annually) – $437.50/month before usage fees (if billed monthly) |

Clockify features Harvest doesn’t have
Clockify offers several benefits that Harvest lacks.
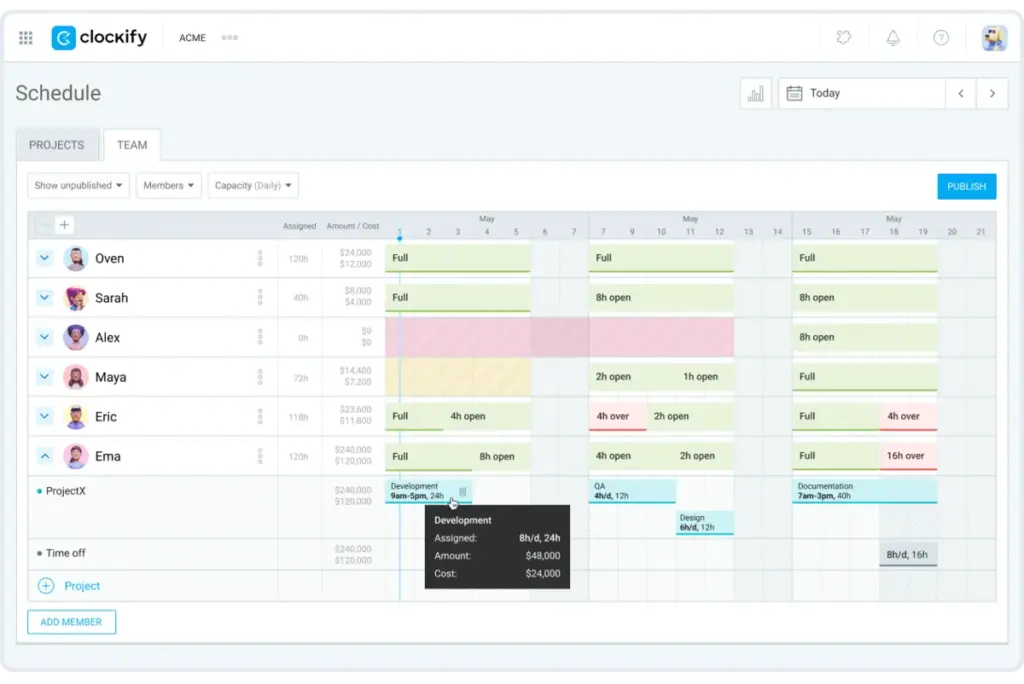
#1: Team schedules
Assign tasks on a timeline based on your team’s available hours. Clockify shows you who’s overbooked or underbooked, helping you balance workloads and avoid scheduling conflicts. Additionally, overtime warnings help you avoid excessive hours and pay issues.
Here’s a sneak peek into Clockify’s scheduling capabilities.
#2: Leave management
Schedule and manage time off for your team. Knowing who’s absent, when, and for how long helps you plan resources confidently for future projects. Tracking leaves also ensures accurate payroll, discourages no-shows, and prevents wage theft.
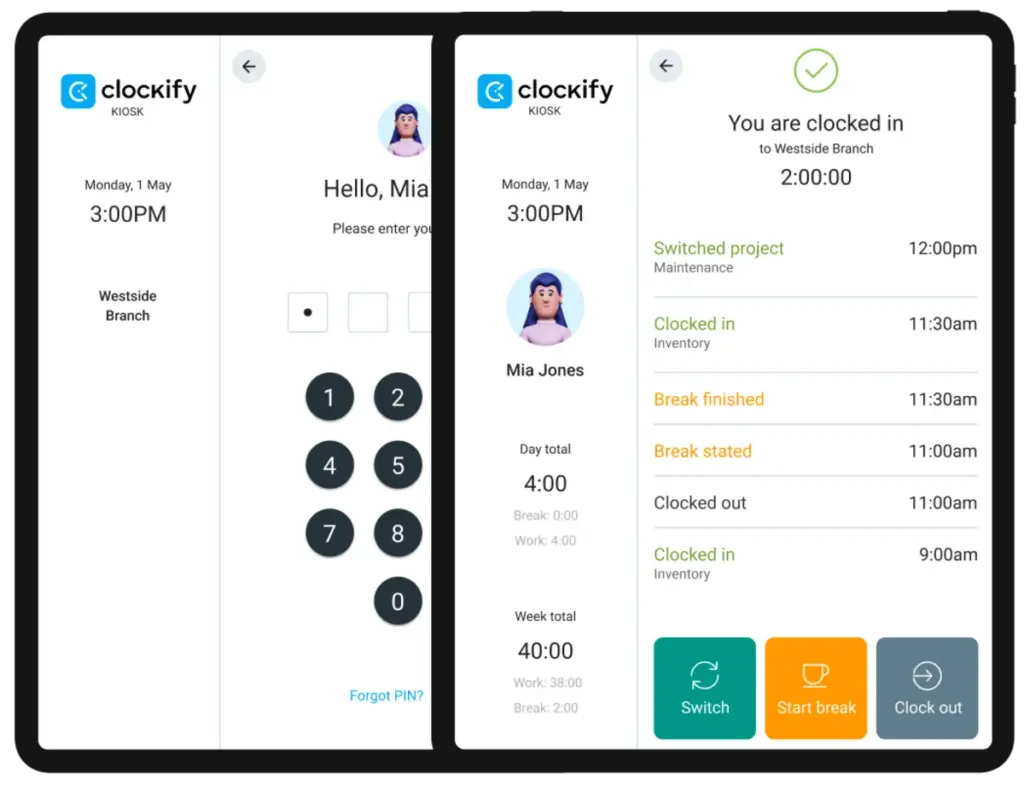
#3: Integrated time clock
Your employees can punch in and out from a shared device or their personal phones. Specifically, Clockify lets you log start/end times for shifts and breaks to simplify time tracking for on- and off-site teams. Sign in with PINs or QR codes to boost security without endangering anyone’s personal data.
💡 CLOCKIFY PRO TIP
Learn more about the perks listed above on the following pages:
Who should use Harvest vs. Clockify?
To make your choice easy, we’ll list 3 client profiles and see which tool suits them best:
#1: Freelancers billing clients
Harvest wins on built-in payment collection, which simplifies your billing. Alternatively, Clockify sends your tracked time to Xero and other accounting software. After receiving your payment in Xero, the invoice status in Clockify will automatically change to Paid.
#2: Teams of 5–50 tracking project time
Clockify takes the cake with a wider range of plans and features, and a free plan that allows multiple projects. Unfortunately, Harvest comes with a strict user cap that prevents teams from adopting it. Harvest also lacks in-app project forecasting that Clockify offers.
#3: Growing teams needing workforce management
Clockify wins this round, too, with flexible offers that support growth. Unlike Harvest, Clockify offers unlimited tracking across all plans and a rich feature set at bargain rates for easy scaling.

How to move from Harvest to Clockify
Take the following 3 steps to save your data from Harvest and continue tracking time in Clockify.
#1: Export data from Harvest
Once you’re logged into Harvest, go to the Reports section and select the desired time range to filter your data. Then, export it as a CSV file.
You can download data directly from the Time tab, which shows general details for each client, project, task, or team member. While there, click Export → Custom export to prepare more specific information for CSV download.
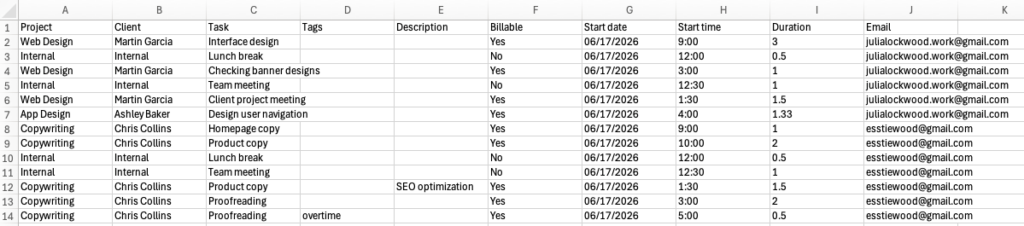
After it’s exported, open your CSV file in Excel.
#2: Edit your file before import
When customizing the document, your column names should match any of the following field names in Clockify:
- Project
- Client
- Task
- Tag
- Start date
- Start time
- Duration
- Billable
- Description
To ensure a painless migration, the fields above cover all the timesheet data you can safely move to Clockify.
Since Harvest uses Notes for adding details to time entries, you can sort them into the Tag or Description column. Additionally, Harvest doesn’t export emails, so you’ll need to add them into your file manually. Your date format also needs to match one of Clockify’s formatting options.
You can only import time data once you’ve set up your users. To do that, import a users file with their full names, emails, billable rates, and cost rates. Alternatively, invite them to your Clockify workspace via email and complete their profiles.

#3: Import files into Clockify
Once you’re in Clockify’s web app, open the Workspace settings and select the Import tab. Here, you can drag and drop CSV files to start uploading data. Then select the file type: Full users for importing team members, or Timesheet for time entries.
Clockify will notify you once your import is complete and provide links to your newly added items.
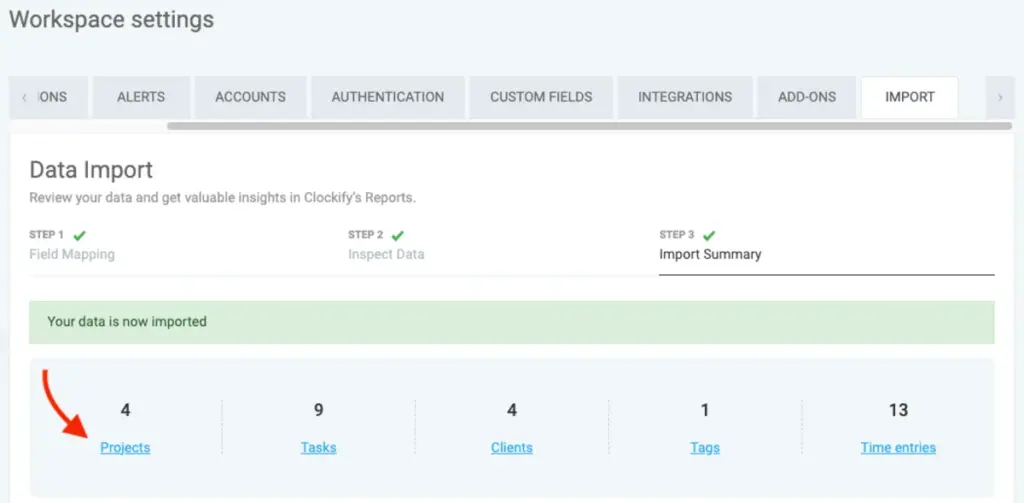
Important: The Free plan lets you upload projects, clients, tags, and tasks using Clockify’s CSV import.
Still curious about the transition process? Contact our 24/7 human support team for fast answers. You can also automate data import and export using CAKE.com Marketplace add-ons like:

Data formatting rules for successful import
Edit your file in Excel or any text editor to make sure your data is named and formatted correctly. Use commas to divide your info in the text editor or columns in Excel. Specifically, the first row should list your data categories. The rows below should include specific details related to those categories.
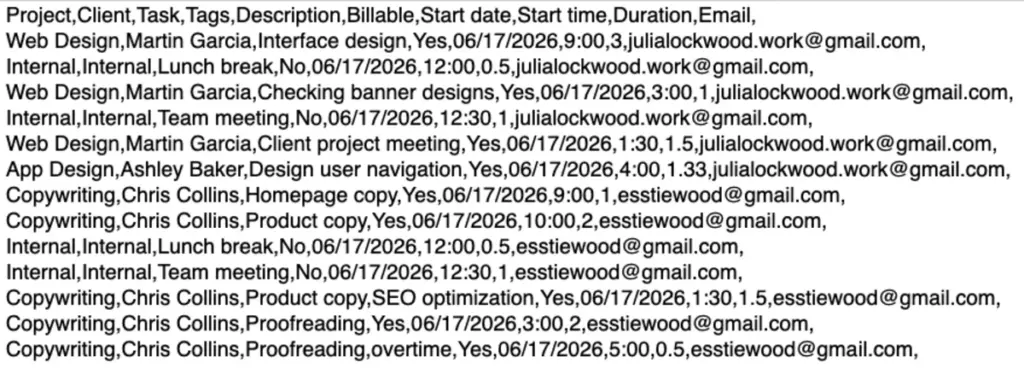
To match your column names with Clockify’s field names, follow this guide:
- Notes -> Description or Tag
- Date -> Start date
- Hours -> Duration
Next, delete redundant columns, such as “Ended at,” from your document. Clockify automatically calculates the end time for your time entries as long as you provide the start time and duration.
To avoid common formatting errors, match date and time formats to those in your Clockify Profile settings.
If you import Harvest’s CSV file without the necessary edits, Clockify will flag any mismatches.
Summary of formatting rules
Here are the formatting guidelines at a glance:
- You can import an unlimited number of files, but their size is capped at 10 MB.
- Only Admins can import files.
- Tasks can’t be imported without the Project they’re linked to.
- The order of the columns isn’t relevant.
- User emails in Clockify and those in the file must match.
- Required columns for the timesheet import include Email, Start date, Start time, and Duration.
- Optional columns for the timesheet import are Project, Client, Task, Description, Tag, and Billable.
- If you’ve set up Required fields in Clockify, your file must include columns that match those fields.
- The Duration column in your file should match the Duration format in your Workspace settings — e.g., Full hh:mm:ss, Compact h:mm, or Decimal 1.25.
- The Start time and Start date columns in the CSV file should match the start and date formats in your Profile settings.
- Clockify automatically calculates the end date and end time for time entries based on the Start date, Start time, and Duration.
- Mark Projects as billable or not by adding values Yes/No under the Billable column.
- If you don’t specify if an entry is billable or not, it will automatically inherit the billable status from the project it’s tied to.
- The users file can include columns: Name, Email, Role, Group, Billable rate, Cost rate, and Daily work capacity (hours).
FAQs about Clockify vs. Harvest
Let’s look over the most frequent questions about Clockify vs. Harvest. Read our compact answers to resolve any doubts.
What does Harvest track?
Harvest tracks time, expenses, projects, and clients. Here’s what transfers from Harvest to Clockify:
- Projects, tasks, clients, and expenses
- Billable rates for users/projects
- Summary, detailed, and weekly reports
- Invoices
Clockify vs. Harvest: What works differently
| Feature | Harvest | Clockify |
|---|---|---|
| Timekeeping | – Timer, Timesheet, and Calendar | – Timer with GPS, Timesheet, Auto tracker, Kiosk, Pomodoro tracker, Calendar |
| Invoicing | – Built-in feature with payment collection via Stripe or PayPal | – Native feature that connects with Xero or QuickBooks |
| Free plan | – 1 user and 2 projects | – 5 users and unlimited projects |
How much does Harvest cost per month?
Harvest’s 2 paid plans cost between $9 and $17.50 a month before additional fees. Under an annual billing cycle, your per-plan/seat cost is $9 (Teams) or $14 (Enterprise). If billed monthly, your per-plan/seat expenses are $11 (Teams) or $17.50 (Enterprise).
Following Harvest’s 2025 price increase, the platform charges base rates plus usage-based fees for:
- Invoices
- Projects
- Clients
- Tasks
Ditch hidden fees — try Clockify
Can Harvest track PTO?
Harvest can’t track PTO, as it doesn’t include time-off options. Its customers have no choice but to create a separate project for rest days. To manage time-off requests, Harvest’s users must subscribe to its sibling app Forecast — which costs extra.
Meanwhile, Clockify tracks time off on the Standard plan so you can see absences on a timeline, schedule PTO, and filter requests.
💡 CLOCKIFY PRO TIP
Track holidays to keep accurate logs of non-working days in Clockify:
Is Clockify good for freelancers?
Yes, Clockify helps freelancers with comprehensive project tracking and reporting. Yet, Harvest inches past Clockify for solo freelancers who rely on in-app Stripe/PayPal payment collection.
However, Harvest’s unpredictable pricing has freelancers clutching their wallets. Clockify emerges as a cheaper, transparent alternative, offering a free 7-day trial and possible extensions.
Is Harvest good for small businesses?
Harvest is suitable for small, freelance-heavy teams that need simple invoicing and payment collection. However, Clockify is better for teams of 5+ who need more features without a higher per-seat cost.
Billing use case: While Harvest unlocks the Stripe integration for $9 (Teams), Clockify syncs with Peppol e-invoicing, Xero, and QuickBooks for $3.99 (Standard).
Does Clockify detect idle time?
Clockify offers idle detection on its browser extension and desktop app (available for Mac and Windows). On the flip side, Harvest detects idle time only on its desktop app. This may compromise timesheet accuracy for teams that rely on web-based tools.
Is Clockify trustworthy?
Clockify is a trusted time tracker owned by CAKE.com, with a loyal user base of 500K+ businesses. Backed by CAKE.com, Clockify offers enterprise-grade data security, timekeeping compliance, and SSO controls.
Moving to Clockify is risk-free, as it removes:
- Wasted time
- Data safety concerns
- Rage-inducing tech errors
💡 CLOCKIFY PRO TIP
Evaluating multiple tools? See our full Toggl vs. Clockify vs. Harvest comparison:
Can you export data from Clockify?
Yes, Clockify exports your data in CSV, Excel, and PDF. Here’s what information is exportable:
- Projects
- Invoices
- Time off
- Time, attendance, and expense reports
- Full members (standard access to Clockify)
- Limited members (no email and Kiosk-only access)
- Groups (of members)
