 Updated: June 11, 2026
 Clockify is a time-centric project management tool that lets you track project hours, monitor progress, and schedule future work hours across projects.
With timekeeping, budgeting, scheduling, reporting, and invoicing, Clockify simplifies project time management and helps you improve productivity. The app covers the full PM workflow for service teams and pairs well with Kanban tools for teams that also need dependency tracking.
- Clockify lets teams track time on projects, set budget alerts, and track project progress from kick-off to delivery.
- Clockify allows you to create projects, assign tasks to team members, track billable time and expenses, set estimates, analyze progress, and create client invoices.
- Clockify integrates with many task board and calendar apps, reducing manual data entry and context-switching.
- SMBs use Clockify to monitor employee productivity, reduce time waste and optimize resources, and improve project profitability.
What is project tracking?
Project tracking is the process of monitoring and comparing planned vs. actual progress across time, budget, and team hours.
Clockify by CAKE.com lets you estimate a project’s length, then monitor progress and compare estimated vs. tracked time to see how well your team performs.
For better budget control, you can set budget alerts to get notified when a project or task reaches a certain percentage of its estimated budget.
To improve stakeholder visibility, Clockify lets you create transparent reports that you can share with your clients via a link.
💡 CLOCKIFY PRO TIP
Besides using a dedicated tool (like Clockify), tracking multiple projects at once requires developing a plan for each project and determining a priority project. For more tips, read the following blog post:
How Clockify organizes your work
Clockify enables you to organize your time using a 4-level structural hierarchy:
- Client
- Project
- Tasks
- Tags
In Clockify, Clients are used to organize projects. A client (the company you bill) may have multiple projects, but the project may belong to only 1 client.
As for Projects (the engagement or initiative), you can create as many of them as you want, archive, or delete them.
Within each project, you can create Tasks that represent smaller units of work within the project.
To add detailed context to individual time entries, you can use Tags (cross-project labels, like “admin”). Tags are useful for easier filtering and reporting.
To better understand how different industry-specific teams can map their work in Clockify, check the table below:
| Team type | Client | Project | Tasks | Tags |
|---|---|---|---|---|
| Agency | Brand | Campaign | Copywriting, Design, Review | Non-billable, Rush |
| IT services | Internal dept or external client | Sprint or release | Tickets, bug fixes | Internal, Billable |
| Consultancy | Company | Engagement | Workstreams, Deliverables | Travel, Admin |
For more information on Clockify’s structural hierarchy, refer to our help page on time categorization.
Which plan do you need to manage projects in Clockify
Some features for managing projects in Clockify are available for free, while others require an upgrade.
Here’s an overview of Clockify’s free vs. paid project management features to help you evaluate your options:
| Features | Free | Paid |
|---|---|---|
| Creating projects and clients | ✅ (unlimited) | ✅ (unlimited) |
| Estimates and project alerts | ❌ | ✅ |
| Creating tasks | ✅ (unlimited) | ✅ (unlimited) |
| Adding team members | ✅ (up to 5 users) | ✅ (unlimited) |
| Scheduling | ❌ | ✅ |
| Time tracker, Timesheet, Auto tracker | ✅ | ✅ |
| Billable and cost rates | ❌ | ✅ |
| Expenses | ❌ | ✅ |
| Forecasting | ❌ | ✅ |
| Reports | ✅ | ✅ |
| Invoicing | ❌ | ✅ |
NOTE: CSV and Excel report exports are paid, as are Shared reports (PDF report exports are free). Also, the Manager role is a paid feature.
How to manage projects in Clockify by CAKE.com
Clockify offers a complete set of features to manage projects from start to finish.
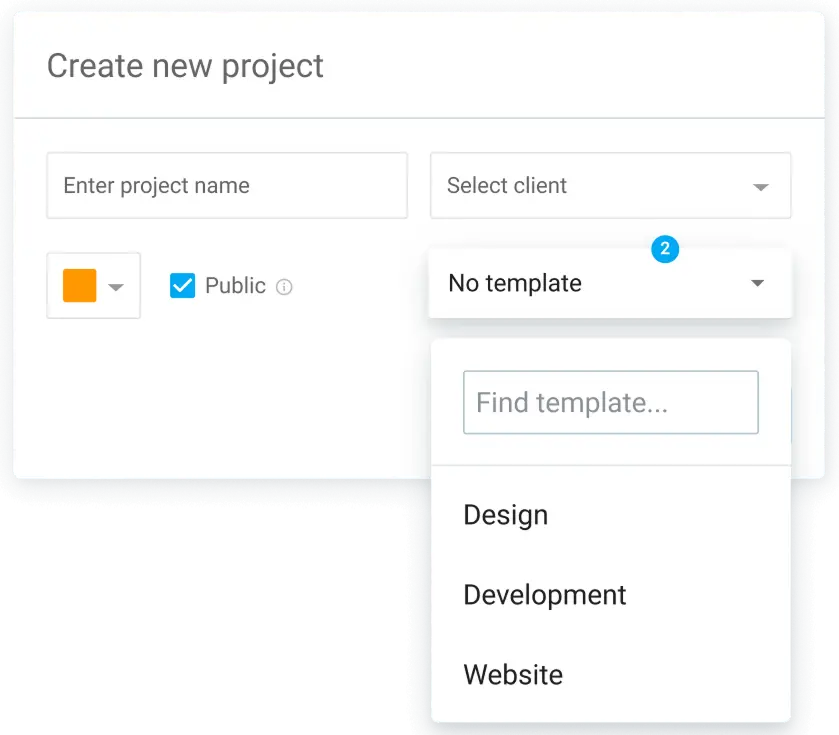
#1: Create a project and assign a client
Creating a project in Clockify is simple:
- Go to Projects
- Click Create new project
- Name the project
- Select a client or create a new one (by typing a name and clicking Create Client)
- Make the project Public or Private
You can also create a new project based on a template you previously saved.
When you create a project and assign its client, the work you do on the project is traceable to the client you’ll later bill for your services.
A new client can also be created by going to Clients, entering the client’s name, and clicking Add. A client will be automatically added to your list.
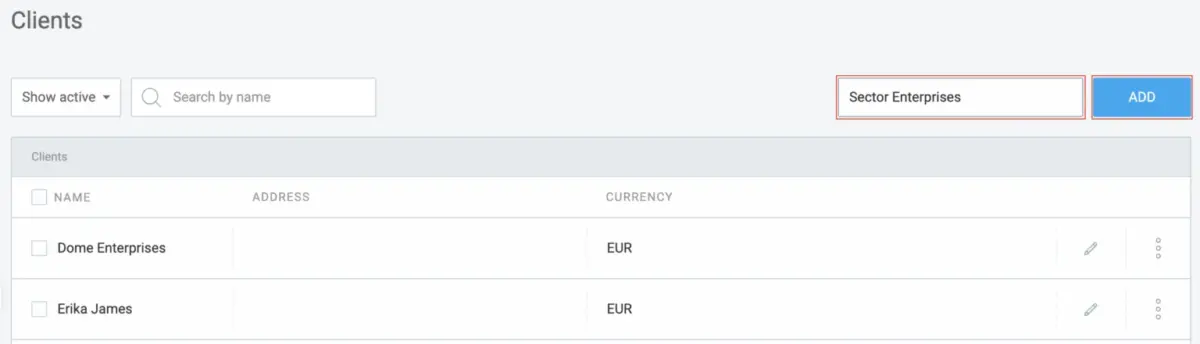
Learn more about how to manage projects and clients in Clockify. There’s also an option to import clients and projects into the app using a CSV file.

#2: Set estimates and reminders
To track your project’s progress, you can set a time estimate for the whole project. Simply go to Projects, select a project, and open the Settings tab. Then select Time estimate in the Project estimate section, click Manual, and type your estimate in hours.
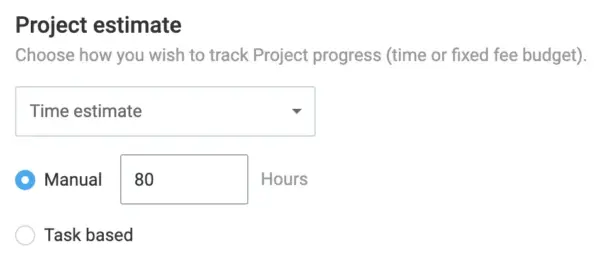
Set time estimates in Clockify
Alternatively, you can define an estimate for each project’s task, and your whole project estimate will be the sum of all task estimates.
To set a budget estimate and track your project’s budget, select Project budget. You’ll also have an option to either manually enter the budget for the whole project or set a budget for each task.
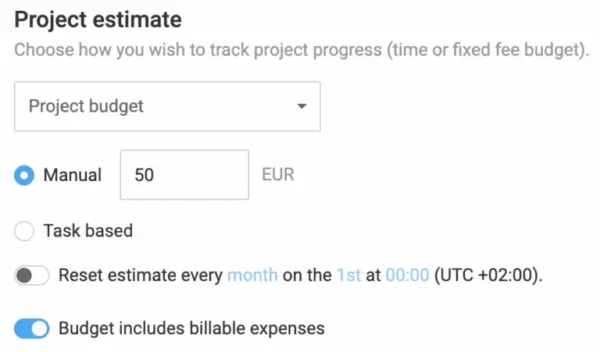
To include billable expenses in the budget, enable that option.
You can also set a reminder to avoid going over the time or budget estimate. You’ll get notified via email when a project reaches a certain percentage of its estimate (e.g., 75%).
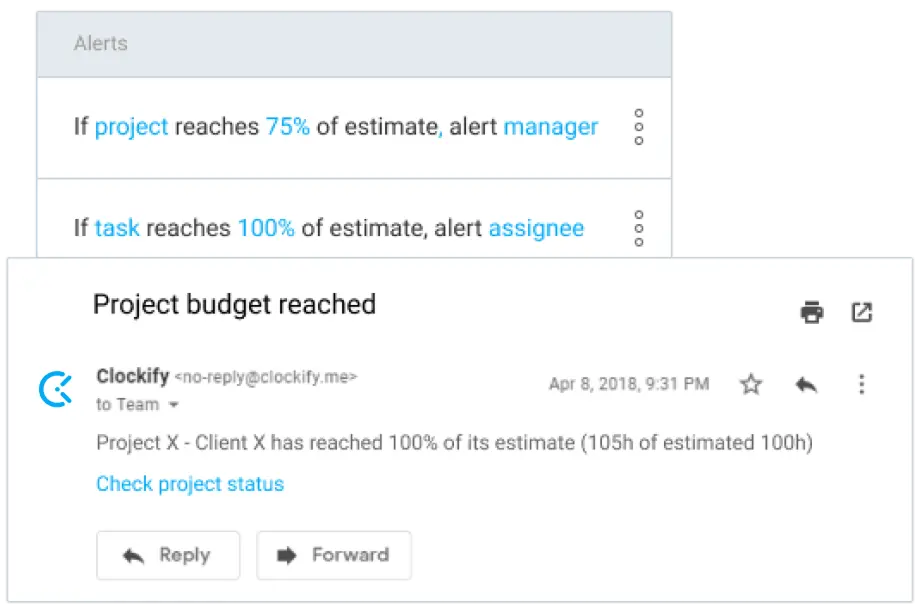
For more details on how Alerts work, check out our help page on setting project alerts in Clockify.
As an effective project deadline tracker, Clockify helps teams monitor progress and stay on schedule. This enables timely project completion.
#3: Split the project into tasks
Within each project, you can add as many tasks as your team needs. To create Clockify Tasks, you need to:
- Go to your project
- Open the Tasks tab
- Type the task name
- Click Add
You can also add task details, like assignee or billable status.
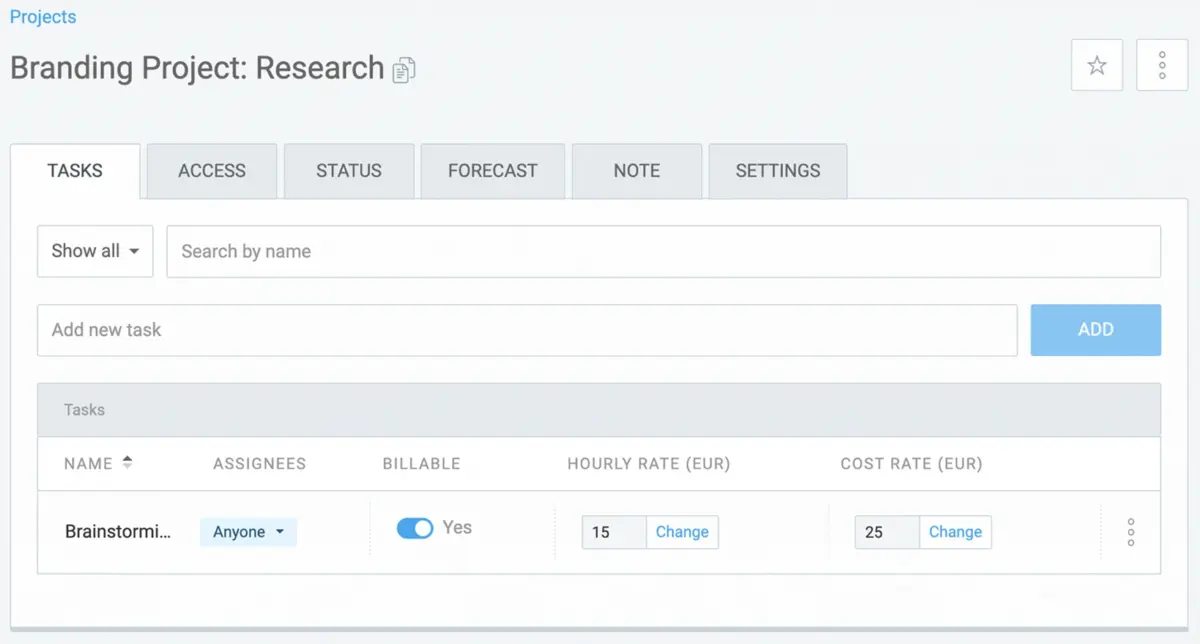
For each task, you can also set an hourly rate (to see the earnings that task brings) and a cost rate (to see the cost working on that task generates).
💡 CLOCKIFY PRO TIP
Breaking projects down into smaller portions is a common practice in project management — it makes the project less daunting. Discover different ways to break down a project here:
#4: Organize and add team members
To manage your team in Clockify, you need to invite team members to your workspace.
Navigate to Team and click Add new member/Add full member. Then, enter the member’s email and click Send invite. The person who got invited will receive an email with the activation link. Finally, they need to click the link and verify their email.
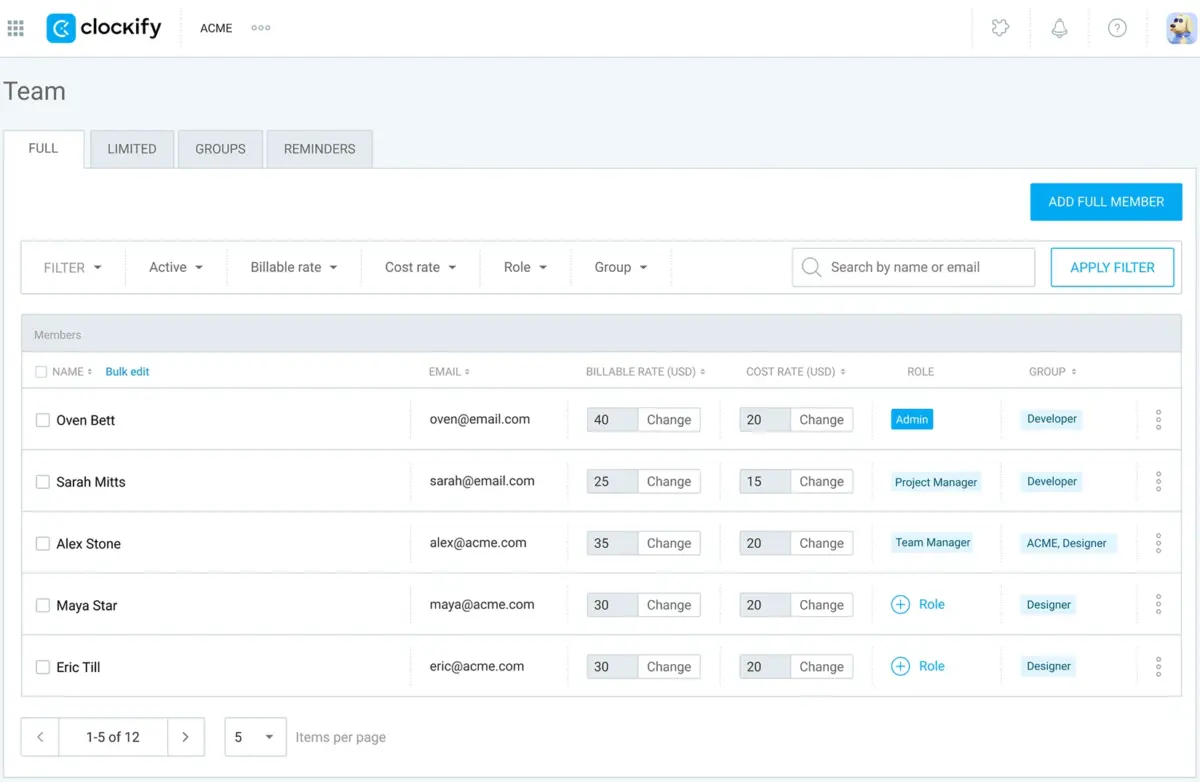
On the Team page, you can also split your members into groups. This way, you can later assign the whole group to a project instead of adding people one by one.
Additionally, you can set billable and cost rates for each member. Cost rates show the amount of money a team member’s working hour costs, while billable rates show the amount of money earned per working hour.
Once team members join your workspace, you can add specific members or groups to your project.
Before adding people to a project, check your team’s capacity. Use the Team view in Clockify’s Schedule to confirm who has available hours before inviting them to a project.
💡 CLOCKIFY PRO TIP
To learn more about how to manage hourly and cost rates in Clockify to calculate profitability and overall labor costs, read the following:
#5: Set roles and permissions
For efficient workflow management, you should understand who can see and do what in Clockify. Different user roles in Clockify are:
- Owner
- Admins
- Project and Team managers
- Regular users
Once you create a workspace in Clockify, you become its Owner and get complete control over workspace management. Owners have all the rights of Admins, plus the ability to delete the workspace and set up Single Sign-On (SSO).
Admins have significant control within Clockify. They can create and manage projects, assign roles, define billable rates, and more.
The Admin role can only be assigned by the Owner or other Admins. Go to Team, find the user you want to appoint as an Admin, click + Role next to their name, and select Admin.
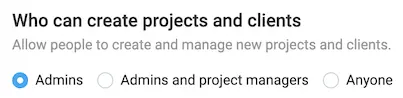
By granting permission in the workspace settings, admins can enable other team members to create projects.
While Team managers oversee specific users or groups, Project managers’ access is focused on the projects they manage. In Clockify, Project managers can view tracked time for their project, manage project details, and schedule assignments.
Learn how to assign Manager roles in Clockify.
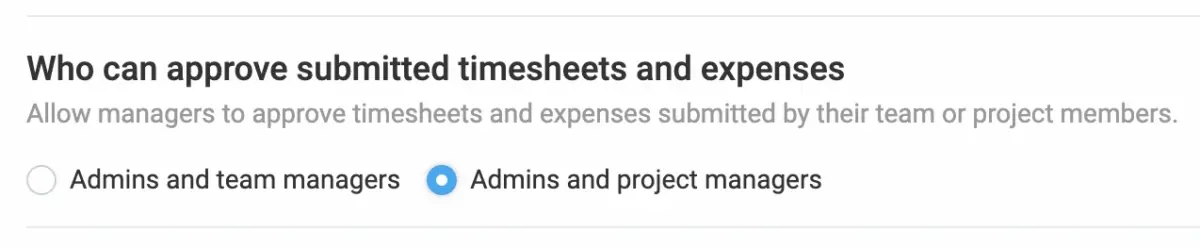
If Project managers or Team managers can’t approve timesheets, it’s because the Admin hasn’t granted them permission.
As for Regular users, they can track time, view their own and others’ time entries (unless disabled), and create tasks and projects (if allowed).
If a team member says they can’t see a project, they’re likely a Regular user on a Private project. In that case, the Admin or Project manager can add the member to the project or set the project to Public.
#6: Assign tasks across your team
You can organize people per project or distribute projects per team member/group, whatever’s easier for you. In both cases, Clockify allows you to switch between the Projects and Team view, keeping the same information you entered.
To open the Projects view, go to Clockify’s Schedule and click the Projects tab. Here, you can create a schedule for your team:
- Define the time period
- Add projects and team members
- Set assignments for them
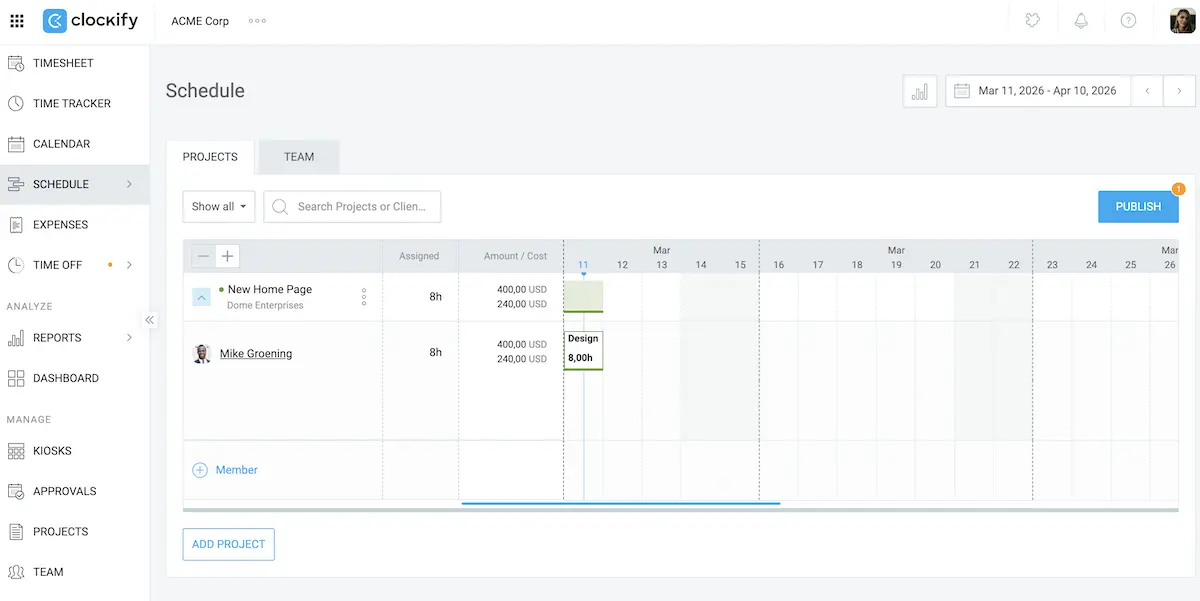
When a new team member is added, their schedule line will be in white until you publish the schedule to notify them about the task.
You can use your mouse to move a scheduled task to another day or split the assignment into two.
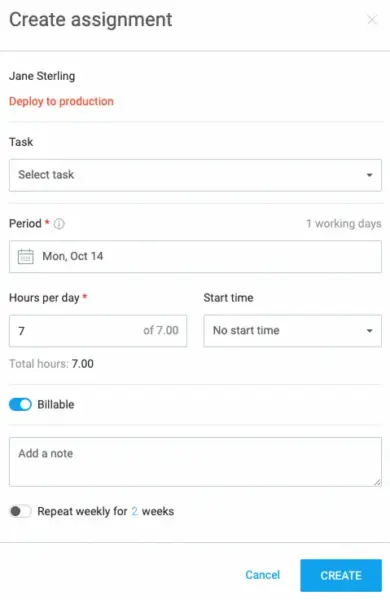
To create a new assignment for a team member, click on an empty spot in a user’s timeline row. Then select a task, define a period, and specify working hours/day. You can also set the assignment to repeat weekly (e.g., for 2 weeks).
If you want to check your team’s capacity, open the Team tab. There, you’ll be able to see who has free hours, who’s booked to full capacity (time tracking target), and who’s overbooked.

Checking your team’s capacity helps you balance workload across the team and prevent employee burnout.
💡 CLOCKIFY PRO TIP
Get more information on scheduling projects in Clockify, including how to add milestones for projects with multiple phases, in the resource below:
#7: Track project billable and non-billable hours
To ensure transparency between you and your clients regarding the time spent on billable and non-billable tasks (e.g., meetings or error fixing), all work on a project should be properly tracked.
Your team can track the time they spend working on each project by using:
- Timer
- Timesheet
- Auto tracker
To track time with Clockify’s Timer, go to the Time tracker page, enter a description of your work, and select the project. To mark your time as billable, click the $ sign (it’ll turn blue). After that, click Start. When you’re done with your task, click Stop to finish tracking billable time.
If you forgot to start the Timer, you can use the manual mode to enter the start and end times of past activities.
However you track work hours, all your time entries are located on the Time tracker page.
If your team prefers to log their daily or weekly work activities at the end of the day/workweek, they can use the Timesheet feature. Later, they can submit their timesheets for manager review.
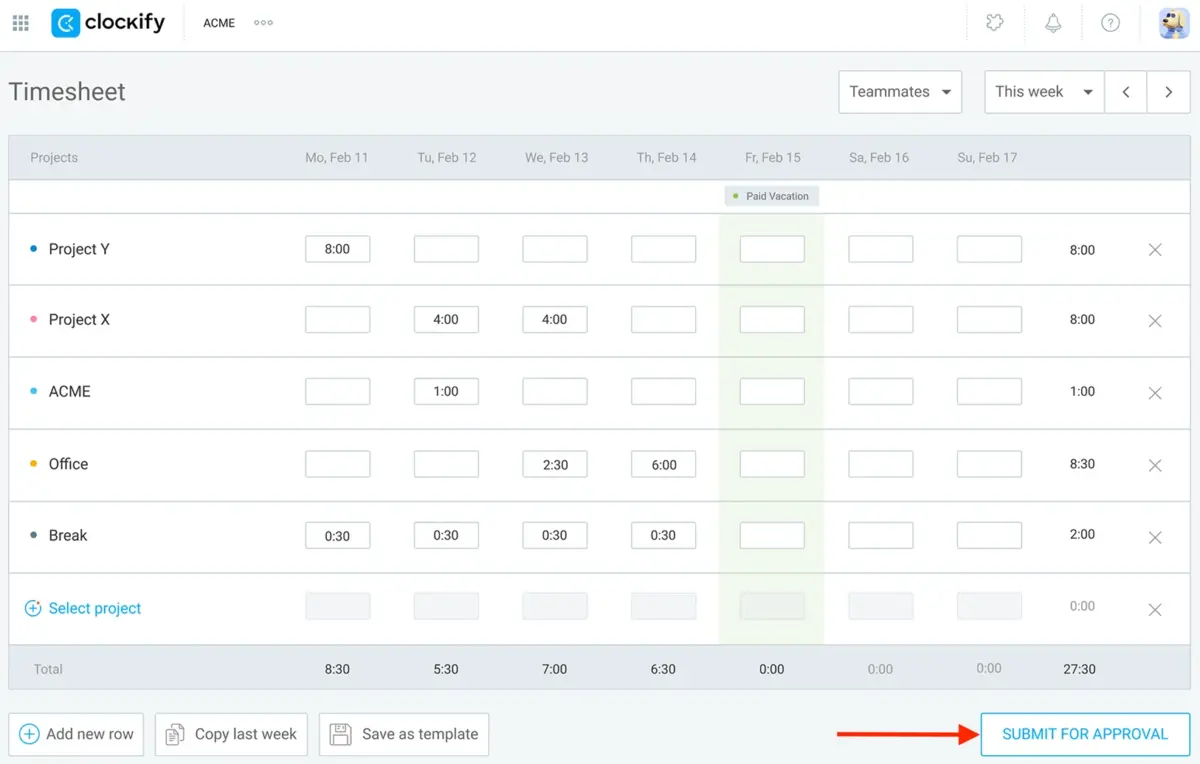
See how to modify time entries in your timesheet by adding details like start and end times or billable status.
The Clockify Auto tracker helps your team members keep track of how much time they spend across apps and websites while working on a desktop computer. Only they can see these records and may choose which entries they want to transfer to the Clockify web (where their manager can see those entries).
Learn how to create time entries from activities in Clockify’s Auto tracker.
#8: Record project expenses
Managing projects sometimes requires additional expenses not initially included in the budget.
Clockify lets you and your team record any expense you might incur during a project — fixed fees (e.g., day rates, retainers, overtime pay) or unit-based expenses (e.g., hours, mileage, materials).
With Clockify’s Expenses, you can:
- Create different expense categories
- Give them unit prices or enter whole amounts
- Attach receipts
- Connect expenses to a project
- Include expenses in an invoice
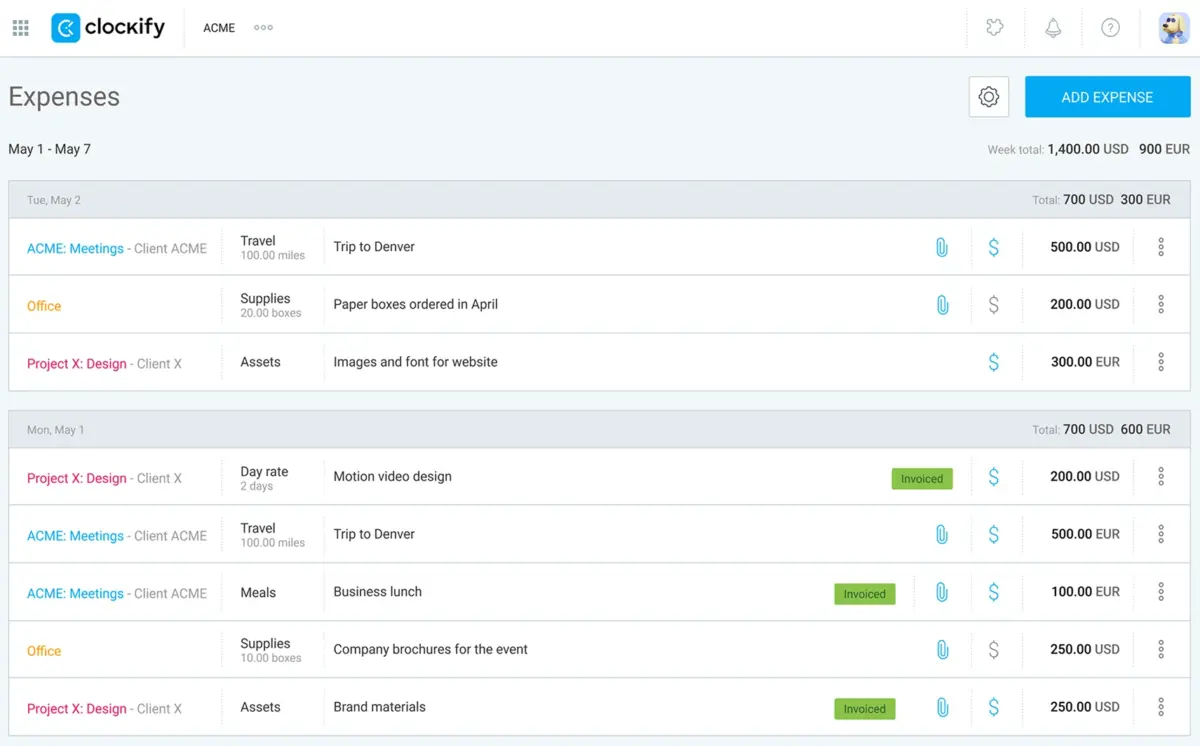
To create an expense in Clockify, click on Add expense. After that, select a project, choose a category, and enter the amount or unit (e.g., miles). Selecting a member and date, or leaving a note, is optional.
Finally, mark the expense as billable to include it in the project’s budget and click Create.

For better control over data, you can prevent Regular users from seeing other people’s tracked time and expenses.
Apart from the web version, expenses can be recorded directly from a mobile app (Android, iOS). This enables easy expense tracking on the go.
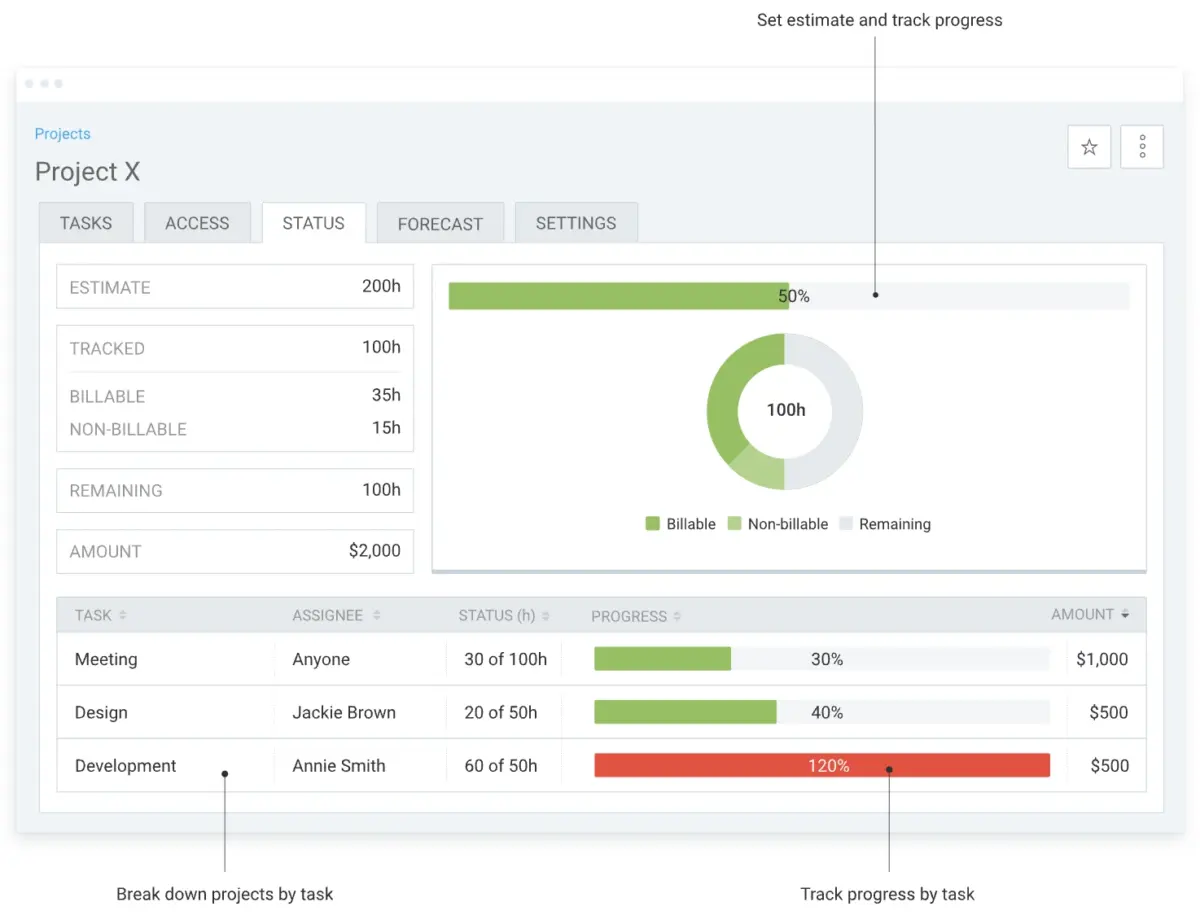
#9: Track and forecast project progress
If you’ve entered time or budget estimates for your project, you can track its progress.
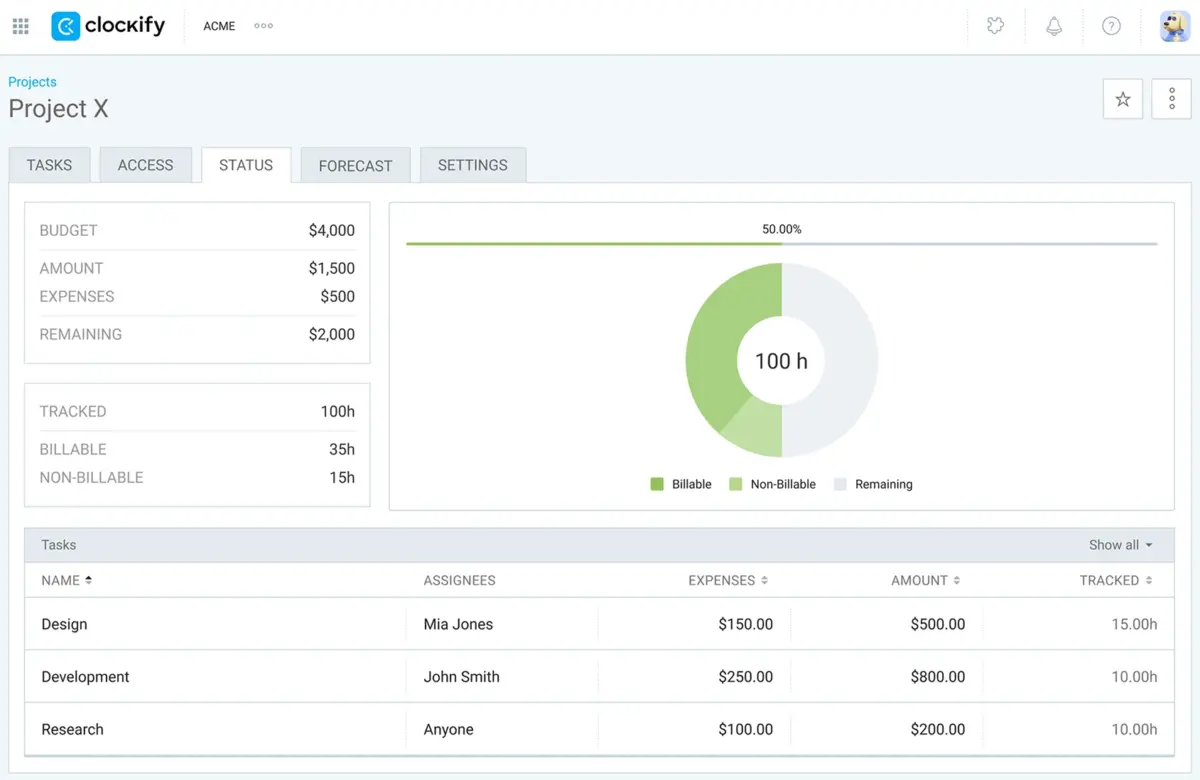
Go to Projects, select a project, and open the Status tab. If you set the budget estimate, you’ll be able to see:
- Amount spent based on tracked billable hours
- Expenses amount
- Remaining budget
- Total tracked (billable and non-billable) hours
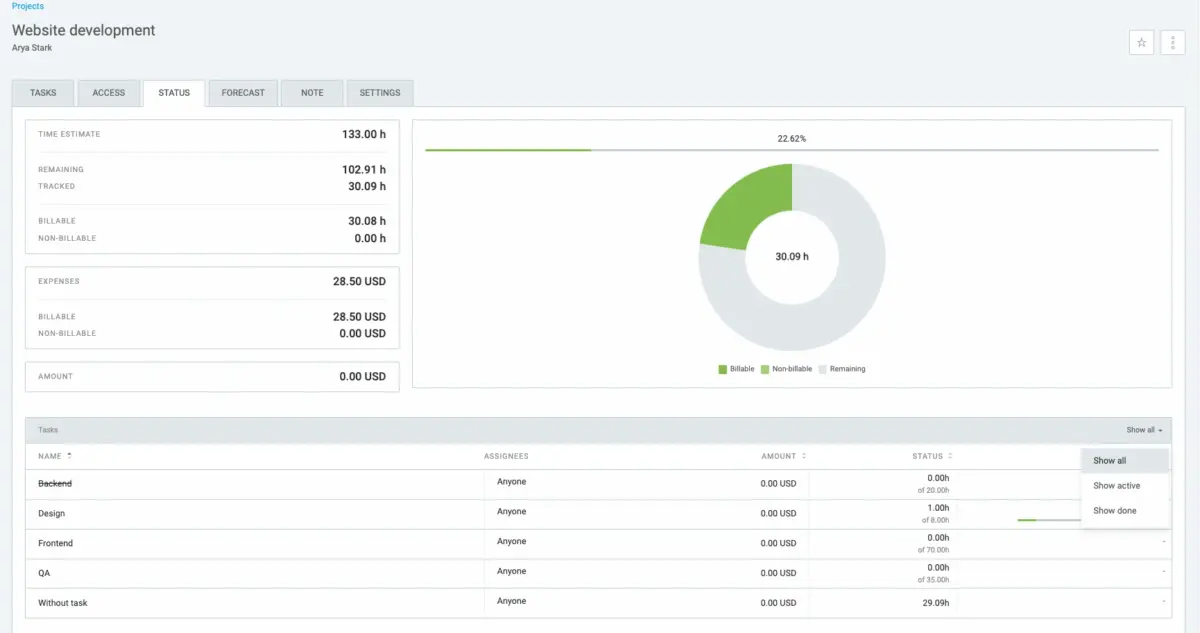
If you set the time estimate for your project, the Status tab will look a bit different. It’ll show:
- Total tracked (billable and non-billable) hours
- Remaining hours
- Expenses amount
Track project progress in Clockify
To visualize your project’s progress based on tracked and scheduled time, use Clockify’s Forecasting. For instance, if you schedule more hours than you estimated at the beginning, Forecasting will alert you that the project will go over the estimate by X hours.
The part of the Forecasted curve (dotted blue line) that’s over the horizontal Estimate line will be in red. This indicates that your project will exceed the estimate.
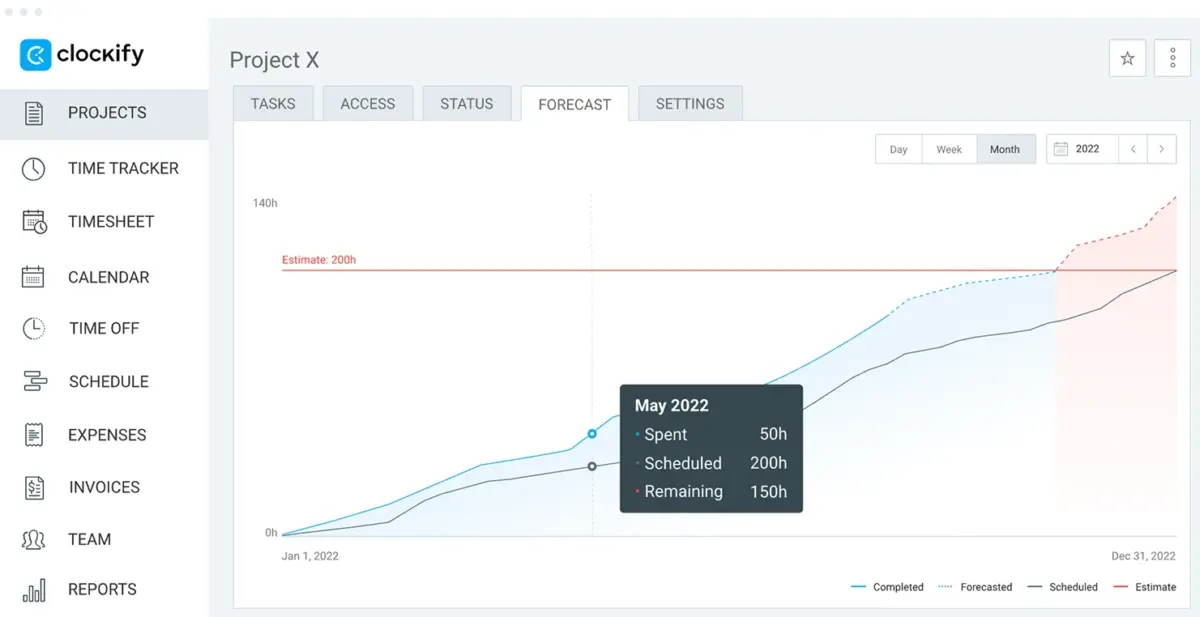
You can use Forecasting in Clockify to adjust estimates or modify team schedules, and reassign tasks.
#10: Chat with your team
To ensure successful project completion, your team members need to stay connected and up to date.
Clockify integrates with Pumble, allowing teams to keep project communication and time tracking updates in one place and reduce tab switching.
Clockify and Pumble, together with Plaky project management app, are all part of the CAKE.com Bundle, which provides these 3 productivity tools at a heavily discounted price of $12.99. This way, you’ll manage your projects, your time, and overall communication with ease.

#11: Customize project reports
Regular reporting gives you a clear overview of project performance. Reports are useful when you want to inform clients of the project’s progress or analyze the costs and profits generated.
Clockify by CAKE.com offers Summary, Detailed, and Weekly reports, which can display any date range you need. You can also filter the data by:
- Team
- Client
- Project
- Task
- Tag
- Status
- Description
To generate a Summary report, go to Reports and select Summary. If you want to analyze your project’s profitability, choose a time range, filter the report by project, and click Apply filter. Then open the Show menu in the top-right corner and check the Show amount, Show cost, and Show profit boxes.
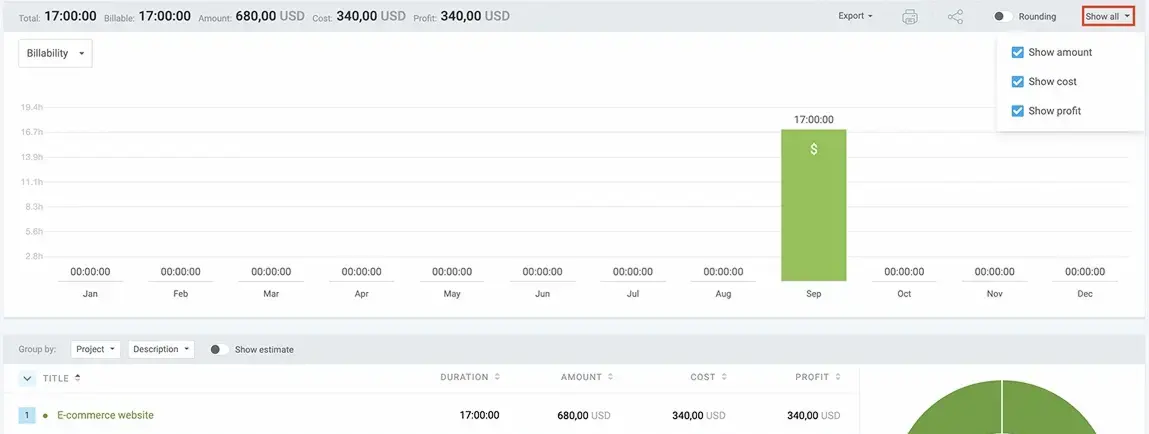
This way, you’ll be able to see total billable hours and the amount, as well as the calculated cost and profit based on billable and cost rates.
To identify which tasks are eating non-billable time, use the Detailed report. It shows full details of all time entries, including start and end times, dates, duration, and billability status.

The Detailed report helps you spot time-consuming non-billable tasks and find opportunities to improve productivity and profitability.
If you want to see a weekly breakdown of all tracked time, use Clockify’s Weekly report.
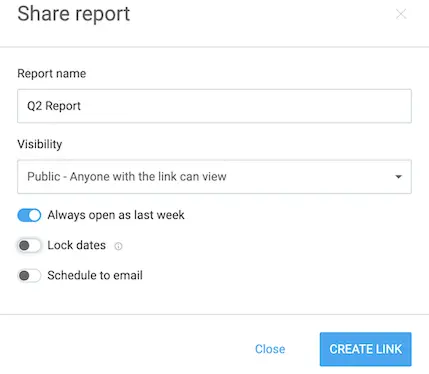
Before getting on a call with a client, you can share a report with them via a link. This way, they can follow real-time project progress without needing a Clockify account.
To share a report, click the share icon, enter the report name, and set the visibility to Public. Then, click Create link, copy the link, and send it to your client.
Sharing real-time project data with a client helps build trust and enables efficient collaboration and decision-making.
Analyze time data with Clockify
#12: Bill projects
When all work on the project is completed, you need to bill your client for your services.
To help you get paid faster, Clockify lets you create client invoices that you can customize to make them more professional.
To create an invoice in Clockify, go to Invoices and click Create invoice. Then select a client, change a currency, and enter the invoice ID. In the end, change the due date (if needed) and click Create.
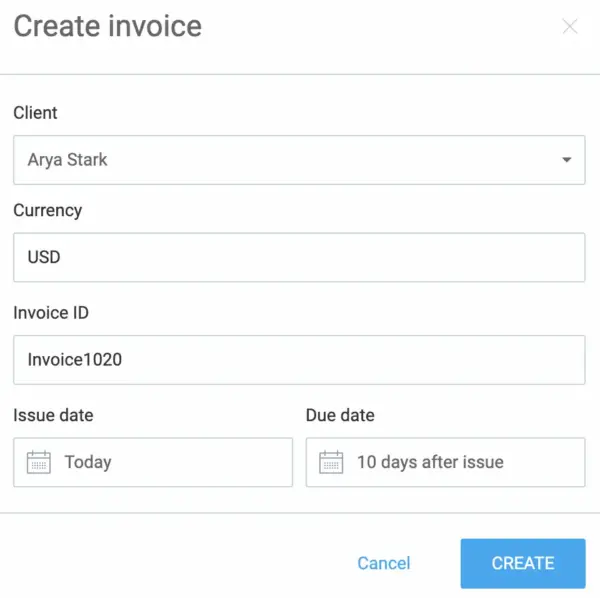
Once you click Create, you’ll be able to add items to the invoice, import time and expenses, and manage all the other invoicing information (e.g., your company and client info). You can even add taxes and discounts or download the invoice.
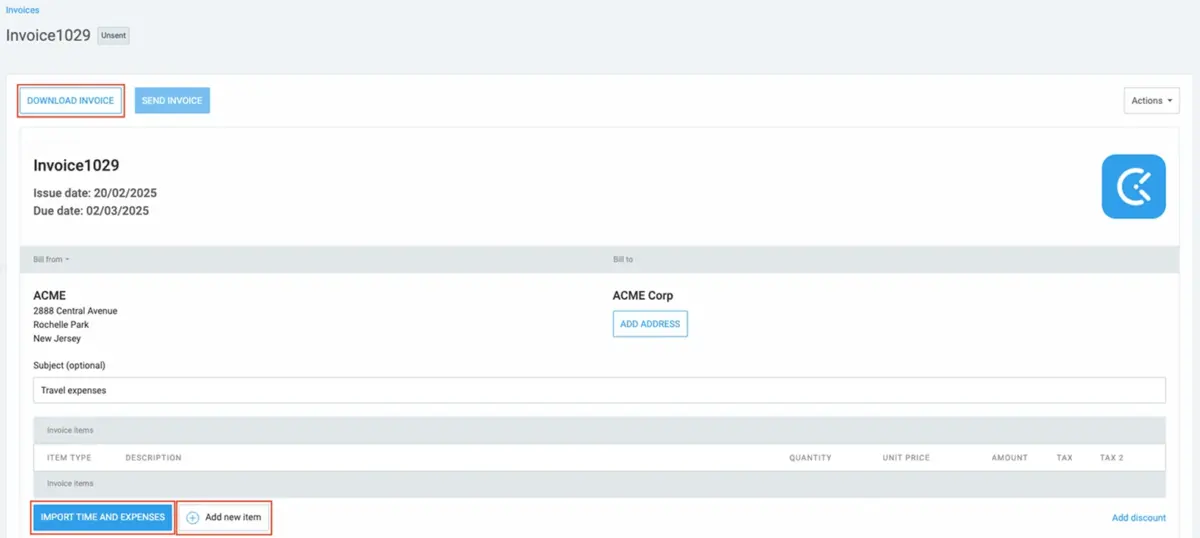
All your invoices will be in the invoice list, where you’ll have a clear overview of their status (sent, paid, unsent, overdue, or void).

💡 CLOCKIFY PRO TIP
For fast invoice creation, download free invoice templates for your business type here:
Clockify integrations for project management
Clockify integrates with 100+ web apps, including popular task board and calendar tools. This enables simple time tracking across platforms and easier task and project management.
For example, you can integrate Jira with Clockify to track time on issues directly from Jira. When your team member starts the timer on a Jira issue, Clockify automatically picks up all the important information:
- Description (issue key number and title)
- Project (Jira project)
- Task (issue key)
- Tags (issue types and labels)
Clockify then syncs these details to your time entry.
To finish tracking time, members can stop the timer from Jira or Clockify (mobile, desktop, or web app).
You can analyze your project’s progress and assess your team’s performance by using Clockify Reports.
To quickly convert client meetings into time entries, connect Clockify with Outlook. This way, you’ll save time and minimize errors.
Check the table below to see what you get by integrating Clockify with Asana, Jira, Trello, ClickUp, Google Calendar, and Outlook:
| Integration | Key project management benefits |
|---|---|
| Asana | Precise tracking of time spent on tasks and project progress monitoring |
| Jira | Helps measure effort on issues and improves sprint planning |
| Trello | Accurate tracking of time spent on cards and workflow stages |
| ClickUp | Efficient per-task tracking, improved workload management, and detailed insights into team productivity |
| Google Calendar | Easy comparison of scheduled vs. actual tracked time |
| Outlook | Fast conversion of meetings and events into time entries |
NOTE: Clockify integrations are available on the Free plan. The only native Clockify integration that’s not free is the QuickBooks integration (available on the Standard plan). See pricing ➜
FAQs about managing projects in Clockify
Here are answers to some frequently asked questions about Clockify.
Is Clockify a project management tool?
While primarily a time tracking tool, Clockify also works as a lightweight project tracking system by enabling teams to:
- Organize projects
- Track time spent on project tasks
- Monitor progress
- Manage budgets
- Analyze project performance
💡 CLOCKIFY PRO TIP
Check out how Clockify helps a VA agency track billable and non-billable hours and improve profitability:
What is Clockify used for?
Clockify is used to record work hours, track project progress, and analyze team productivity and project profitability. It also simplifies client billing by allowing managers to create invoices from billable time and expenses.
Why do companies use Clockify?
Companies use Clockify to increase project visibility, improve budgeting and resource planning, and maximize revenue. The app also helps organizations streamline payroll and stay compliant with timekeeping laws.
How does Clockify work for employees?
Employees can learn how to use Clockify very quickly thanks to its ease of use and intuitive interface. Once you set up projects and tasks and invite team members to your workspace, they can start tracking time spent on tasks with a single click by using the Timer.
Team members can also submit their daily or weekly timesheets for approval and request time off through the app. This simplifies attendance management and reduces admin work.
Track employee hours with ease
Can Clockify see what I’m doing?
What users can see in Clockify depends on their role and the workspace’s settings.
Admins can see and manage time and expense reports for all users. They can also view team activity and approve all timesheets.
Team managers can view all tracked time for members they manage. If enabled in the settings, they can also approve their timesheets. Project managers can view all tracked time on their projects and approve timesheets for members assigned to their projects (if enabled).
Does Clockify have automations?
Clockify automates the following:
- When a project hits a set percentage threshold, admins, project managers, and/or project members receive a budget alert email.
- When a team member hasn’t submitted their timesheet for a specific period, they receive a reminder.
- When team members submit their timesheets, their managers receive an email. Members get notified when their manager approves/rejects their timesheet.
- When the admin schedules reports, emails are automatically sent to the admin or to selected users.
💡 CLOCKIFY PRO TIP
For conditional task automation, you can connect Clockify with Zapier. Learn more about it here:
What is the best project management tracking tool?
Clockify is strongest for time-centric project management and client billing. For teams that require Kanban organization and dependency tracking, it works best when paired with a task board tool such as Jira or Asana.
How we reviewed this post: Our writers & editors monitor the posts and update them when new information becomes available, to keep them fresh and relevant.