
No matter the size or type of company you work for, asking for time off can be a bit stressful. It may seem like there is never a perfect time to request a leave of absence.
However, taking time off is an integral part of working. Without taking a break from time to time, employees would likely experience burnout much faster and not be able to work effectively.
On the other hand, whenever an employee takes time off, it is the employer’s responsibility to track their absences and manage their requests. This can be quite challenging, especially if they don’t use the proper tools.
As this guide is intended to help both employees and employers keep an eye on and streamline the process of tracking and requesting time off, we’ll explain:
- What a time off request is,
- How an employee can request time off,
- Why it’s important to have a clearly defined PTO policy, and
- How employers can manage their team’s vacation, holidays, and other types of leave.
What is a time off request?
A time off request is a written request an employee hands over to their employer when they want to ask for permission to take a leave of absence.
An employee may ask for time off for different reasons — maybe they need to take a break from work or help a family member who’s seriously ill.
Here are some of the types of leave an employee may take depending on the reasons behind their time off request:
- Sick leave — a time off an employee can take to recover from an injury or illness.
- Family or medical leave — a time off an employee can request to take care of a family member who’s seriously ill or to bond with a newborn/adopted child.
- Maternity and paternity leave — a new mother can use maternity leave after giving birth and to take care of a newborn/adopted child. Also, a new father can use paternity leave to take care of a newborn/adopted child.
- Holiday leave — an employee can take time off during public holidays such as Christmas Day, Independence Day, etc.
- Bereavement leave — a time off an employee can take to grieve the loss of a family member or close relative, make funeral arrangements, and similar.
- Vacation leave — a time off an employee can take to rest, travel, or spend time with family and friends.
- Sabbatical leave — an extended time away from work an employee can use for various reasons, such as to take care of their mental health or for professional self-development.
- Military leave — a time off an employee takes when they need to participate in active or inactive duties in the National Guard or as a Reservist of the Armed Forces.
- Jury leave — a time off an employee takes to serve as a juror or witness.
Track PTO & vacations with Clockify
Paid time off vs. unpaid time off
Before we explain how an employee can request time off, let’s differentiate between two main types of leave an employee can take:
- Paid time off, and
- Unpaid time off.
Paid Time Off (PTO) is a type of leave an employee can take while still getting paid regular wages.
In the US, employers are not required to offer paid time off, but most of them choose to provide it to their employees to boost morale and increase employee productivity.
Moreover, rules regarding how many days off an employee gets and when they can use these days vary depending on different factors, for example, whether an employee is a part-time or full-time employee.
Unpaid Time Off (UTO) refers to time away from work an employee can take while not getting paid.
Employers are generally not required to provide their employees with unpaid time off. However, they may be legally obliged to allow employees to take unpaid leave in certain cases, such as:
- Family and Medical Leave (FMLA),
- Jury duty,
- Military leave, or
- Voting.
An employer can offer unpaid time off to their employees in addition to PTO, but they may also choose to provide only unpaid time off instead of PTO.
How to request time off — tips for employees
According to the Pew Research Center’s research, nearly half of workers take less time off than their employer offers because they worry they might fall behind at work, among other reasons.
However, taking time off doesn’t have to be stressful – you just have to find the right way to approach it.
Even if you’re a new employee, you probably already know that requesting time off is much easier when you know you’ve handled all important issues in advance, such as:
- Finishing the task you started,
- Figuring out a plan on how you’ll cover for missed work,
- Informing your team members and your manager of your vacation plans and similar.
If you want to avoid stressing over taking time off, you need to make certain preparations for your absence.
In this section of our guide, we’ll cover everything you need to know about requesting time off, including:
- Letting you in on some general tips for requesting time off,
- Providing you with advice on asking for time off at a new job, and
- Helping you with requesting a day off at the last minute.
General tips for requesting time off
To successfully request time off, here are some helpful tips you should use.
Tip #1: Read your company’s PTO policy
Before you start planning your vacation, it’s important to check what your company’s policy says about your rights to take time off.
Most employers offer some form of PTO to their employees — vacation, sick leave, holidays, etc.
After you read your company’s PTO policy, you’ll know:
- How you can earn/accumulate time off,
- When you become eligible for time off,
- How many days you can take for different types of PTO, and more.
For example, an employer can put a clause in their PTO policy that employees are not allowed to use any paid vacation time for the first 90 days of employment. So, make sure you pay attention to every detail in the policy.
💡 Clockify Pro Tip
A PTO policy should also state what happens to the PTO hours an employee accumulated but did not use. To see what laws in the US states say about employees’ rights to PTO payout, read our comprehensive guide:
Tip #2: Talk to your manager before making plans
Unless you’re a new hire who already had a vacation booked before accepting the job offer, it’s best to discuss your vacation plans with your manager before you start making them.
That way, your manager can:
- Reorganize and reprioritize your tasks, if needed, and
- Get prepared for your absence on time.
You can also ask your manager for advice on what the best time for you to take a leave would be.
Tip #3: Check the company’s calendar in advance
If you want to avoid obsessing over work during your vacation, check your company’s calendar in advance. This allows you to see whether your time off overlaps with busy times when there’s a lot more work than usual.
As a rule of thumb, for your peace of mind, try to avoid taking time off if:
- There’s some kind of crisis at the company, or
- It’s a busy season.
You can also check your team members’ schedules and plan your vacation accordingly. If the majority of the team has already planned to take a vacation around the same period, it may be harder for you to get your request approved. This is another reason why it’s important that you “reserve” your time off as soon as possible.
Track PTO in Clockify by CAKE.com
Tip #4: Make sure there are no gaps in your team’s work while you’re away
Besides talking with your manager, you should also mention your vacation plans to your team members.
If you’re working on a specific task with a coworker, you can schedule a one-on-one meeting to discuss how you plan to complete your joint task before you go on vacation.
Your absence shouldn’t affect your team members, so make sure you:
- Inform them of your absence in advance,
- Let them know how you plan to cover your workload (for example, maybe you’ll work extra hours),
- Instruct a colleague that’s replacing you while you’re away on what they should do and how they should do it in your place (if there’s someone replacing you), and
- Offer some sort of availability (via phone or email) in case of an emergency while you’re away.
Tip #5: Submit a formal request for time off
After you’ve talked to your manager and your team about your leave, the final step is to submit a formal request for time off.
You can submit your time off request through:
- A formal letter,
- An email, or
- Using your company’s vacation tracking system.
Some companies will require that you make your request in writing, while for others, it may be enough that you make a request in person. It all depends on the company in question, so make sure you’re familiar with all the time off request rules in your organization.
How do you ask for time off at a new job?
Although it can be a bit uncomfortable to ask for time off shortly after you start a new job, it’s important that you do it properly and not procrastinate on it.
You may even be in a situation where you have to ask for time off during the job interview itself, that is, even before you accept the job offer.
A couple of tips can help you handle every time off situation, regardless of whether you need to ask for time off:
- Before you start working, or
- Shortly after you start working.
So, let’s take a look at what exactly you can do.
How to ask for time off before you start working
Maybe you had already planned a family vacation months before you got this job opportunity, and now it’s pretty hard to cancel your plans.
If you’re wondering how to approach this type of situation, it’s very easy — just let your new employer know about your plans in advance. Being open about your plans during the interview gives the impression that you are an honest and reliable person, and the employer will likely appreciate that.
Moreover, when you ask for time off, make sure you:
- Tell your employer exactly when you plan to take a break and how long it will last, and
- Let them know you’ll try your best to integrate into the organization as smoothly as possible.
That way, you’ll show your appreciation and commitment to the company, despite taking days off before you even started working.
How to ask for time off shortly after you start working
You may also feel uncomfortable asking for time off during the first couple of months at work. Many employees fear asking for time off at a new job because they think it might lead to a perception that they’re slacking off.
To navigate this type of situation and still make a good impression, follow these guidelines:
- Inform your manager as soon as possible — this will leave your manager with enough time to plan and organize your work tasks accordingly.
- Get familiar with the company’s culture — by seeing how often your coworkers take time off or how early they ask for it, you’ll get the feel of how others in the organization handle their leaves. This will also allow you to ask for time off without much pressure or guilt.
- Pay attention to the timing — if your team has a lot of work to do during that particular period and you’re able to postpone your plans, it may be the best option to do so. However, if you can’t postpone your plans (e.g., you have an important doctor’s appointment or your family member suddenly fell sick), find a way to alleviate the burden of your absence by asking a coworker if they could cover some of your assignments while you’re away, for example.
- Organize your workload — before you request days off, you may want to finish as many work tasks as you can. You can also suggest to your manager that you work extra hours before you leave.
By thinking in advance, you’ll leave a good impression and show your manager how dedicated you are despite taking days off soon after you got the job.
💡 Clockify Pro Tip
Do you want to learn more about how to be more proactive in all aspects of your life? If you want to start thinking ahead and see why it is important to take the initiative at work and in life, check the blog post below:
How do you request a day off last minute?
Although requesting time off on short notice is usually not recommended regardless of the industry, life is complicated and you never know when you’ll be forced to do something like that.
So, you may ask: What is the best way to request a day off last minute?
Well, here are some useful guidelines that could help you:
- Avoid asking for a day off on the day itself — the best option is to give your manager at least one day’s notice. Requesting a day off on the same day should only be an option in extreme situations, should they arise.
- Be respectful and professional — talk with your manager respectfully and with a certain caution. Remember, even if your mood isn’t the best at that moment, you can’t let your emotions affect your work relationships. And don’t forget to say “Thank you.”
- Be specific about your reasons for time off — if you clearly state your reason for taking a day off on short notice, your manager may be more understanding of your request.
- Offer your availability via email/phone if something urgent comes up — your team members or your manager might need quick assistance from you while you’re away, so you can offer it in advance. This shows that you’re aware of your responsibilities and don’t want your absence to affect your or somebody else’s work.
How to track time off — tips for employers
To be able to manage employees’ time off successfully, an employer has to:
- Establish a clearly defined policy regarding time off, but also
- Be aware of how many used/unused days off each employee has at any given time.
If you’re an employer and you don’t have a clearly defined PTO policy, it’ll be extremely hard for your employees to understand their rights to take time off. Consequently, you won’t be able to manage their absences accurately.
Also, if you want to make tracking time off as easy as possible, using a PTO and vacation tracker could help you automate the process of keeping an eye on everyone’s leave.
To make it easier for you to manage your employees’ time off, in this section of our guide, we’ll cover:
- Why it is important to have a clearly defined PTO policy, and
- How you can use Clockify as a PTO and vacation tracker to monitor your employees’ absences effectively.
The importance of having a clearly defined PTO policy
Having a clearly defined PTO policy is equally important for both the company and its employees — it allows everyone to stay informed about the rules regarding time off.
Therefore, if you’re an employer, you first need to define your PTO policy to be able to manage your employees’ time off.
Your policy can fall anywhere between:
- Traditional — with a set number of days or hours, and
- Unlimited — where employees can take as many off days as they like.
Regardless of your PTO policy pick, what matters the most is to clearly define your PTO policy so that:
- Employees know how best to use their PTO, and
- You can easily manage your team’s time off.
Once you define the policy, you can rely on a PTO tracker to make sure it falls into place.
💡 Clockify Pro Tip
If you still don’t have a defined PTO policy, we offer a bunch of different PTO templates you can adjust to your business’ needs:
How to access the Time off feature in Clockify by CAKE.com
Since employers have to be careful when managing their employees’ time off and do it accurately, using the right tool for tracking time off is always of great help.
Clockify’s Time Off feature lets you easily manage vacations, holidays, and any other type of leave directly in the app.
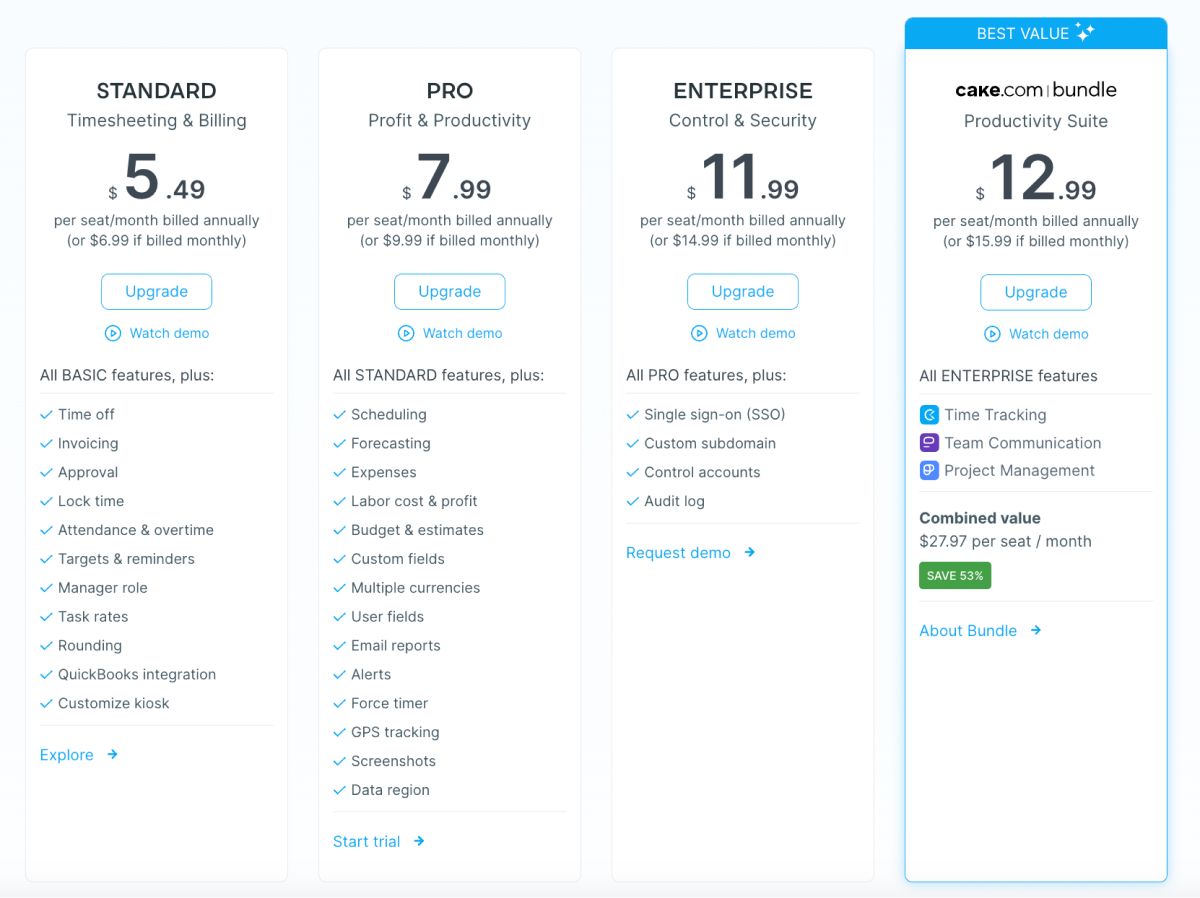
To access and use the Time Off feature, you need to upgrade your workplace to one of the following paid plans:
- Standard,
- Pro,
- Enterprise, or
- CAKE.com Bundle.

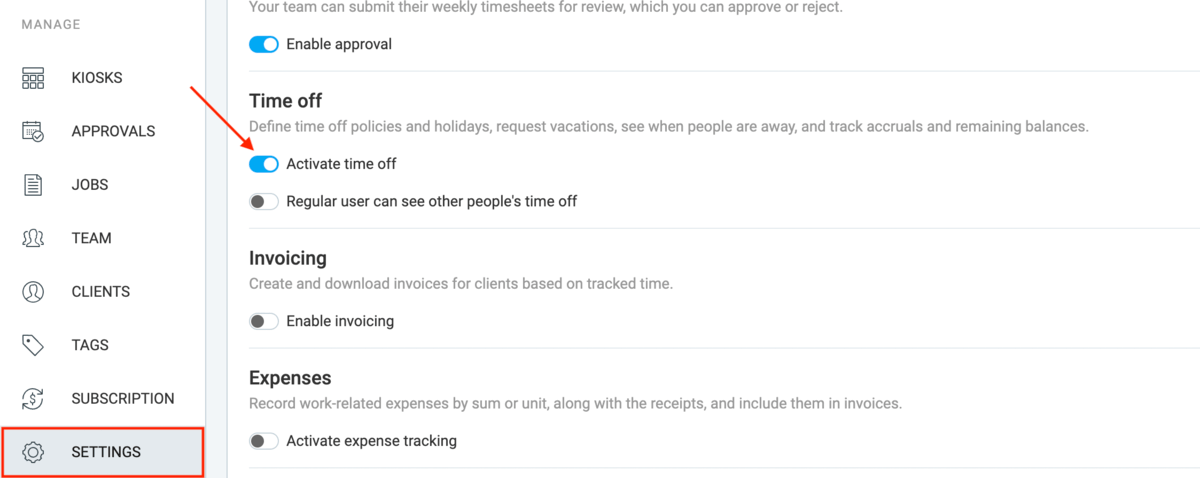
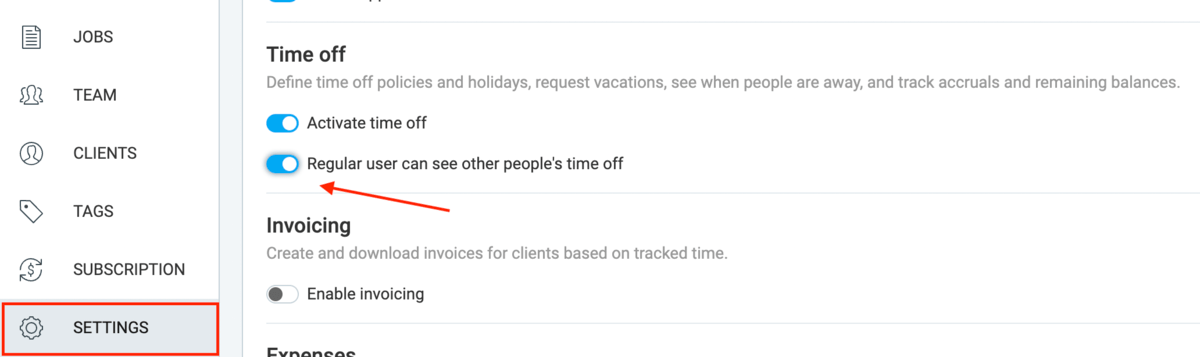
Once you do that, you need to activate the feature in your workspace settings by doing the following:
- Open your workplace settings,
- Scroll down to the page and find “Time off,” and
- Activate the feature using the toggle button.
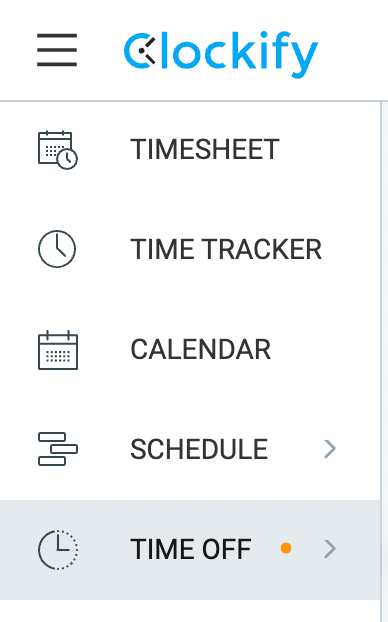
Once you enable the feature in your workspace settings, it will appear in your sidebar.
This is where you will:
- Create,
- Access, and
- Manage all your leave policies.
In the following sections, we’ll explain in detail how to use Clockify’s Time Off feature to create different leave policies and track your team’s time off with ease.
How to track your team’s vacation time in Clockify by CAKE.com
Since vacation usually takes up most of the employees’ PTO, we’ll illustrate how to track your team’s vacation time in 7 steps. They include:
- Creating the policy,
- Managing the policy,
- Adding balance,
- Requesting time off,
- Managing requests,
- Viewing the team’s time off, and
- Managing balance.
💡 Clockify Pro Tip
If you’re confused about the difference between PTO and vacation, check out our resource on the subject:
Step #1: Creating the policy
To create your first time off policy, go to the Time Off feature in the sidebar.
The following window will appear on your screen.
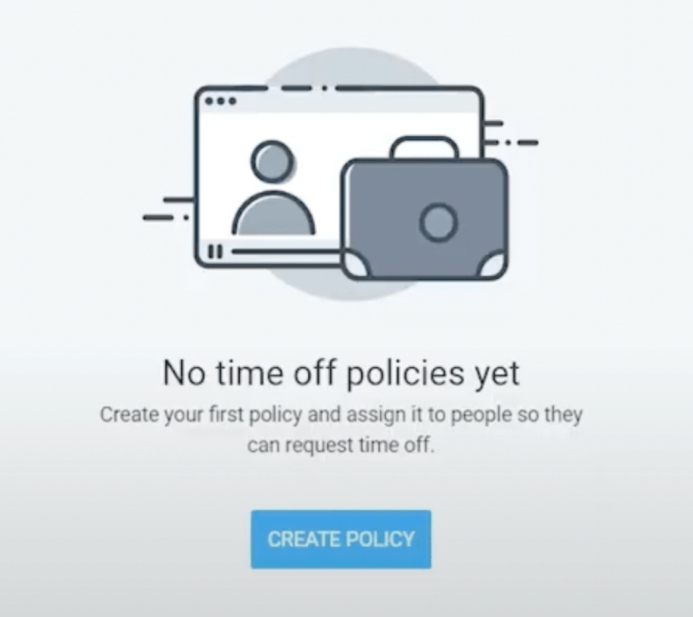
By clicking on the “Create Policy” button, you’ll get to define your policy.
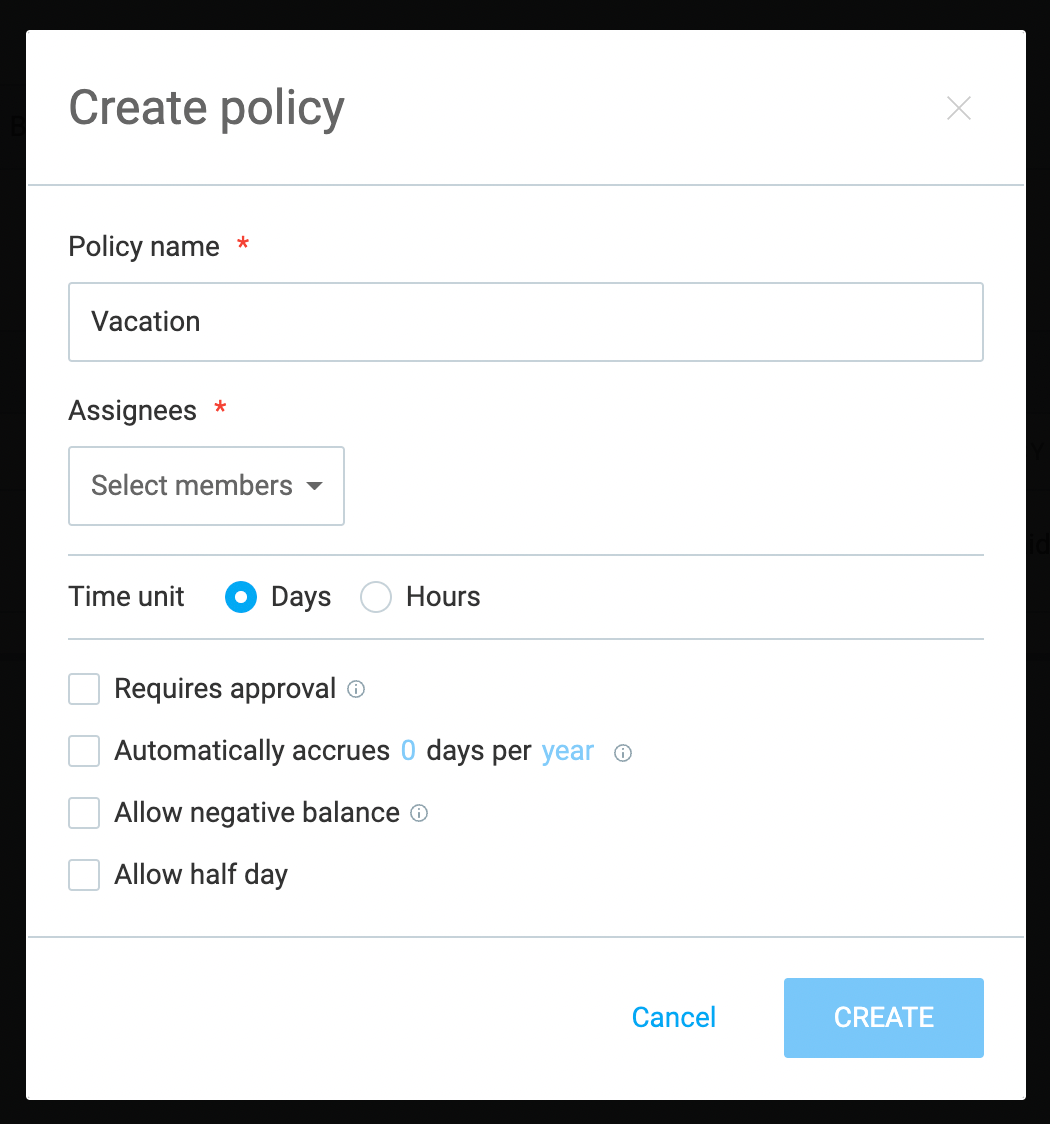
You can define all the relevant elements of your vacation policy, including:
- Name — in our case, “Vacation,” “Collective vacation,” or similar,
- Assignees — who can use the policy,
- Time unit — whether vacation time can be used in days or hours, and
- Approval — whether time off needs to be approved and by whom.
If this vacation time applies to everyone in your organization, you can select all in the drop-down menu under “Assignees.”
Alternatively, if different departments have different vacation policies, you can select a particular team/teams this policy applies to.
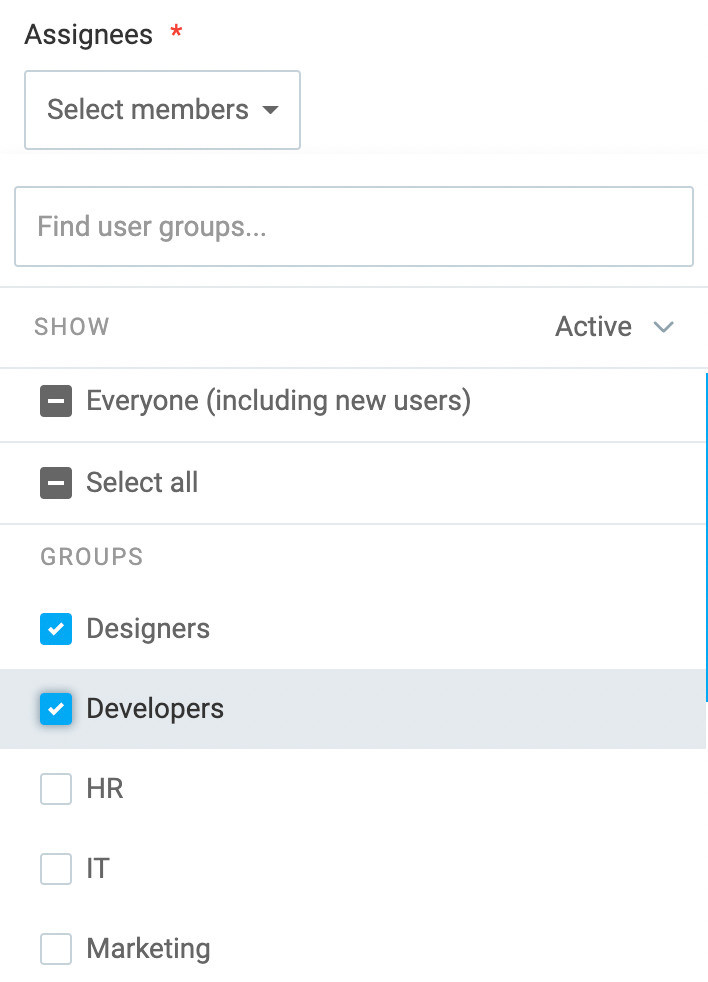
You can even create a policy that applies to specific team members by selecting only them from the “Users” section in the drop-down menu.
Also, you can set up an approval system for taking vacation time by ticking the “Requires approval” box.
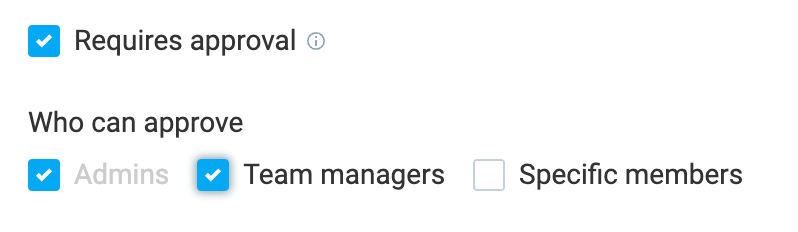
Once you check that box, you’ll be given several options as to who can approve your team’s time off.
You’ll be able to appoint admins or team leads — or both. You can also choose the “Specific members” option and appoint a specific team lead from the list.
If you select the “Team managers” option, all the users with the team manager role in Clockify will be able to approve the request.
Apart from admins, only users with the team manager role in your workplace can approve time off requests.

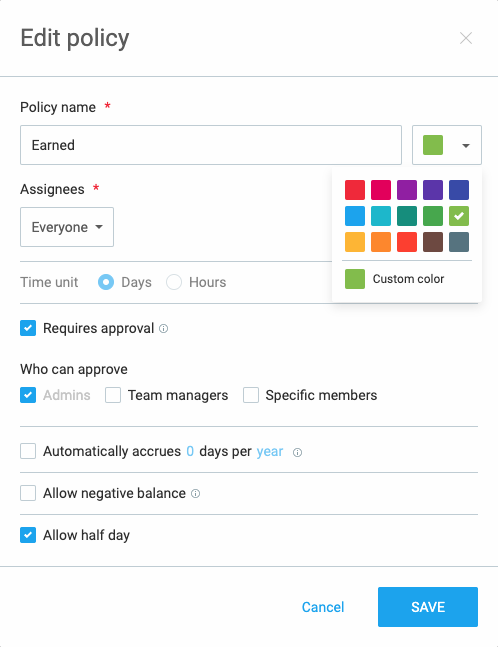
When you’ve entered all the details, click “Create” — and your policy is all set.
You can also further customize your policy by choosing one of the available colors or making a custom policy color for each policy you have.
Step #2: Managing the policy
Once created, you can access your time off policy by clicking the settings icon in the upper-right corner of the Time Off page.
This way you’ll get the option to manage your policies.

There, you’ll be able to see all the leave policies you’ve created, including your vacation policy.
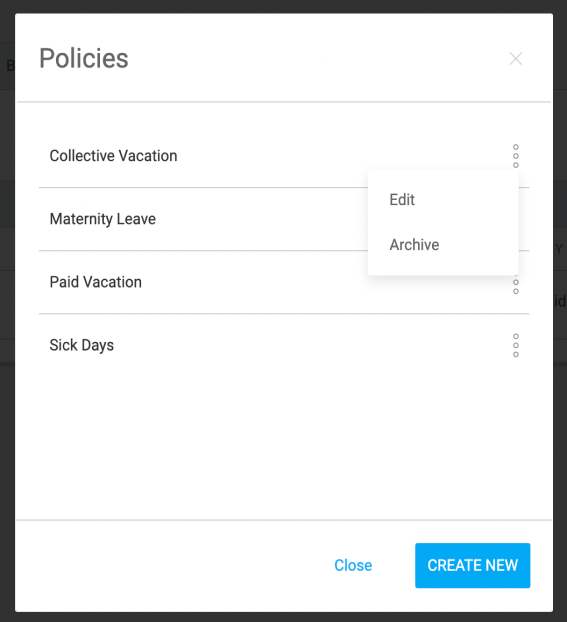
By clicking on the three dots next to your policy name, you get two options:
- Edit the policy, and
- Archive the policy.
When you archive the policy, it will appear as crossed off in your Policies section. You can use this option to archive last year’s vacation time, for example.
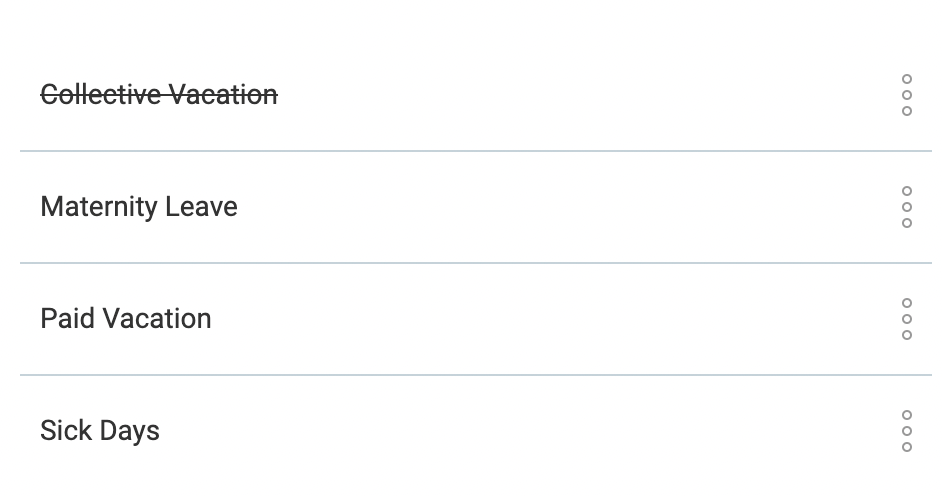
Once a policy is archived, you can still view its history — who used how much time and when. But, your team will no longer be able to select it when requesting leave.
If you archive a policy by accident, you can easily restore it by choosing the Restore option from the three-dots menu.
Apart from restoring it, you can also:
- Edit the archived policy, or
- Delete it.
Remember, if you choose the latter option, you delete the policy’s entire history — i.e., all the requests, withdrawals, and approvals.
Step #3: Adding balance
Now that you’ve set up your policy, you need to add a precise number of days or hours your team can use as per the policy.
To add everyone’s balance, go to the Balance tab on the Time Off page and select your vacation policy from the drop-down menu.
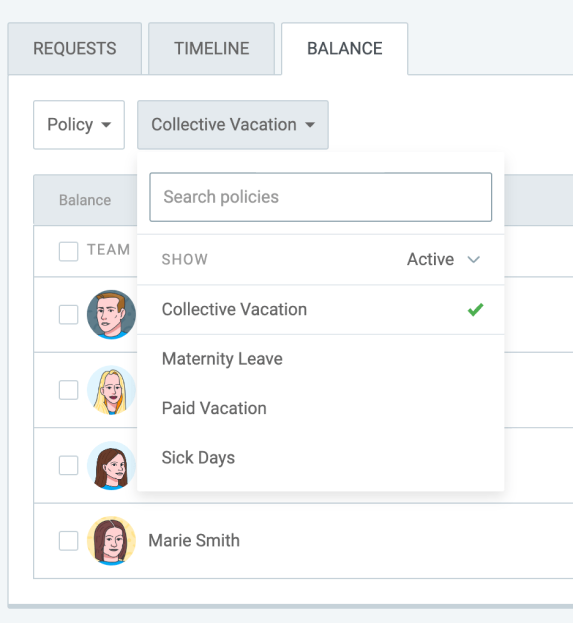
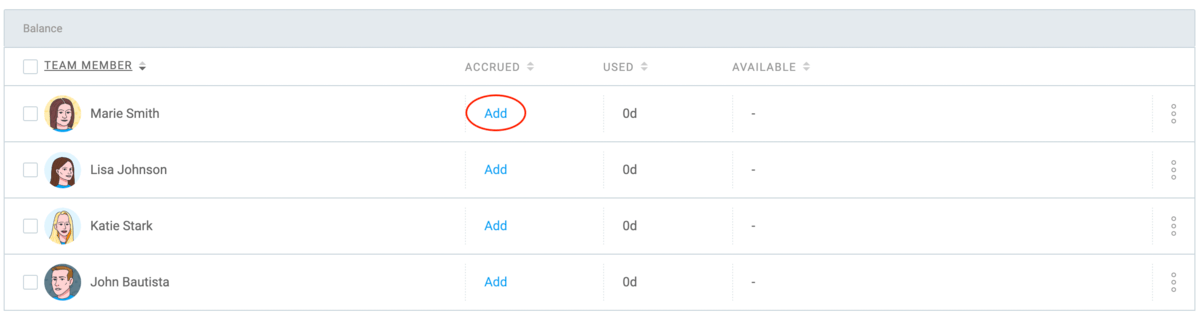
Once you do that, you’ll get an overview of all the employees with the right to your vacation policy.
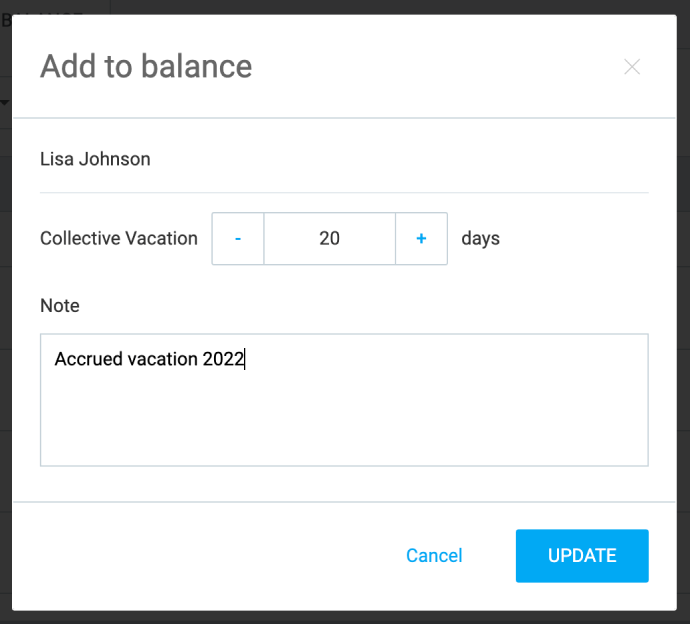
From there, you can add individual balances by clicking “Add” for each member.
A window will appear, asking you to input the exact number of days to add to a person’s balance.
There, you’ll also see a field where you can add any notes concerning the balance.
Alternatively, if all team members get the same number of days to start with, you can add their balances in bulk.
You can do that by selecting the entire team and choosing the “Add to balance” option.
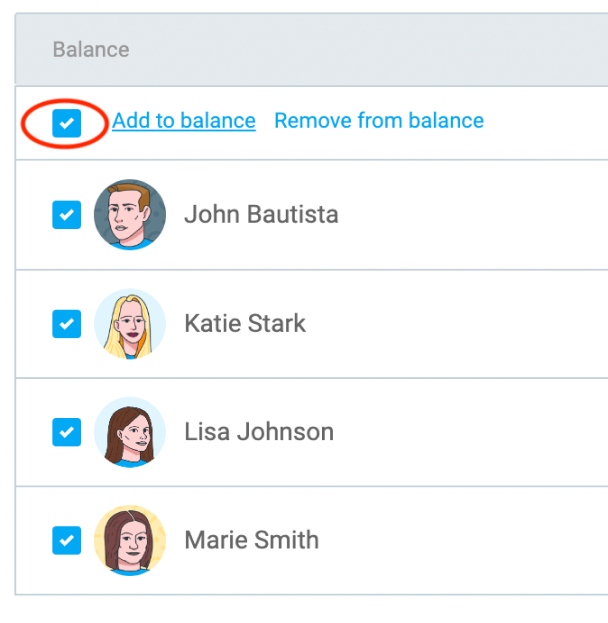
As you can see from the screenshot above, there’s also an option to remove balance in bulk if you’ve made a mistake or need to change the balance for whatever reason.
You can also do it for individual team members by choosing that option from the three-dots menu next to the user’s balance.
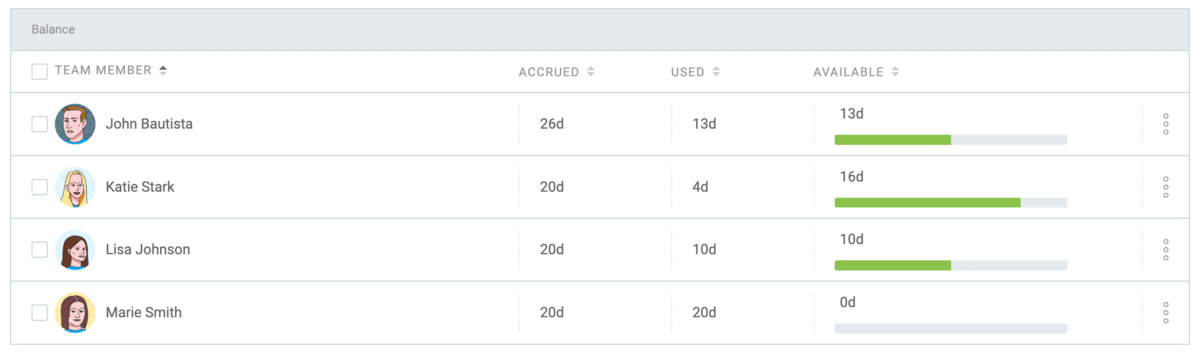
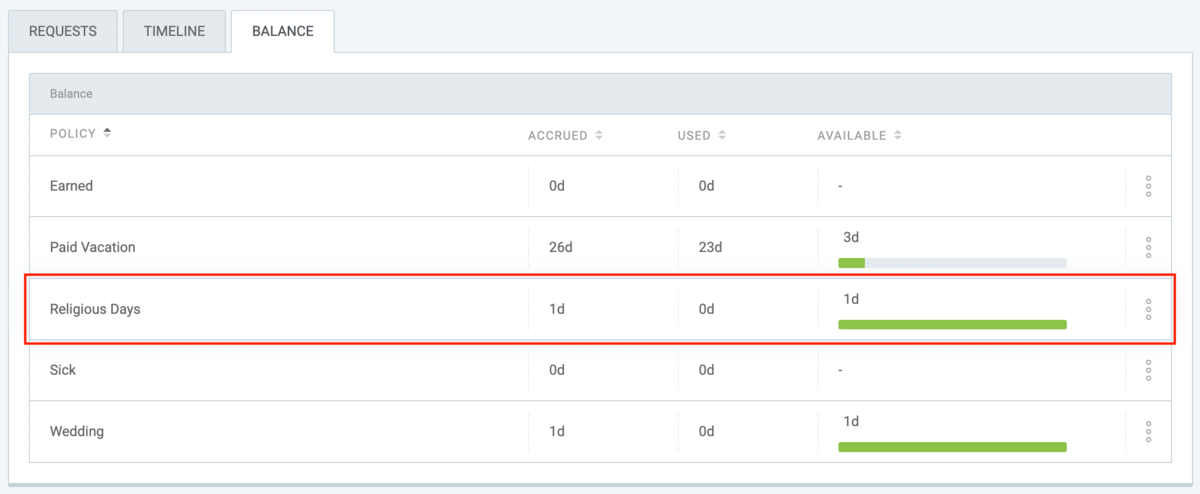
In time, as people start using their vacation days, in the balance tab, you’ll be able to see their:
- Accrued time,
- Used time, and
- Time off they have left.
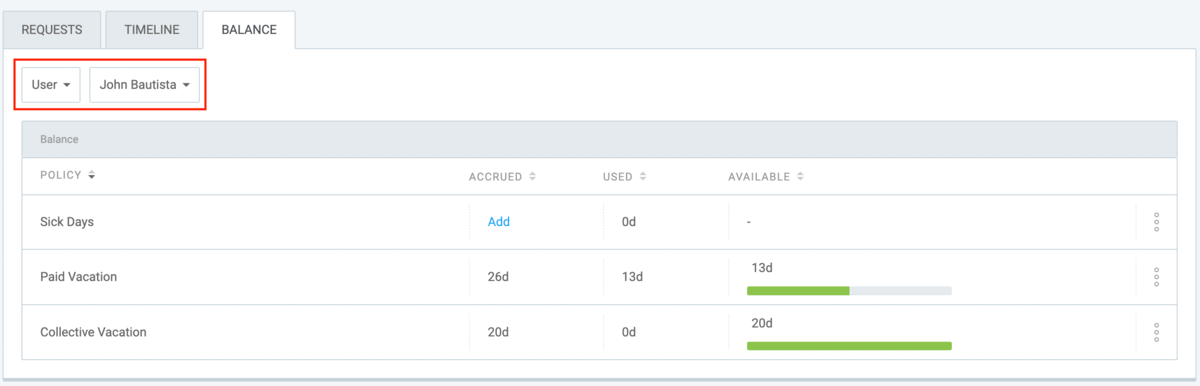
In the balance tab, you can also view your team’s individual balance by selecting a specific team member from the drop-down menu.
There, you’ll be able to see their balance for all the active leave policies in your workplace.
Step #4: Requesting time off
When you’ve set up your policy and added a balance for each team member, they can easily request vacation time.
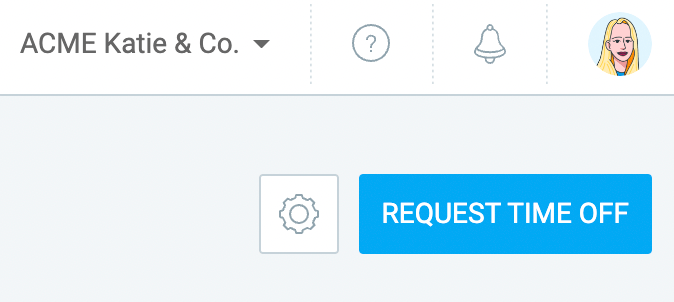
On their Clockify profile page, they’ll have the same Time Off option in the sidebar.
Once they click on it and get to the Time Off page, they can click on the request button in the upper-right corner of the screen.
They’ll get a request form to fill out with the following information:
- The leave policy they want to use,
- The date range for their time off, and
- An optional note on using the time off.

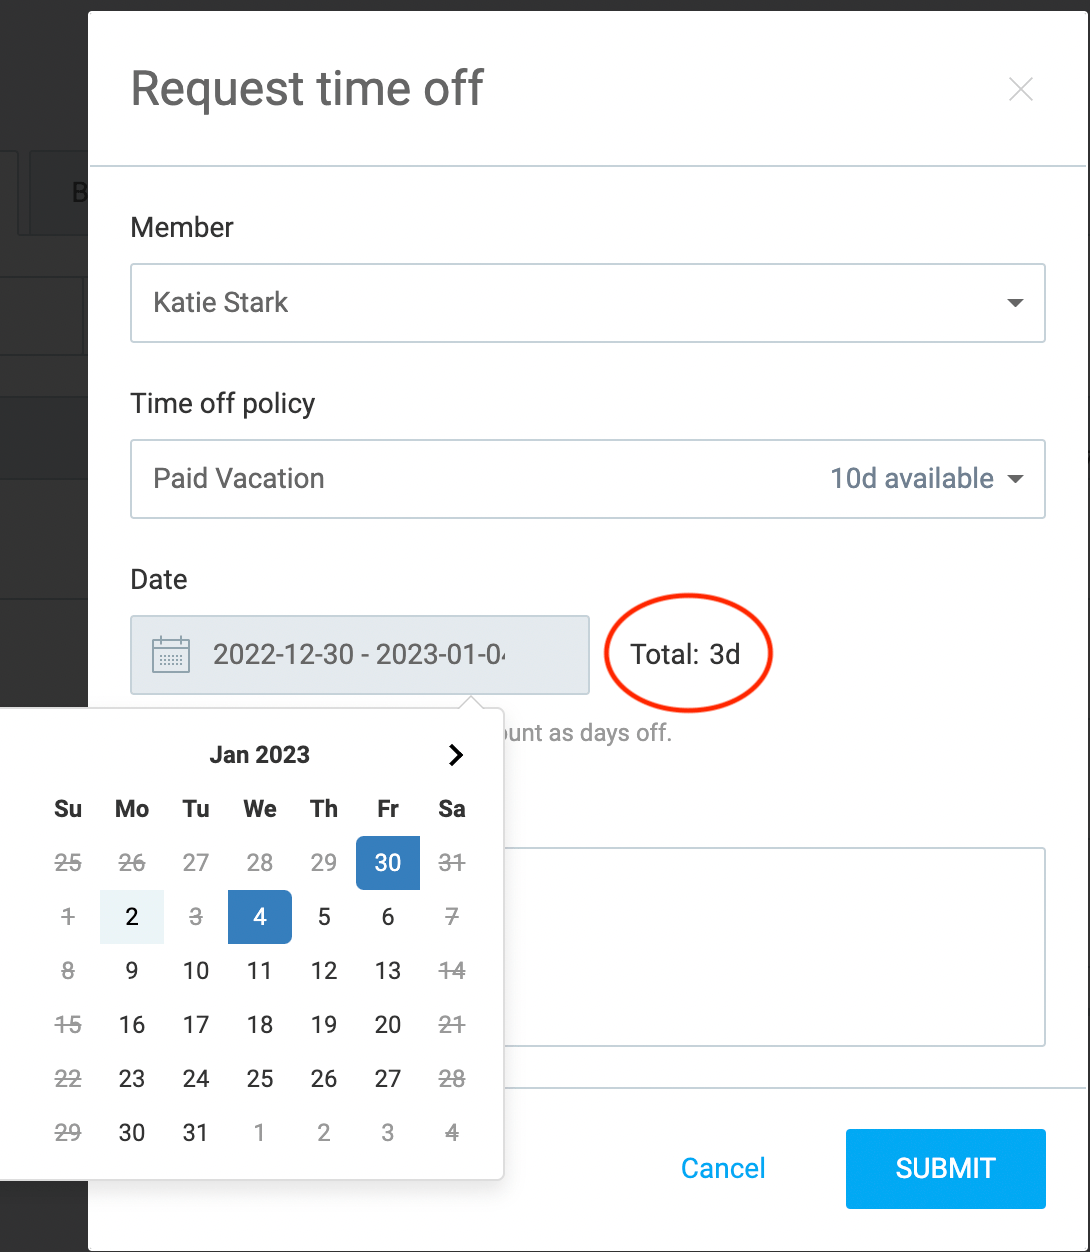
When your team members select the policy, they’ll be able to see the number of days available.
Once they select the date range, the form will calculate the total number of days they want to request, excluding any weekends or holidays in the range.
Bear in mind that weekends automatically count as non-working days — but you can change that in your workplace settings.
Once your team members fill out the form, they press submit, and you receive their request.
Step #5: Managing time off requests
When a team member requests time off, those responsible for the request approval (workplace admins, all workplace team managers, or specific team managers) will get an email notification.
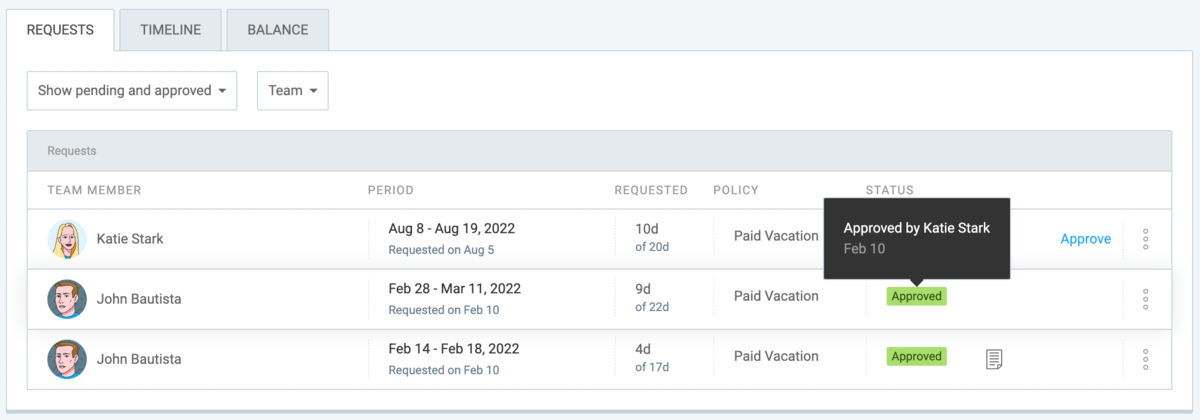
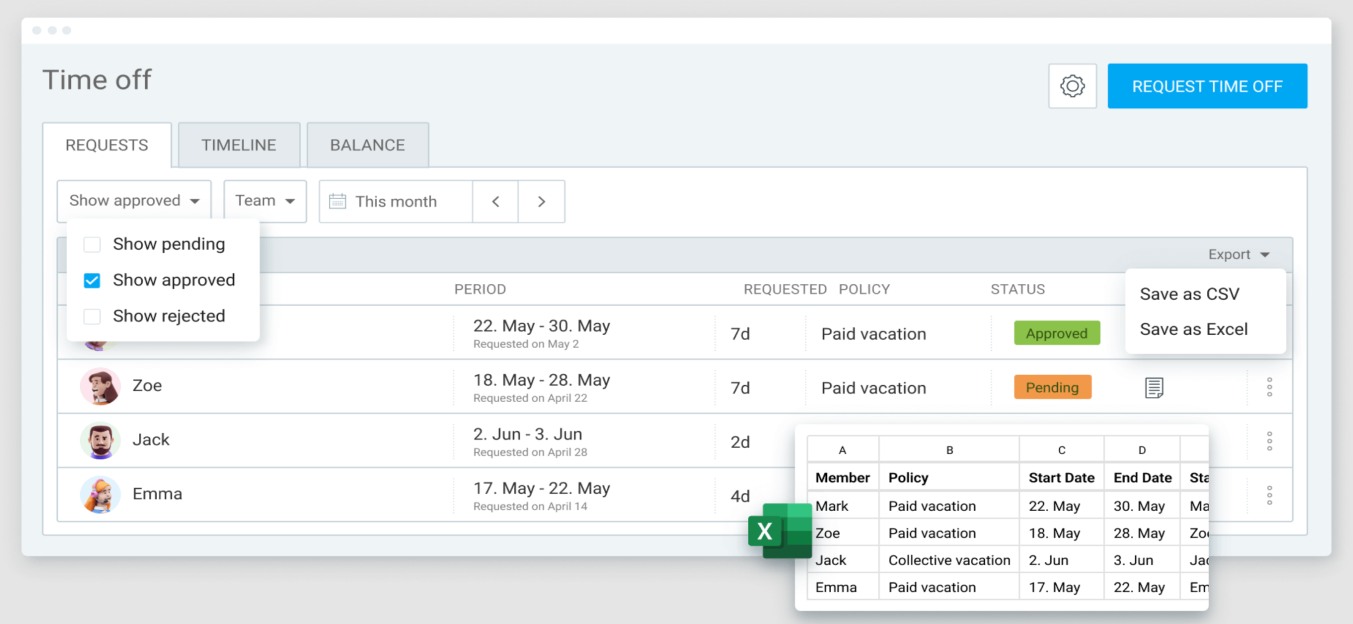
You can access the request either through the request email or by going to the “Requests” tab on your Time Off page.

There, you can see all the requests in detail, as well as their status:
- Approved,
- Pending, and
- Rejected.
You can also filter your requests by status — for example, if you only want to see the pending requests.

You can also see when a request was approved and by whom by hovering over the “Approved” status.
To approve a request, simply click on “Approve” next to the request.
If you want to reject or withdraw a request, you can do that by clicking on the three dots on the side and selecting the appropriate option.
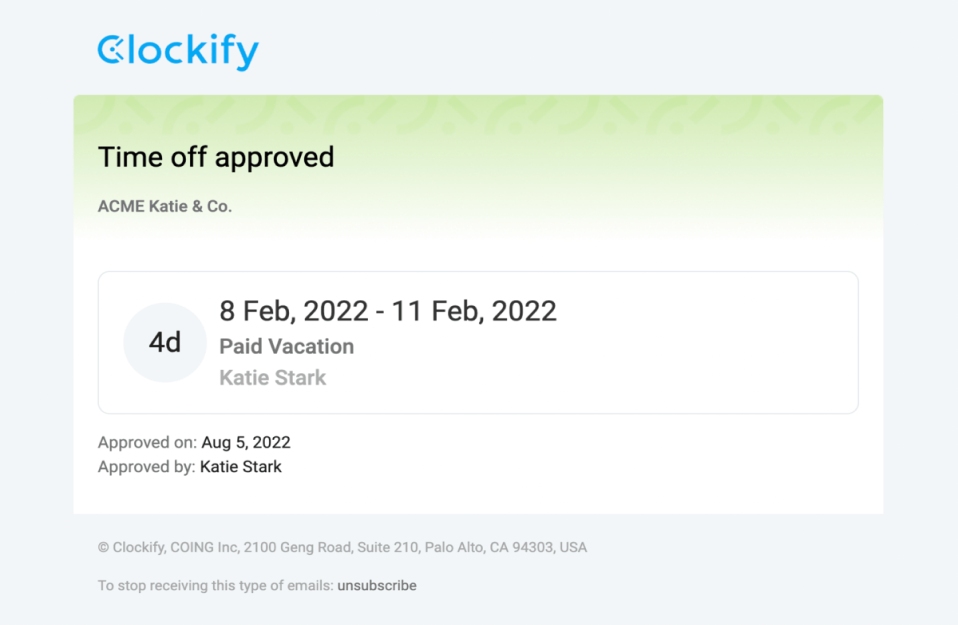
When a request has been approved, the team member who made the request will get notified via email. The team leader will also receive an email about their team member’s time off.
If the request is rejected or withdrawn, the team member will also be notified via email.
Step #6: Viewing the team’s time off
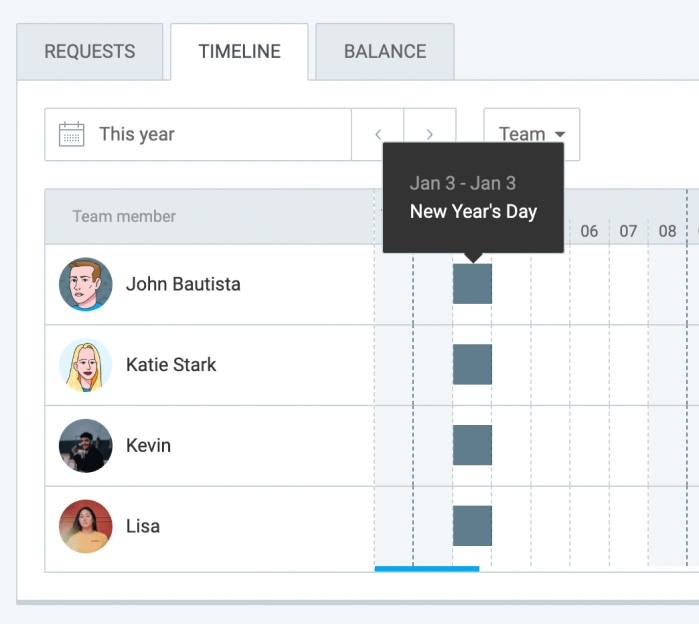
To have a clearer overview of your team’s time off and see if there are any overlaps, you can go to the Timeline tab on your Time Off page.
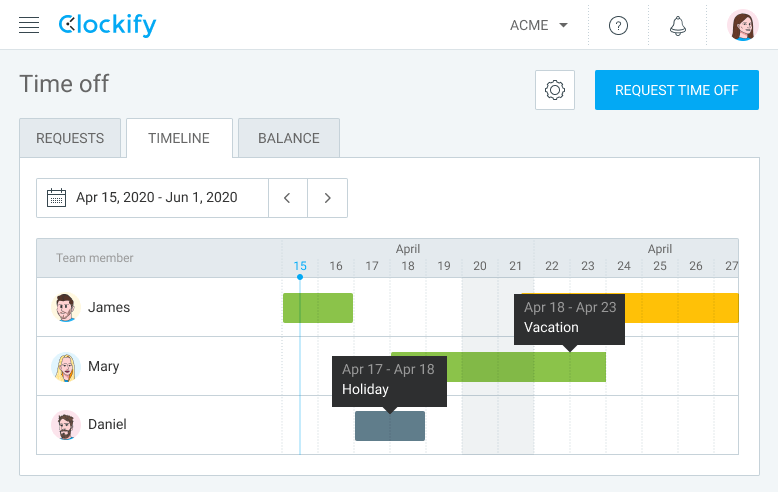
There, you’ll be able to see who’s got any vacation time in the following week or filter your search by applying a specific date range.
In any case, you’ll only be shown people who do have some time off in the selected period.
The time off will be displayed as lines across the calendar in different colors:
- Green — if vacation is approved, and
- Yellow — if vacation is pending approval.
There’s also gray for holidays (more on them later).
By default, workplace admins can see everyone’s time off, whereas team leaders can only see their own and their team members’ leave.
Regular users (those without admin or team manager roles and permissions) can also see their own time off, as well as that of their team members (i.e., their team manager’s users).
However, you can enable all the users to see everyone’s time off in the workplace settings.
Step #7: Viewing time off history
If you want to see a team member’s time off history as an admin, you can do so by:
- Going to the Balance tab,
- Clicking on the three dots next to a team member, and
- Selecting History from the menu.
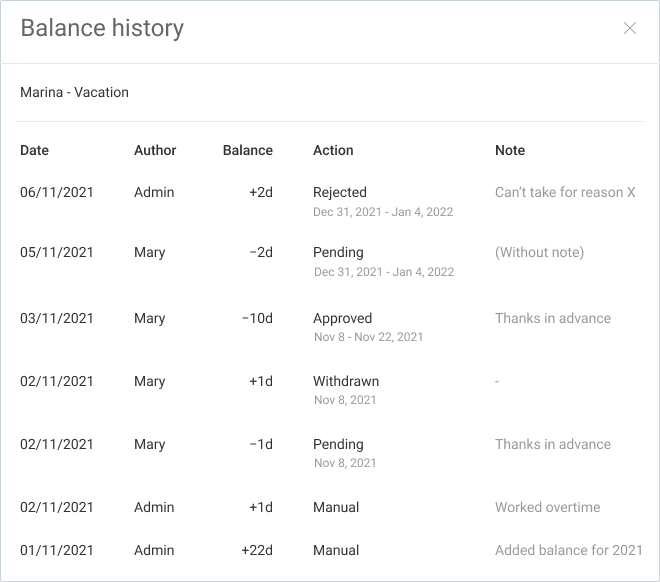
There, you’ll be able to see:
- All their past and current time off requests, along with their status and any additional notes, and
- All changes in their balance, who made them, when, and even why (you’ll see “why” in the notes section — e.g., “Added a day due to overtime.”)
Apart from admins, no one else can see everyone’s accrual history.
Individual team members who are regular users can only see their own balance and balance history. Team leads (those with the team manager role in the app) can see their team members’ balance and balance history — but they can’t edit it.
You can also get all balances and requests in CSV & Excel by clicking on the “Export” drop-down menu in the top right corner of the Time Off page.
If you want to see your team’s attendance, including daily hours, breaks, overtime, and time off, you can do so by selecting Attendance in the Reports section.

This will allow you to see exactly who’s available and when and who’s taken time off, which is useful when delegating work tasks.
How to track your team’s sick leave in Clockify by CAKE.com
According to the U.S. Bureau of Labor Statistics, in 2022, paid sick leave was available to 70% of employees working in smaller companies and to 91% of employees working in larger companies.
If you’re one of these employers that offer paid sick leave to their employees and you want an easy way to track it, you can do that in Clockify too.
How you track your team’s sick days in Clockify depends on your sick leave policy.
If you want to adopt an unlimited policy, that is, allow your team to take an unlimited number of sick days, you can enable a negative balance in your policy.
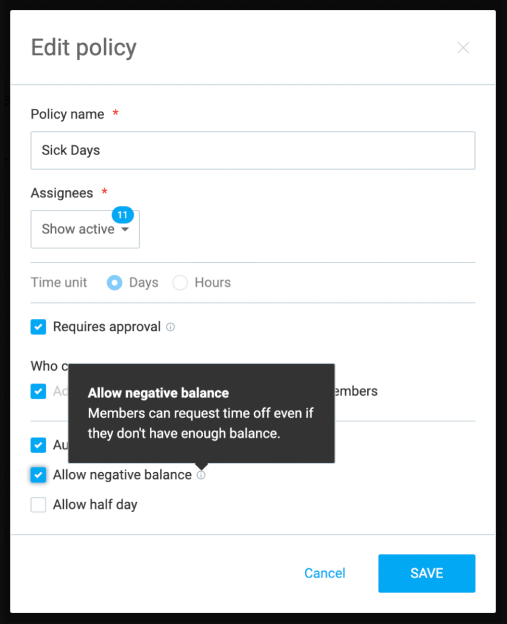
By allowing a negative balance, your employees can ask for as many days as they need.
The rest of the steps are the same as in the vacation policy example.
However, when the negative balance option is disabled, your team can only use a predetermined accrued number of days per policy. This type of policy is a limited policy.
If you want to allow a predisposed number of sick days per pay period (let’s say, 10 days a year), you’d make a sick leave policy in Clockify the same way as you would a vacation policy.
So, if your sick leave policy allowed everyone 10 days per year, you would add 10 days in bulk to everyone’s balance and disable the negative balance option.
This way, if anyone wanted to use more than that — they simply wouldn’t be able to. The app wouldn’t allow it.
💡 Clockify Pro Tip
Have you ever wondered what the paid sick leave laws across the US are? Read our paid sick leave laws guide for 2023 and learn more about it:
How to track your team’s holidays in Clockify by CAKE.com
Except for federal employers who have to provide their employees with 11 days of paid holidays annually, US employers are not required to offer or pay for holiday time off. However, some choose to provide paid holidays to motivate their employees.
If you’re one of those employers who want to offer time off for holidays, you can manage and track those days easily in Clockify for your team.
Here are the steps you need to take to track your team’s holidays in Clockify.
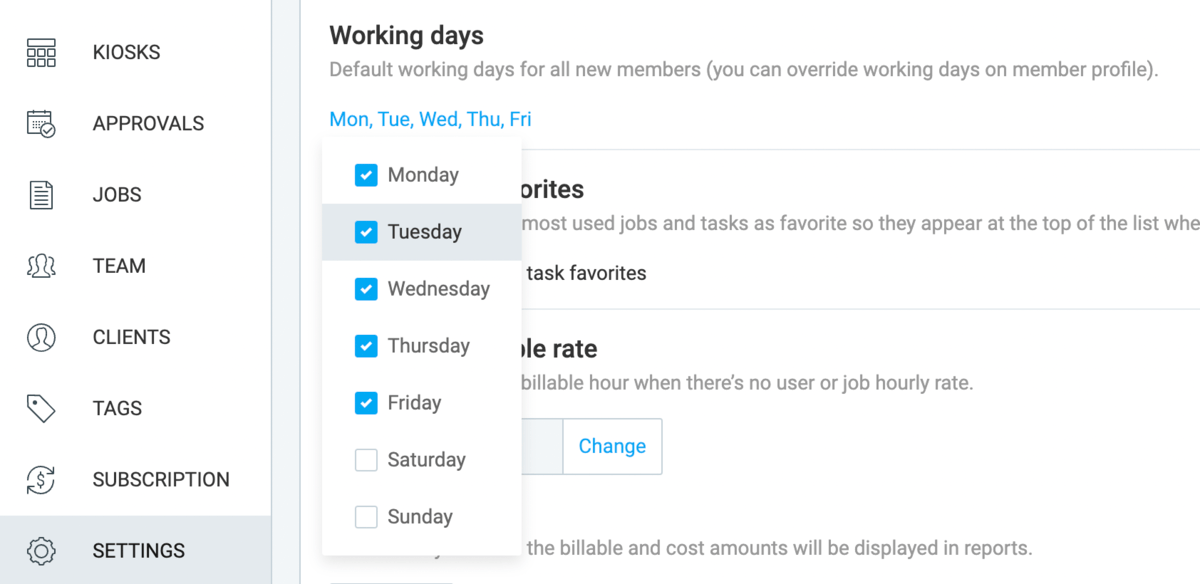
Step #1: Defining working days
By default, your work days are set to Monday through Friday, therefore Saturdays and Sundays are non-working days.
However, if your team follows a different schedule, you can change the standard working days in the settings.
💡 Clockify Pro Tip
If you want to understand how to create the most effective schedule for your team, check out the following article:
Step #2: Adding holidays
Adding holidays is similar to adding vacation time.
Go to the Time Off page, click on the settings, and choose “Manage holidays.”
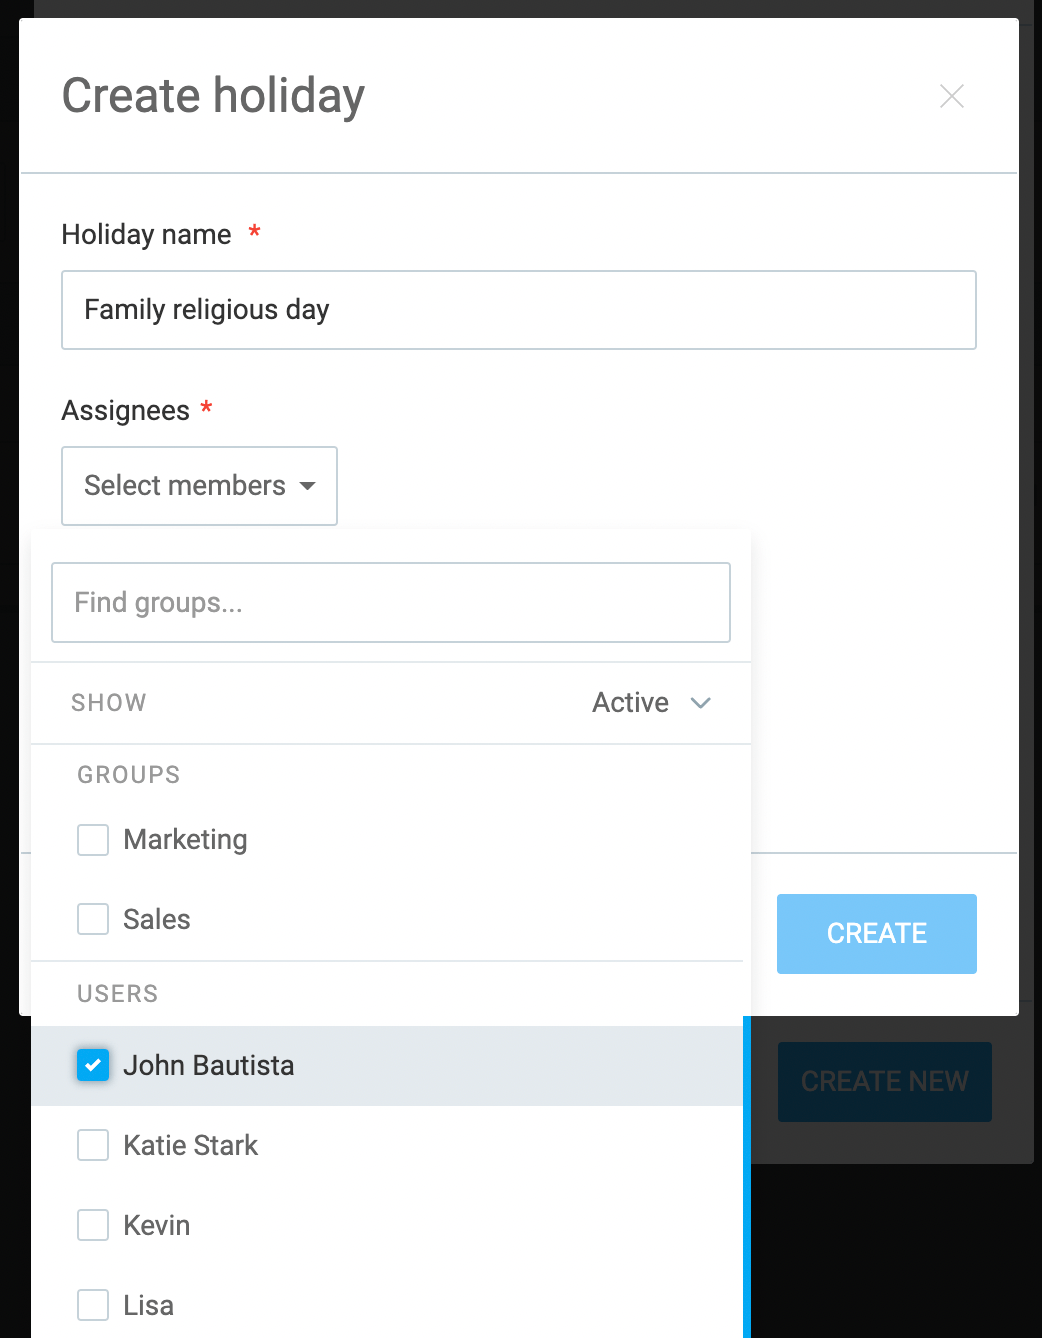
From there, you’ll be able to define as many holidays as you like by clicking “Create new” and inputting relevant information.
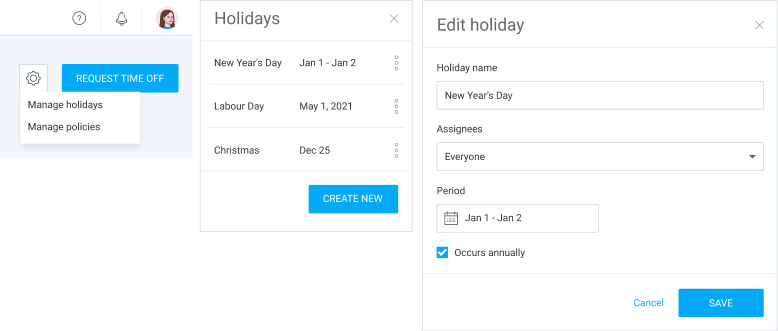
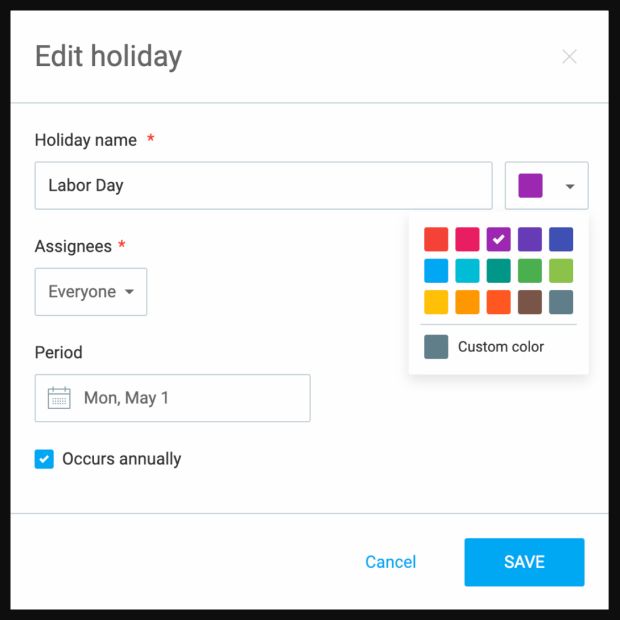
The information you need to define regarding a holiday includes:
- Holiday name (e.g., Boxing Day),
- Assignees (select everyone, different departments, or different individuals),
- Period (be it a day or a longer period), and
- If the holiday occurs annually.
The last option lets you avoid having to set up recurring holidays time after time. You only need to set them up once, and they’ll be there in the following years.
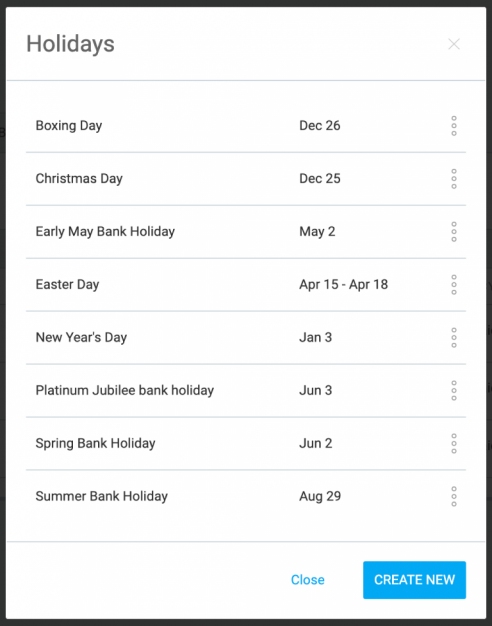
You can edit or delete holidays by clicking the three dots next to their date and choosing the appropriate option.
To add a different color to each holiday you offer, click on the drop-down menu right beside the “Holiday name” section. You can either choose a color or make a custom one.
💡 Clockify Pro Tip
To learn more about paid holidays and how they work, check out our blog post on the subject:
Step #3: Viewing holidays
In the Timeline view, holidays will appear as dark gray areas in everyone’s calendar. That’s how you can tell them apart from other types of time off (which will be green if approved or yellow if pending).
On the other hand, weekends are marked by a lighter shade of gray.
Hovering above the dark gray area lets you see which holiday it is.
It’s important to note that when people request time off, holidays and weekends (or other non-working days) don’t count.
For example, consider the following scenario.
Someone requests a vacation from December 30th to January 4th. As December 31st and January 1st fall on the weekend, and January 3rd is a holiday, although the person technically won’t work for 6 consecutive days, 3 of those days are non-working days. That’s why they only request 3 vacation days.
How to track other types of leave in Clockify by CAKE.com
As you could probably have seen from the examples above, a time-tracking tool like Clockify can help you track employee time off, no matter your leave policy.
That being said, apart from vacations, holidays, and sick days, Clockify lets you manage many other specific types of leave, such as:
- Maternity leave,
- Bereavement leave,
- Unpaid leave, or
- Wedding leave.
You would create any of these leave policies the same way as you would a vacation policy outlined above.
Now, let’s take a look at some more specific types of time off and how you would configure them in Clockify.
We’ll go over the following:
- Religious days,
- Half-day time off,
- Unlimited PTO, and
- Time off in lieu (TOIL).
How to track your team’s religious days
People tend to celebrate family-specific holidays across different religions. So, companies sometimes opt to give their employees a religious day off — apart from the ones already defined as holidays by the company.
This way, employees can choose a specific day they want to use as part of the “religious day off” policy.
To implement this policy, you have two options.
The first option is to create a religious days policy the same way you would create a vacation policy.
Once you do that, assign all team members a day (or more) within the policy and allow them to take that day off whenever they want.
Another option is to ask all team members to choose a specific date they want you to count as their religious day.
Then, you would add user-specific holidays to the calendar, which would automatically count as non-working days for those employees.
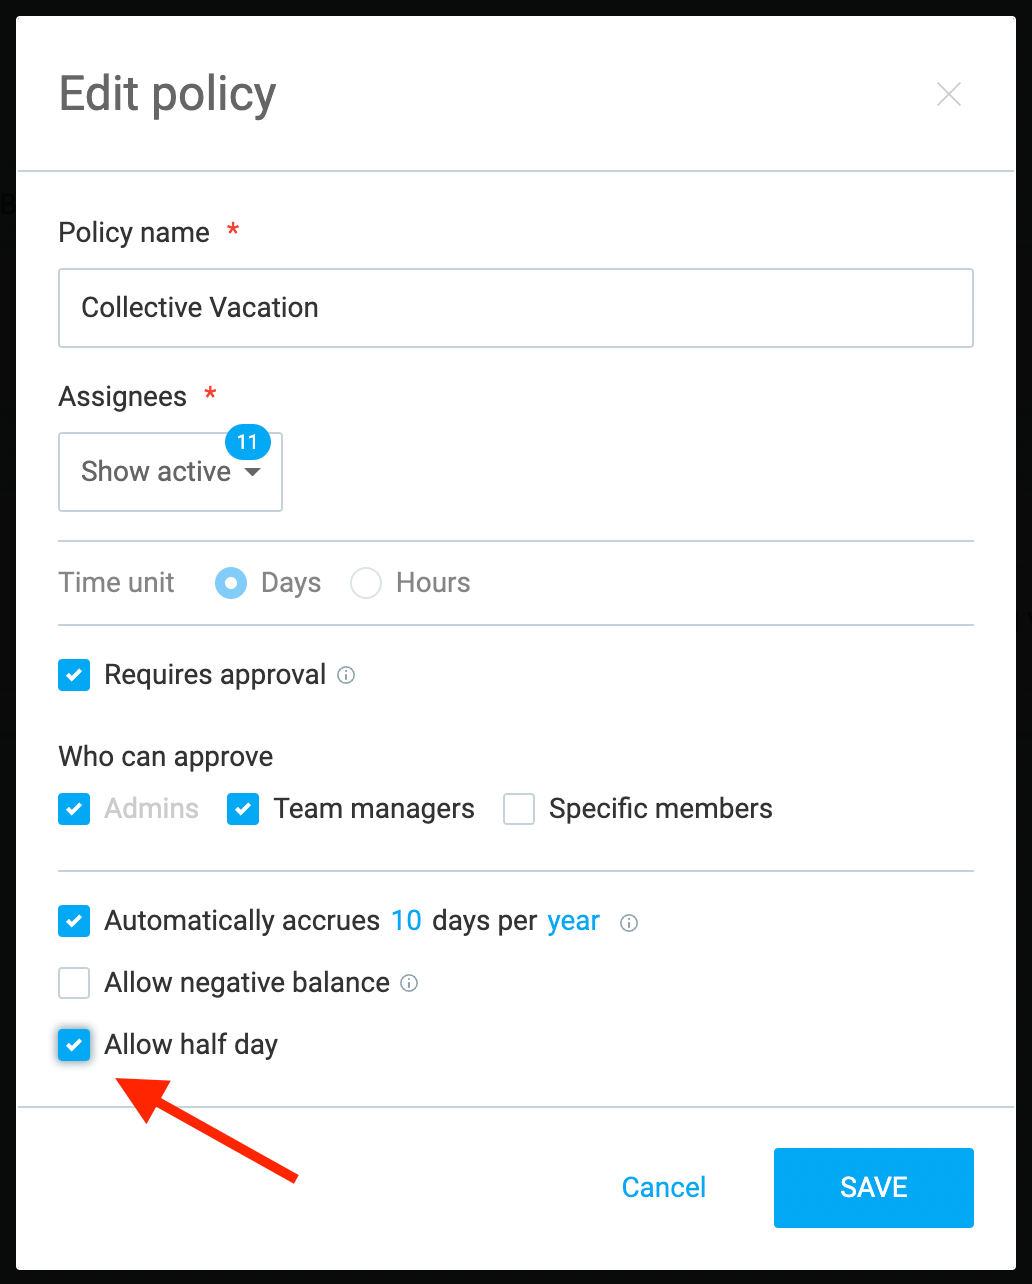
How to track your team’s half-day time off
Companies often allow employees to take half-day time off to promote better work-life balance. This option can come in handy when people need to run some errands or take care of a personal matter.
Some employers in the US even offer half-day Fridays — or so-called Summer Fridays — to their employees to reward them and boost their morale, especially during the hot summer months.
Clockify gives you the option to allow your employees to use their vacation or other types of leave in half-days too.
To make half-day time off possible, you simply need to enable that option while creating the relevant time off policy.
How to track your team’s unlimited PTO
According to a survey by the Society for Human Resource Management, unlimited PTO is still a rarely offered PTO option in most US workplaces — only 6% of employers offered it in 2022.
Unlimited paid time off is a leave policy that doesn’t assign a specific number of days to each employee. Instead, they can take as many vacation days as they want to, as long as their work doesn’t suffer.
This rather liberal policy puts a great deal of trust in each individual employee.
However, in practice, employees usually can’t just take days off without any notice. They can request time off as they see fit. But someone (usually their team leader) needs to assess if the employees’ time off will affect the team’s performance.
That’s why two things are critical when creating an unlimited PTO policy in Clockify:
- Allowing negative balance, and
- Enabling time off request approval.
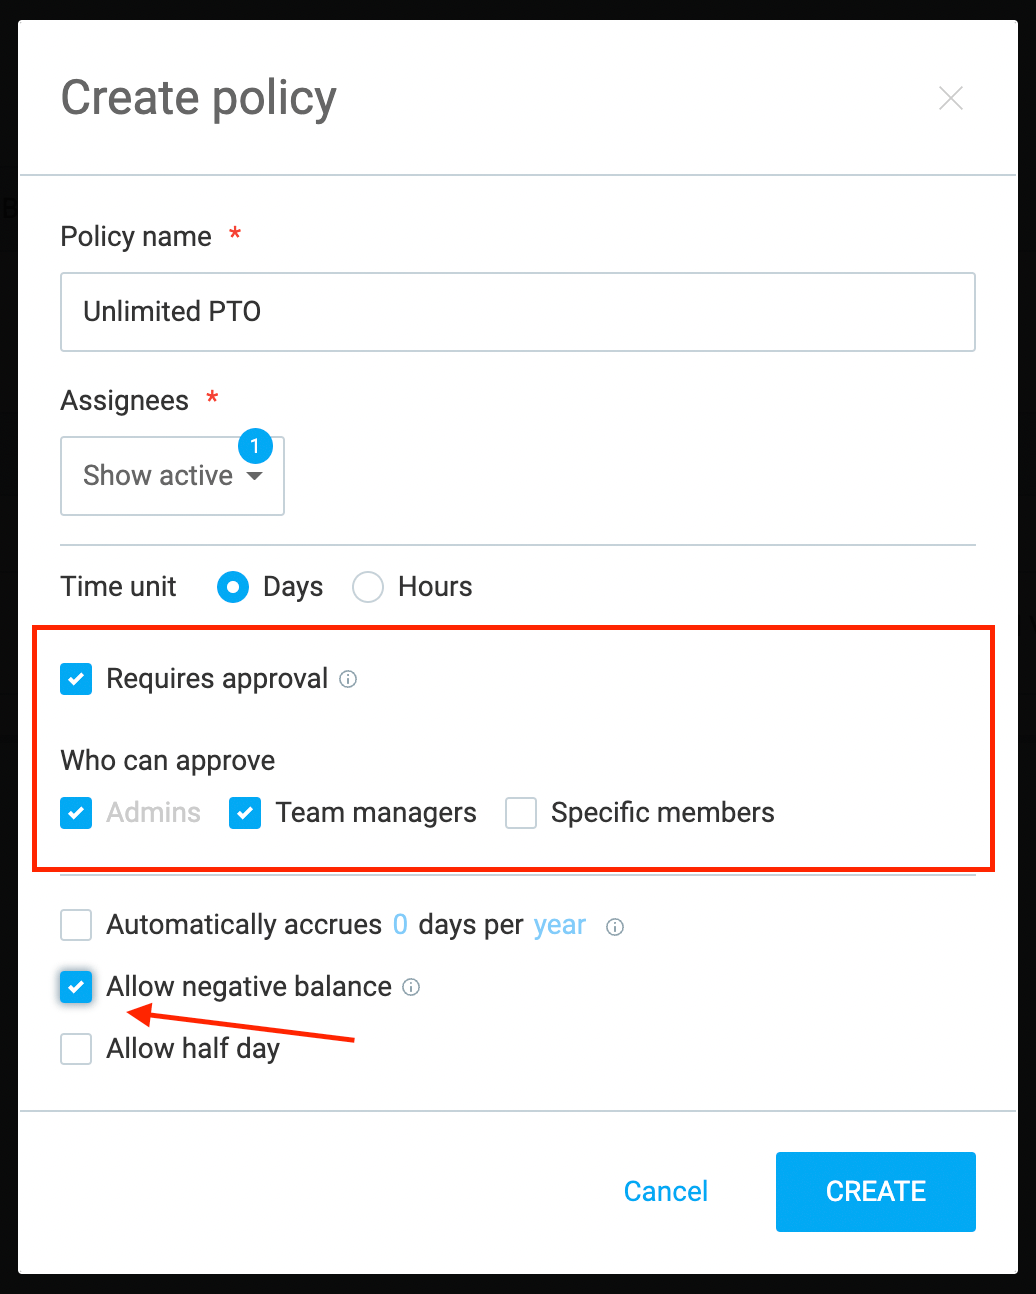
For this type of policy, you don’t need to add a specific number of days to your employees’ balance — simply allow a negative balance.
This way, employees will be able to request as many days as they want, and the appropriate person can then approve or reject the request.
How to track your team’s time off in lieu (TOIL)
Time off in lieu (TOIL) is a time off policy based on overtime work.
In other words, it’s an arrangement that enables employees who have worked overtime to take extra time off instead of being paid for their overtime work.
Usually, the time off an employee can take matches the exact time they spent working beyond their regular hours.
For example, let’s say an employee has a 7-hour workday, and one day, they worked 9 hours.
This means that the employee worked 2 hours of overtime that day. Consequently, they get 2 hours of TOIL they can use when convenient.
When your team members get into a habit of tracking their work time in Clockify, it’s easy to create a TOIL policy. You’ll just need to:
- Create a regular policy on your Time Off page and name it Time off in lieu (TOIL),
- Set the time unit to “Hours,”
- Set those responsible for approving TOIL requests, and
- Allow negative balance.
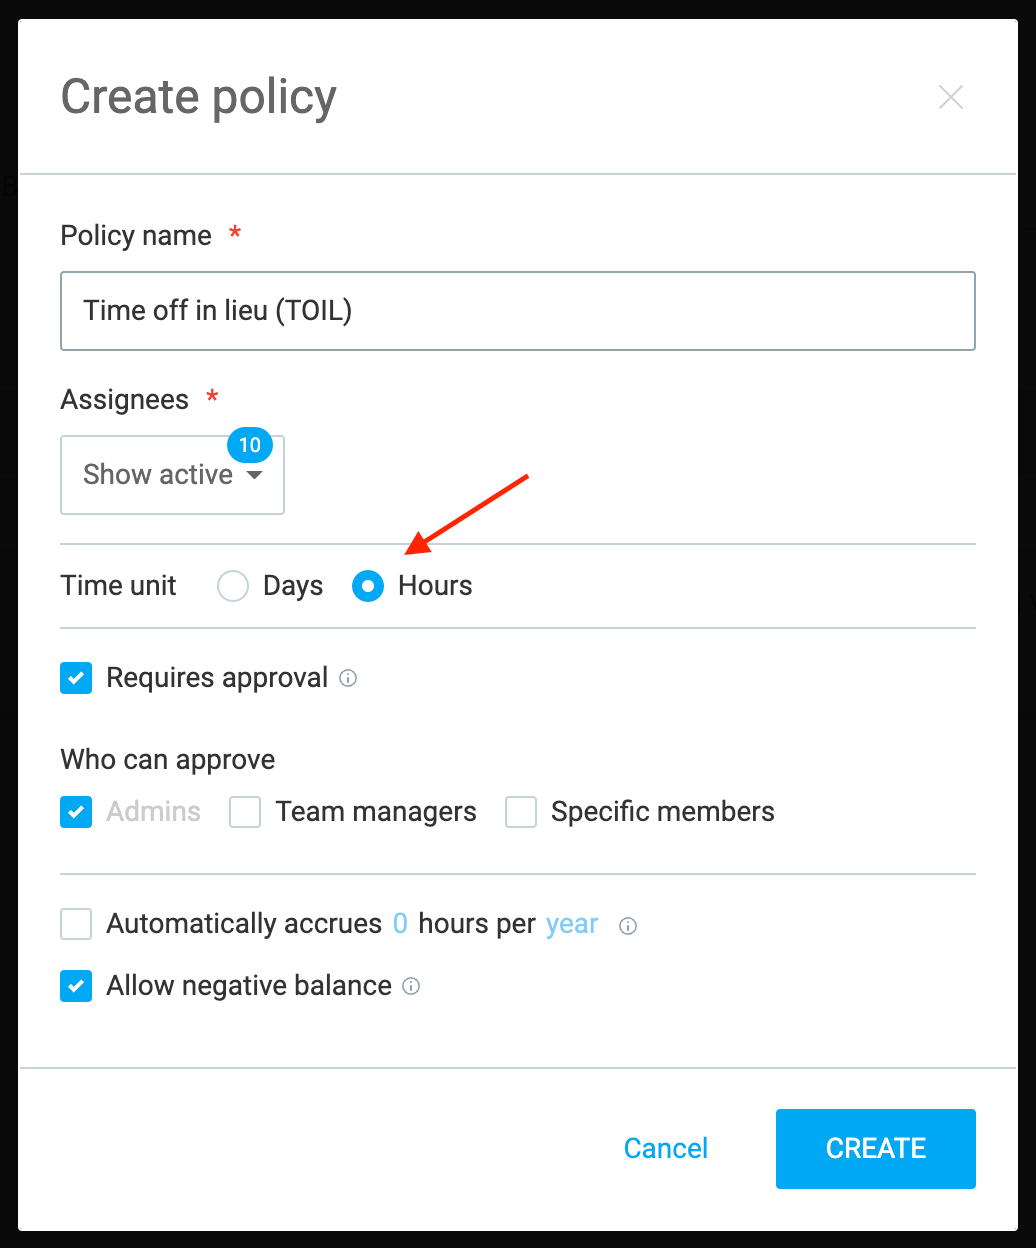
As with an unlimited PTO policy, you don’t have to add any predetermined number of hours per user.
Simply allow the negative balance option and let employees request an appropriate number of hours based on their overtime.
Once employees request TOIL, you can go to their timesheet and check if their logged hours match their TOIL request.
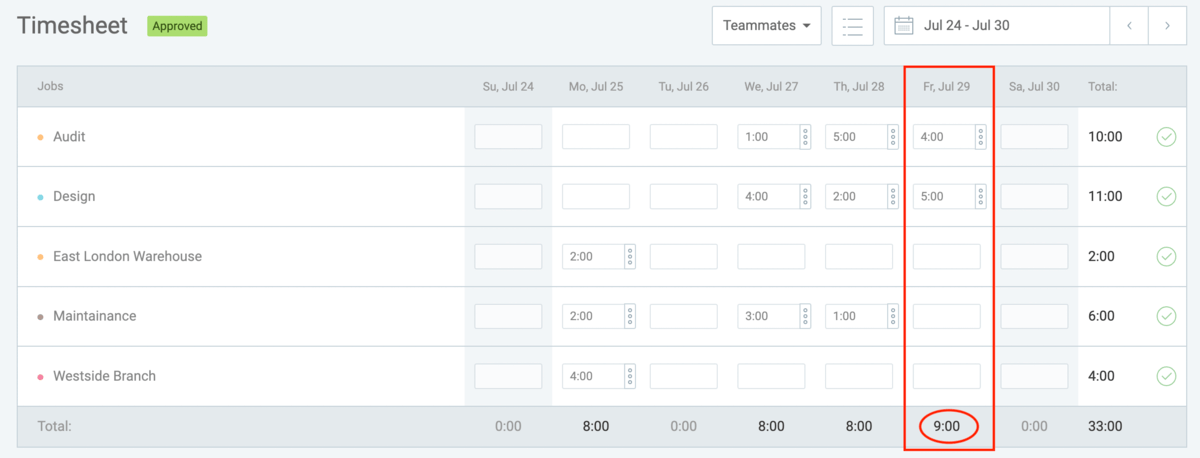
If the Timesheet confirms their request, you can approve it.

Alternatively, you can ask employees to notify you of any overtime hours — which you can then add manually to their TOIL policy after you check their timesheets. With this option, you don’t need to allow the negative balance.
💡 Clockify Pro Tip
If you prefer to pay your employees for their overtime work rather than provide them with additional time off, you can use our calculators to easily determine their pay:
Wrapping up: Requesting and tracking time off is simple with the right steps and tools
Whether you’re looking for the simplest way to request time off or you’d just like to keep up with your team’s leaves, following the right set of steps coupled with a handy time off tool could automate these processes and even save you time in the long run.
If you want to successfully request time off for yourself, make sure you’ve reviewed your company’s time off policy and informed everyone about your leave in time.
In case you’re an employer looking for the right way to track and manage your team’s leaves, we hope our step-by-step guide has helped you achieve just that.
Just don’t forget to define and create your time off policy beforehand, inform your team on all the details, and let the PTO and vacation tracker do the rest.
Track PTO & vacations with Clockify
How we reviewed this post: Our writers & editors monitor the posts and update them when new information becomes available, to keep them fresh and relevant.