Using a project management tool like Trello helps you manage your tasks and projects, see who’s working on what, delegate tasks to your team members, and more.
However, if you want to monitor the progress of your tasks and projects, you should track the time you and your team spend on them.
While Trello is rich in project management features, it lacks a built-in time tracking solution. That’s why, in this guide, we’ll tell you how to track the time you spend on Trello tasks using the Clockify browser extension.
So, let’s start.
How to track time with Clockify in Trello
Clockify by CAKE.com is a simple time tracker that lets you track work hours across projects.
If you’ve been using Trello and Clockify side by side, you’ve probably already noticed a significant boost in productivity.
However, combining the 2 apps lets you manage your projects and tasks while tracking the time you spend on them — all in Trello.
Let’s go over the step-by-step process of how to track time in Trello with Clockify so that you can make the most out of your work hours.
💡 CLOCKIFY PRO TIP
Leveling up your productivity is never a bad idea, so we’ve compiled a handy list of tools that you can introduce to your workflow:
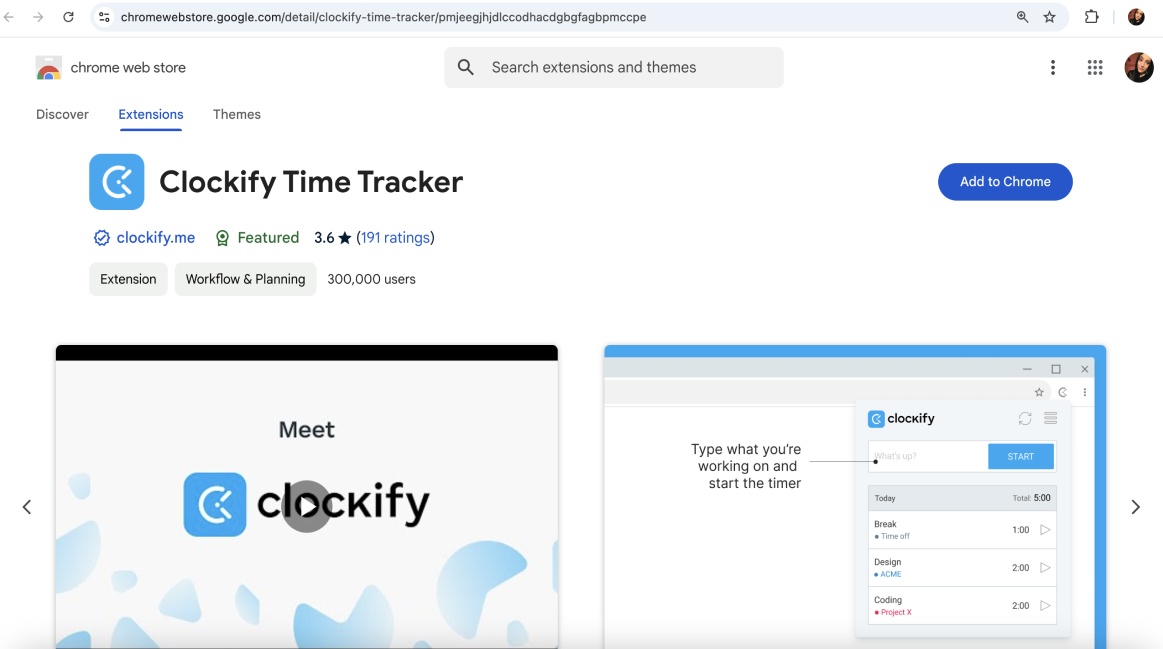
Step #1: Install the Clockify browser extension
You can download Clockify extensions for Chrome, Firefox, and Edge, depending on your web browser. If you prefer Chrome, you can download the Clockify extension from the Chrome web store.
When you enter the Chrome web store and find the Clockify extension, simply click the Add to Chrome button — and your Clockify extension will be installed.
💡 CLOCKIFY PRO TIP
If you’re new to time tracking and Clockify time tracker, we suggest you take a few minutes to watch our video tutorials and learn just how easy it is to use our tool:
Step #2: Start tracking time for tasks in Trello
After you add the Clockify extension to your browser, it will appear in the Extensions menu — like below.
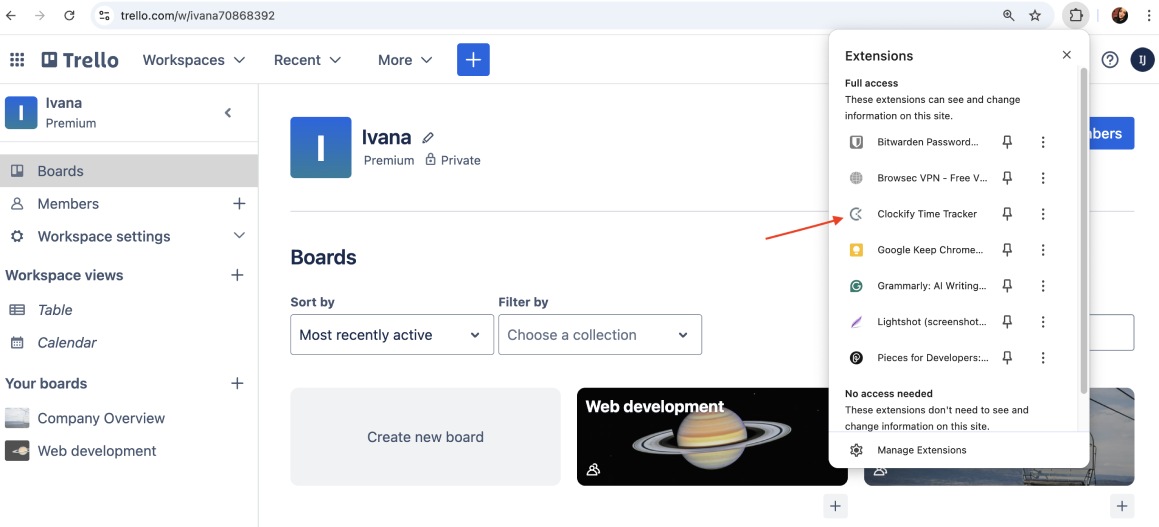
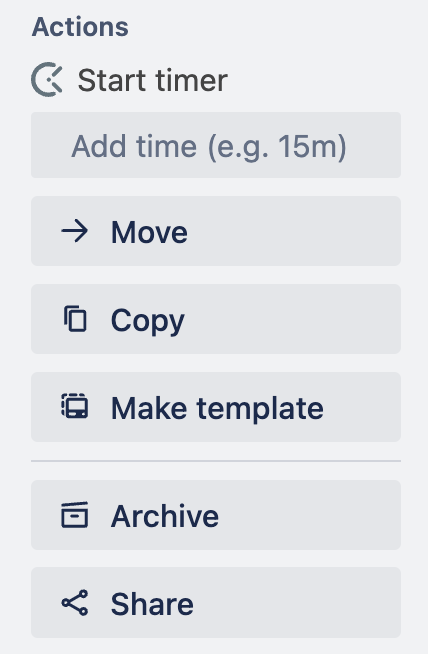
Also, Clockify’s Start timer button will appear in the Actions section on your Trello card. Then, to start Trello time tracking, just click on the Start timer button — it’s conveniently stored in the bottom right corner.
As an alternative to clicking the button to start the timer, you can also select any text in your Trello card and start tracking time from there.
After selecting your preferred text (e.g., the card’s title), you need to right-click on the text and select Start timer with description.
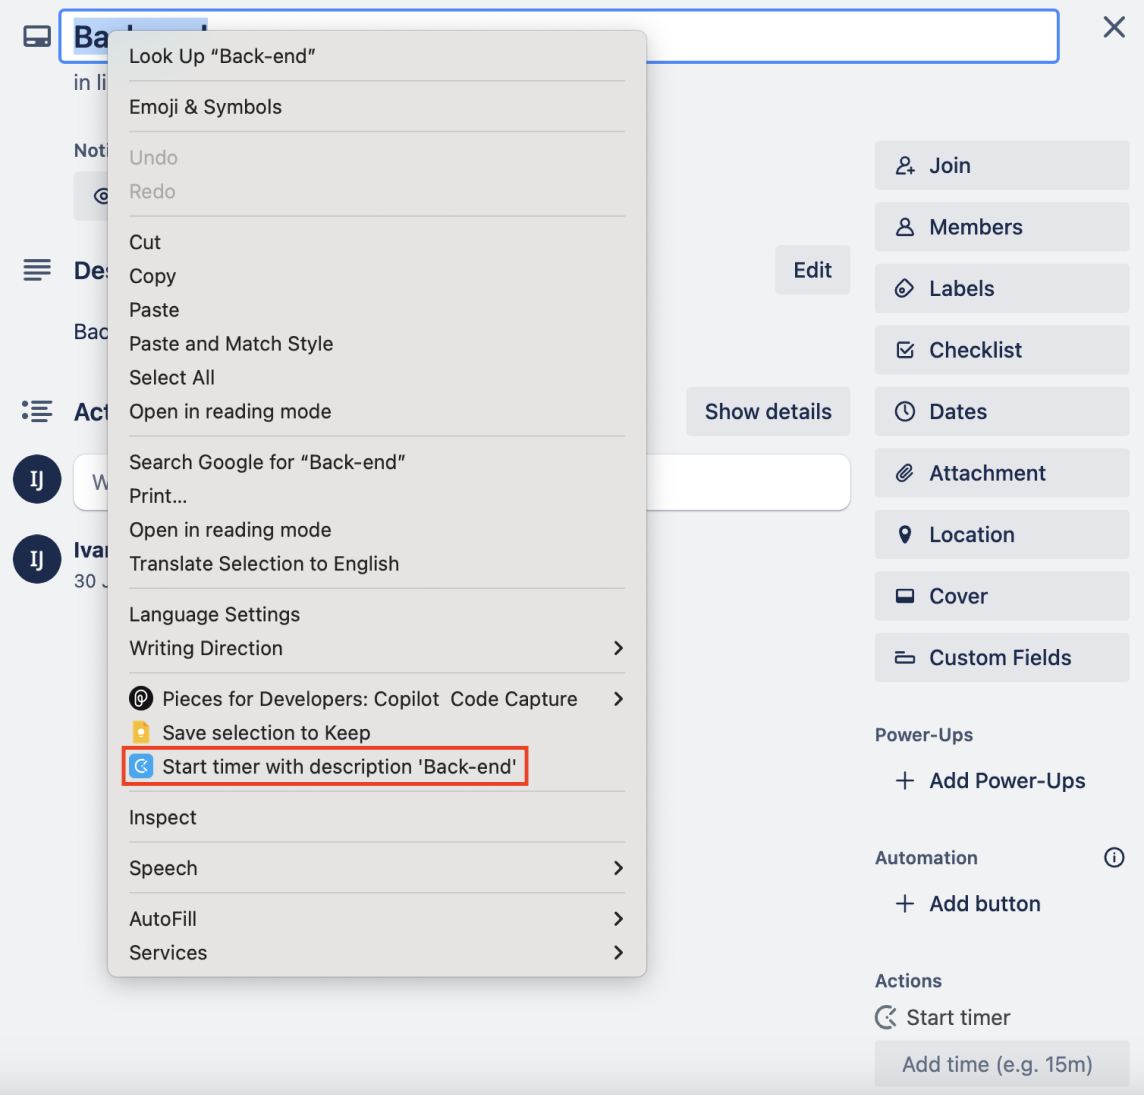
When you click on Start timer with description (in this case, Start timer with description ‘Back-end’), the timer will start ticking, and you’ll start tracking the time for a time entry with the selected text as description.
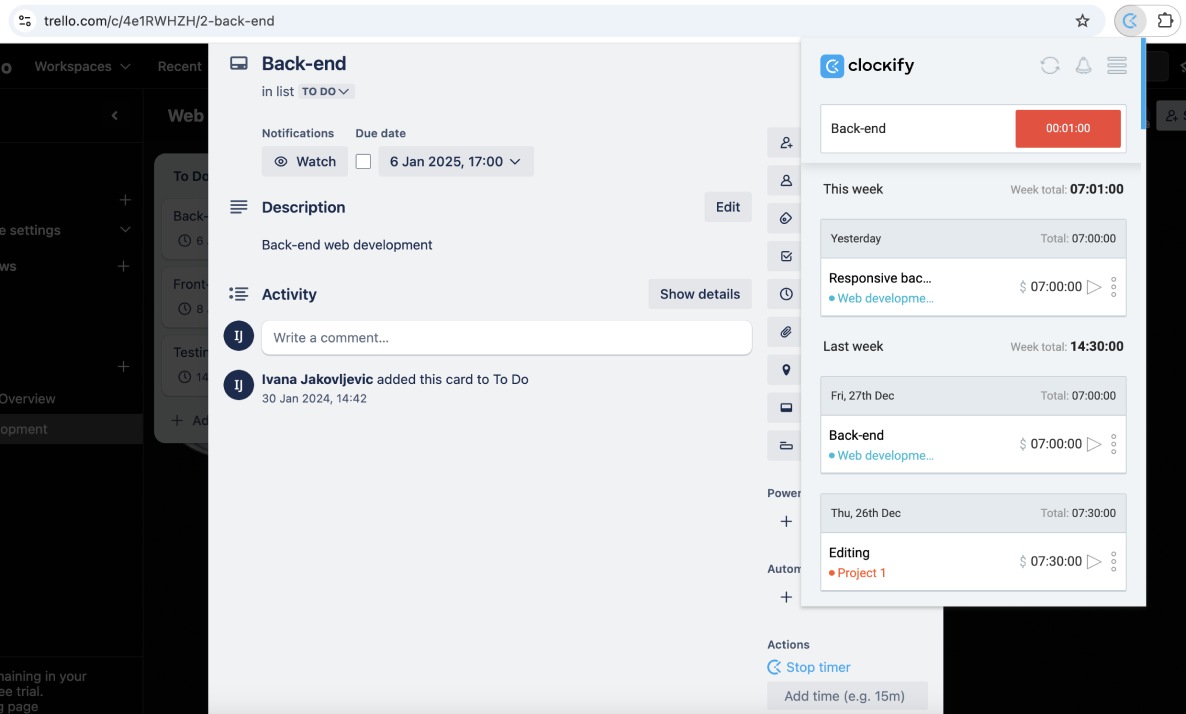
When the timer starts running, you’ll notice that the Clockify extension icon in your browser bar has changed from gray to blue. That’s how you’ll know for sure that every single second of the work you’ve put in counts.
In case you prefer to manually add the time you spent working on a particular Trello task, you can do that with Clockify as well. Just add your time in the Add time section right below Clockify’s Start timer button on your Trello card.
As soon as you add your time, it’ll immediately appear in the Clockify browser extension.
💡 CLOCKIFY PRO TIP
To learn more about the process of tracking projects and tasks for your clients, here’s a helpful resource for you:
Step #3: Find the time tracked in Trello
Whether you track time via timer or add your time manually on a Trello card, Clockify task time tracker keeps a record of all your time entries in your browser extension.
If, besides the extension, you’re also using other Clockify apps (mobile, desktop, and web versions), you can go to any of those apps — and all your tracked time will be safely stored there.

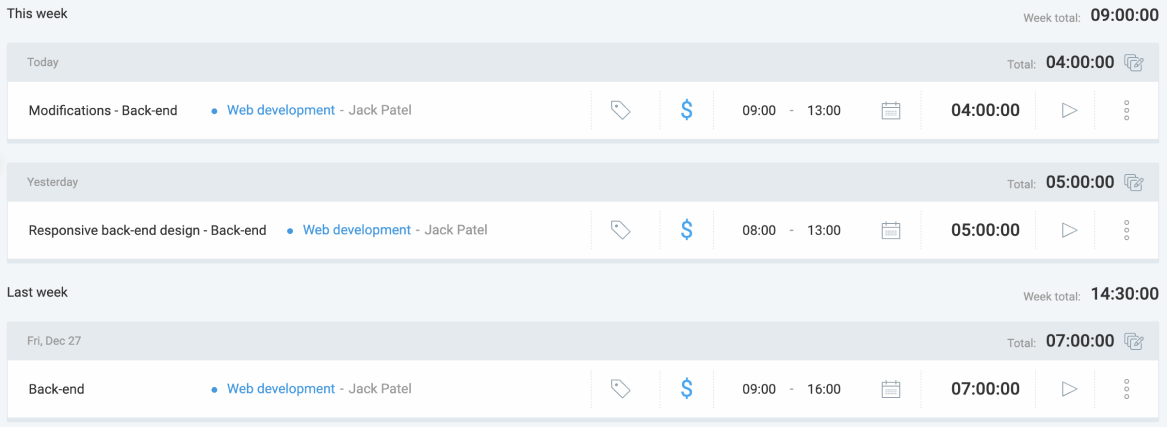
For instance, when you go to your Clockify web version, you can see your time entries for the current and previous weeks. You can also edit your time entries or delete them if you want.
Step #4: Analyze the time tracked in Trello
Once you and your team decide that you’re ready to wrap up the tasks you’ve been working on, you can go back to your Clockify web account and analyze the time you tracked in Trello.
For this purpose, you can pick a report you’d like to see — it can be a summary, detailed, or weekly report.
Let’s say you’ve chosen a summary report. To see the breakdown of the time you and your team tracked while working on a certain project, you’ll need to:
- Filter the report by project you worked on in Trello,
- Filter the report by team members who worked on said project, and
- Group the data by User and sub-group it by Project.
You can also choose a period you’d like to look into (e.g., this week, last week, past 2 weeks, this month, etc.).
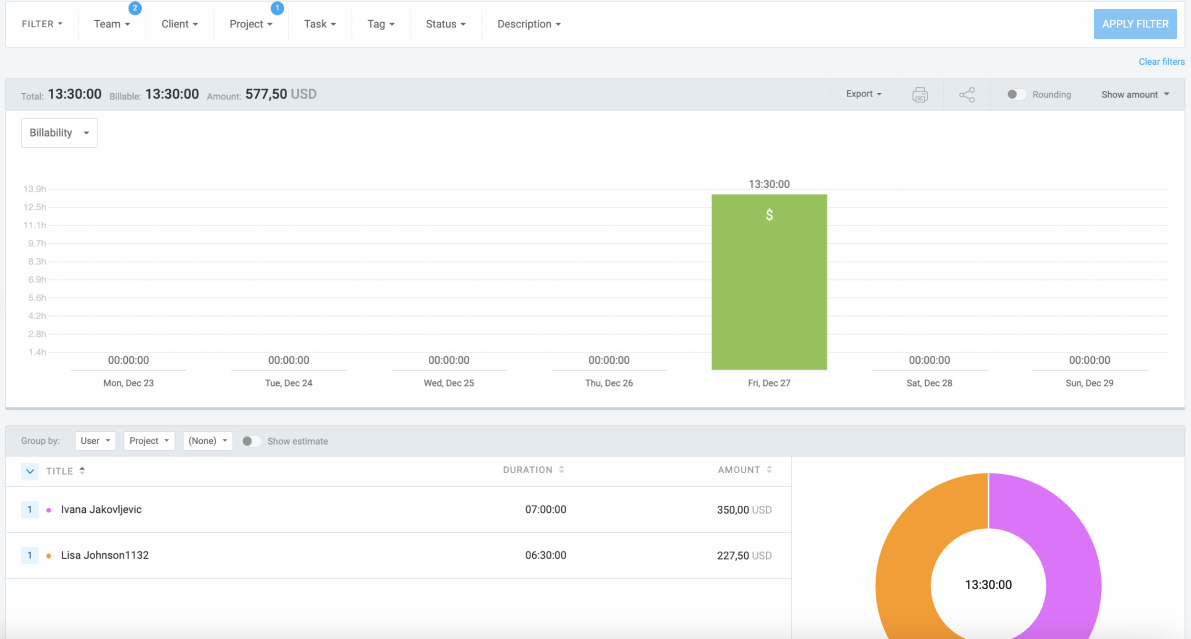
Analyze tracked time with Clockify
What’s more, to get additional information about your team members’ tracked time, you can use the detailed report in Clockify — like below.
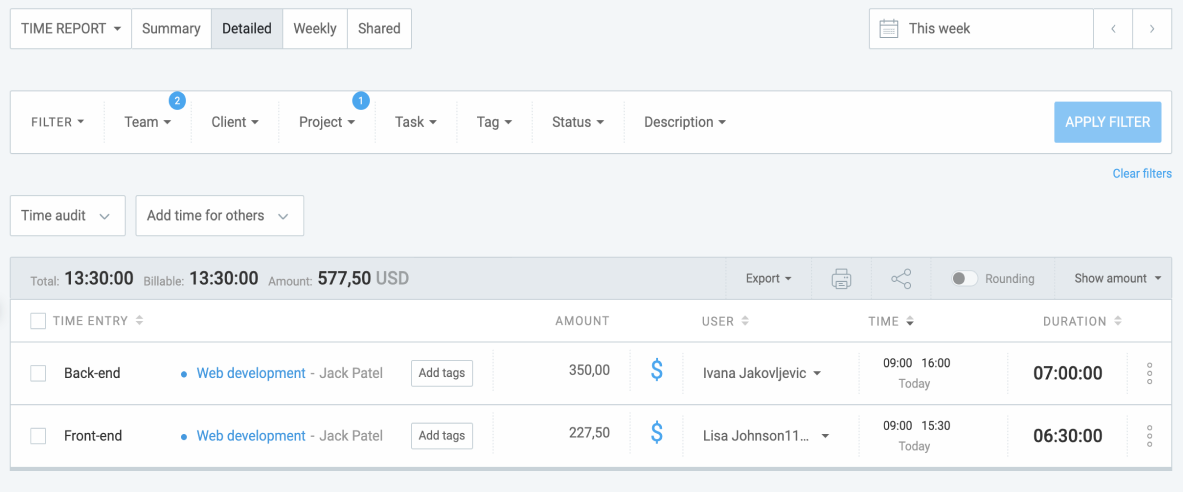
In the detailed report, you’ll be able to see when and for how long your team members worked on each of their tasks.
By analyzing your team’s tracked time in detail, you’ll see if they spent too much time on specific tasks, helping you better understand your team’s productivity.
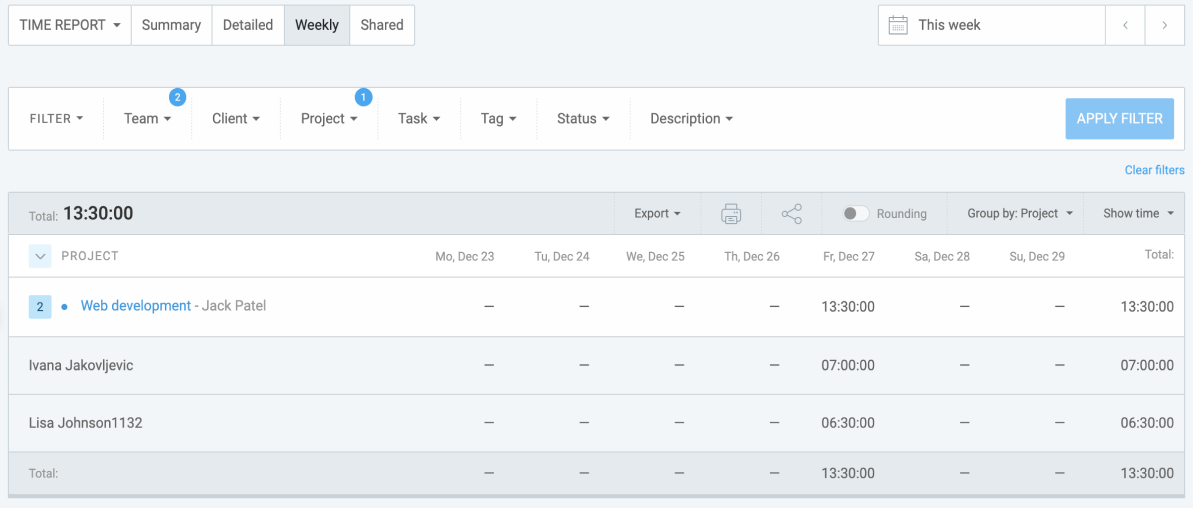
Moreover, to see each team member’s tracked time for any given week, you can use Clockify’s weekly report.
If you want to stay up to date with your team’s tasks regularly, you can also receive scheduled time reports via email and see everyone’s tracked time for a day, week, or even a month.

Additional tips for tracking time in Trello
Sometimes, staying on top of your tasks goes beyond the quick and easy option of starting your timer. That’s where additional tips on perfecting your time tracking in Trello come in handy.
Tip #1: How not to forget to start tracking time in Trello
If you often forget to start your timer, Clockify offers a solution for that, too. You can set a reminder to track work time and receive a notification from the Clockify browser extension to start your timer.
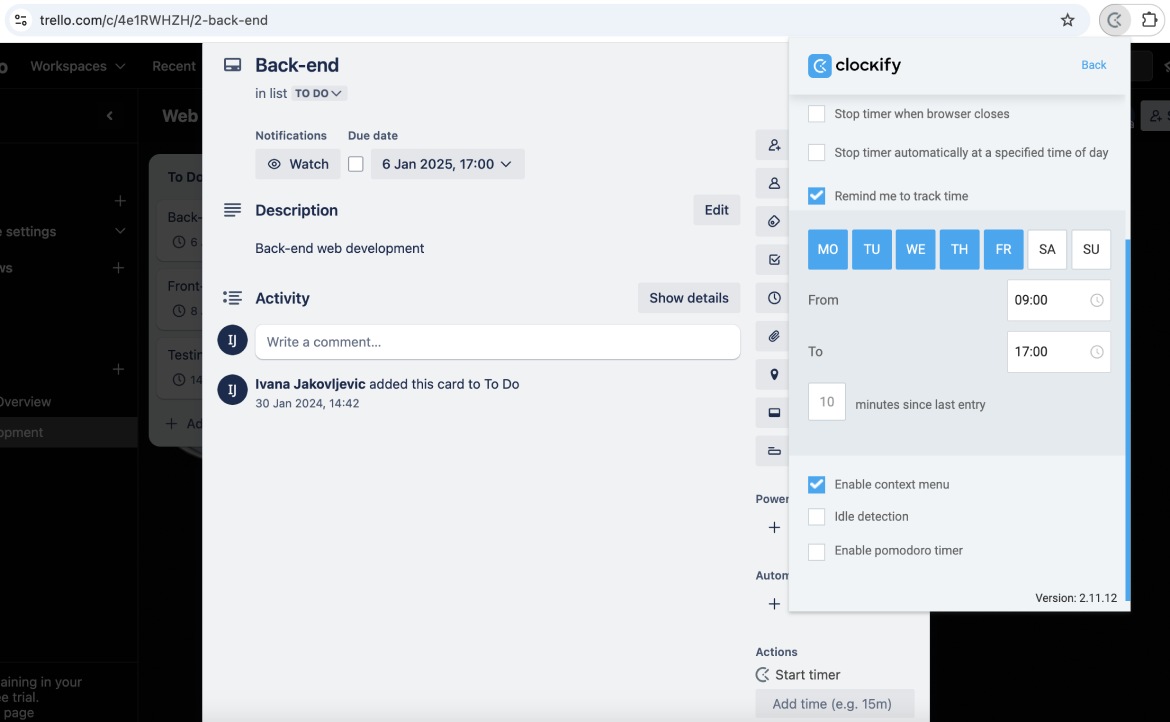
Furthermore, to automate the timekeeping process, you can check the Start timer when browser starts option in your Clockify extension. This way, the timer will instantly start tracking your time as soon as you open your preferred browser.
Additionally, to automatically stop the timer when you close your browser, you can check the Stop timer when browser closes option.
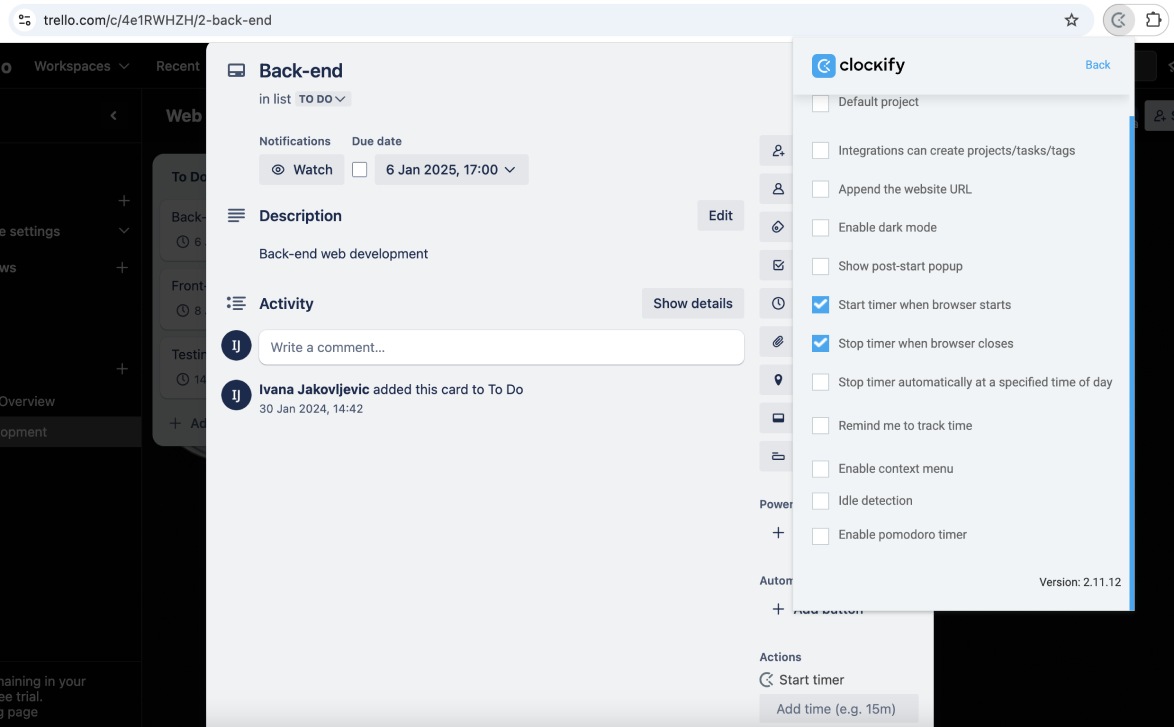
Clockify extension also offers the option to stop the timer automatically at a specified time of day, which is useful if you usually finish working at 5 p.m., for example.
Tip #2: How to track time for items (sub-tasks) in Trello checklists
Adding a checklist to a Trello card is ideal if you want to break a task down into sub-tasks and make tracking the progress of your tasks extra easy. This option allows you to create a to-do list where you can add items (your sub-tasks) and check them off the list once you complete them.
Just click on the Checklist button located in the sidebar on your Trello card and add your items. In fact, you can organize the items according to their importance or urgency and motivate yourself to start working on the most important item first.
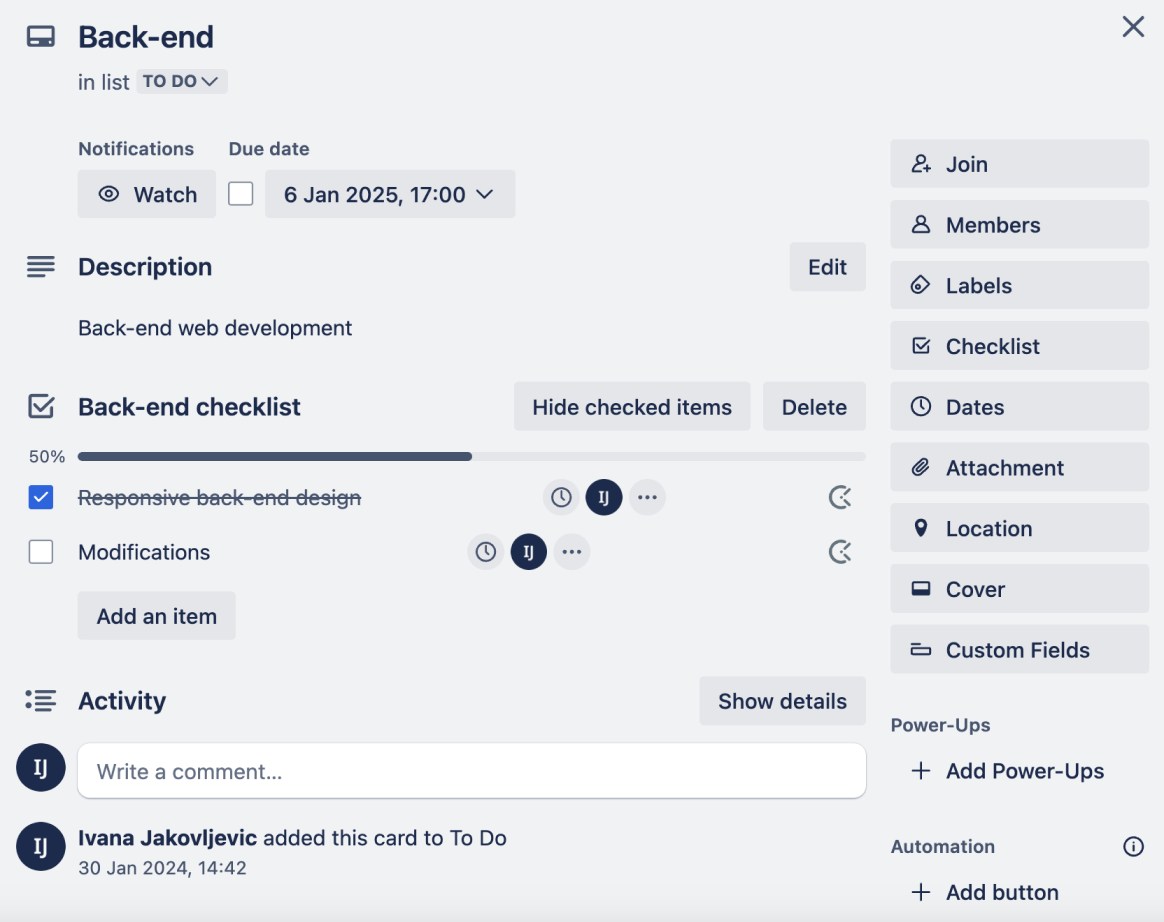
You’ll also notice a Clockify button next to each item you add to a Trello card.
As soon as you start working on an item, click on the button, and the timer will immediately start ticking in your Clockify browser extension.
When you finish working on a checklist item, you can put a checkmark next to it, and Trello will automatically cross it off. This way, you’ll know exactly how many sub-tasks you have left to complete a certain task.
Each time you’re done working on a checklist item in Trello, you need to stop the timer and go to the web version of the Clockify app. There, you’ll be able to see all your Trello checklist time entries.
💡 CLOCKIFY PRO TIP
To find out what the best way to break down a project into tasks is, read more about it in the following blog post:
Tip #3: How to manage deadlines in Trello
Trello gives you and your team the option to set and keep up with deadlines.
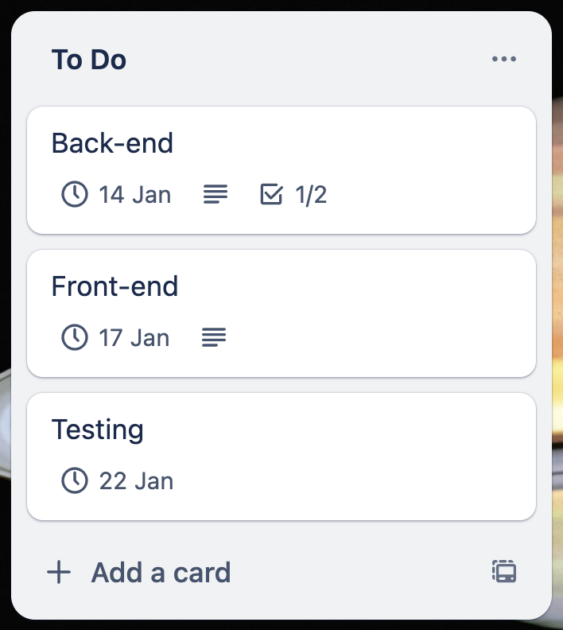
For example, you can set a due date for each card on your Trello list and let your team know exactly when their deadline is approaching. This will encourage them to finish their tasks on time.
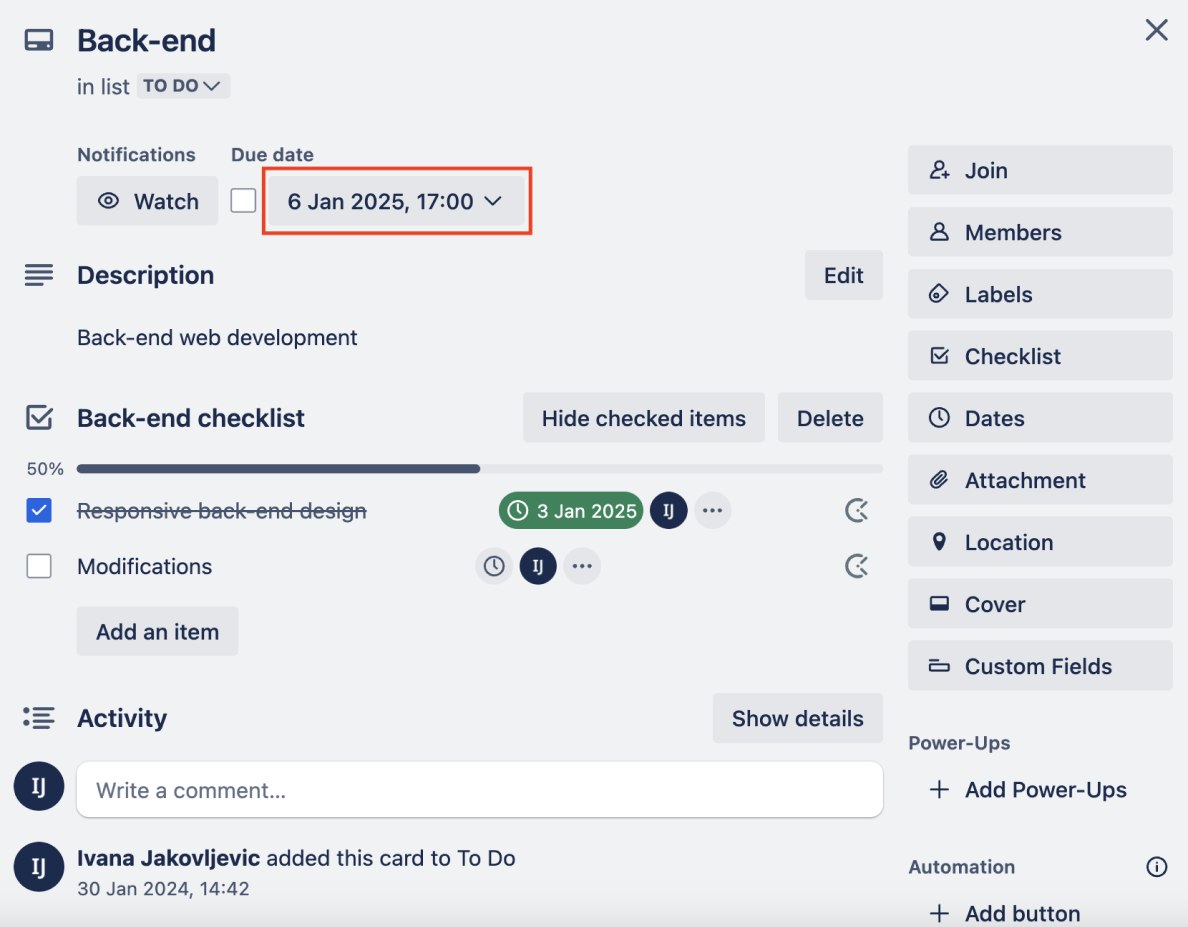
In Trello, you can also set due dates for sub-tasks. Based on the cards’ deadlines, you can update their order by dragging and dropping your cards within the lists. That way, you can put priority tasks at the top and let your team know what cards to tackle first.
Setting deadlines in Trello is an essential part of Trello time management. It ensures that everyone knows how much time they have available for their tasks.
Also, once you start setting deadlines and tracking how your team copes with them, you’ll be able to see whether you need to introduce some changes to your team’s workflow.
You may find that your deadlines are too time-pressing and lead to your team rushing to meet them — at the expense of the quality of their work.
Or, you may discover that your deadlines are too lenient, so employees spend a lot of time procrastinating instead of working.
When this happens, your team may fall prey to Parkinson’s law, filling the time they have available before the deadline instead of moving on to the next task.
💡 CLOCKIFY PRO TIP
If you’re curious about how to prevent Parkinson’s law from taking the best of your team, read more about it here:
Tip #4: How to manage time estimates for Trello tasks
Setting time estimates is crucial for proper project planning. It allows you to allocate resources effectively, set realistic deadlines, and spot potential delays so you can make necessary corrections before it’s too late.
That’s why, before you start Trello time tracking, you should:
- Go to your Clockify web version,
- Select the project you’re working on in Trello, and
- Set an estimate for it.
You can set an estimate for the whole project and type your estimate in hours under Manual (e.g., 135 hours). Alternatively, you can select the Task-based option and set estimates based on tasks.
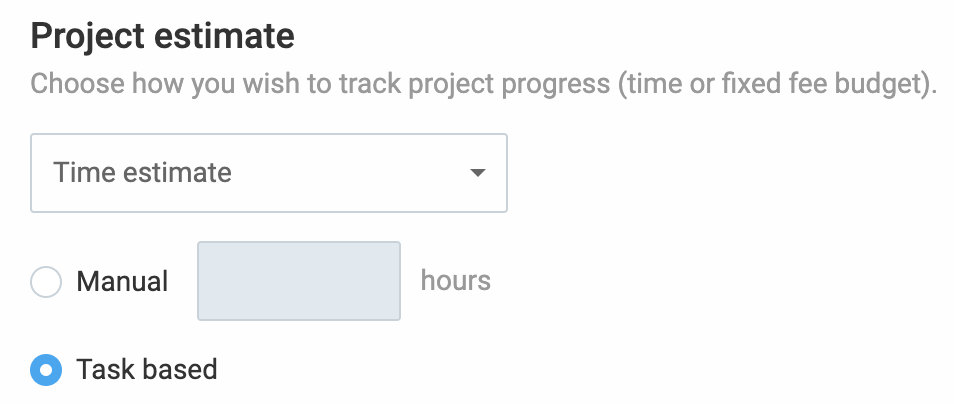
Set time estimates with Clockify
Let’s say you’ve chosen the Task-based option. In that case, your whole project estimate will be a sum of all individual task estimates you set.
Before you start tracking time on Trello cards, the best practice would be to create tasks corresponding to those cards in Clockify and then set individual estimates for each.
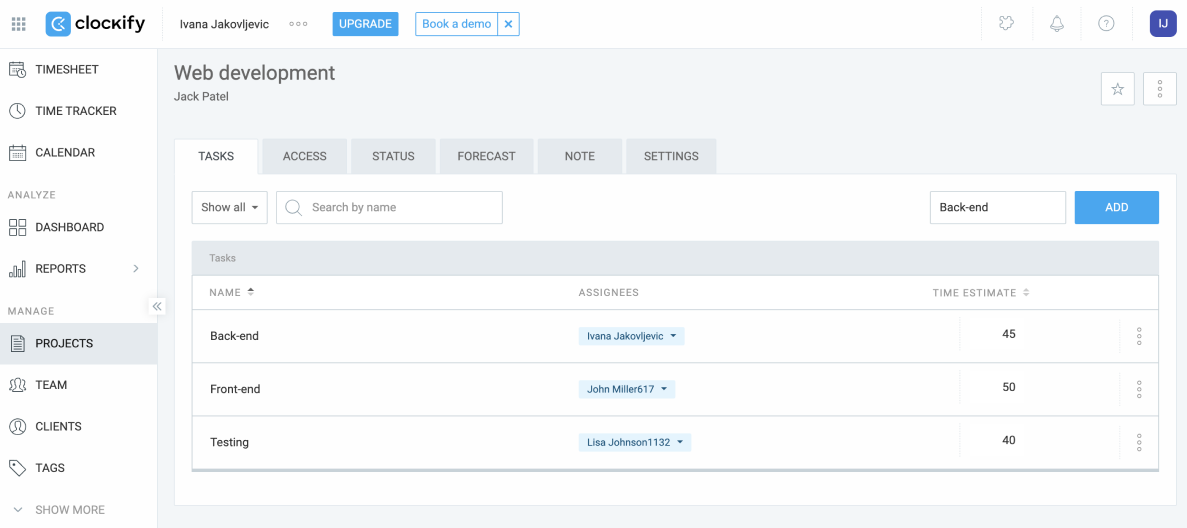
As you and your team work on your Trello cards (indicated as tasks in the Clockify web version), you can check how much time you’ve left until you reach your estimated time for your tasks in Clockify. This will help you track project progress and understand how well you and your team are performing.
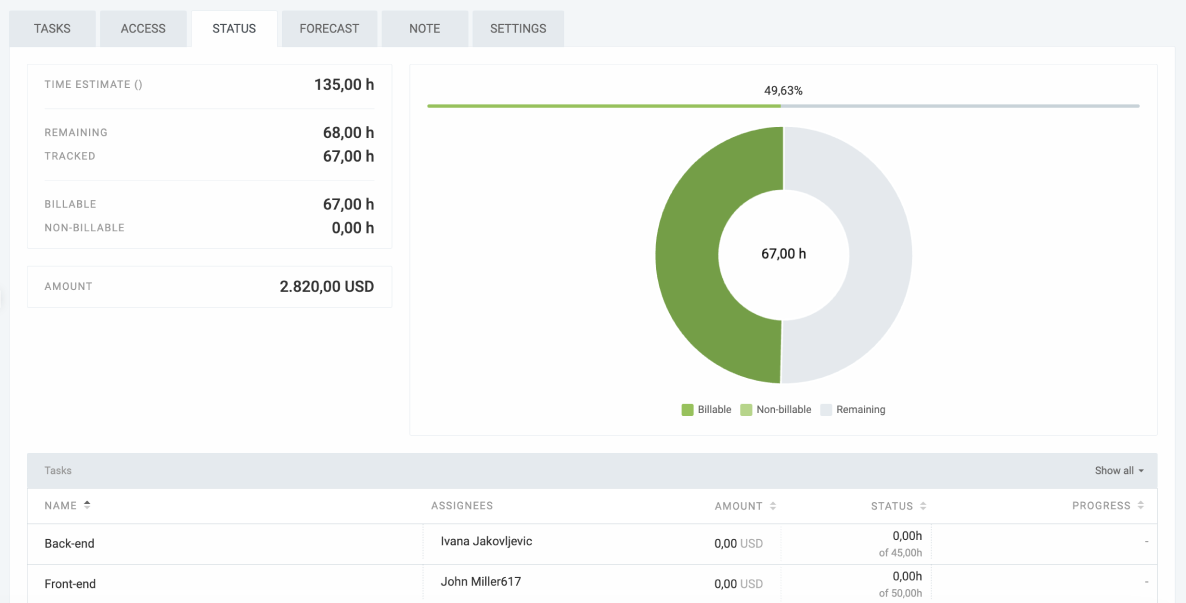
You can also compare estimated vs. actually tracked time on a project in Clockify. This allows you to better understand how long a project like that takes, which will help you estimate future projects more accurately.
💡 CLOCKIFY PRO TIP
To see why time estimation is important for project management and what consequences poor time estimation may bring, read our guide below:
Tip #5: How to use Clockify to calculate billable hours for projects in Trello
Clockify can also help you bill your clients for your projects — and all you need to do is track your and your team’s billable hours.
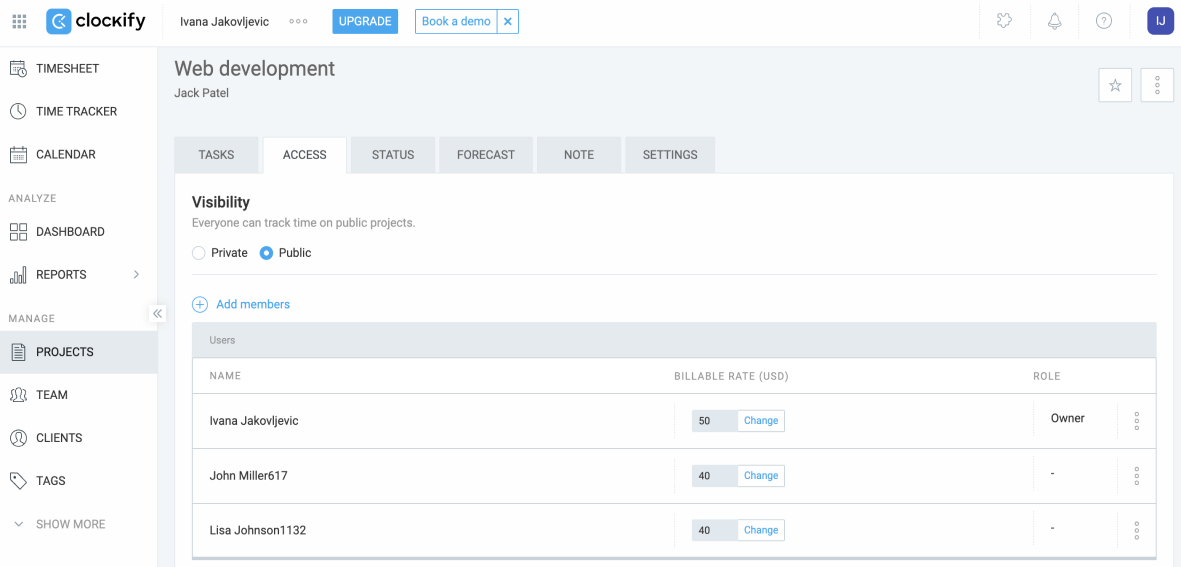
To calculate billable hours for yourself and your team members, you should first indicate your hourly rates in Clockify. You can set them per:
- Workspace,
- Team member,
- Project,
- Task, or
- A team member within a particular project.
The system will use the most specific hourly rate you set (a team member within a particular project being the most specific of the 5 above-mentioned rates).
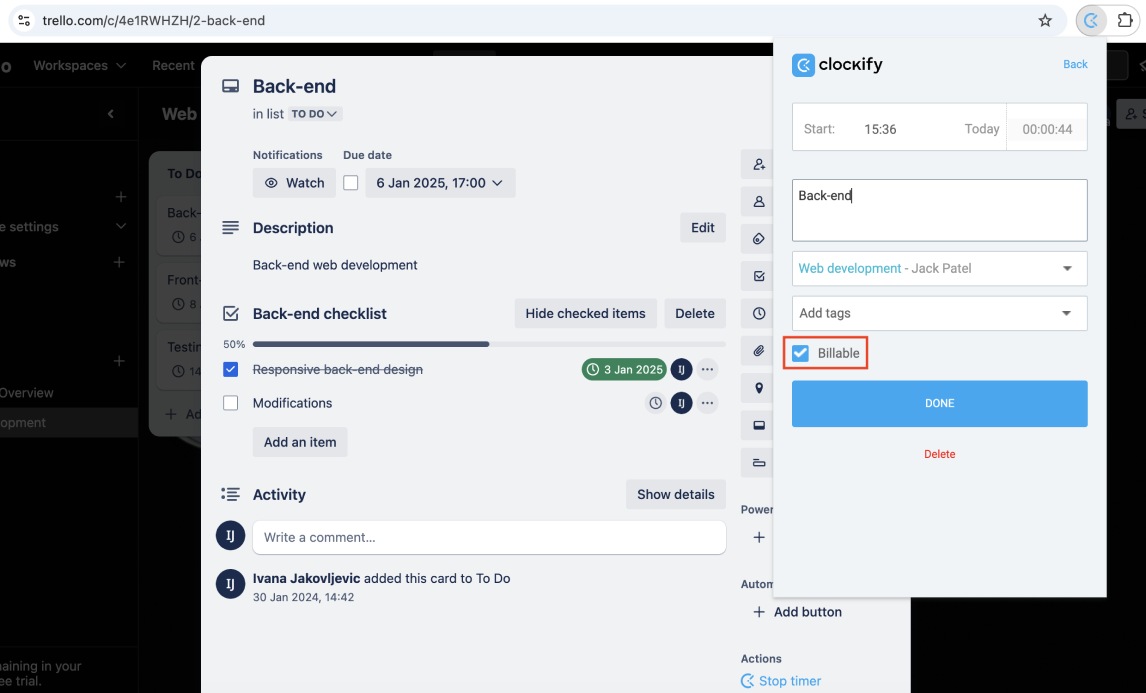
After you set your hourly rates, you can begin working on a Trello card.

When you start the timer in your Trello card, a window will open where you can mark your time entry as billable.
Once you finish tracking time for this card (or project, if you want to bill for all of your Trello board’s activities altogether), go to your summary report.
There, you can select the period when you worked on that Trello project (say, this month) and filter the report by said project. After that, you’ll see your total hours tracked and total billable hours for that project in the header.
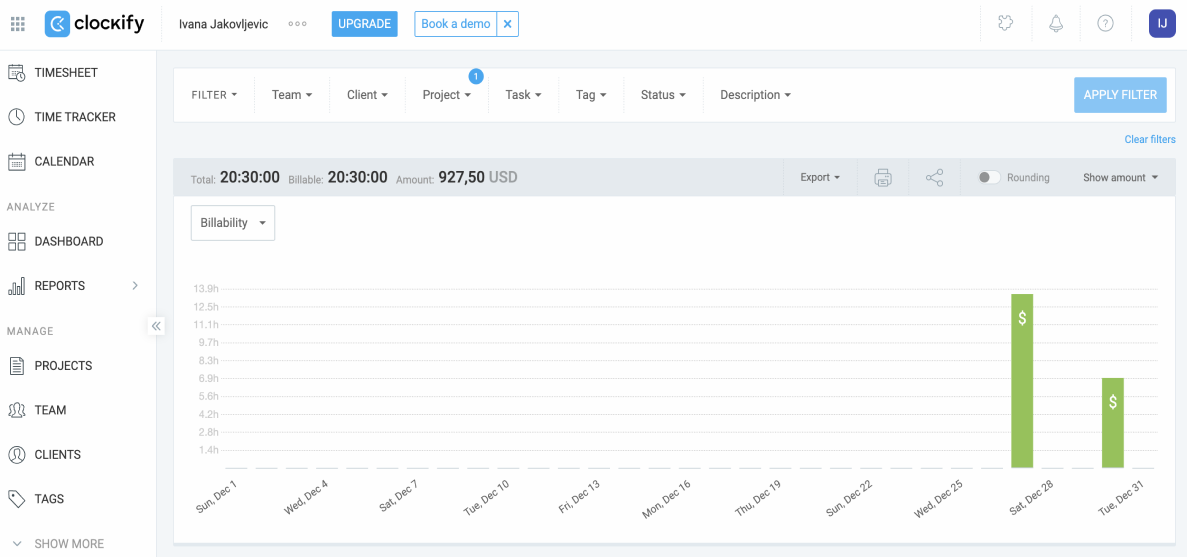
Right beside your billable hours in the header, you’ll also see the total amount of money you’ve earned according to your billable hours. Then, you can create invoices in your Clockify web version, export them as CSV, Excel, or PDF files, and send them to your clients.
💡 CLOCKIFY PRO TIP
Want to create professional-looking invoices that encourage payment? To learn how to do that in 3 easy steps, check out the video below:
Clockify by CAKE.com simplifies time tracking in Trello
They say that the best things in life are free — but a blend of 2 free apps that level up your productivity is a combination that might just be unmatched.
With Trello, a project management app that helps you organize your tasks and projects, and Clockify, a simple time tracker that lets you track and calculate your billable hours — it seems like you have it all.
Apart from tracking time on projects, Clockify allows you to create invoices based on tracked time and expenses, monitor what your team’s working on in real time, and more, so make sure to try it out.