From relying upon the sun and the stars, through using water, to the invention of an atomic clock. Humans have always been fascinated by time and have been looking for more efficient ways to tell and record time. I’ve tracked my standard work tasks using a few different tools and found some interesting things, as well as pros and cons for each one along the way.
Time tracking devices through history
Nowadays, we’re lucky to have pretty accurate methods of telling and recording time. But it hasn’t always been like this.
Humans have been experimenting with numerous ways of monitoring time by taking advantage of:
- the movement of the sun and stars, with devices such as sundials, obelisks, merkhets (star clocks), and noon cannons;
- the water flow, with water clocks;
- incense and fire, with incense clocks;
- the movement of the sand, with hourglasses (sand clocks);
- oil and candle burning, with oil-lamp and candle clocks;
- the zig-zag movement of the ball, with Congreve clocks;
- the oscillating mechanism that indicates the movement of time, with mechanical clocks;
- the movement of a swinging weight (pendulum), with pendulum clocks.
At this point in time, some of these time tracking tools only exist in museums, such as an incense clock. However, other devices, like a sand clock, can still be found in many households. That’s why we’ll demonstrate how to measure time with an hourglass, but with some additional time tracking tools as well.
How to record time using different time tracking devices?
To show you how you can utilize diverse time tracking devices to record your daily activities, I’ve tried several tools. Some of these are physical devices, like the Pomodoro kitchen timer, and some are time tracking apps, such as Clockify by CAKE.com.
Tracking time with an hourglass
One of the methods I employed is measuring time with an hourglass, or sand clock. These time tracking tools can measure both longer and shorter fixed periods of time. But, the most common types are those that last either one or three minutes. In my case, I used a three-minute sand clock.
Now, if you opt for an online hourglass, you’ll be able to select your desired time frame. So, you can also plan your day by limiting the time for every task. This is known as the timeboxing technique, which consists of setting time slots for each activity during the day.
However, in this article, we’ll focus on a physical hourglass.
How to track time with an hourglass?
Before you start measuring time with an hourglass, be sure to write down your task descriptions in a notebook.
So, this is the task I tracked by using an hourglass:
- Modifying a blog outline.
The goal is to review the outline and edit some parts if needed. This task should last 15 minutes.
But, since I could only track three minutes with a sand clock, I decided to parse this 15-minute assignment into five sections. Thus, each section lasts three minutes, so I’ll have to edit each section of a blog outline within three minutes.
Then, begin timing your activity by rotating an hourglass. Whenever you take a look at a sand clock, you’ll see how much time you have left to finish your task. Remember to flip an hourglass once the time is up.
Pros and cons of tracking time with an hourglass
In my experience, keeping track of daily activities with a sand clock makes me aware of the movement of time. I constantly see the sand grains quickly falling, and I know that it’s time to focus on tasks. Therefore, I always try my best to pay attention to work.
Speaking of the benefits of employing a sand clock as a time tracker, here’s what I noticed:
- There are no sound notifications and thus, no sound distractions, so you can just focus on your assignments.
- In line with the previous advantage, if you can’t hear that the time has passed, sometimes you’ll continue working if you’re feeling a burst of inspiration. Although the time has expired, working for several minutes longer will have positive effects on your tasks and overall results. This flexibility will be particularly handy for those working in creative industries.
For example, instead of 15 minutes, it took me around 20 minutes to change the blog outline. But, thanks to these additional five minutes that I didn’t plan, I was happy with the new version of the blog outline.
On the other hand, these are the downsides of using a sand clock as a time tracker:
- If you’re tired, you can easily get distracted by looking at the sand slowly falling, which will prevent you from completing the assignment.
- As I mentioned earlier, there aren’t any options for adding the task name or description unless you remember to write it down in a notebook.
Tracking time with a stopwatch
Now, monitoring time with a stopwatch is a straightforward method that is especially useful for repetitive tasks. These are assignments such as replying to emails, waiting for the manager’s approval, and attending meetings. If you’d like to find out how much time you spend on recurring tasks, just keep a stopwatch nearby when your next meeting starts.
Moreover, a stopwatch is a great tool for measuring time while doing personal activities, like going for a run or grocery shopping.

How to track time with a stopwatch?
You won’t need any fancy equipment. Your mobile phone, your watch, or even a fitness watch will do the trick.
Before clicking on a “Start” button, remember to note down the name of the task. For example, I tracked the time I needed to go through all the emails first thing in the morning. Thus, the description of this task is “Checking an inbox and replying to emails.”
Once you’re done, stop the timer and mark down the time it took you to complete the task. In this case, I’m lucky not to have a lot of emails per day, so I finished this assignment in 5 minutes.
Pros and cons of tracking time with a stopwatch
Recording time with a stopwatch is a perfect fit for anyone who likes to keep things as simple as possible.
So, these are the bright sides of employing a stopwatch:
- Simple to use, and you don’t need any special equipment.
- No visual or noise distractions.
However, there are some drawbacks, as well:
- If you get interrupted by a colleague or a family member, you can easily forget to pause or stop the timer.
- There are no options to add the description/name of the task you’ve worked on; you have to remember to write it down yourself.
Tracking time with a Pomodoro timer
Another practical method of recording time is by using the Pomodoro technique. This method consists of 25-minute work sessions (Pomodoros), followed by 5-minute breaks between work intervals.
Now, to track your work sessions, you should use either a Pomodoro timer app, such as Clockify by CAKE.com, or your kitchen timer. We’ll explain both ways in the following section.
How to track time with Clockify Pomodoro timer?
To take advantage of the Pomodoro timer, you’ll first need to install the Clockify app for Mac or use the Clockify browser extension. Then, create an account and log in. Next, go to settings and enable Pomodoro.
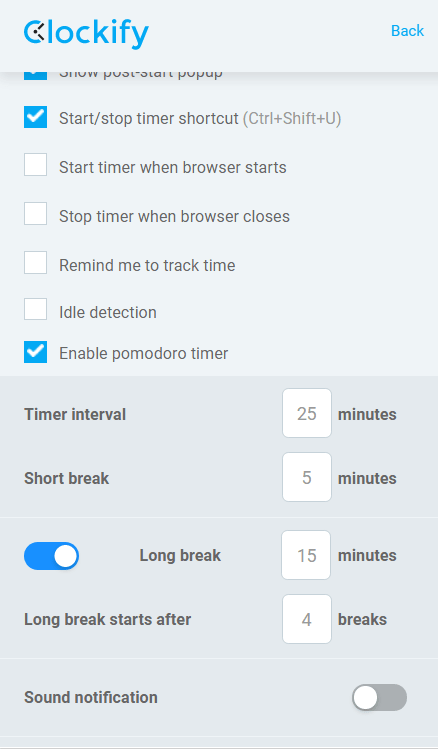
So, every time you start working on a new task, be sure to type what you’re working on and start the timer. After 25 minutes, you’ll get a notification, which means that it’s time to take a break. You’ll be notified when the break is finished, too. Then, you can continue working for another 25 minutes or stop the timer if you’ve completed your task.
The Pomodoro timer comes in handy when you have to deal with several smaller tasks or one more demanding task for a day. In the latter case, you’ll probably need an entire day to complete an assignment. Therefore, to make things easier, be sure to organize your day by working in 25-minute increments. Of course, take quick breaks after every work session. If needed, you can prolong your Pomodoros to 45, 60, or 90 minutes. Just make sure you change these details in the settings.
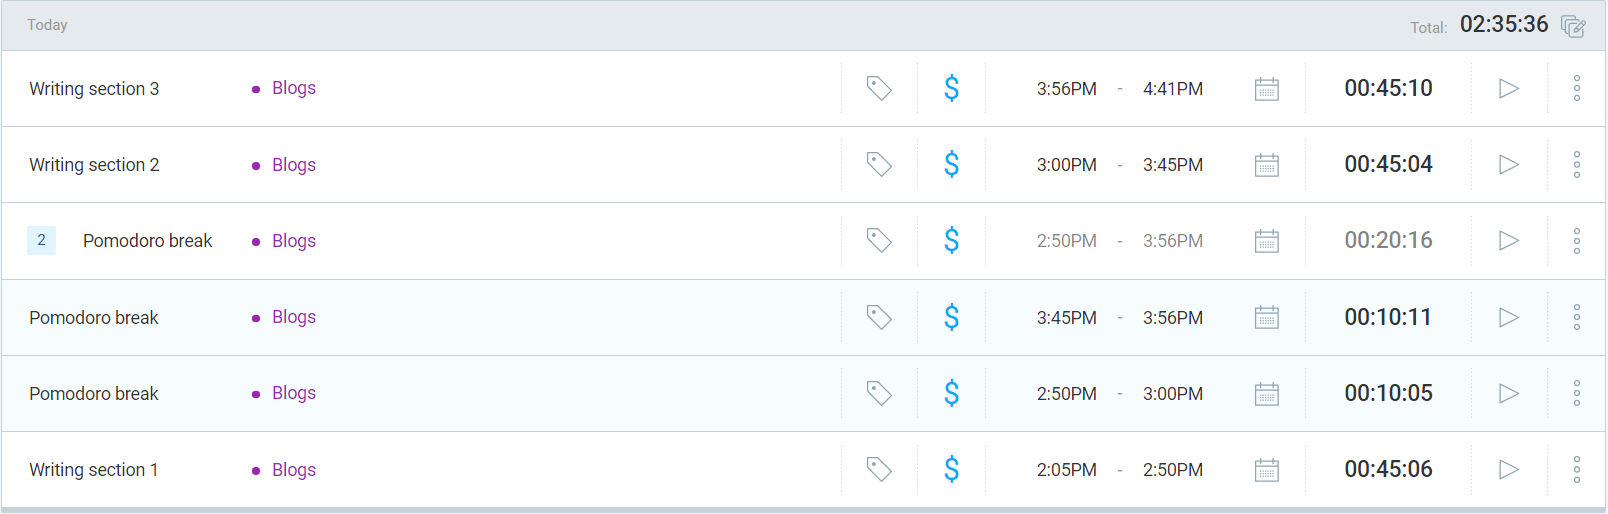
For instance, when writing a blog post, I feel like working only for 25 minutes is a brief time frame. I usually need a longer period, such as 45 minutes or even an hour of uninterrupted work. That way, it’s more likely that I’ll stay focused on the writing process.
As you can see below, I parsed my main task for the day, writing a blog post, into several 45-minute sessions, along with brief breaks. In addition, each Pomodoro here contains the description of the assignment, like “Writing section 1”, “Writing section 2” and so on. When you name your work sessions, it’ll be easier for you to know what parts of a task you have finished.
Try Clockify by CAKE.com today
Pros and cons of tracking time with Clockify Pomodoro timer
The Pomodoro timer is a great solution if you’re struggling to aim your attention at work. Whether you usually have one key assignment per day or a set of smaller ones, you’ll surely benefit from recording your time with Pomodoro.
So, here are the advantages of using the Pomodoro timer:
- You can select the time frame that works best for you and your activities, therefore, improve your productivity. Plus, you’ll get a notification for break times.
- You can write down the name of the tasks you’re working on.
- You won’t get distracted while dealing with your tasks because the timer works in the background.
When it comes to the disadvantages of the Pomodoro timer, I hardly noticed any. But, here’s the one that I experienced:
- The breaks might seem unnatural and unnecessary sometimes. For instance, when my mind feels energized and ready for work in the morning, I don’t really need to take a break after working for 45 minutes. On the other hand, I wouldn’t skip any Pomodoro breaks in the afternoon, when my energy levels are much lower.
How to track time with the Pomodoro kitchen timer?
You probably use your Pomodoro kitchen timer when cooking pasta or boiling an egg. Apart from these culinary purposes, this handy device can help you monitor your work assignments, too. Unlike an online Pomodoro timer, a kitchen version might not be a perfect fit for monitoring an entire workday and all tasks. But, you can experiment by tracking assignments that you usually take care of every day and that last up to 10 or 15 minutes. In addition, you can employ it for recurring assignments. And, if you set your timer, you’ll push yourself to finish these less demanding tasks within the time frame.
For instance, I have a habit of writing a to-do list for tomorrow, before clocking out from work. These lists are extremely valuable because they ensure you won’t forget anything important the next morning. Plus, making plans for tomorrow should become a part of your end-of-workday ritual, which will also help you unplug from work.
So, I wanted to see whether the Pomodoro kitchen timer can help me be more efficient with this task. As you already know, the process couldn’t be easier, you just have to set the timer and start working on your assignment.
Pros and cons of tracking time with the Pomodoro kitchen timer
This time tracking tool is practical when you don’t want to waste too much time doing a repetitive task. For example, if you’d like to declutter your desk or go through your inbox. Speaking of the assignment I mentioned earlier, writing a to-do list, recording time with the Pomodoro kitchen timer was quite handy. Even though I set the timer for 15 minutes, I managed to complete the task within 10 minutes.
Here’s what I liked about the Pomodoro kitchen timer:
- It’s easy to use and highly convenient for smaller tasks.
- You can choose the time period you need, from one to 55 minutes.
At the same time, here’s what I did not enjoy about the Pomodoro kitchen timer:
- You cannot pause the timer if you need to, in case you get interrupted.
In addition, the sound of the clock ticking all the time made me feel like I’m in a TV contest, competing against someone. But, maybe this sound is what motivated me to be more efficient since I needed less than fixed 15 minutes to write down a to-do list.
Tracking time inside apps for work
Do you usually switch between different project management, communication, or productivity apps during a typical workday? For instance, you have several Zoom meetings per day. Plus, you have to deal with tasks from Trello or Asana and check your email frequently. To stay on top of every assignment, you’ll need a time tracking tool that allows you to record time from other apps, like Clockify by CAKE.com.
How to track time with Clockify integrations?
To use time tracking integrations, you first need to install the Clockify extension for Chrome, Firefox, or Edge. Once you do that and log in, the button will become visible. Next, when you begin working in a Google Doc, Figma, QuickBooks, or other apps, you just start the “Start timer” button.

“Start timer” button in Google Docs
Then, you’ll notice how the extension’s icon has changed its color – from gray to blue. For example, I used this time recording method when writing a blog post in Google Docs. So, the extension will name your task by taking the document name when it comes to Google Docs. But, you have to add the project name by yourself. Once I stopped the timer, the task was automatically added to my tracked time.

Pros and cons of tracking time with Clockify integrations
Connecting the apps you commonly utilize throughout the workday with a time tracker can be quite beneficial. You’ll be able to learn more about your productivity habits.
So, here are the advantages of adopting Clockify integrations into your daily routine:
- Starting the timer and adding the details about your tasks is straightforward. Plus, if you add a new task each time you switch to a new app, you’ll have a full list of tracked assignments at the end of the day.
- It’s less likely that you’ll be distracted by a timer since it only changes color when you click on it. Therefore, you’ll be more productive, too.
Speaking of the disadvantages of Clockify integrations, there aren’t any major ones. However, if your job requires you to work on one larger task during the day or if you only work in one app an entire day, maybe you won’t find Clockify integrations much useful for your needs. In that case, you should only remember to write down your working hours for the day and task descriptions.
Conclusion
When it comes to time tracking, the good thing is that you can be creative. Depending on your tasks and their complexity, you can measure the time with a couple of simple tools such as a stopwatch or an hourglass. Or, you can try time tracking software, in case you need to add some precise details about your assignments. We hope we managed to spark your interest in time recording with some of the methods we tested for this article. And who knows, maybe you’ll discover that a particular time tracking device suits your professional needs, while another tool helps you monitor your personal activities.
✉️ How about you? What time tracking tool do you usually utilize and why? Send your answers, suggestions, and comments to blogfeedback@clockify.me and we may include them in this or future posts.