Approve team’s time entries
As a Team or Project manager, you can ensure that your team’s time entries are accurately tracked, reviewed, and approved in the Approvals page. This guide walks you through the process of managing time entry approvals, so that time and budget allocations for projects are correctly recorded.
What is time entry approval? #
Approving time entries is the process where Admins, Project managers, or Team managers review and approve or reject time entries submitted by team members. The goal is to ensure that time spent on projects is correctly tracked, budgeted, and allocated for accurate reporting and invoicing.
Time approvals are available on Standard and higher subscription plans. The ability to approve expenses requires a Pro or higher plan.
Roles and permissions #
In your workspace, the ability to approve time and expenses is determined by your role and the permissions.
| Role | Permission |
| Workspace owners and admins | Can approve all time entries and expenses |
| Team manager (if enabled) | Can approve time entries and expenses for users they manage |
| Project managers (if enabled) | Can approve time entries for team members working on projects they manage |
Admins can modify these permissions by navigating to the Workspace Settings > Permissions tab and configuring the Who can approve submitted timesheets section.
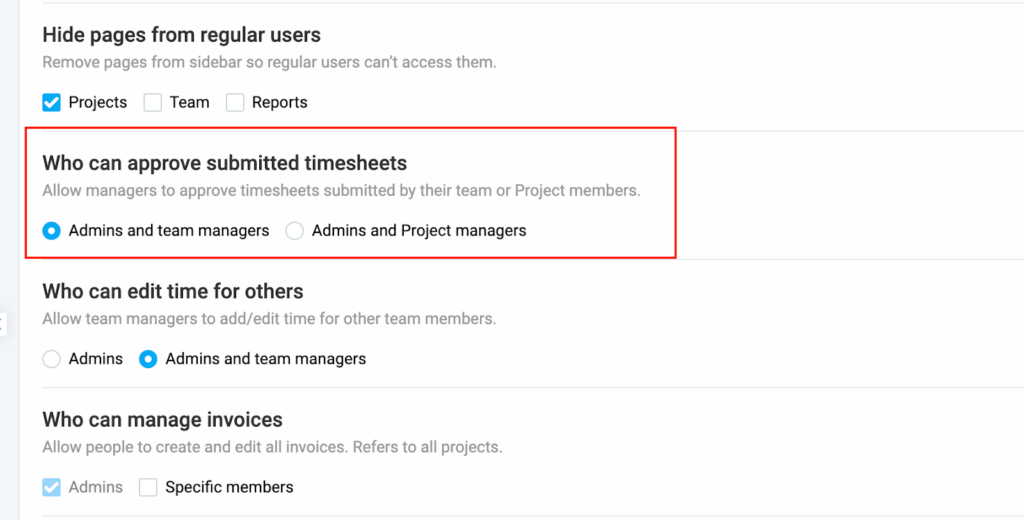
If a user holds both the Team manager and Project manager roles, only one role can have permission to approve/reject time entries as you can only choose one of the following options:
- Admins and team managers
- Admins and Project managers
Approve time entries #
Time entries submitted for approval appear in the Approvals section. Here’s how to approve time entries:
Steps to approve time entries:
- Click on the Approvals page in the sidebar
- Switch to the Pending tab
- Filter the timesheets by User or Group (optional)
- Click on the team member’s name to open the request
- Click on the Approve button and click Approve again on the confirmation window
- Or Select Approve all to approve all pending requests at once
Admins can send reminders to Team or Project managers to approve their team’s timesheets by clicking the Remind to approve button on the Approvals page.
Edit pending time entries #
As an Admin, Team manager, you may need to edit time entries before approving them. Note that Project Managers cannot edit pending time entries, but can only approve or reject them.
To edit pending time entries:
- Go to the Approvals page
- Navigate to the Pending tab
- Click on the team member’s name to open the timesheet
- Click the edit pen icon next to the entry you want to edit
- Make the necessary changes:
- You can update the following details:
- Time and date
- Description
- Project
- Billability
- You can also duplicate or delete entries
- You can update the following details:
6. Click Save to apply the changes

Reject time entries #
If you come across time entries that are incorrect or do not meet the requirements, you can reject them.
Rejecting a request will delete the entry from the approval queue, and the user will be notified via email.
Steps to reject time entries:
- Go to the Approvals page
- Switch to the Pending tab
- Click on team member’s name to open their timesheet
- Click Reject in the upper-right corner
- Provide a reason for the rejection in the pop-up window
- Click Reject to finalize the action
After rejection, the user will receive an email with the rejection reason, and the Pending label will be removed from the entry.
Bulk approve/reject time entries #
You can quickly approve multiple pending timesheets and expenses from the Approval page.
Steps to perform bulk action:
- Go to the Approval page
- Make sure you’re on the Pending tab
- Check the boxes next to the timesheet you want to process. You can choose multiple across different submission periods.
- Click Approve/Reject button that appears
- Click Approve and then confirm the action in the pop-up.
- If you click Reject, a pop-up will appear requiring you to add a rejection note before confirming.
Notifications #
- The user’s manager is notified when a timesheet is submitted.
- The user is notified when their timesheet is approved, rejected, or withdrawn.
- Admins are notified when a timesheet is submitted, depending on their role in the workspace.
Withdraw approval #
If you mistakenly approve a timesheet or need to revoke approval, you can withdraw approval from the Approvals page. This action will notify both the user and all admins.
To withdraw approval:
- Go to the Approvals page
- Switch to the Archive tab
- Click on the team member’s name to open the timesheet
- Click the Withdraw approval button in the top-right corner
- Provide a reason for the withdrawal in the text field
- Click Withdraw to confirm the action
FAQ #
How do I know when a time entry is awaiting approval?
When there are pending time entries waiting for your approval, you will see an orange dot indicator next to the Approvals page in the sidebar. All pending requests will appear in the Pending tab.
What happens if I reject a time entry?
When you reject a time entry, it will be deleted from the approval list, and the user will receive an email notification explaining the reason for rejection. The entry will get a Rejected label and moved to the Archive tab.
If you need to edit a rejected timesheet, you can manually correct it in Detailed report or allow the user to edit and resubmit the entry.
How do I assign Team or Project manager roles for time approval?
To assign Team manager or Project manager roles, follow these steps:
- Go to the Team page
- Select the user to assign a role
- Click + Role and check either Team manager or Project manager
- Select the users, groups, or projects they will manage
- Save your changes
Once assigned, the manager will have access to the Approvals page for their team or project.
What happens if a time entry includes overnight work?
If a time entry spans multiple days (for example, it starts in the evening and ends the next morning), the system will display a superscript number next to the end time. This indicates how many additional days the entry covers.