Free Excel Timesheet Template (+ Guide & Top Alternative)
Excel offers a simple timekeeping system for companies that still don’t use a dedicated time tracker. But as managers gather more data with Excel, the system becomes clumsy — prone to freeze-ups and miscalculations.
So, let’s:
- Explore the Excel timesheet (and template)
- Create a time tracking spreadsheet together
- Discuss a smart Excel alternative
Key takeaways • What is an Excel timesheet? • Why you should use Excel timesheets • Free Excel timesheet template • How to make a timesheet in Excel • Downsides of the Excel timesheet • FAQs about the Excel timesheet • Use Clockify for timesheet accuracy and automation

KEY TAKEAWAYS
- Excel is the most popular tech skill in the US in 2025 — appearing in over 531,000 job postings.
- On average, full-time US employees work 38 hours a week.
- US workers must be paid at least $7.25 per hour, and their overtime rate is 1.5 times the regular rate.
- In October 2025, Microsoft stopped supporting Windows 10, leaving Excel and other programs exposed to cyberattacks.
What is an Excel timesheet?
An Excel timesheet is a spreadsheet that automatically calculates employee hours and breaks with formulas — reducing manual work and errors.
You can confidently use a simple Excel timesheet for operations like payroll management or employee monitoring, which is especially practical for:
- Operations managers,
- Project coordinators, or
- HR/Finance assistants.
Despite IT innovations, Excel continues to dominate data management. In fact, the 2025 Course Report on popular tech skills looked into 12 million US job posts. Remarkably, Excel took first place with 531,000 mentions.
Even so, modern companies are switching to time-tracking tools like Clockify to improve data automation and accuracy.

Now, let’s see why Excel remains a relevant business tool.
Why you should use Excel timesheets
Excel timesheets help you track company finances over a certain time with spot-on metrics — like billable and payroll hours.
As a manager, you can calculate total employee hours and pay with an Excel timesheet that covers a specific timeframe, such as:
- Daily — tracks billable work on short-term projects,
- Weekly — shows time and budget spending over the week, and
- Monthly — sums up monthly expenses and aligns with payroll schedules.
Beyond payroll and invoicing, you’ll find time-tracking spreadsheets especially useful for:
- Legal compliance — to make sure you adhere to state labor laws on work hours, rates, and breaks.
- Raising productivity — to have employees record daily hours worked for enhanced accountability and time allocation.
- Managing budgets — to compare tracked vs. billable time and assess your budgeting strategy.
🎓 Free Printable Timesheet Templates
Free Excel timesheet template
This simple timesheet template can help you:
- Auto-generate totals for work time, break duration, and pay for a certain date range, and
- Maintain a clean, shareable timesheet for both employees and contractors.
⬇️ Download Weekly Timesheet Template (Google Sheets)
⬇️ Download Biweekly Timesheet Template (Google Sheets)
⬇️ Download Monthly Timesheet Template (Google Sheets)
(You can download all the above as Excel by selecting File > Download > Microsoft Excel)
If you want to create your own Excel timecard from scratch, check out our step-by-step guide below.
How to make a timesheet in Excel
Creating an accurate Excel timesheet includes the following steps:
- Add basic and timesheet labels,
- Define Excel formulas for automatic calculations,
- Format cells for more clarity and data protection, and
- Save your time-tracking spreadsheet for streamlined operations and client transparency.
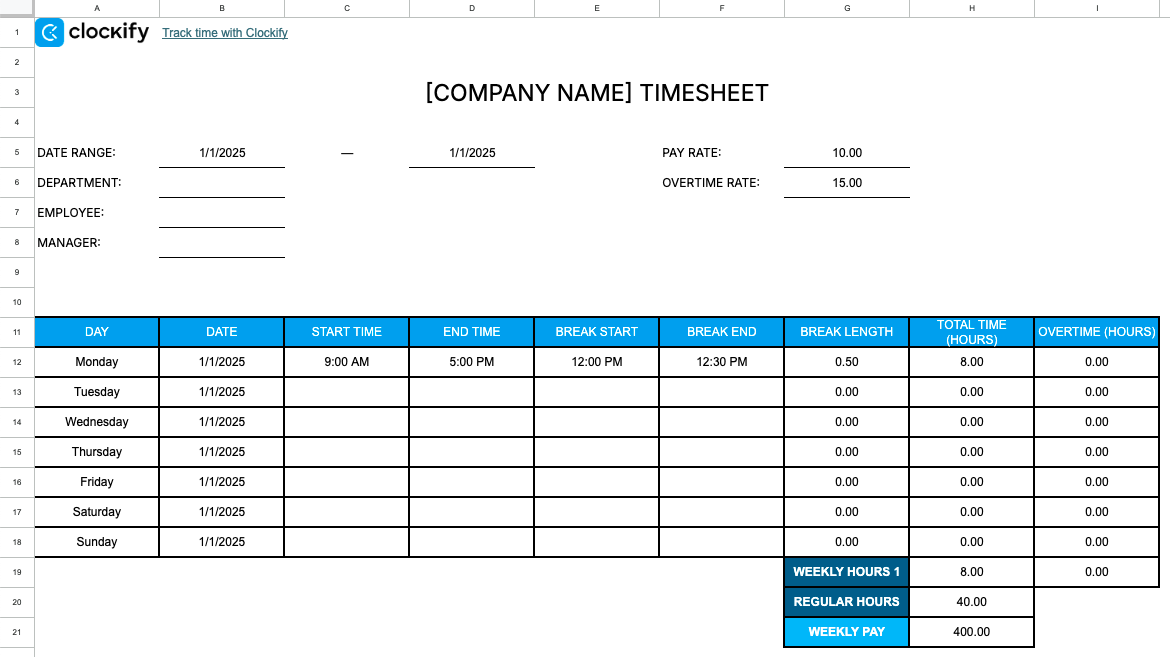
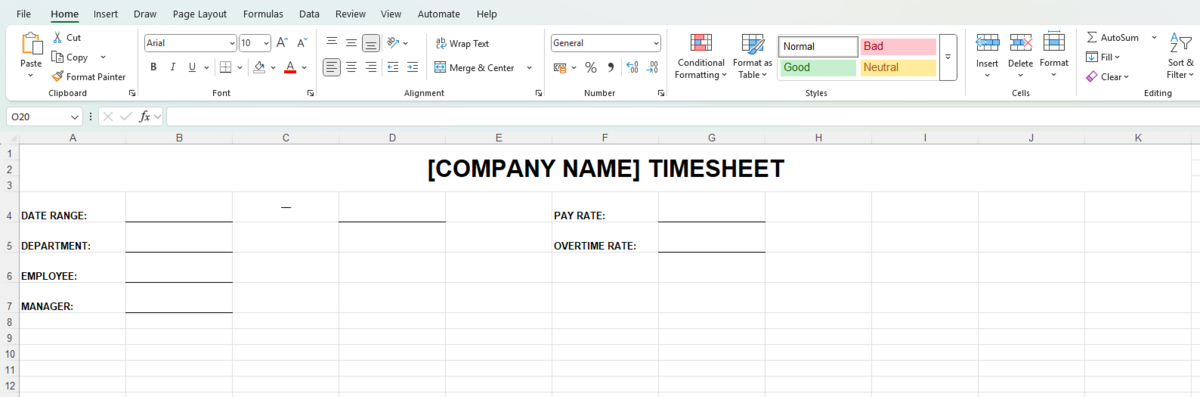
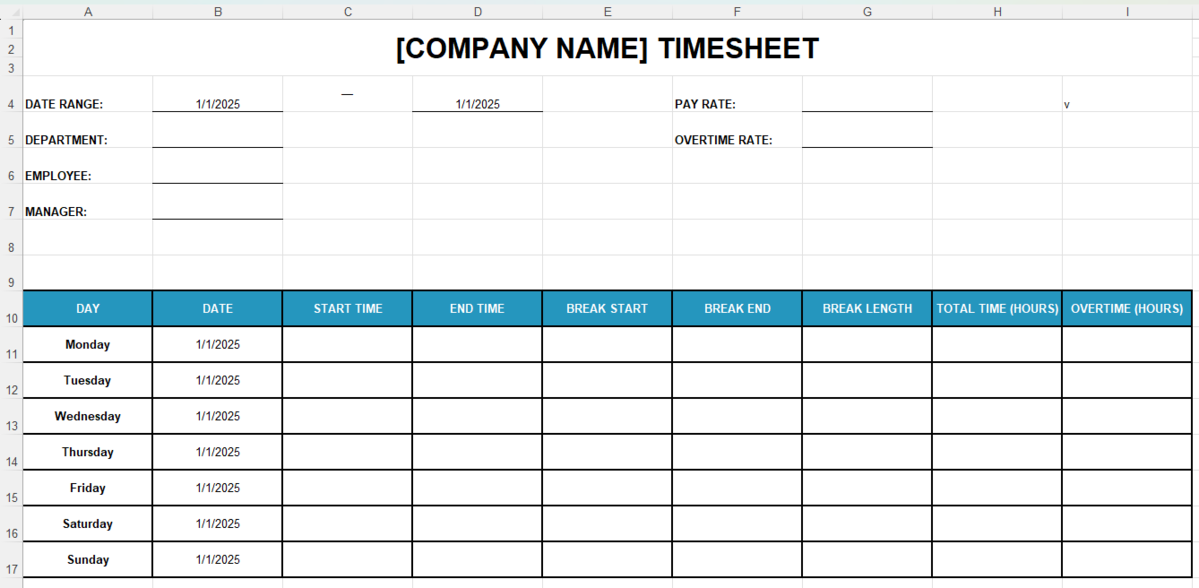
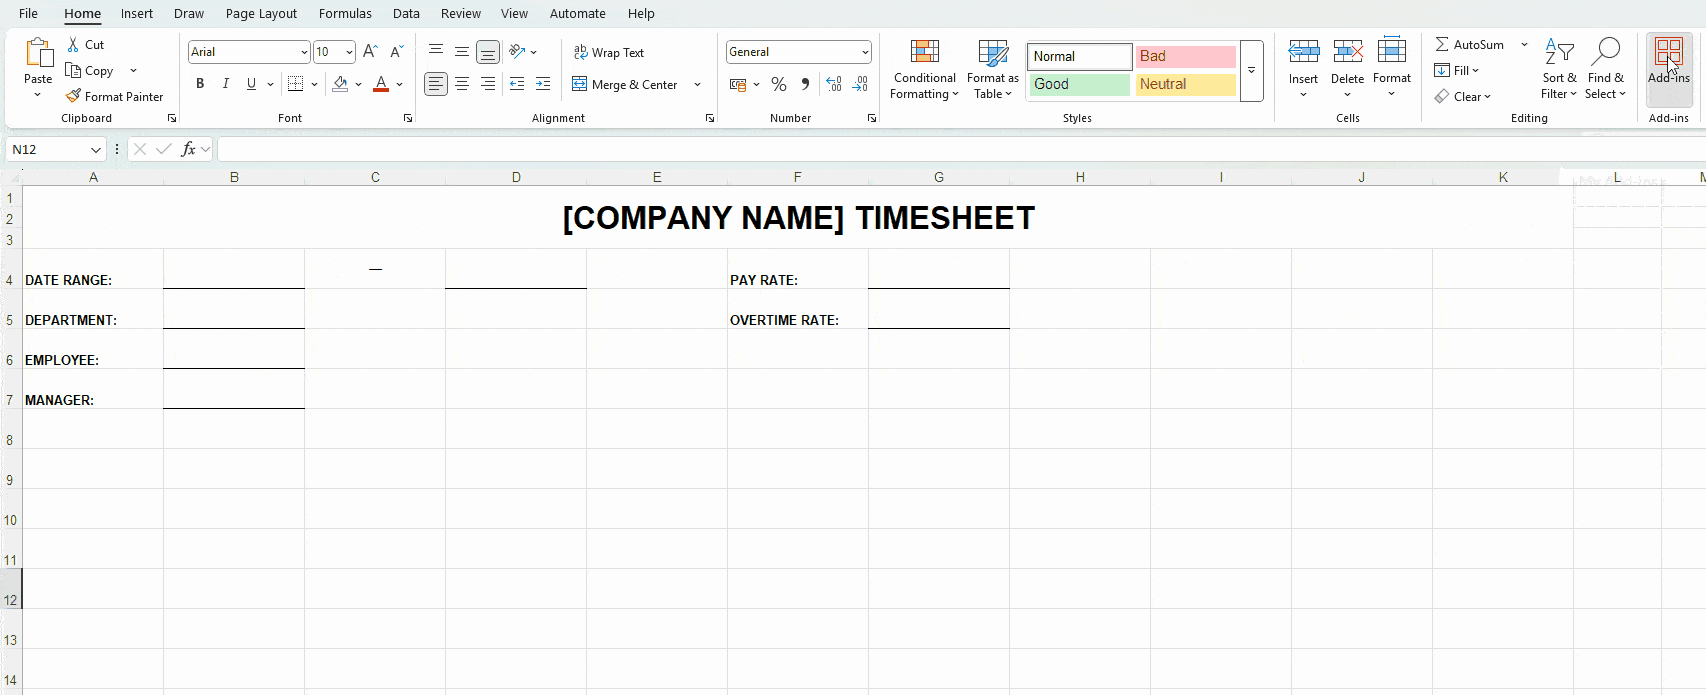
Step #1: Add basic labels
First, add the title and labels, along with basic information, to your Excel timesheet. Some common basic labels include:
- Date range covered by your timesheet,
- Company department,
- Employee name,
- Manager name,
- Pay rate, and
- Overtime rate.
You can add more information, as long as you keep things simple and stay organized.
Meanwhile, feel free to format the following part to your liking. We recommend resizing your rows so that your data fits neatly. For our spreadsheet, we set the row height to 30.
Here’s how we customized our basic labels:
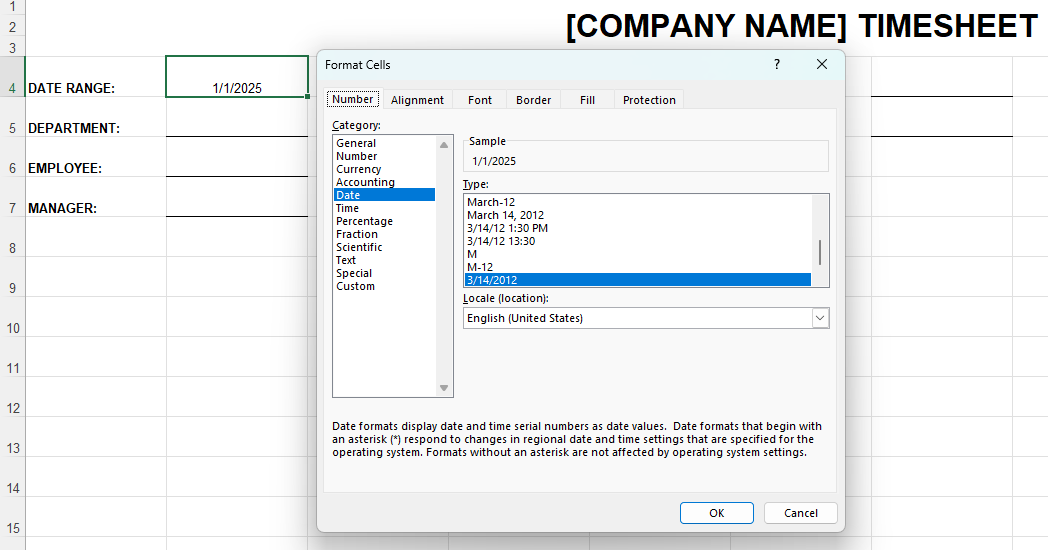
To choose your preferred date format, right-click on the cell next to Date Range (B4) and select Format Cells. This helps Excel recognize the data type and display it correctly — see the image below.
Step #2: Enter timesheet labels
Under the basic labels, insert timesheet labels into the Excel employee timesheet.
In the same row, fill columns A-I with different time-tracking data, such as:
- Day,
- Date,
- Start time,
- End time,
- Break start,
- Break end,
- Break length,
- Total time (hours), and
- Overtime (hours).
Then, dedicate the next 7 rows to each day of the week, starting each row with the day’s name. For a cleaner look, select your timetable and:
- Increase the font size,
- Add thick box borders,
- Resize columns to fit data (we used size 20),
- Wrap text to keep it within cell borders, and
- Bold all the labels and add a fill color.
Now, your Excel employee timesheet should resemble this:
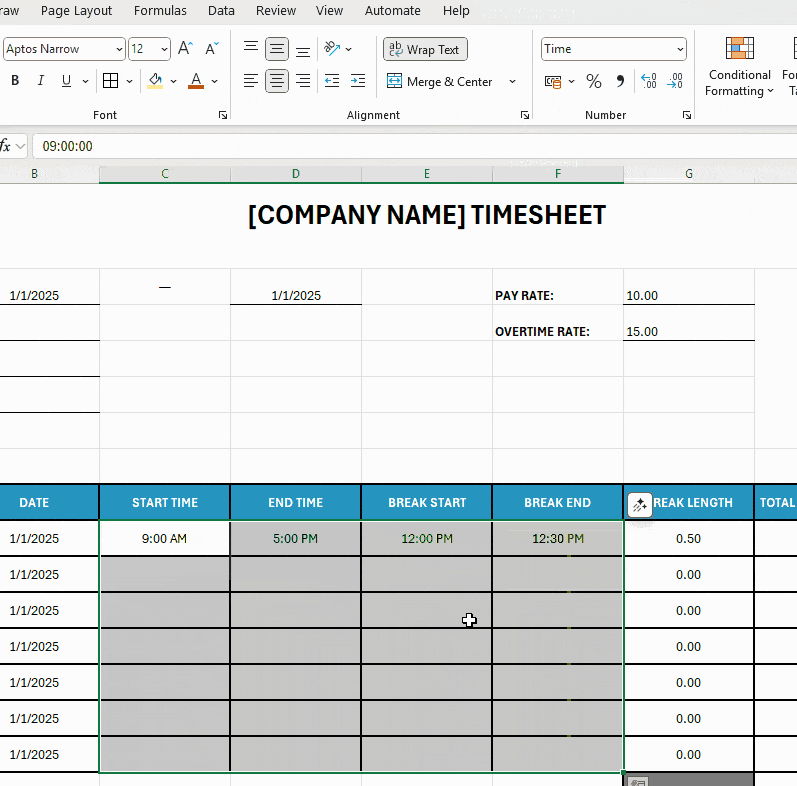
Before you move on to Excel timesheet formulas, prep your time-related cells to ensure error-free calculations:
- Set the format to Time for cells under columns C-F and then,
- Format cells under columns Total Time (Hours) and Overtime (Hours) as Number.
Here’s a quick demo of that:
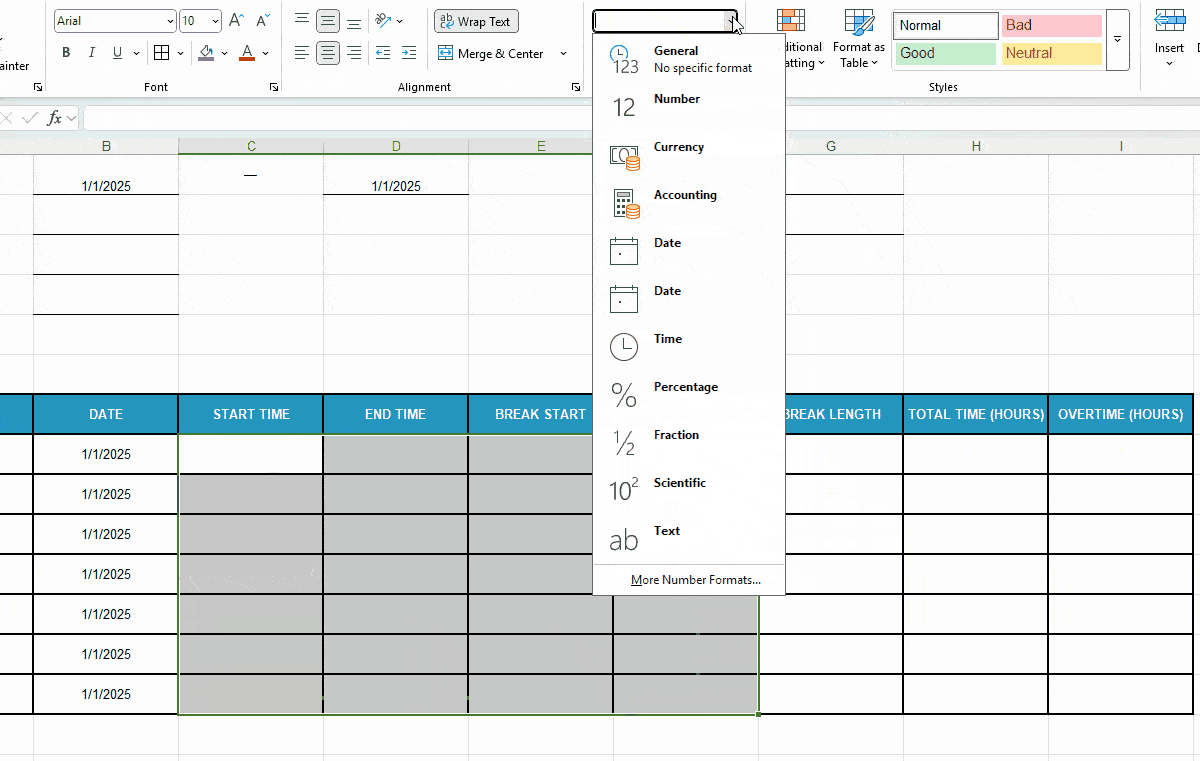
After that, Excel will use your preferred time format to present your time entries.
🎓 Timesheets for Employees and Other Best Ways to Track Employee Hours
Step #3: Calculate daily work hours
To calculate total hours in Excel per day, you’ll first need to figure out:
- Break Length,
- Total Time (Hours), and
- Overtime (Hours).
Below are the Excel formulas for time calculation listed by column:
| Break Length (Column G) |
=(F11-E11)*24 (Row G11) |
| Formula breakdown: • Subtracts the break end from the break start. • Multiplies the result by 24 to convert it into hours. |
|
| Total Time (Hours) (Column H) |
=(D11-C11)*24 (Row H11) |
| Formula breakdown: • Subtracts the end time from the start time. • Multiplies the result by 24 to convert it into hours. |
|
| Overtime (Hours) (Column I) |
=MAX(0,H11-8) (Row I11) |
| Formula breakdown: • Uses MAX to find the highest value out of a set of numbers. • Subtracts 8 (regular hours) from the total time to calculate overtime hours. If there’s no overtime, it displays 0. |
|
If your Excel timesheet is a direct replica of ours, just copy/paste these formulas into their respective cells. If not, see how to set them up below:
When it comes to shift work, payroll managers may find this free, simple timesheet template especially helpful:
⬇️ Download Weekly Work Schedule Template (PDF)
As shown in the illustration above, you can expand the selection to calculate the remaining days. This is the first step to counting weekly totals.
🎓 Free Work Time Calculator | Free Time Card Calculator
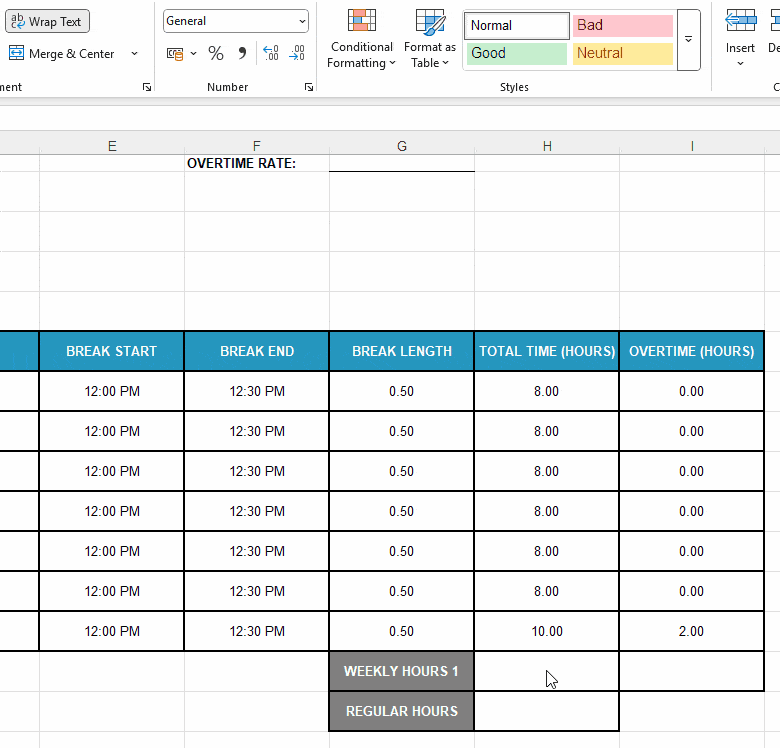
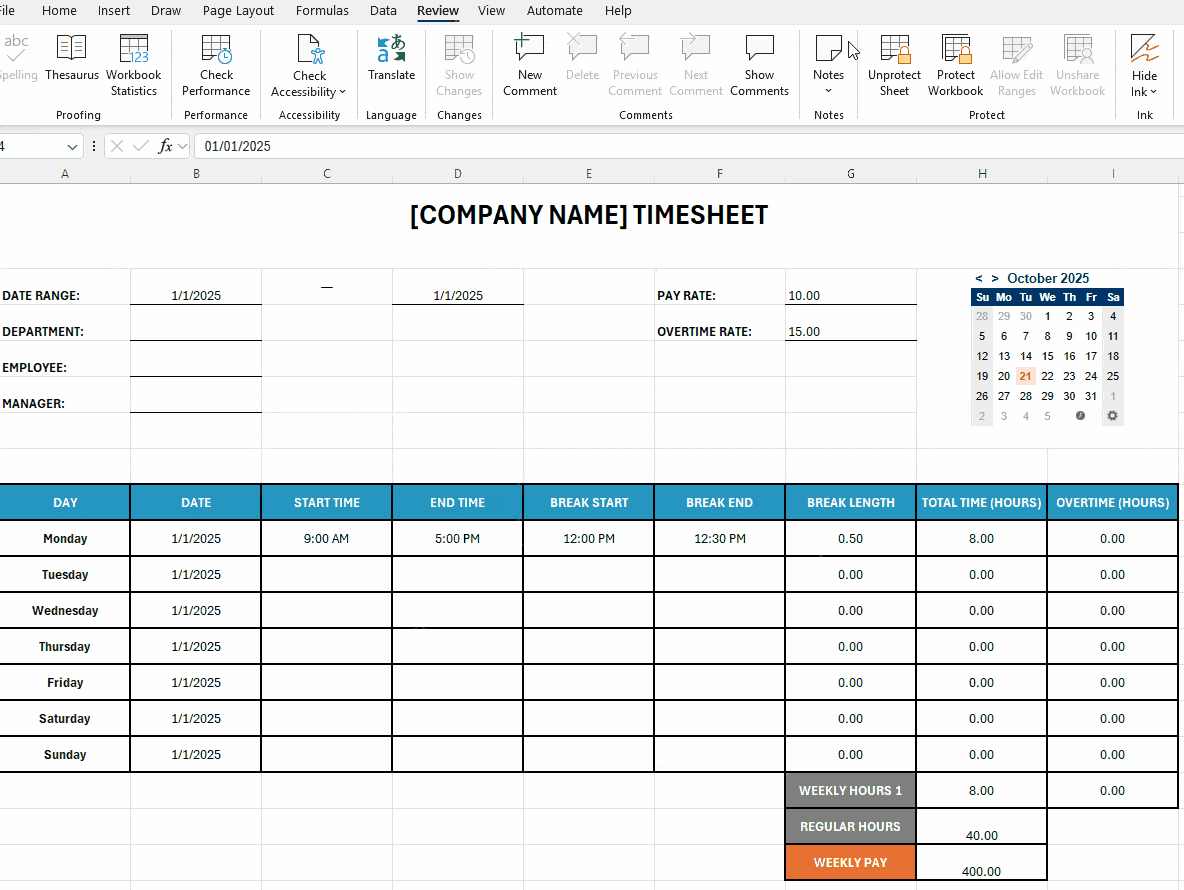
Step #4: Figure out weekly work hours
First, set up a dedicated space for your weekly calculations — add the following labels in cell G18 and G19 of your Excel timecard:
- Weekly Hours 1 — use numbers to distinguish workweeks, and
- Regular Hours — define how much the employee usually works.
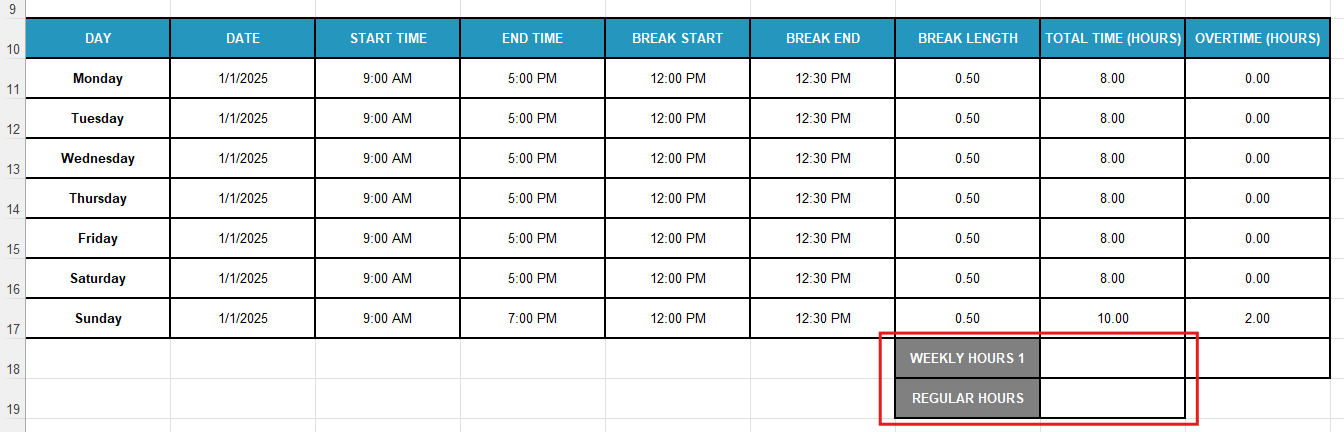
Fun fact: The average work time for full-time US employees is 1,975 hours per year — that’s 38 hours per week.
Next, format the adjacent cells H18 and H19 as Number and:
- Enter your employee’s standard weekly hours — e.g., type in “40.”
- Use the formula SUM(H11:H17) to add up daily hours and get the weekly total.
Here’s a quick illustration of all the steps involved:
In the same Excel timesheet, you can copy/paste this table 4 times to calculate the monthly total — which we’ll cover next.
Step #5: Sum up monthly work hours
After filling out your weekly work schedules, you can calculate the monthly hours. Your current Excel timesheet layout should look like this:
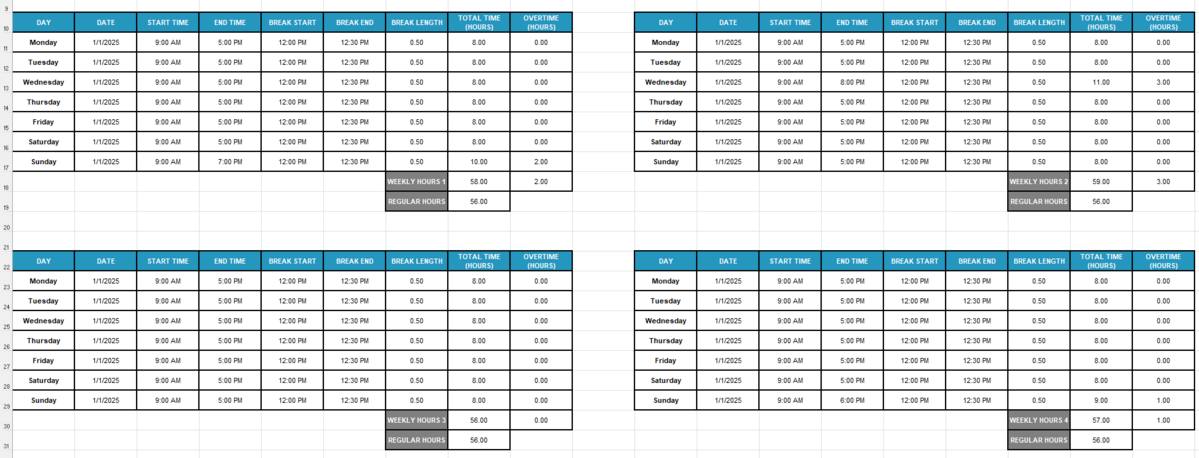
Conduct your monthly calculation with the following steps:
- Insert the label Monthly Hours into cell G34 (under Weekly Hours).
- Format the label and the adjacent cell H34 to match the timesheet design. For quicker formatting, use the Format Painter to copy the look of one cell and paste it onto another.
- Enter the formula SUM(H18,R18,H30,R30) to sum up the Weekly Hours cells and calculate the monthly work time.
Any changes made in the weekly timesheets will be reflected in the Monthly Hours cell.
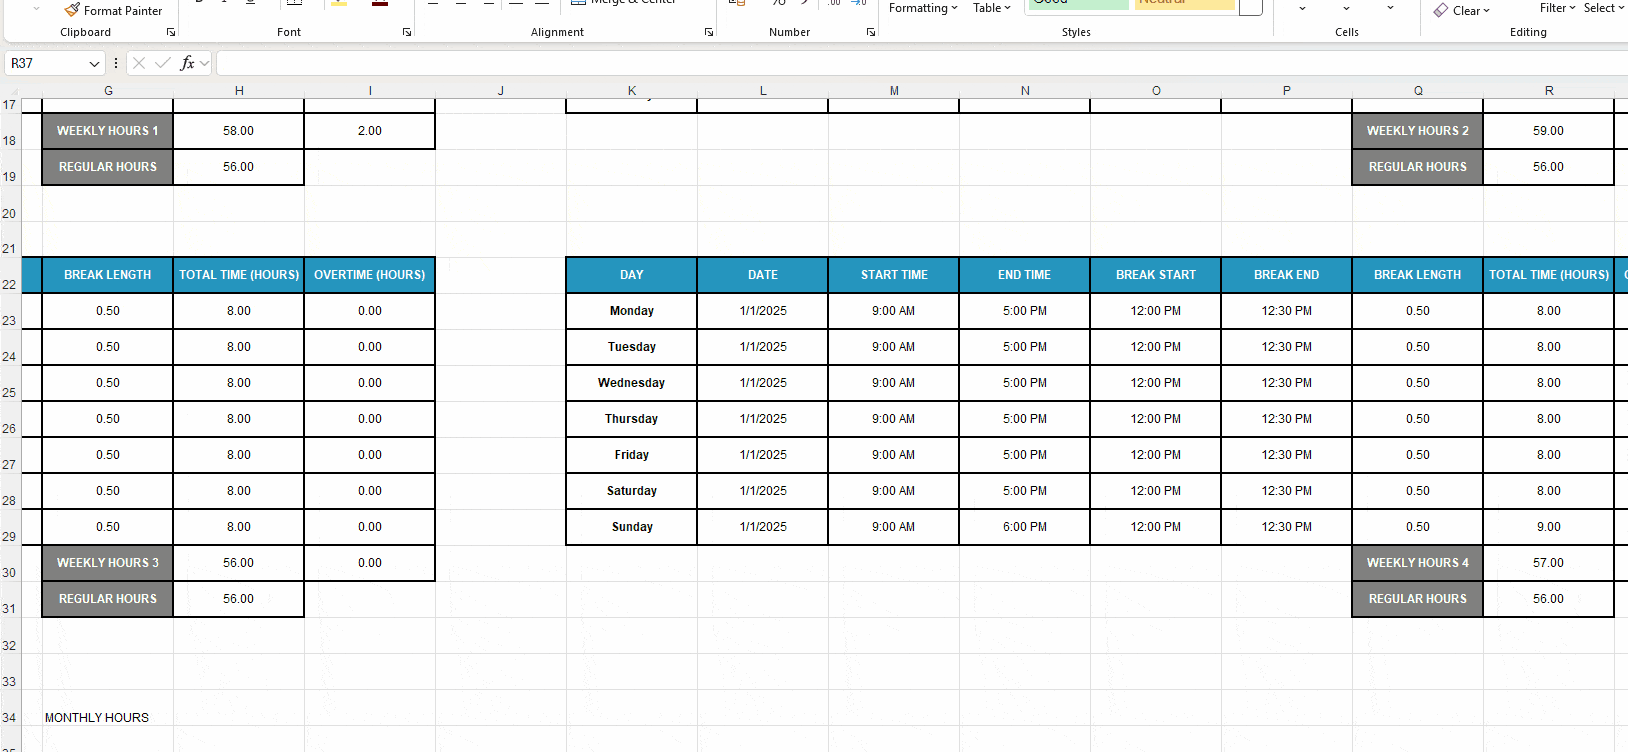
Step #6: Calculate employee pay
Beyond tracking employee hours, you can use your Excel employee timesheet to figure out:
- Weekly pay, and
- Monthly pay.
To calculate weekly earnings in your Excel timesheet, take the following steps:
- Format the cells beside labels Pay Rate and Overtime Rate as Number (G4 and G5) and type in the hourly rates — e.g., 15.
- Add the label Weekly Pay to cell G20 (or under the label Regular Hours). Use a different fill color to distinguish your time and financial data.
- Use the Excel formula =(H19*G4)+(I18*G5). Basically, you multiply regular hours by the pay rate and overtime hours by the overtime rate. Then add those 2 values.

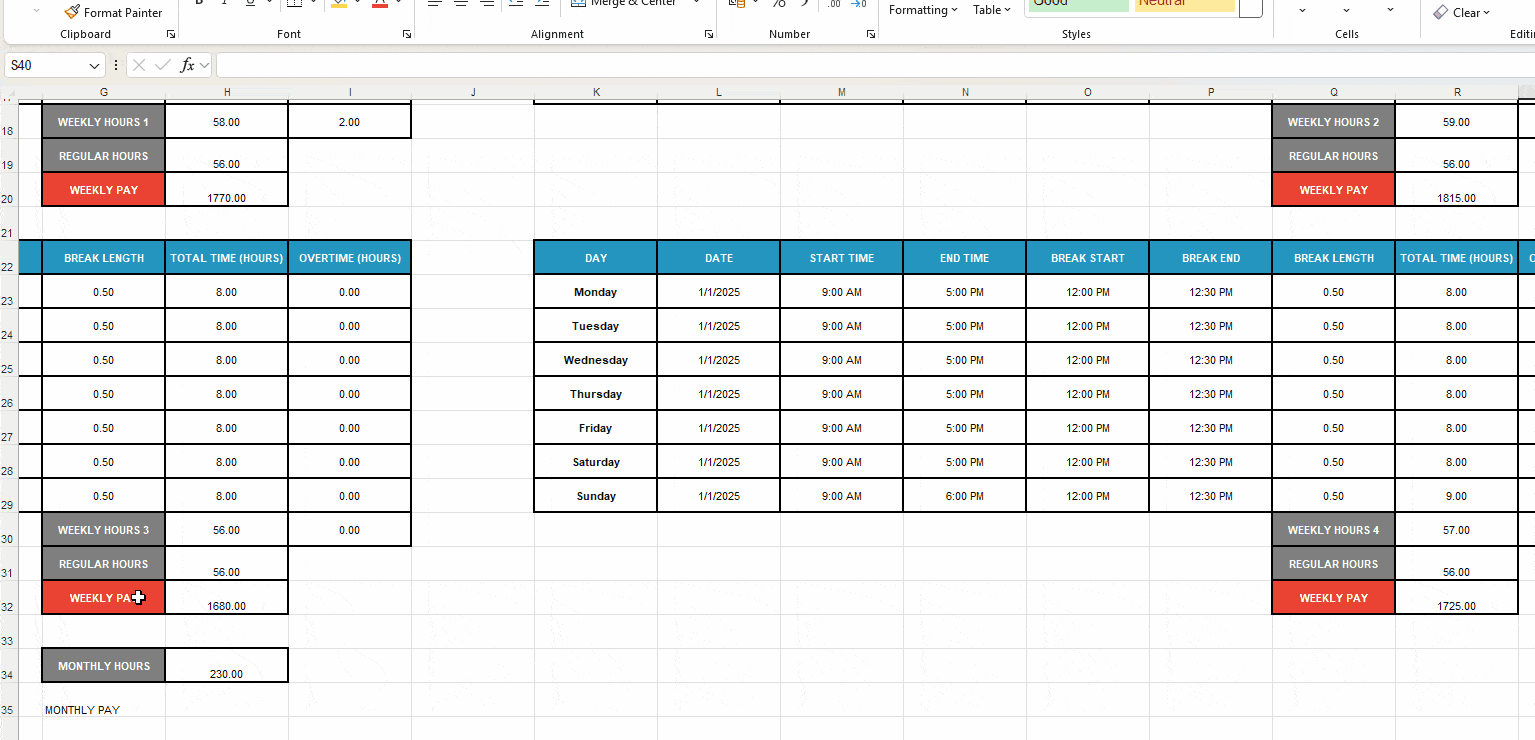
To get the monthly pay, use this method:
- Add the label Monthly Pay to cell 35 (or under label Monthly Hours),
- Format the next cell as Number, and
- Enter the formula SUM(H20,R20,H32,R32) to sum up the total pay for all 4 weeks.
Heads-up: American employees are entitled to a minimum wage of $7.25 per hour. Anyone working overtime (or over 40 hours weekly) should be paid 1.5 times the regular rate.
So, make sure to comply with timekeeping laws when setting hourly rates.
🎓 Free Payroll Templates | Overtime Calculator
Step #7: Protect and save your Excel timesheet
Once your simple Excel timesheet is ready, you'll need to lock certain cells to keep your formulas working smoothly. Specifically, you should lock all cells with:
- Employer-controlled data — like regular employee hours and hourly rates, and
- Excel formulas — like time and pay calculations.
By default, all Excel cells are locked. However, staff should be able to add work and break times, so you’ll need to unlock the following cells:
- Start Time,
- End Time,
- Break Start, and
- Break End.
To unlock cells for employee editing:
- Select multiple cells by holding Ctrl and clicking or dragging your mouse,
- Right-click on the selection and choose Format Cells, and
- Open the Protection tab within the Format Cells window, and untick the Locked checkbox.
To prevent anyone from changing your timesheet setup:
- Click on the Review tab, select Protect Sheet, and choose what users are allowed to do,
- Add (and remember) a password, and
- Reenter the password to confirm it.
Now, your employees will only be able to work with editable cells.
Here’s how to protect your Excel timesheet in practice:
You can also unprotect the spreadsheet under the Review tab and type in the same password. Below is a brief illustration of how that works:
All set: You can save and share your simple timesheet template with employees and contractors.
Downsides of the Excel timesheet
Once you’re done tweaking your Excel timesheet, start using it to track everyone’s hours. You’ll have less admin work, but still encounter some spreadsheet timekeeping drawbacks.
Spreadsheet con #1: Manual entry
Your staff has to fill in their work time by hand — which can lead to accidental mistakes or omissions.
Meanwhile, managers spend hours updating timesheets to ensure they comply with state labor laws and employee work arrangements.
Spreadsheet con #2: Risk of error
Manual inputs make errors more likely, such as incorrect work hours and pay rates. This can lead to miscalculations and hours of backtracking — which slows down paychecks.
Principal consultant at a PEO solutions company, Guillermo Triana, explains how spreadsheet mistakes can cause financial setbacks:

“I once saw a simple payroll overpayment linked to the Excel tracking that took 3 days to unravel and cost $4,300 in penalties!”
Spreadsheet con #3: Malware threats
According to The Guardian, Microsoft ended software updates for Windows 10 in October 2025. This leaves Microsoft Excel and other programs vulnerable to cyberattacks.
More seriously, this jeopardizes your data security. So, take full advantage of safe time trackers like Clockify that offer:
- Data encryption,
- GDPR compliance, and
- DCAA compliance for the US.
Spreadsheet con #4: Lack of automation
Excel makes it difficult to feed your time-tracking stats into other work-related tools.
CFO/COO at a global digital agency, Bojan Milicevic, shares how modern time trackers outclass spreadsheets — with automation and integration options:

“Sophisticated time-tracking tools replace Excel’s manual functionality with effortless data collection while integrating with payroll and project management systems.”
In the long run, Excel employee timesheets can lead to technical problems — like lagging and difficulty pulling reports.
FAQs about the Excel timesheet
Now, let’s dig into the most popular questions regarding Excel timesheets.
How do you calculate hours worked in Excel?
First, you’ll need to “set the scene” for your calculation. To calculate total hours in Excel, take the following steps:
- Enter the start and end time into 2 adjacent cells, like “8:00 AM” and “4:00 PM.“
- Pick an empty cell next to them, type “=,” select the end time, type “-,” and select the start time.
- Click Enter, and Excel will generate the result — which is 8.
How do you insert a time clock in Excel?
Excel doesn’t have a built-in time clock. Instead, you can use a few Excel formulas like:
- Ctrl + ; — to add the current date, and
- Space + Ctrl + ; — to enter the current time.
Bonus tip: Download the add-on Date Picker to automatically add dates in the MM/DD/YYYY format — as illustrated below.
Use Clockify for timesheet accuracy and automation
Creating an Excel timesheet is simple, but it requires a lot of grunt work. So, swap manual labor for an affordable timesheet app like Clockify.
Our intuitive time tracker can optimize workflows for any company, anywhere — with versatile features.
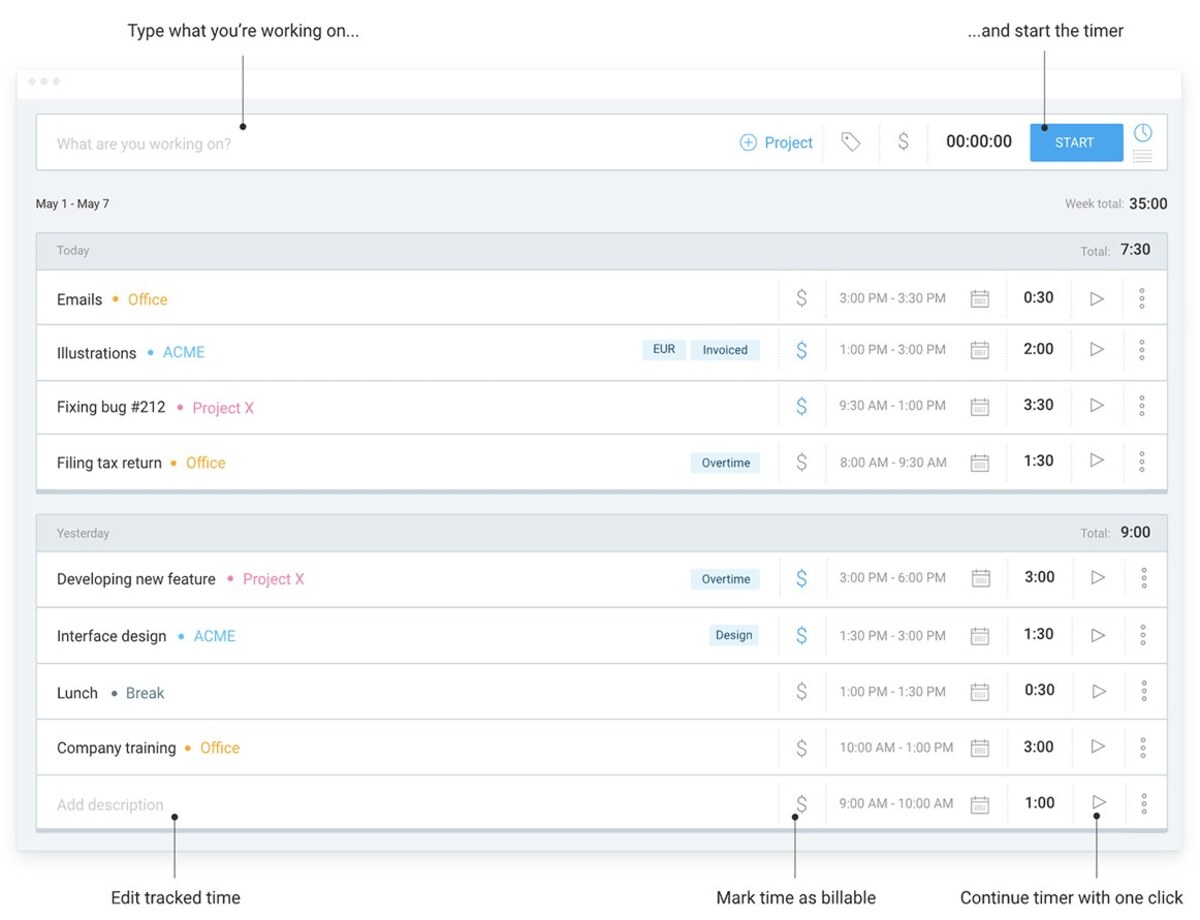
Clockify by CAKE.com brings you a ready-made, straightforward timesheet template for faster timekeeping. To illustrate, office managers can:
- Enter time and task description,
- Calculate work hours automatically, and
- Lock timesheets for data security.
For payroll precision, use Clockify’s timer to track time, including:
- Overtime,
- Breaks, and
- PTO.
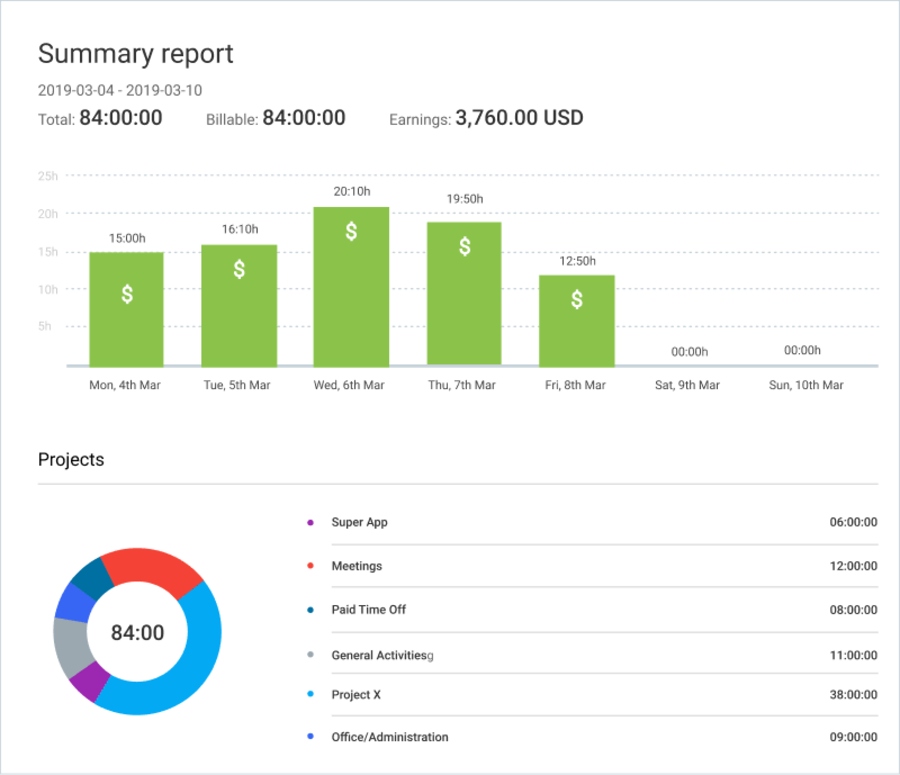
Also, Clockify’s reports help you analyze team time and finances within a certain date range:
- Summary report — quick overview of everyone’s current activity and time use.
- Detailed report — time entries sorted by user, project, and billability, with custom filters.
- Weekly report — recap of your team’s work for the entire week.
If you notice any errors, our powerful app lets you bulk-edit time entries to adjust:
- Dates,
- Start and end times,
- Projects,
- Billability status, and more.

Finally, share reports with clients or export them as a CSV file for:
- Safekeeping, or
- Deeper analysis in Excel.
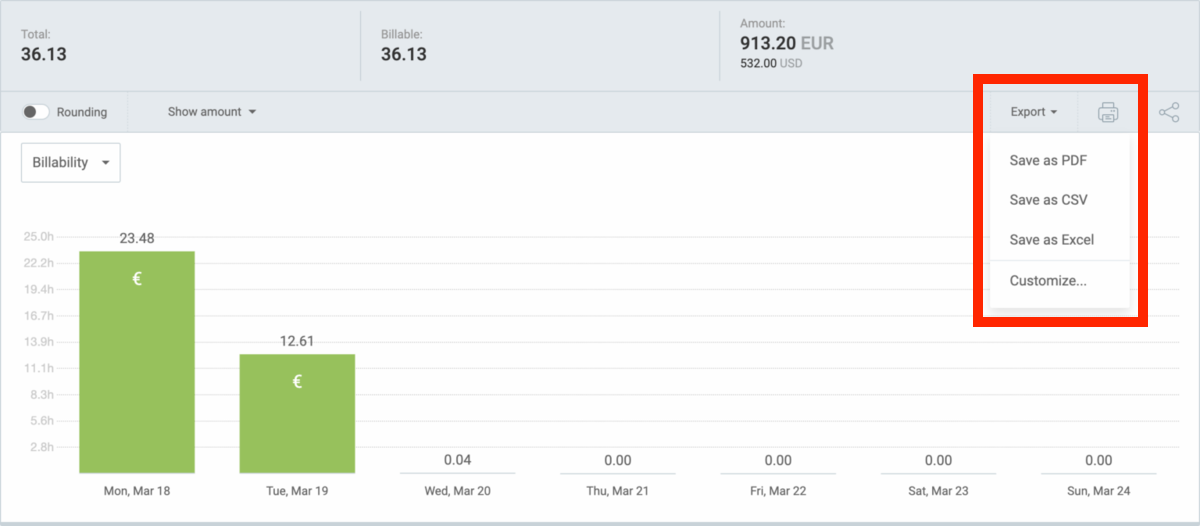
You can also save them in the PDF format for convenient viewing.
For more data export options, check out the CAKE.com Marketplace and browse free add-ons — like Daily data export - BigQuery backup.
Chase progress with instant, integrated timesheet data.